Introduction
Welcome to the world of Google Docs! As a writer or an avid user of this powerful online document editing tool, you know the importance of crafting error-free and polished content. It can be quite frustrating to spot grammar and spelling mistakes after spending hours pouring your thoughts into a document.
But fear not! With the help of Grammarly, a leading AI-powered writing assistant, you can now enhance your writing skills and ensure your Google Docs are error-free. Grammarly offers real-time grammar and spelling suggestions, along with advanced writing insights and style improvements.
In this article, we will guide you through the process of adding Grammarly to Google Docs, so you can take advantage of its powerful features and improve the quality of your written work.
Whether you are a student working on an essay, a professional crafting an important business proposal, or a blogger creating engaging content, Grammarly can assist you in creating error-free documents that resonate with your audience.
So, without further ado, let’s dive into the steps to add Grammarly to Google Docs and elevate your writing to a whole new level!
Step 1: Install the Grammarly Extension
The first step to adding Grammarly to Google Docs is to install the Grammarly extension on your web browser. The Grammarly extension is available for popular browsers like Google Chrome, Mozilla Firefox, Safari, and Microsoft Edge.
To install the extension, follow these simple steps:
- Open your web browser and go to the extension marketplace. For example, if you are using Google Chrome, go to the Chrome Web Store.
- Search for “Grammarly” in the search bar of the extension marketplace.
- Click on the Grammarly extension in the search results.
- Click on the “Add to Chrome” or “Install” button to begin the installation process.
- Once the installation is complete, you will see the Grammarly icon added to your browser’s toolbar.
That’s it! You have successfully installed the Grammarly extension on your web browser. Now, let’s move on to the next step to enable Grammarly on Google Docs.
Step 2: Open Google Docs
Now that you have installed the Grammarly extension, it’s time to open Google Docs and start creating or editing your document. Google Docs is a free and cloud-based document editing platform offered by Google. It provides a user-friendly interface, collaboration features, and the ability to access your documents from anywhere with an internet connection.
To open Google Docs, follow these steps:
- Open your web browser and go to https://docs.google.com.
- If you have a Google account, sign in. Otherwise, you can create a new Google account or use a non-Google email address to sign up.
- Once you are signed in, you will be redirected to the Google Docs homepage.
- Click on the “+ Blank” or “Blank document” button to create a new document. Alternatively, you can open an existing document from your Google Drive by clicking on the “Open file picker” icon.
That’s it! You are now ready to start working on your document in Google Docs.
Before we move on to the next step, make sure you have your Grammarly extension enabled and activated.
Note: If you encounter any issues opening Google Docs or accessing your documents, ensure that you have a stable internet connection and try refreshing the page.
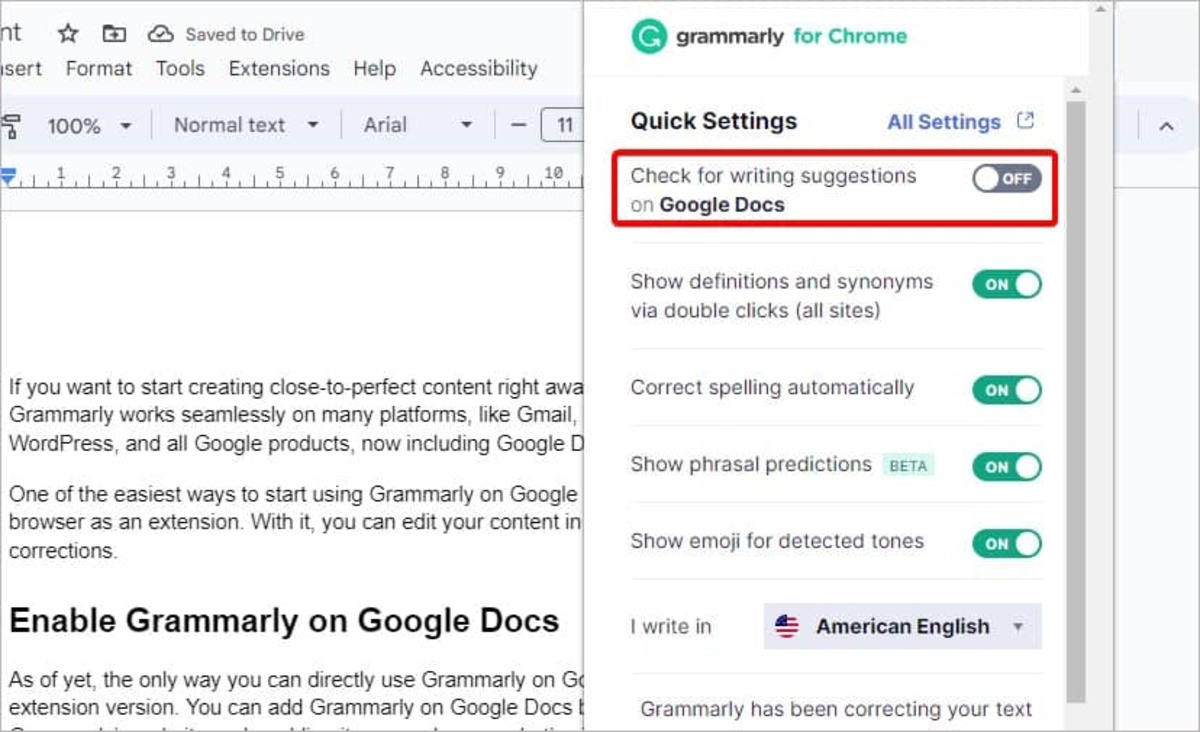
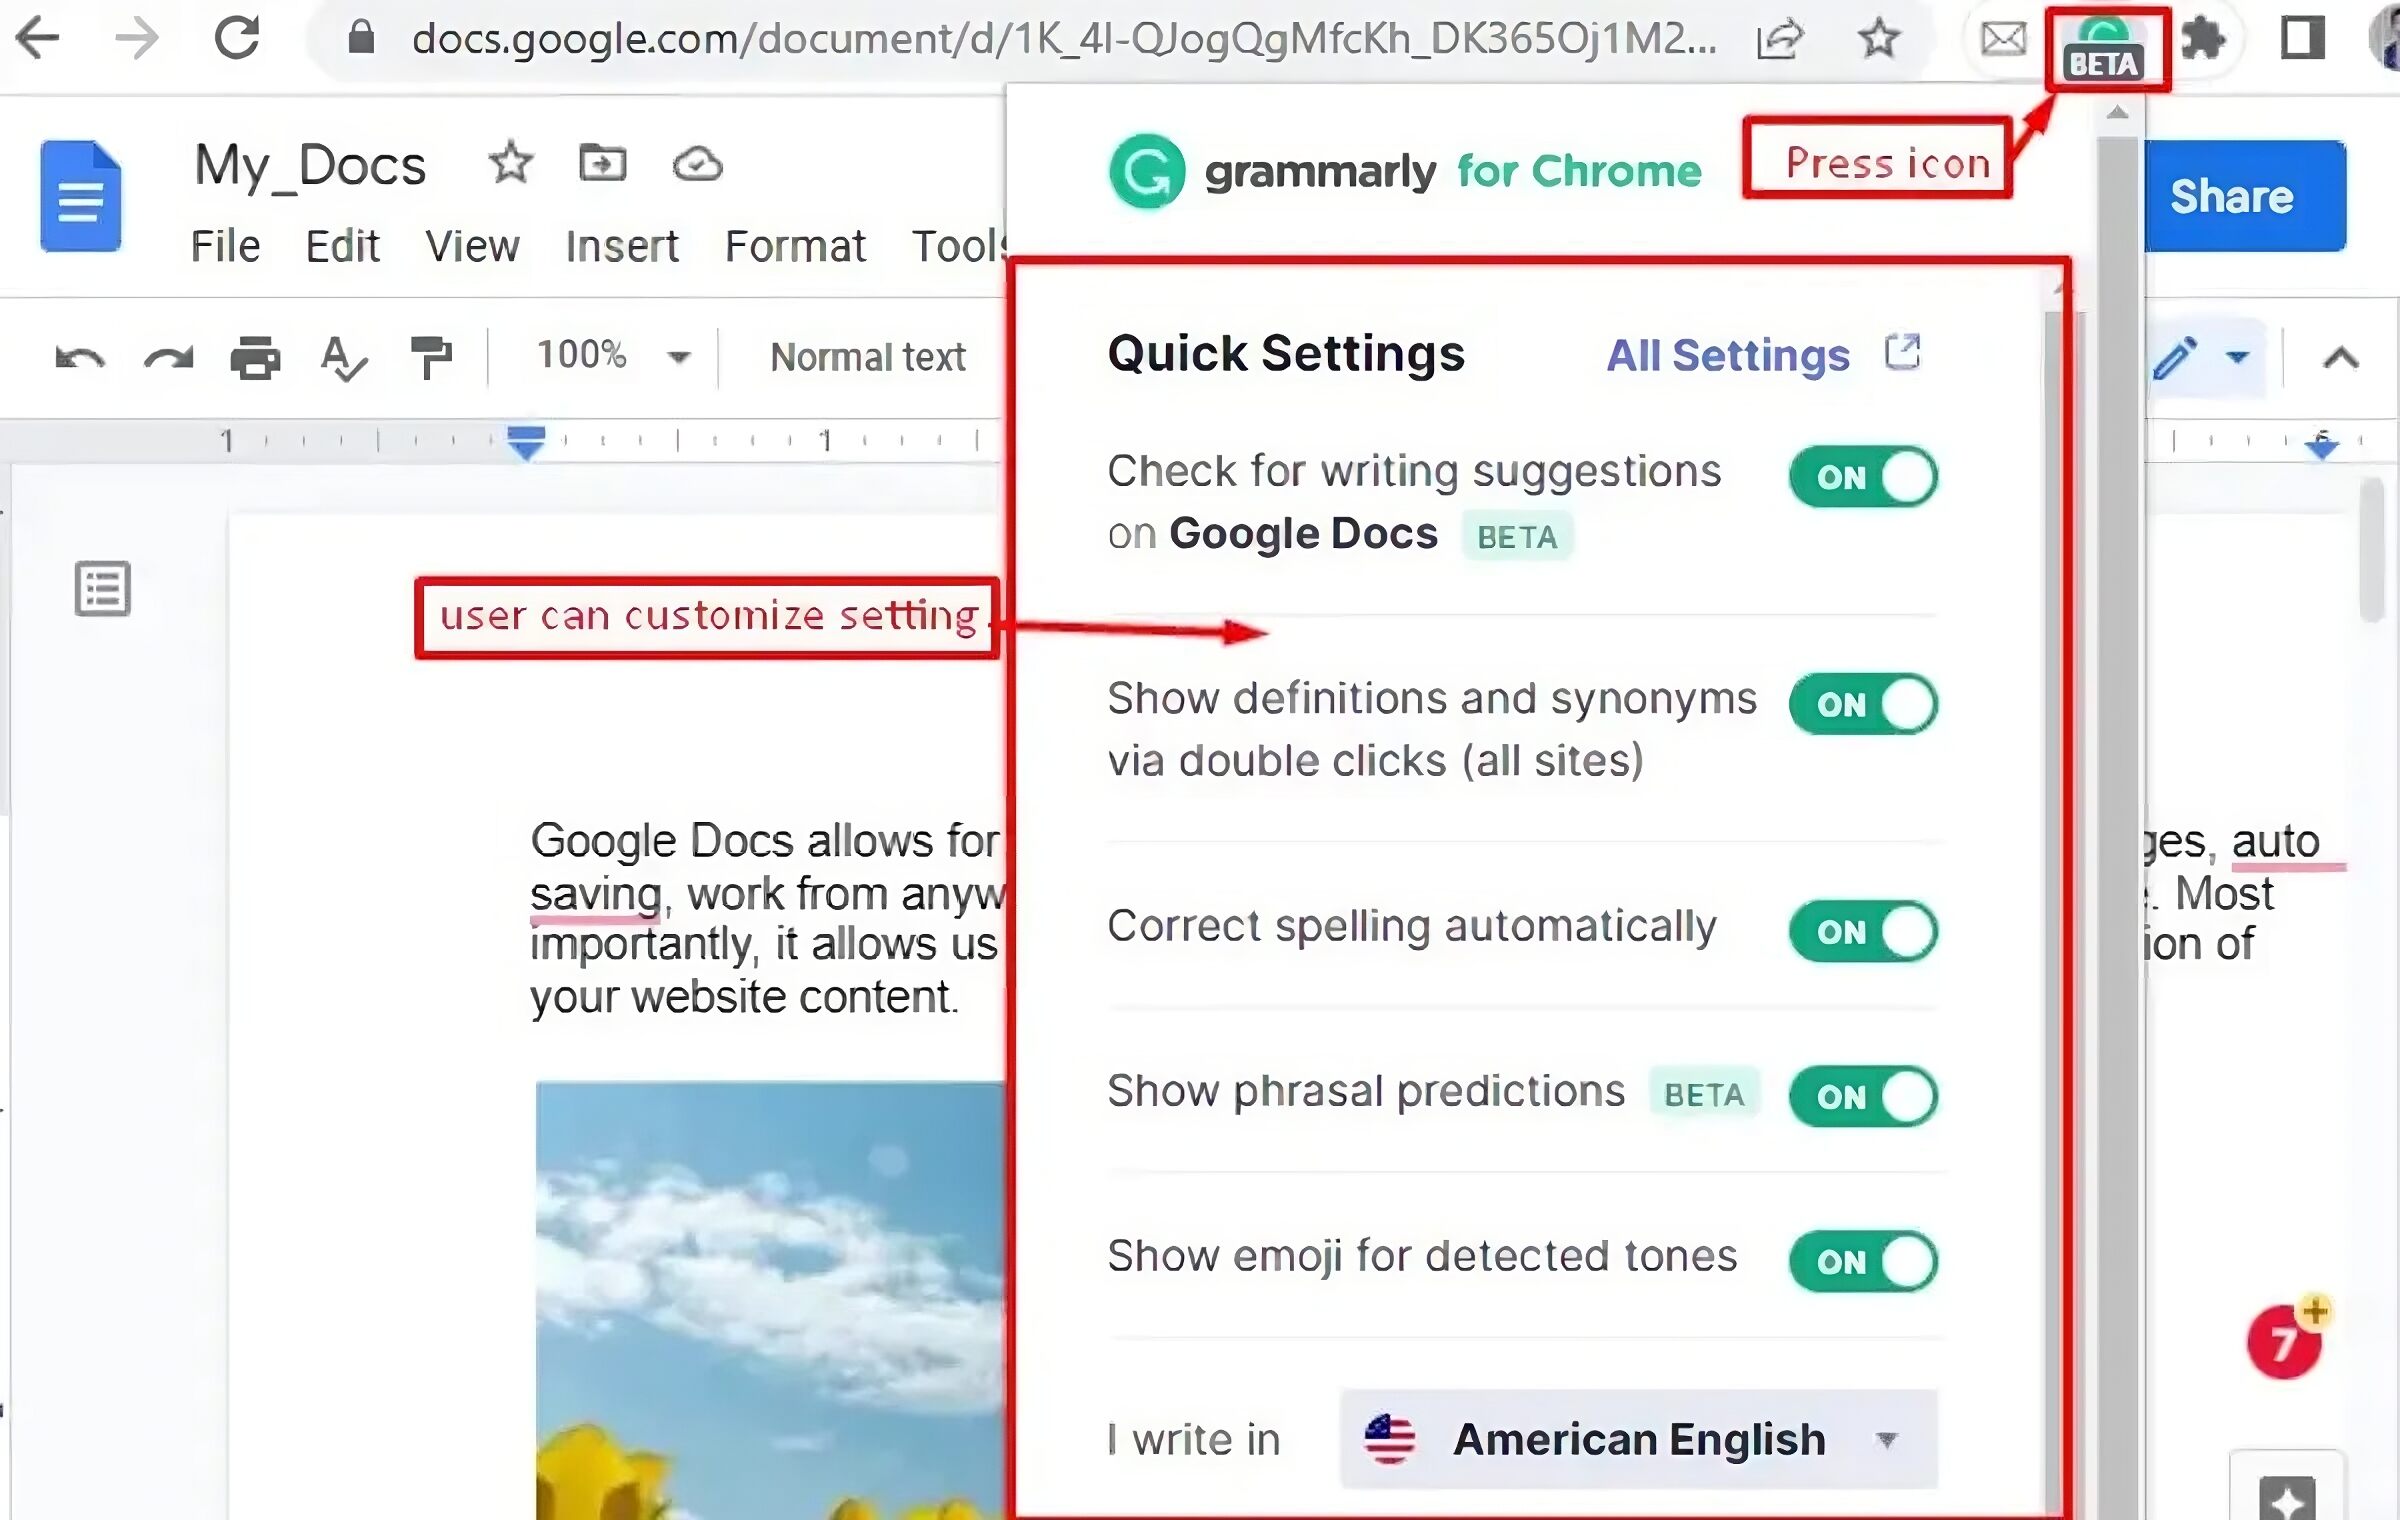
Step 3: Enable Grammarly on Google Docs
Now that you have Google Docs open, it’s time to enable Grammarly and start harnessing its powerful writing assistance on your documents. Enabling Grammarly on Google Docs is a straightforward process:
- Click on the Grammarly icon in your browser’s toolbar. This will open the Grammarly sidebar.
- Next, click on the “Turn on for Google Docs” toggle switch in the sidebar. This will activate the Grammarly integration with Google Docs.
- Once you have enabled the integration, you will see the Grammarly editor interface appear on the right side of your Google Docs document.
Congratulations! You have successfully enabled Grammarly on Google Docs.
With Grammarly enabled, you can now take advantage of its robust grammar and spelling suggestions, sentence structure improvements, vocabulary enhancements, and writing style recommendations directly within Google Docs.
It’s important to note that Grammarly works in real-time, continuously analyzing your writing and providing suggestions and feedback as you type. This means you can catch errors and improve your writing on the go, without the need for manual proofreading or editing.
Now, let’s explore how you can customize Grammarly’s settings to tailor the writing assistance to your specific needs.
Step 4: Customize Grammarly Settings
Customizing Grammarly’s settings allows you to personalize your writing experience and tailor the suggestions and corrections to meet your specific preferences. To customize Grammarly settings in Google Docs, follow these steps:
- Click on the Grammarly icon in your browser’s toolbar to open the Grammarly sidebar.
- In the sidebar, click on the gear icon labeled “Settings.” This will open the Grammarly settings panel.
- Within the settings panel, you will find various customization options to modify Grammarly’s behavior. Here are a few key settings you may want to consider:
- Goals: Define your writing goals by selecting options such as “Creative,” “Academic,” or “Business.” Grammarly will then analyze your writing based on the selected goal.
- Tone Detector: Enable or disable the tone detector feature, which provides feedback on the tone of your writing, such as formal, neutral, or informal.
- Writing Preferences: Adjust settings related to writing style, such as formality level, use of gendered language, and more.
- Correctness: Customize the types of errors Grammarly should flag, such as spelling, grammar, punctuation, and clarity.
- Exclusions: Define exclusions for certain types of content or websites where Grammarly should not be active.
Once you have made your desired adjustments to the Grammarly settings, you can close the settings panel and continue using Grammarly in your Google Docs documents.
Remember, these settings can be modified at any time to further refine and optimize your writing experience with Grammarly.
With Grammarly customized to your preferences, you are now ready to dive into the next step and start using Grammarly’s suggestions to enhance your writing.
Step 5: Use Grammarly on Google Docs
Now that Grammarly is enabled and customized to your liking, it’s time to utilize its powerful features and ensure error-free writing in your Google Docs documents.
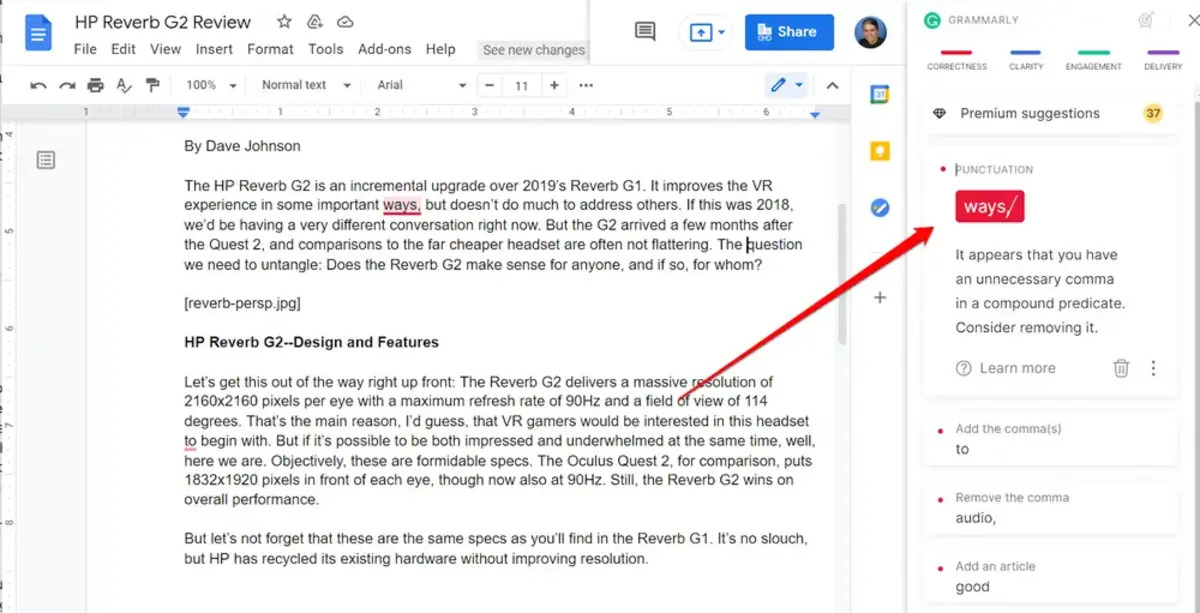
As you type in Google Docs, Grammarly will automatically analyze your writing and provide suggestions, corrections, and improvements in real-time. Here’s how you can make the most out of Grammarly on Google Docs:
- As you write, look for underlined words or phrases in your document. These underlines indicate potential issues or suggestions found by Grammarly.
- Hover your cursor over the underlined text to see Grammarly’s suggestion. It may be a spelling mistake, grammar error, punctuation correction, or a writing style improvement.
- Click on the suggestion to apply the recommended change to your text. You can also choose to ignore the suggestion if you believe it is not necessary.
- Continue typing, and Grammarly will continuously analyze your writing, offering suggestions and corrections along the way.
- If you need more information on a suggestion, click on the Grammarly logo in the bottom-right corner of the Grammarly sidebar. It will provide a detailed explanation of the issue and offer suggestions for improvement.
By actively engaging with Grammarly’s suggestions, you can enhance the clarity, accuracy, and overall quality of your writing. It serves as a valuable tool to help you catch and correct common errors, improve sentence structure, and enhance your overall writing style.
Utilizing Grammarly’s suggestions not only helps you produce polished and error-free documents but also enables you to fine-tune your writing skills over time. It’s like having a personal writing coach right within your Google Docs workspace!
Now that you know how to use Grammarly effectively on Google Docs, let’s explore how you can review and edit your document using Grammarly’s suggestions in the next step.
Step 6: Review and Edit with Grammarly Suggestions
Grammarly offers a powerful set of writing suggestions that can help you polish and refine your document. Here’s how you can review and edit your document using Grammarly’s suggestions:
- As you type in Google Docs, Grammarly will underline potential issues or suggestions in your text.
- Take a moment to review the underlined portions of your document. These are areas where Grammarly has identified possible errors, grammar issues, punctuation mistakes, or writing style improvements.
- Hover your cursor over the underlined text, and Grammarly will display a suggestion or explanation for the issue.
- Read the suggestion carefully and consider whether it improves the clarity and correctness of your writing.
- If you agree with the suggestion, you can click on it to apply the correction.
- If you disagree with the suggestion, you can either ignore it or consider the explanation provided by Grammarly to modify your text accordingly.
- Continue reviewing and editing your document, addressing each underlined suggestion until you are satisfied with the quality of your writing.
Remember, Grammarly is a tool, and while it provides valuable suggestions, it’s important to use your judgment as the writer. Consider the context, tone, and intended audience of your document as you make edits.
By incorporating Grammarly’s suggestions and making necessary changes, you can enhance the overall readability and professionalism of your document.
Once you have reviewed and edited your document with Grammarly’s assistance, you are ready to save and share your work. Let’s explore this final step in the next section.
Step 7: Save and Share your Document
After using Grammarly to review and edit your document, it’s time to save and share your work with others. Google Docs provides a seamless way to save your document and collaborate with colleagues, classmates, or clients. Here’s how you can save and share your document:
- To save your document, click on the “File” menu in the Google Docs toolbar.
- From the drop-down menu, click on “Save” or use the shortcut “Ctrl + S” (or “Cmd + S” on Mac) to save your changes.
- Google Docs automatically saves your document as you work, so you can rest assured that your progress is always saved.
- To share your document with others, click on the “Share” button in the top-right corner of the Google Docs toolbar.
- In the sharing settings, enter the email addresses of the people you want to share the document with.
- Choose the appropriate access level for each person – view, comment, or edit.
- Click on “Send” to notify the recipients about the shared document.
By saving and sharing your document, you can collaborate with others in real-time, receive feedback, and make further improvements based on their suggestions.
Remember, as you continue working on your document and making changes, Grammarly will stay active, providing live suggestions and assisting you in creating polished content.
Congratulations! You have successfully added Grammarly to Google Docs, customized the settings, utilized its suggestions, and prepared your document for sharing.
Now you can confidently create error-free, well-structured, and professional documents using Google Docs and Grammarly.
Keep honing your writing skills, and enjoy the benefits of using Grammarly to elevate your writing to the next level!