Introduction
Welcome to the ultimate guide on how to turn on Grammarly for Google Docs. Whether you’re a professional writer, a student, or simply someone who wants to enhance their writing skills, Grammarly is a powerful tool that can help you improve the quality and clarity of your work. With its advanced grammar, spelling, and punctuation checking capabilities, Grammarly ensures that your writing is error-free and polished.
Google Docs is a popular platform for creating and editing documents online. However, it doesn’t come with built-in grammar and spelling checking. This is where Grammarly comes in handy. By integrating Grammarly with Google Docs, you can enjoy the benefits of its comprehensive proofreading and writing suggestions right within your document.
In this guide, we will take you through the step-by-step process of installing and enabling the Grammarly extension in Google Docs. We’ll also show you how to customize Grammarly settings to suit your specific writing style and preferences. So, let’s dive in and discover how to unleash the full potential of Grammarly in Google Docs.
Step 1: Installation
The first step to turning on Grammarly for Google Docs is to install the Grammarly extension. Follow these simple steps:
- Open your Google Chrome browser and navigate to the Chrome Web Store.
- In the search bar, type “Grammarly” and press Enter.
- Click on the “Add to Chrome” button next to the Grammarly extension.
- A pop-up window will appear. Click on the “Add extension” button to install the extension.
- Wait for the installation process to complete. Once installed, you will see the Grammarly logo on the top right corner of your browser.
Congratulations! You have successfully installed the Grammarly extension in your Google Chrome browser. Now, let’s move on to the next step and enable the extension for use in Google Docs.
Step 2: Enabling the Extension
Now that you have installed the Grammarly extension, it’s time to enable it for use in Google Docs. Follow these steps:
- Open a new tab in your Google Chrome browser and navigate to Google Docs.
- Sign in to your Google account if you haven’t already.
- Click on the “Blank” or “Start a new document” button to create a new document.
- Once the document is open, you will notice the Grammarly logo in the bottom right corner of the editor. Click on the logo to open the Grammarly panel.
- A pop-up window will appear, asking you to log in to your Grammarly account. If you already have an account, enter your credentials and click “Log In”. If you don’t have an account, click on “Sign Up” to create a new account.
- After logging in, the Grammarly panel will appear on the right side of your document. You can now start using Grammarly to check and improve your writing.
That’s it! You have successfully enabled the Grammarly extension for use in Google Docs. Now, let’s move on to the next step and grant the necessary permissions for Grammarly to work seamlessly with your documents.
Step 3: Granting Permissions
After enabling the Grammarly extension in Google Docs, the next step is to grant the necessary permissions to ensure smooth integration. Follow these steps:
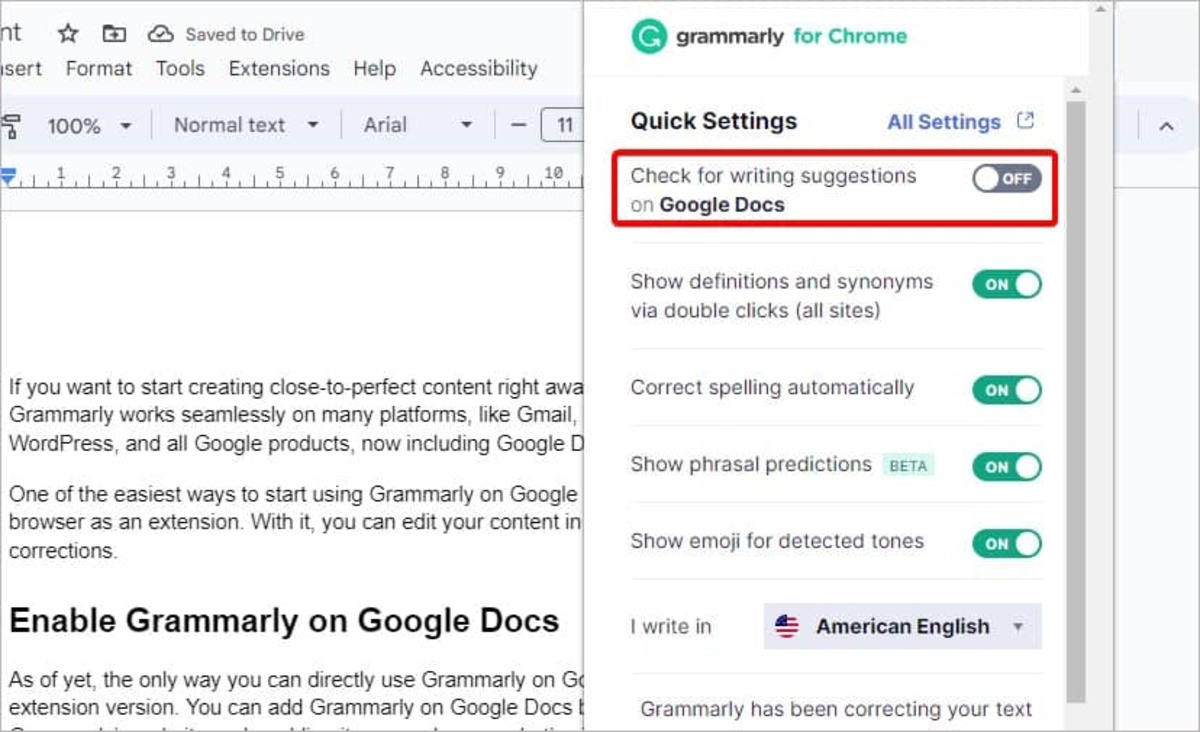
- In the Grammarly panel on the right side of your document, click on the gear icon at the bottom.
- A settings menu will appear. Click on the “Allow” button under the “Permissions” section.
- A pop-up window will appear, asking for permission to access and edit your documents. Click on the “Allow” button to grant Grammarly the necessary permissions.
- You may also see a permission request for access to your clipboard. This allows Grammarly to check your copied text for errors. Click on the “Allow” button if prompted.
- Once you’ve granted the permissions, Grammarly will have full access to analyze and provide suggestions for your writing in Google Docs.
Now that you’ve granted the necessary permissions, you can start using Grammarly to enhance your writing in Google Docs. Let’s move on to the next step and test Grammarly’s capabilities in your document.
Step 4: Testing Grammarly in Google Docs
Now that you have enabled Grammarly and granted the necessary permissions, it’s time to put it to the test. Follow these steps to see Grammarly in action:
- Type or paste some text into your Google Docs document.
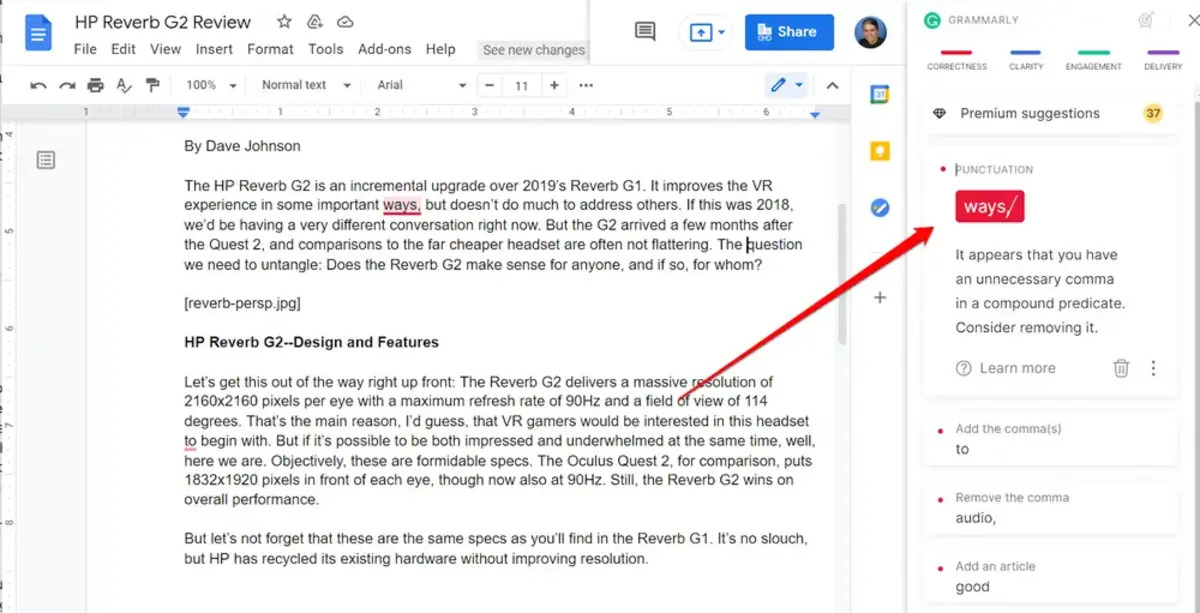
- As you type, Grammarly will automatically start analyzing your text and underline any potential errors or areas for improvement.
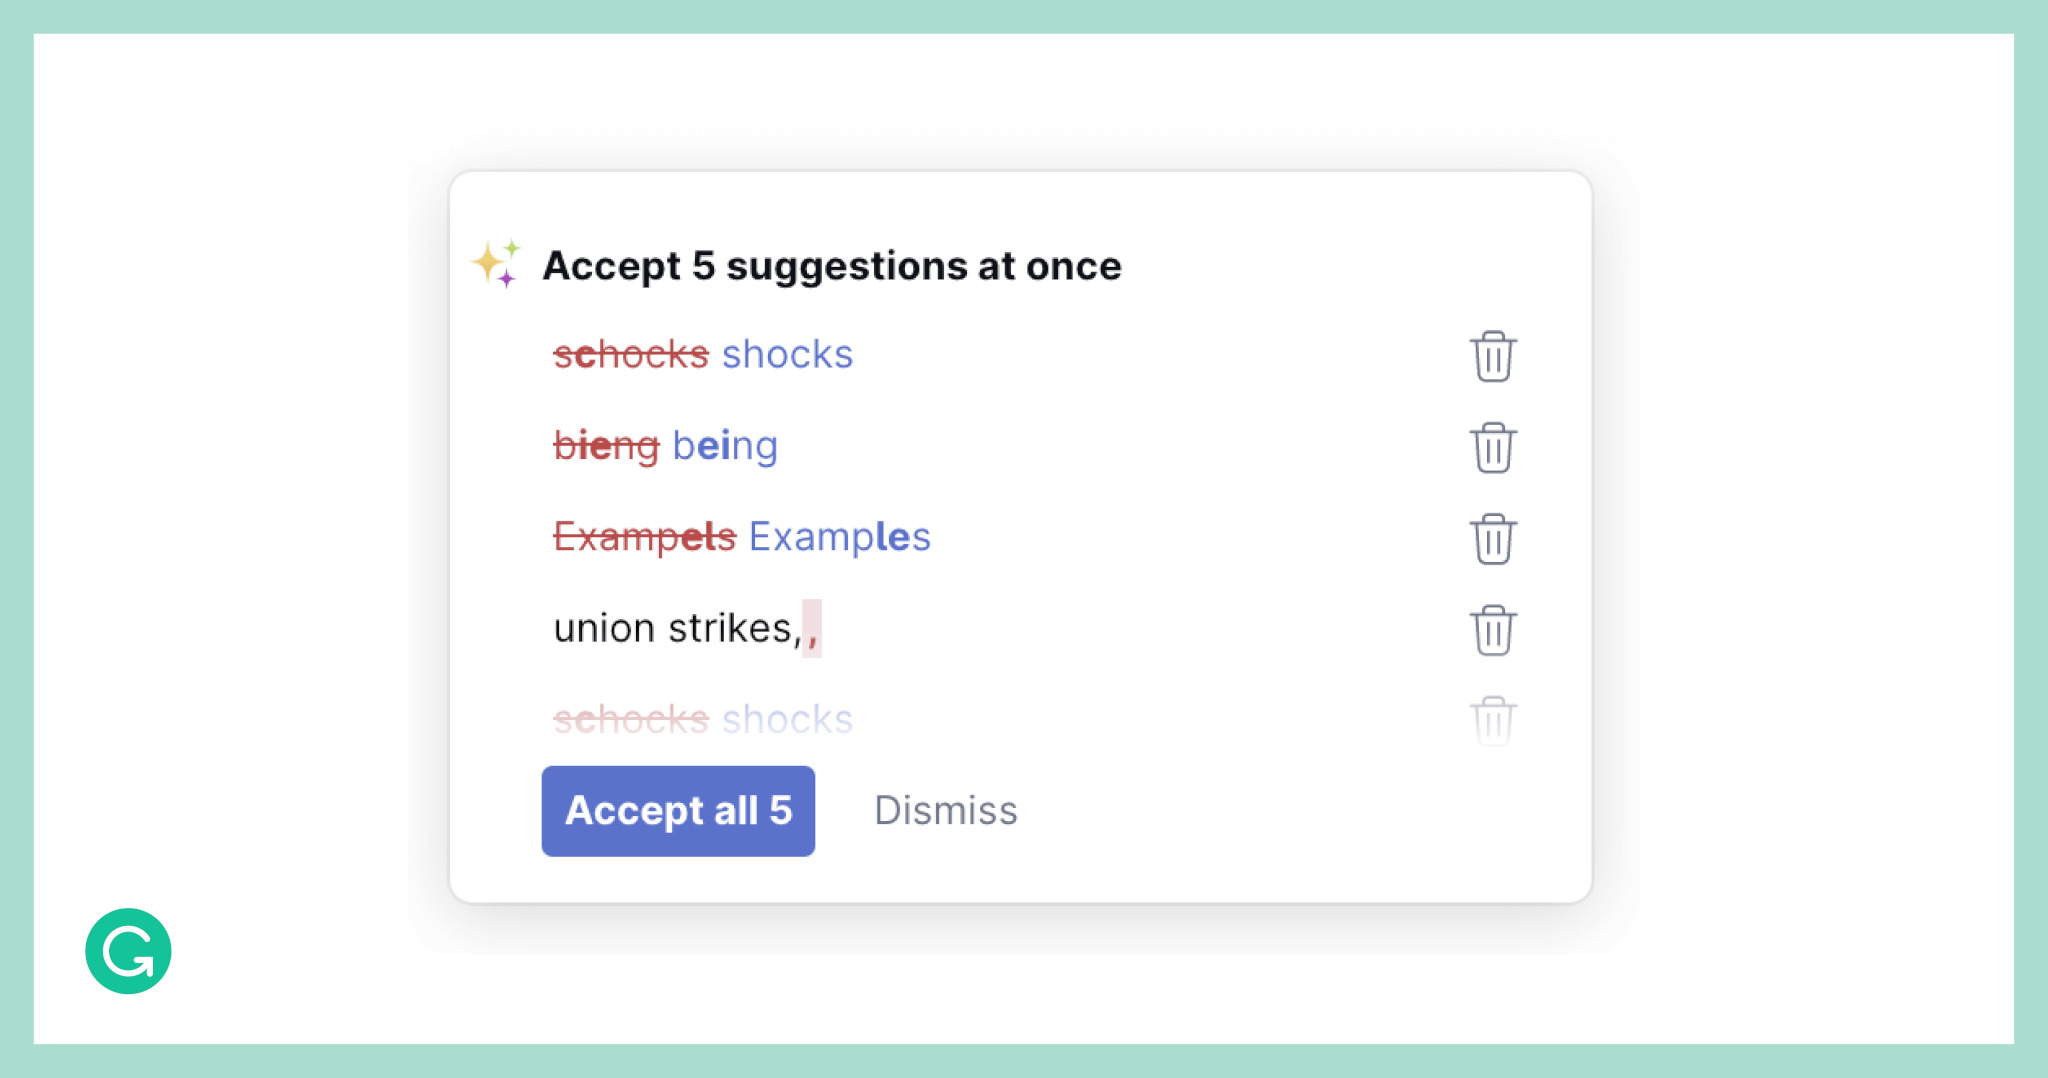
- If Grammarly detects an error, simply hover over the underlined word or phrase to see a suggested correction or improvement.
- Click on the suggested correction to accept it and automatically make the change in your document.
- Grammarly will also provide explanations and suggestions for grammar, punctuation, and clarity improvements. Take these suggestions into account to enhance the overall quality of your writing.
- Continue typing and editing your document, and Grammarly will continuously analyze and provide suggestions to help you refine your writing.
By using Grammarly in Google Docs, you can save time and effort in proofreading and editing your work. It acts as your virtual writing assistant, providing real-time feedback and suggestions to help you achieve better writing outcomes.
Now that you’ve tested Grammarly in action, let’s move on to the final step: customizing Grammarly settings to suit your specific writing style and preferences.
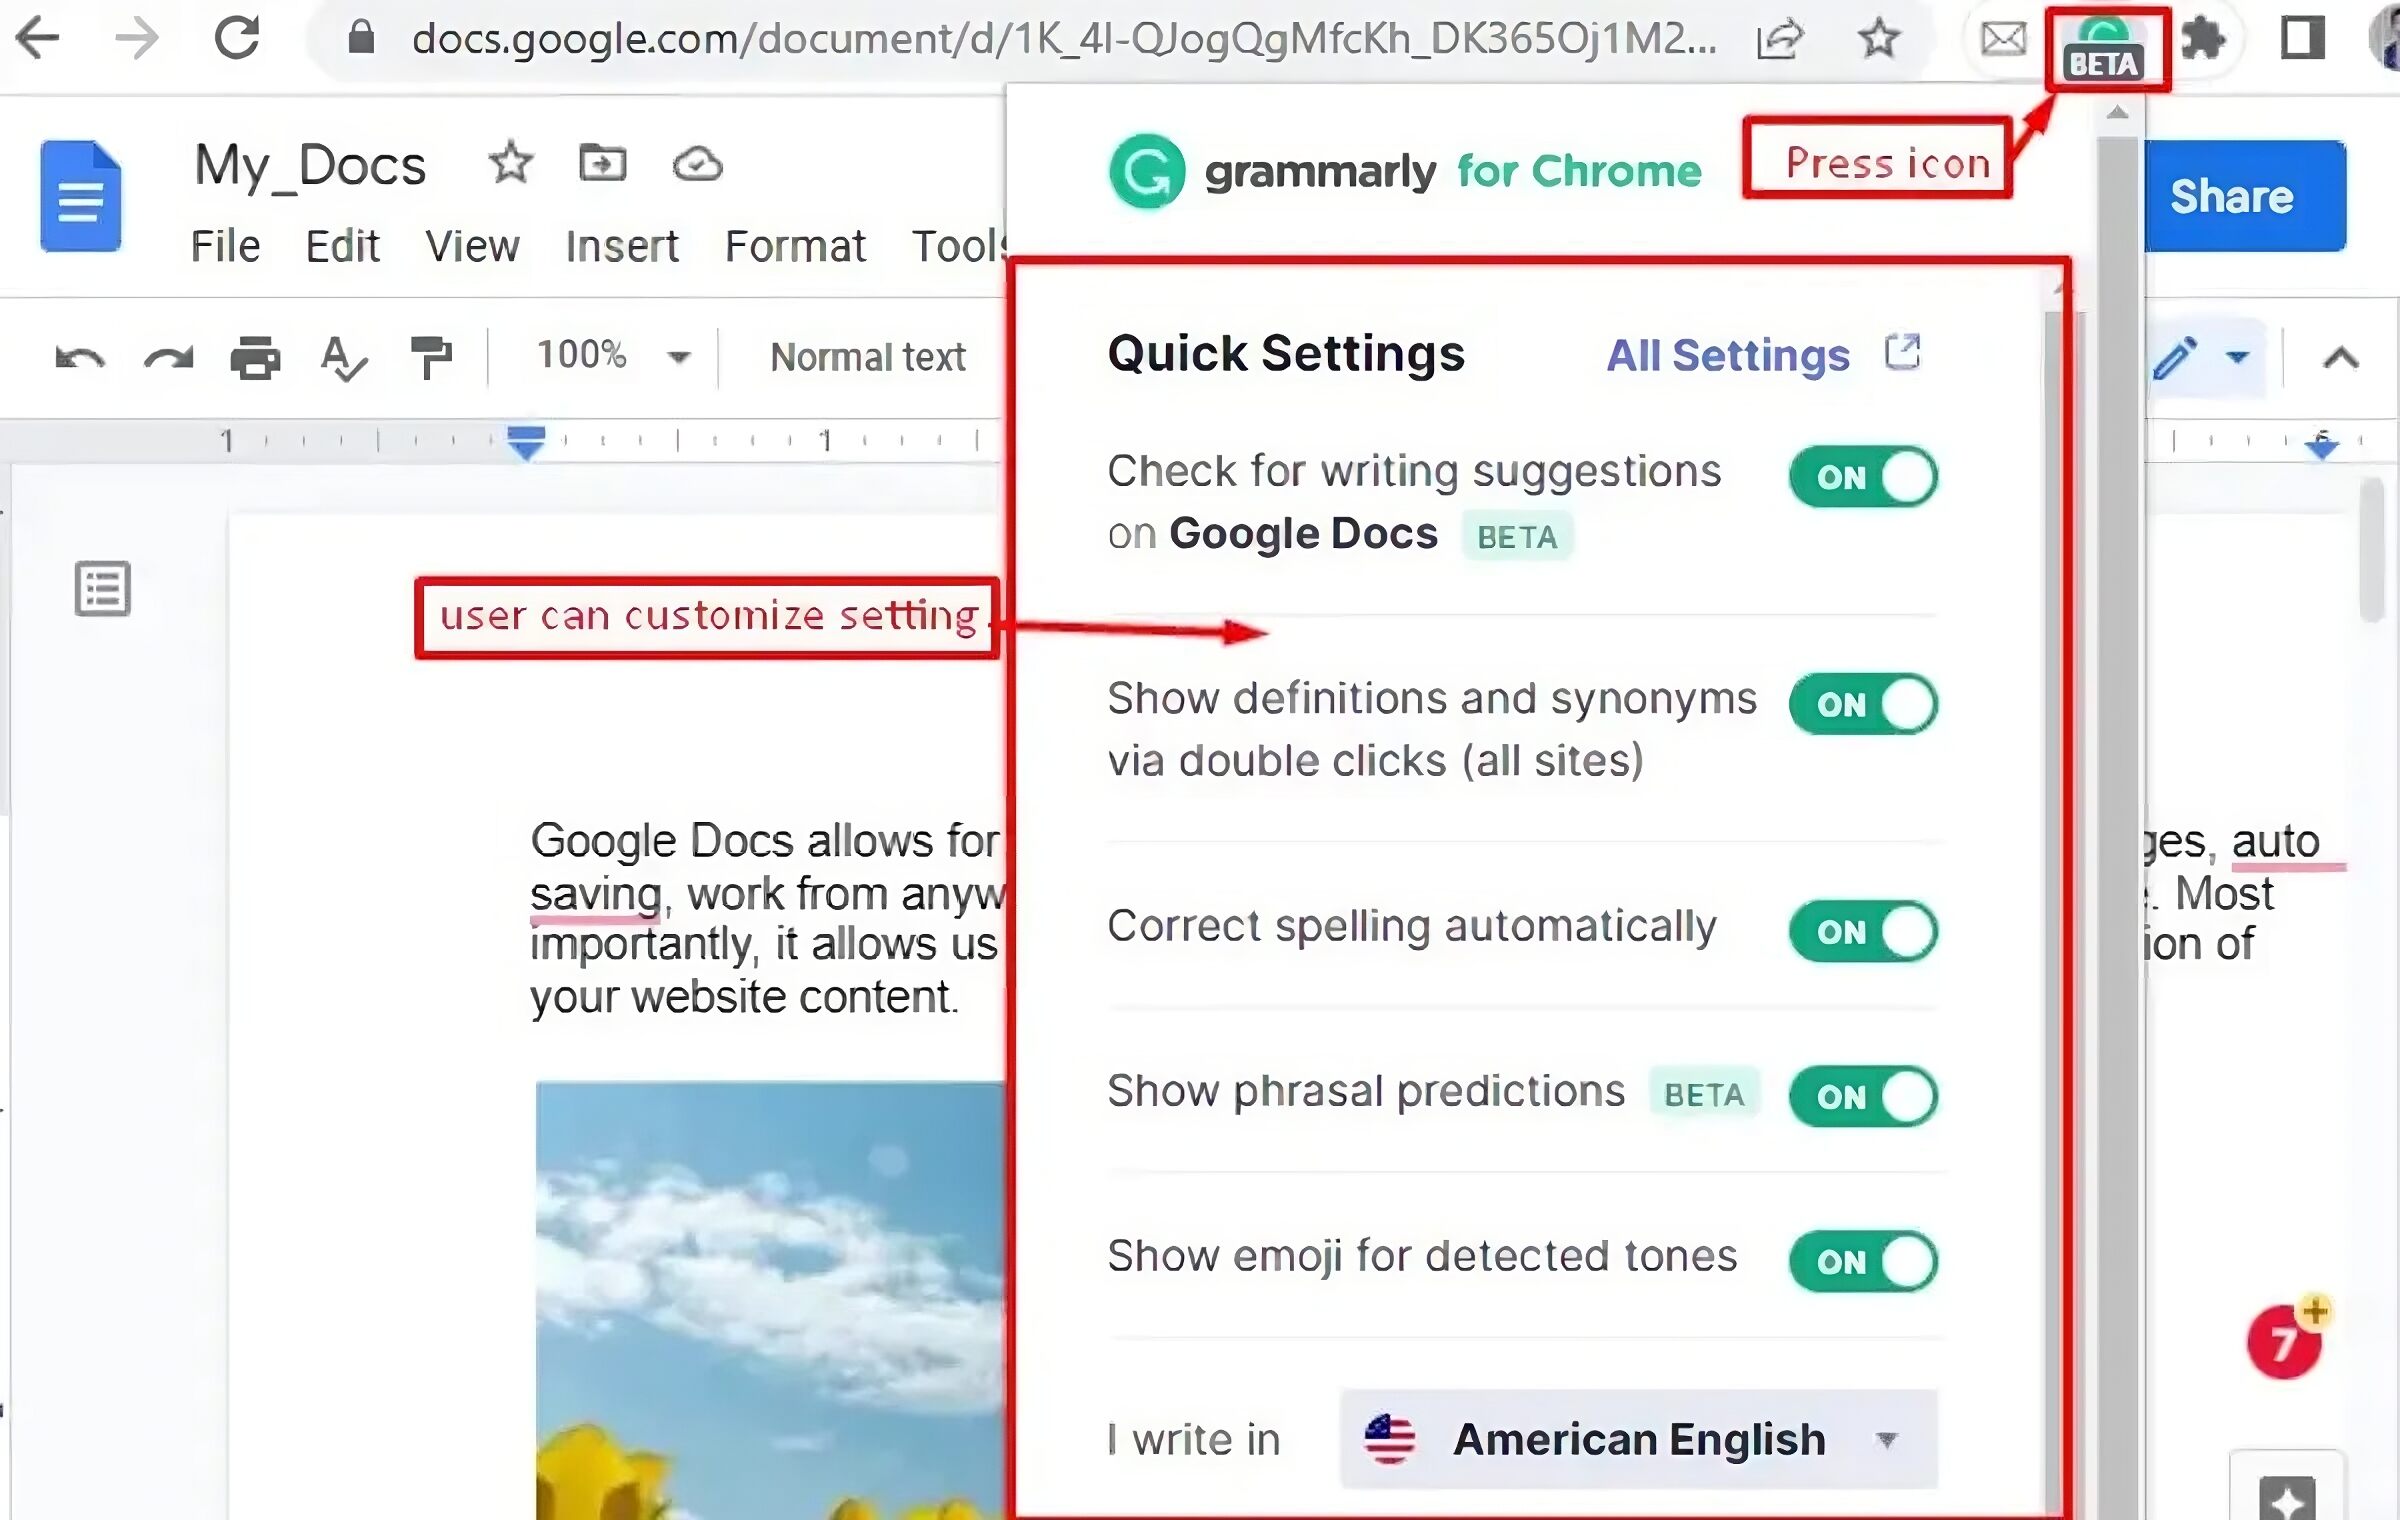
Step 5: Customizing Grammarly Settings
Grammarly offers a range of customizable settings that allow you to tailor its suggestions and preferences to align with your unique writing style and preferences. Follow these steps to customize Grammarly settings:
- Click on the Grammarly logo in the bottom right corner of your Google Docs editor.
- In the Grammarly panel, click on the gear icon at the bottom to access the settings menu.
- In the settings menu, you will find various options to customize Grammarly according to your needs.
- For example, you can enable or disable certain types of alerts, such as spelling errors or punctuation mistakes.
- You can also choose the writing genre or style you’re working on to allow Grammarly to provide more accurate suggestions.
- Additionally, you can adjust the severity level of Grammarly’s alerts, from basic to advanced, based on the level of assistance you require.
- Take some time to explore the different settings and adjust them according to your preference.
By customizing Grammarly settings, you can enhance the accuracy and relevance of its suggestions, ensuring that it aligns with your specific writing goals and requirements.
Congratulations! You have successfully customized Grammarly settings in Google Docs. Now, you can enjoy a personalized writing experience with Grammarly’s tailored feedback and suggestions.
In this guide, we explored the step-by-step process of turning on Grammarly for Google Docs. We discussed the installation process, enabling the extension, granting permissions, testing Grammarly in action, and customizing settings. By following these steps, you can make the most out of Grammarly’s powerful writing assistance within Google Docs.
Conclusion
Gaining the ability to use Grammarly in Google Docs can significantly improve your writing experience and elevate the quality of your work. In this guide, we walked through the process of installing the Grammarly extension, enabling it for Google Docs, granting the necessary permissions, testing its capabilities, and customizing the settings to suit your preferences.
By following these steps, you have unlocked the full potential of Grammarly’s powerful writing assistance within Google Docs. With Grammarly, you can catch spelling mistakes, correct grammar errors, improve punctuation, and enhance the overall clarity and readability of your documents.
Remember to make use of Grammarly’s suggestions and explanations to actively develop your writing skills. Use it as a valuable tool to refine your writing style, improve your command of grammar, and polish your work to perfection.
Whether you are a student, a professional, or someone who simply wants to improve their writing, Grammarly integrated with Google Docs is a winning combination. Embrace the benefits it offers and watch as your writing reaches new heights.
Now that you are equipped with the knowledge of how to turn on Grammarly for Google Docs, it’s time to put your newfound skills into practice. Start creating flawless documents with the help of Grammarly and enjoy the confidence that comes with producing error-free and polished writing.