Introduction
Welcome to the digital age where effective communication is crucial, whether it’s a professional email, an academic paper, or a blog post. However, even the most skilled writers can make mistakes such as typos, grammar errors, or punctuation slips. Thankfully, there are tools available to assist us in improving our writing, and one of the most popular ones is Grammarly.
Grammarly is an advanced writing assistant that helps users enhance their writing by providing real-time feedback and suggestions. It not only highlights spelling mistakes and grammatical errors but also provides explanations and suggestions to help you improve your writing style and clarity. While Grammarly is already popular as a standalone tool, it has also integrated itself seamlessly with Google Docs, making it even more convenient for users.
In this article, we will guide you through the process of using Grammarly with Google Docs, from installation to customization. You will discover how Grammarly’s features can enhance your writing experience, expedite the editing process, and ultimately, help you create more polished and error-free documents.
Whether you are a student working on an important assignment, a professional crafting a report, or a writer perfecting your manuscript, using Grammarly with Google Docs can significantly elevate the quality of your work. Let’s dive in and explore the benefits of this powerful combination.
Step 1: Installing Grammarly for Google Docs
To begin using Grammarly with Google Docs, you first need to install the Grammarly extension. Follow these simple steps to get started:
- Open your Google Chrome browser.
- Click on the three-dot menu icon located in the top right corner of the browser window.
- From the dropdown menu, select “More Tools” and then click on “Extensions”.
- In the extensions page, click on the “Open Chrome Web Store” link located at the bottom left corner of the page.
- In the search bar of the Chrome Web Store, type “Grammarly” and hit Enter.
- From the search results, click on the Grammarly extension.
- On the Grammarly extension page, click on the “Add to Chrome” button.
- A popup window will appear, asking you to confirm the installation. Click on the “Add extension” button.
- Wait for the installation to complete. Once done, you will see a blue ‘G’ icon in the top right corner of your Chrome browser.
That’s it! You have now successfully installed the Grammarly extension for Google Chrome. This extension enables Grammarly to function seamlessly within Google Docs, providing you with real-time writing suggestions and improvements.
It’s important to note that the Grammarly extension is currently only available for Google Chrome. If you’re using a different browser, you may need to switch to Chrome temporarily to utilize Grammarly’s integration with Google Docs.
Now that you’ve installed the extension, you’re ready to take advantage of Grammarly’s powerful features while editing your Google Docs documents. In the following steps, we’ll guide you through accessing and utilizing Grammarly in Google Docs.
Step 2: Accessing Grammarly in Google Docs
With the Grammarly extension installed, accessing Grammarly in Google Docs is a breeze. Follow these steps to start utilizing Grammarly’s features:
- Open your Google Docs document in the Google Chrome browser.
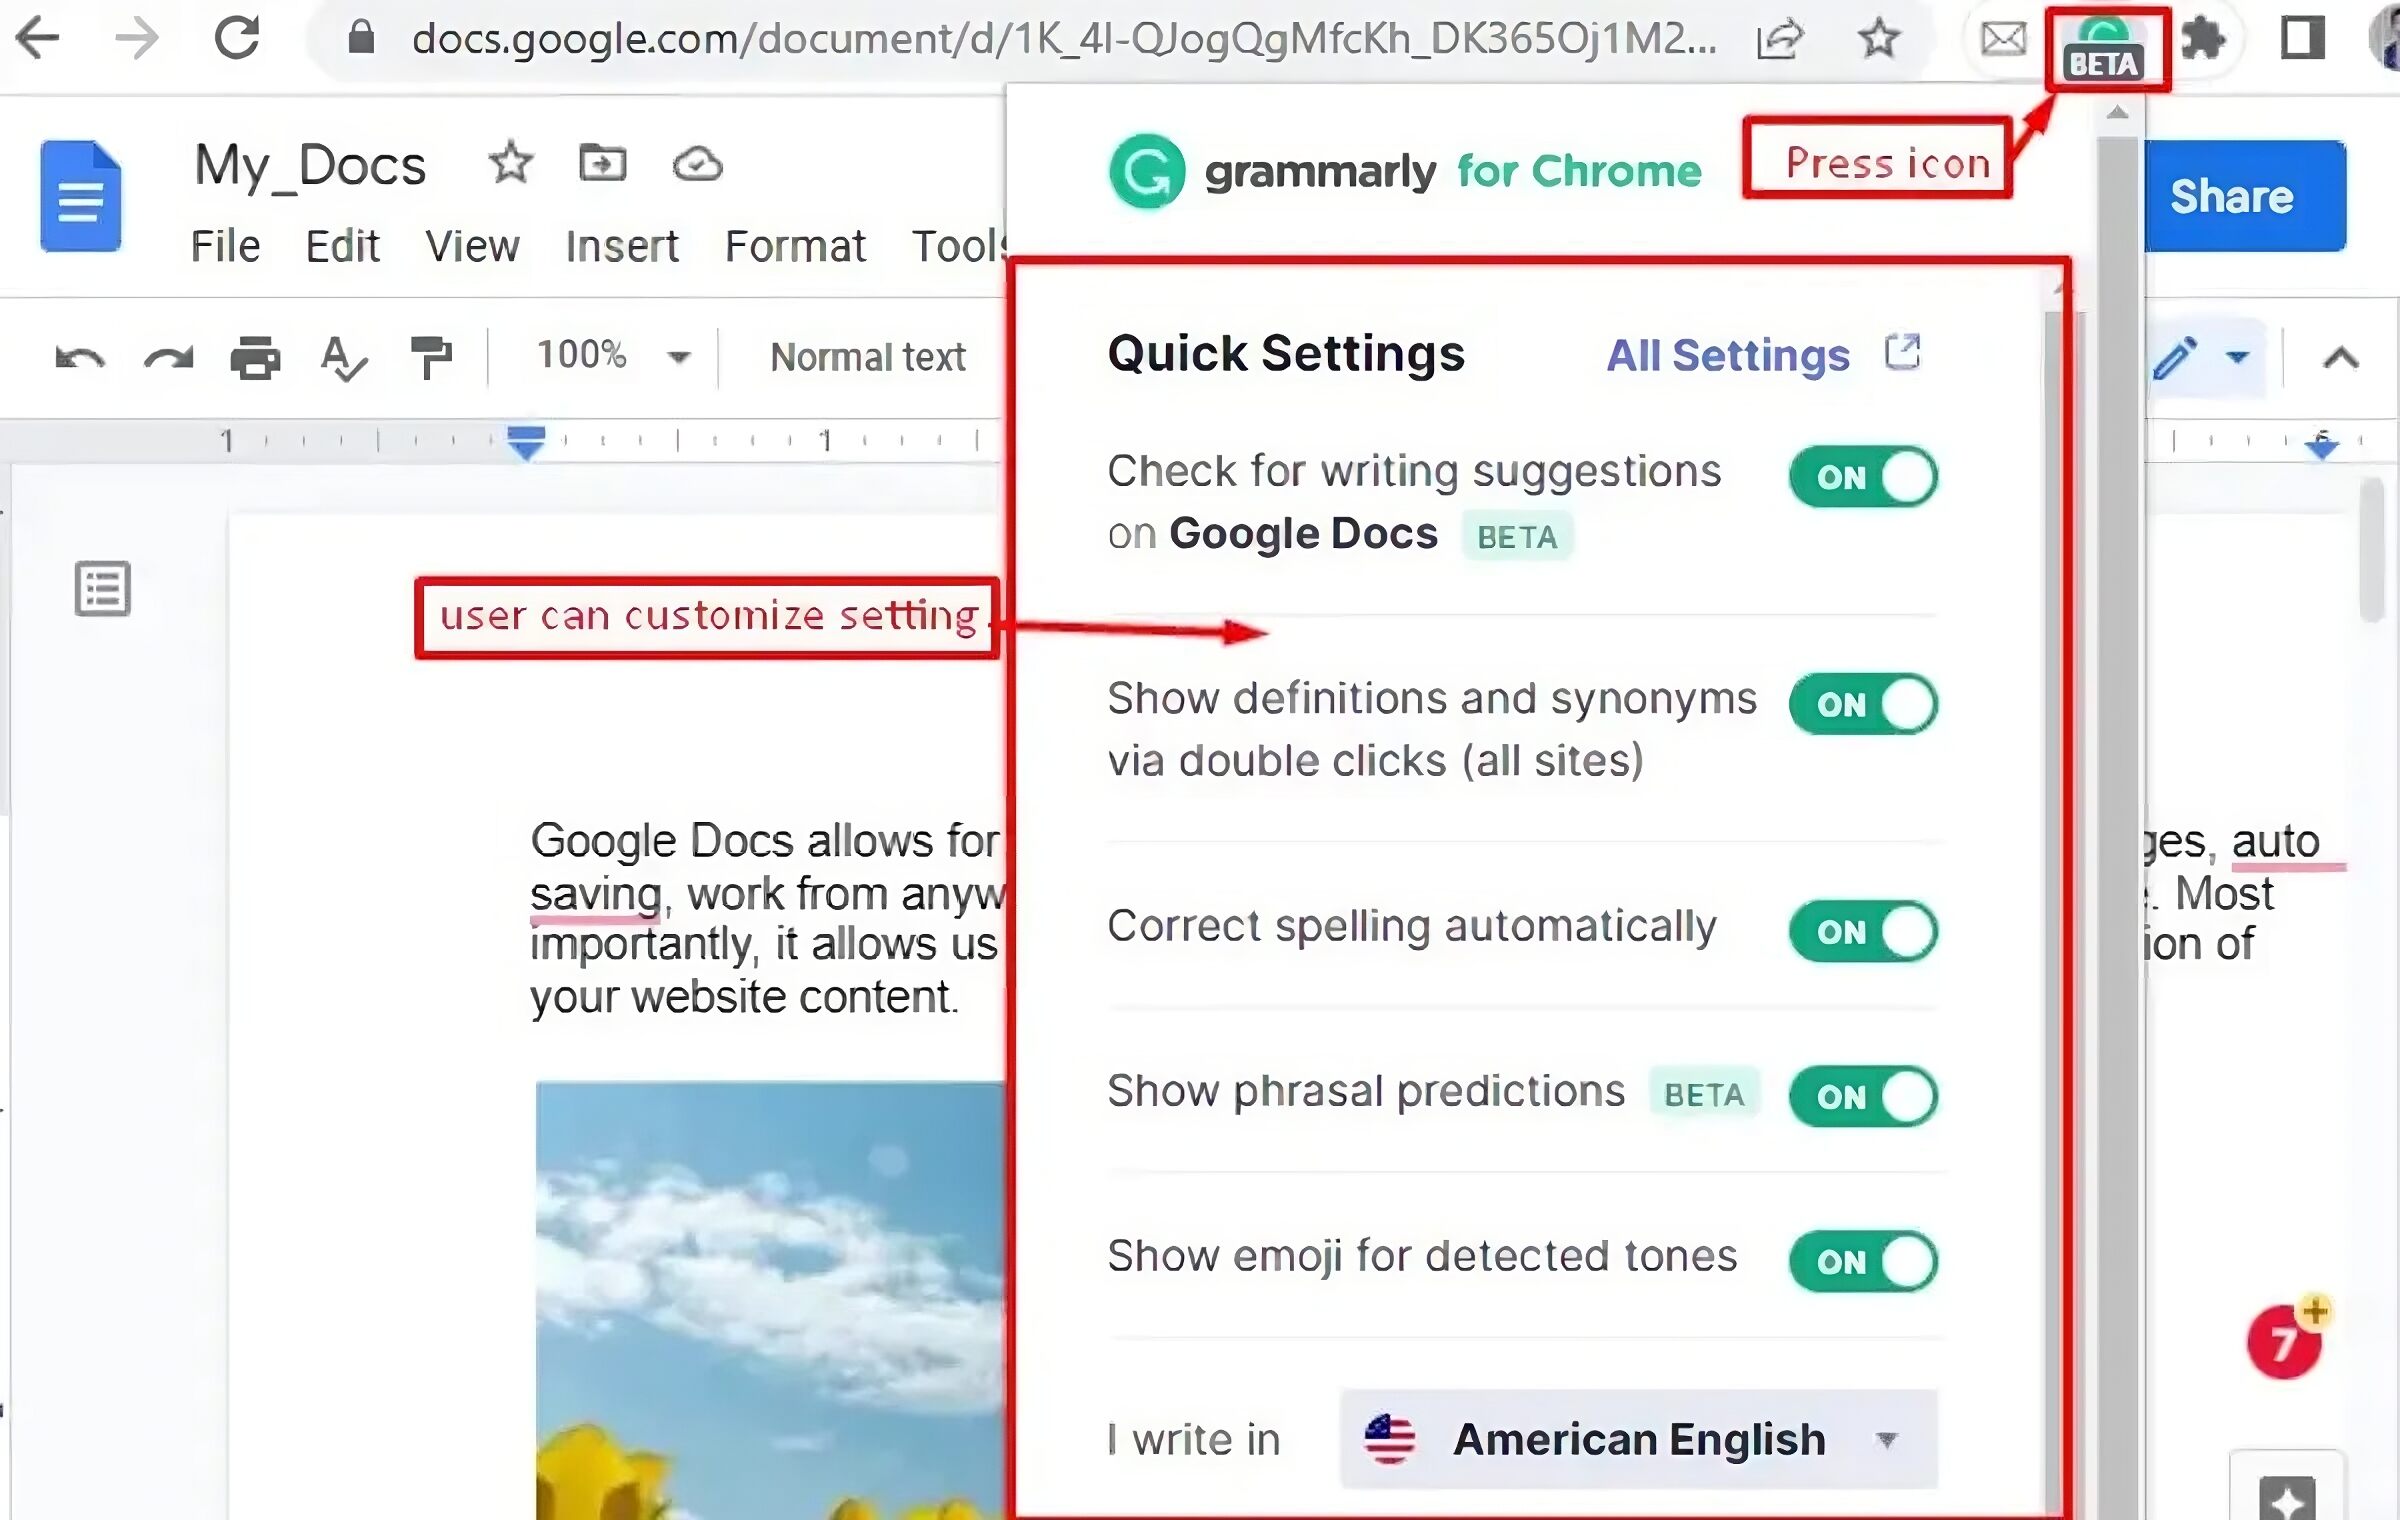
- Once your document is open, you will notice the Grammarly icon, represented by a small green circle with a white “G” inside it, located at the bottom right corner of the document interface.
- Click on the Grammarly icon to open the Grammarly sidebar.
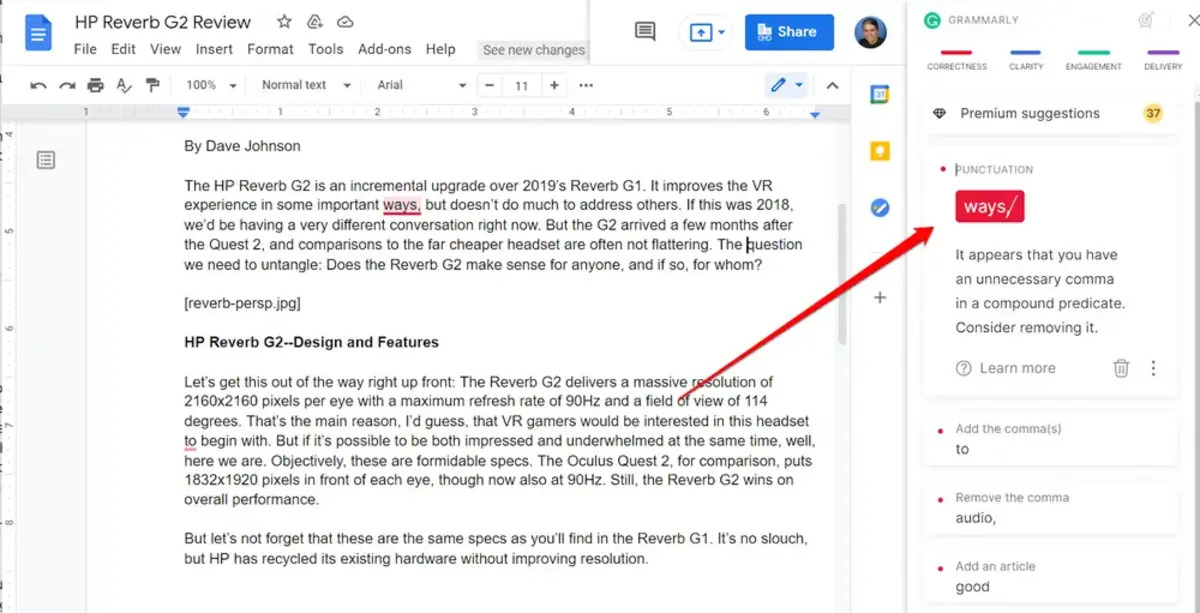
- The Grammarly sidebar will appear on the right side of your document, providing you with valuable insights and suggestions for improving your writing. It highlights potential errors, offers suggestions for correcting grammar and spelling mistakes, and enhances the clarity and readability of your content.
- As you type, Grammarly automatically scans your document and instantly provides feedback. You can also manually initiate a scan by clicking on the “Review” button at the bottom of the Grammarly sidebar.
- Grammarly offers various types of suggestions, such as grammar, spelling, punctuation, sentence structure, style, and clarity. Each suggestion is highlighted, and you can hover over it to see detailed explanations and alternative options. You can then choose to accept or ignore the suggestions, based on your preference.
- If you want to hide the Grammarly sidebar temporarily to focus on your content, simply click on the small double arrow icon to minimize it. You can expand it again by clicking on the same icon.
- If you need to disable Grammarly temporarily for any reason, you can do so by clicking on the “Turn off Grammarly for this document” option in the Grammarly sidebar.
By utilizing Grammarly’s powerful capabilities within Google Docs, you can efficiently and effectively improve your writing skills. Let’s now explore the basic features Grammarly has to offer in the next step.
Step 3: Utilizing Grammarly’s Basic Features
Now that you have accessed Grammarly in Google Docs, let’s dive into the basic features that Grammarly offers to enhance your writing:
- Grammar and Spelling: Grammarly’s primary function is to identify and correct grammatical and spelling mistakes in your document. It underlines errors in real-time and offers suggestions for improvement. By addressing these errors, you can ensure your writing is clear, concise, and error-free.
- Punctuation: Grammarly not only helps with grammar and spelling but also assists in proper punctuation usage. It alerts you to missing or incorrect punctuation marks and provides suggestions to ensure your sentences are correctly punctuated.
- Style and Clarity: Grammarly analyzes your writing style and provides suggestions to improve its overall clarity. It helps you eliminate wordiness, improve sentence structure, and enhance readability, making your writing more engaging and effective.
- Contextual Vocabulary: Grammarly identifies overused words and offers alternatives, helping you diversify your vocabulary and enhance the quality of your writing by suggesting stronger and more precise word choices.
- Document Optimization: Grammarly provides an overall document score, indicating the overall quality and clarity of your writing. It offers suggestions to optimize your document and make it more effective, ensuring your message is communicated clearly to your audience.
As you utilize Grammarly’s basic features, you will notice the interactive and intuitive nature of the tool. It not only highlights errors but also explains the rules and reasons behind the suggestions it provides. This provides you with valuable insights into your writing weaknesses and helps you learn and improve over time.
Remember, while Grammarly is an exceptional tool for enhancing your writing, it’s important to use your own judgment in accepting or rejecting suggestions. Always consider the specific context and purpose of your writing and make adjustments accordingly.
Now that you are familiar with Grammarly’s basic features, let’s move on to exploring its advanced features in the next step.
Step 4: Utilizing Grammarly’s Advanced Features
In addition to its basic features, Grammarly also offers advanced features that can further enhance your writing. Let’s explore some of these advanced features:
- Tone Detector: Grammarly’s Tone Detector analyzes the tone of your writing and provides feedback on how your message comes across to the reader. It helps you ensure that your tone is appropriate for the intended audience and purpose of your document.
- Plagiarism Checker: Grammarly has a built-in plagiarism checker that can help identify instances where your writing may be too similar to existing content. This feature helps you maintain originality and avoid unintentional plagiarism.
- Vocabulary Suggestions: Grammarly suggests vocabulary enhancements, offering synonyms and alternative word choices to diversify your writing and make it more engaging and impactful.
- Readability Analysis: Grammarly provides a readability score, indicating the overall readability of your document. It highlights sentences or phrases that may be difficult for readers to understand and offers suggestions to improve clarity.
- Confidence Level: Grammarly assigns a confidence score to each suggestion it provides. This indicates the level of certainty Grammarly has in its suggestion and allows you to make informed decisions when accepting or rejecting suggestions.
By utilizing these advanced features, you can elevate your writing to a higher level of quality and professionalism. Grammarly acts as your personal writing assistant, providing valuable insights and recommendations to help you become a more effective communicator.
It’s worth noting that some of Grammarly’s advanced features may require a premium subscription. While the free version is still highly effective, upgrading to Grammarly Premium unlocks additional features, personalized suggestions, and a more comprehensive writing experience.
Now that you’re familiar with Grammarly’s advanced features, you can explore and experiment with them as you continue refining your writing in Google Docs. In the next step, we’ll guide you through customizing Grammarly settings to tailor the tool to your specific needs.
Step 5: Customizing Grammarly Settings
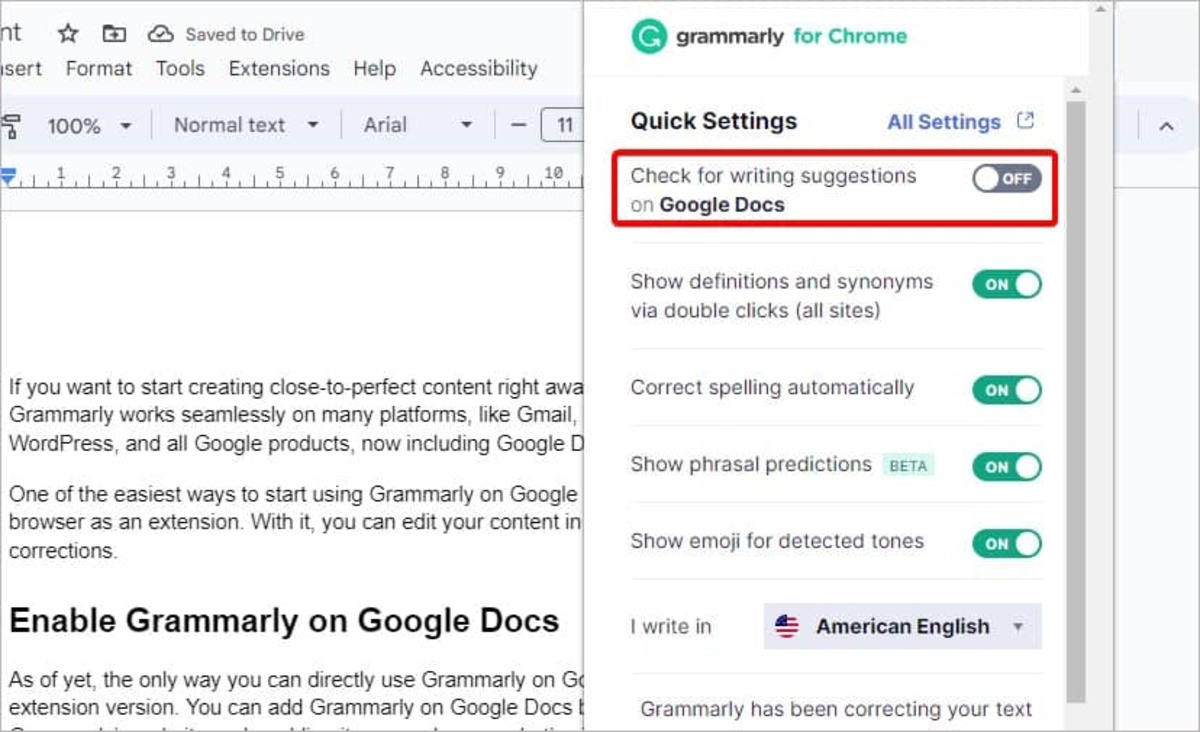
Grammarly understands that each writer has unique preferences and requirements. That’s why it offers customization options to tailor the tool to your specific needs. Here’s how you can customize Grammarly settings:
- Click on the Grammarly icon in the bottom right corner of your Google Docs document to open the Grammarly sidebar.
- In the Grammarly sidebar, click on the gear icon at the bottom left to access the settings menu.
- Within the settings menu, you will find various customization options. You can choose to enable or disable specific types of suggestions, such as spelling, grammar, punctuation, or clarity.
- You can also customize the style of Grammarly’s suggestions, selecting either a formal or informal tone based on your writing style and audience.
- If you have specific writing goals, you can set them within the settings menu. Grammarly will then provide suggestions and feedback based on those goals.
- Grammarly also allows you to create personal dictionaries. If there are specific words or phrases that you frequently use and don’t want Grammarly to flag as errors, you can add them to your personal dictionary.
By customizing the settings to align with your writing style and goals, you can optimize Grammarly’s feedback and maximize its effectiveness in helping you improve your writing.
Remember, you can always revisit the settings menu to make adjustments as needed. Experiment with different settings and see what works best for you. The more you tailor Grammarly to your preferences, the more it will adapt to your unique writing needs.
Now that you know how to customize Grammarly settings, let’s move on to the next step, which focuses on collaboration using Grammarly in Google Docs.
Step 6: Collaborating with Others Using Grammarly in Google Docs
Collaboration is a key aspect of writing, especially when working on documents with others. Grammarly seamlessly supports collaboration within Google Docs, allowing multiple users to utilize its features. Here’s how you can collaborate with others using Grammarly in Google Docs:
- Share your Google Docs document with your collaborators, granting them editing or commenting access.
- Each collaborator needs to have the Grammarly extension installed in their Chrome browser.
- When collaborators open the shared document in Google Docs, they will see the Grammarly extension icon in the bottom right corner, just like you do.
- Each collaborator can interact with Grammarly individually, receiving suggestions and making edits based on their writing needs.
- Grammarly works in real-time for each collaborator, providing immediate feedback and suggestions as they type.
- Collaborators can also communicate and provide feedback to each other using the commenting feature in Google Docs.
- As the document owner, you can review and accept or reject the suggested edits made by your collaborators using Grammarly’s recommendations.
- The collaborative editing process becomes more streamlined and efficient with the help of Grammarly, ensuring that everyone is contributing to a high-quality document.
Whether you’re working on a group project, editing a document with colleagues, or collaborating with clients, Grammarly in Google Docs simplifies the editing and revision process. It promotes effective communication and ensures that your collaborative writing maintains a consistent and polished tone.
By leveraging the power of Grammarly and Google Docs, you can enjoy a seamless collaboration experience while producing well-written and error-free documents.
Now that you have learned how to collaborate using Grammarly in Google Docs, you have successfully completed the steps to fully utilize Grammarly’s integration. Take advantage of this powerful tool to enhance your writing, refine your documents, and effectively communicate your ideas to your intended audience.
Conclusion
Grammarly with Google Docs is a dynamic combination that empowers writers to create polished, error-free documents. By following the steps outlined in this guide, you have learned how to install Grammarly for Google Docs, access its features, customize settings according to your preferences, and collaborate with others seamlessly.
Grammarly’s real-time feedback and suggestions provide invaluable support for writers of all levels, whether you are a student, professional, or content creator. With Grammarly, you can confidently tackle grammar, spelling, punctuation, clarity, and style issues, ensuring that your writing is precise, engaging, and effective.
Additionally, Grammarly’s advanced features, such as the Tone Detector, Plagiarism Checker, and Vocabulary Suggestions, further elevate the quality of your writing. By taking advantage of these features, you can enhance your writing style, maintain originality, and captivate your readers with a diverse and impactful vocabulary.
Remember to customize Grammarly’s settings to align with your writing goals and preferences. By tailoring the tool to your unique needs, you can maximize its effectiveness and receive more targeted suggestions and insights for improvement.
The collaboration functionality offered by Grammarly in Google Docs allows multiple users to work on documents seamlessly. It promotes effective communication and ensures that collaborative writing projects are consistent and error-free.
Now, armed with the knowledge and skills to make the most of Grammarly with Google Docs, you have the tools to enhance your writing, elevate the quality of your documents, and communicate your ideas more effectively. Embrace Grammarly and enjoy the benefits of improved writing proficiency across all your endeavors.