Introduction
Welcome to our guide on how to turn off announcements on AirPods. If you own a pair of Apple AirPods, you may have noticed that when you connect them to your iPhone, iPad, Mac, or Apple Watch, you hear announcements for things like battery status, connection status, or incoming calls. While these announcements can be helpful in some situations, they can also be repetitive and distracting, especially if you prefer a quieter and more seamless listening experience.
Luckily, Apple provides multiple methods to turn off these announcements on your AirPods, giving you more control over how and when you receive information. In this article, we will explore four different methods to turn off announcements on AirPods, depending on the device you are using and your preferred settings.
Whether you want to enjoy your music or podcasts uninterrupted, or simply find the announcements unnecessary, we’ve got you covered. Let’s dive in and discover how to personalize your AirPods experience by disabling those pesky announcements.
Method 1: Using iPhone or iPad
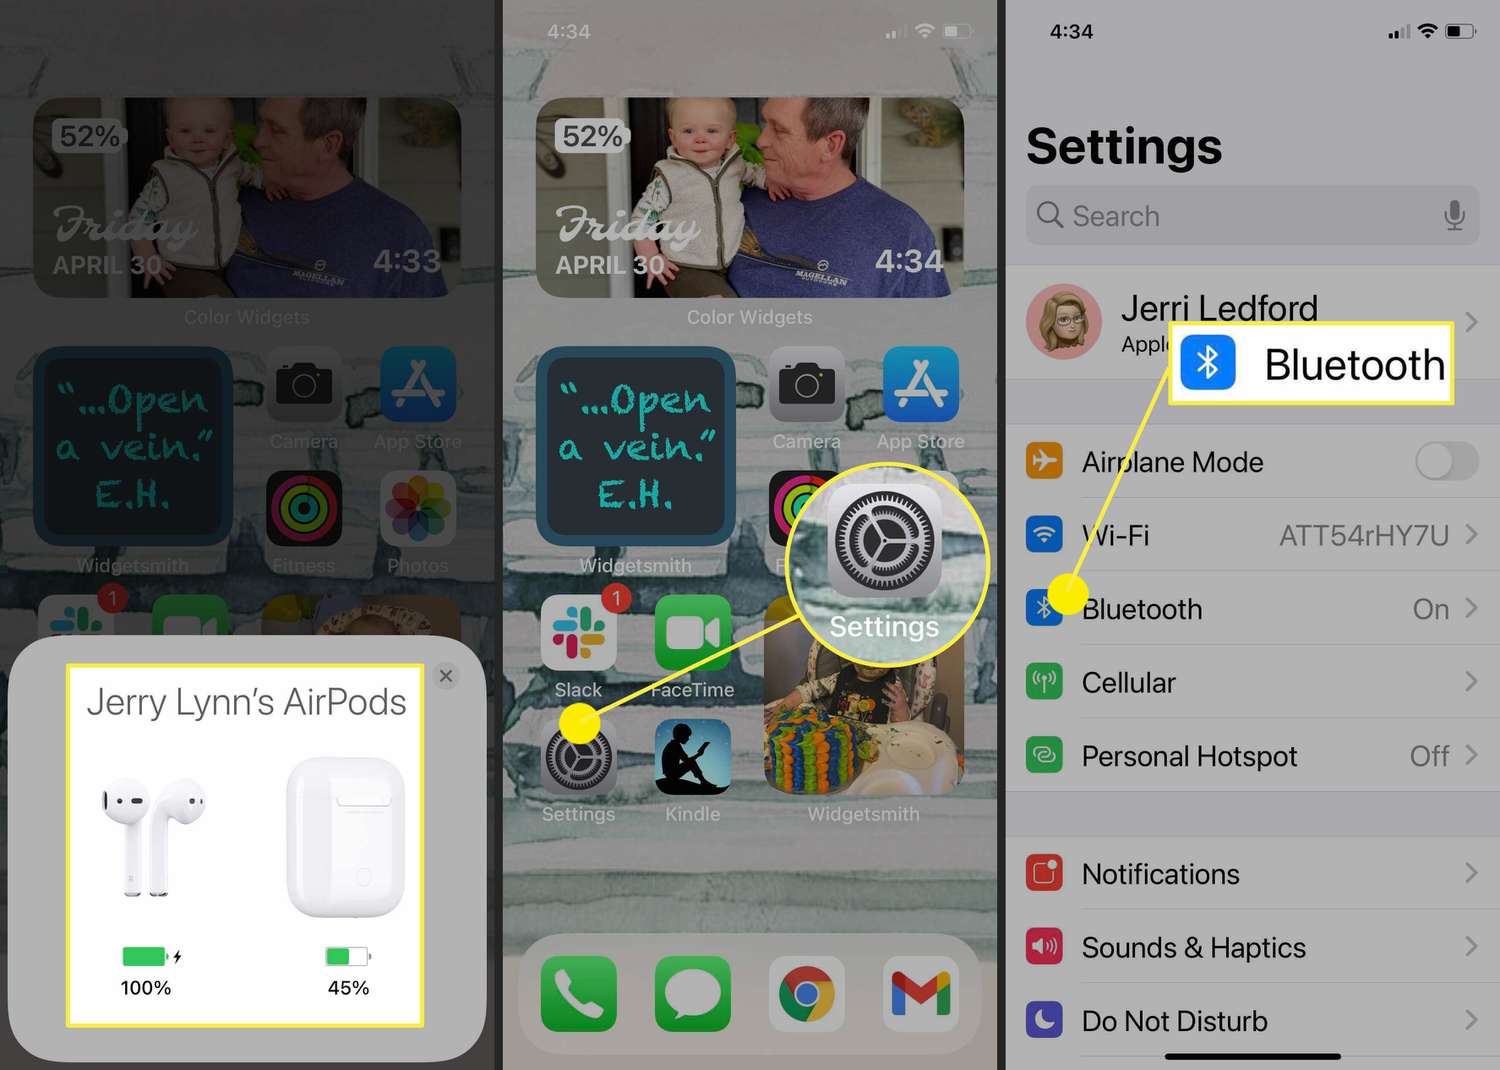
If you primarily use your AirPods with your iPhone or iPad, you can easily turn off announcements through the Bluetooth settings. Follow these steps:
- First, make sure your AirPods are connected to your iPhone or iPad by opening the lid of the AirPods case and placing them in your ears.
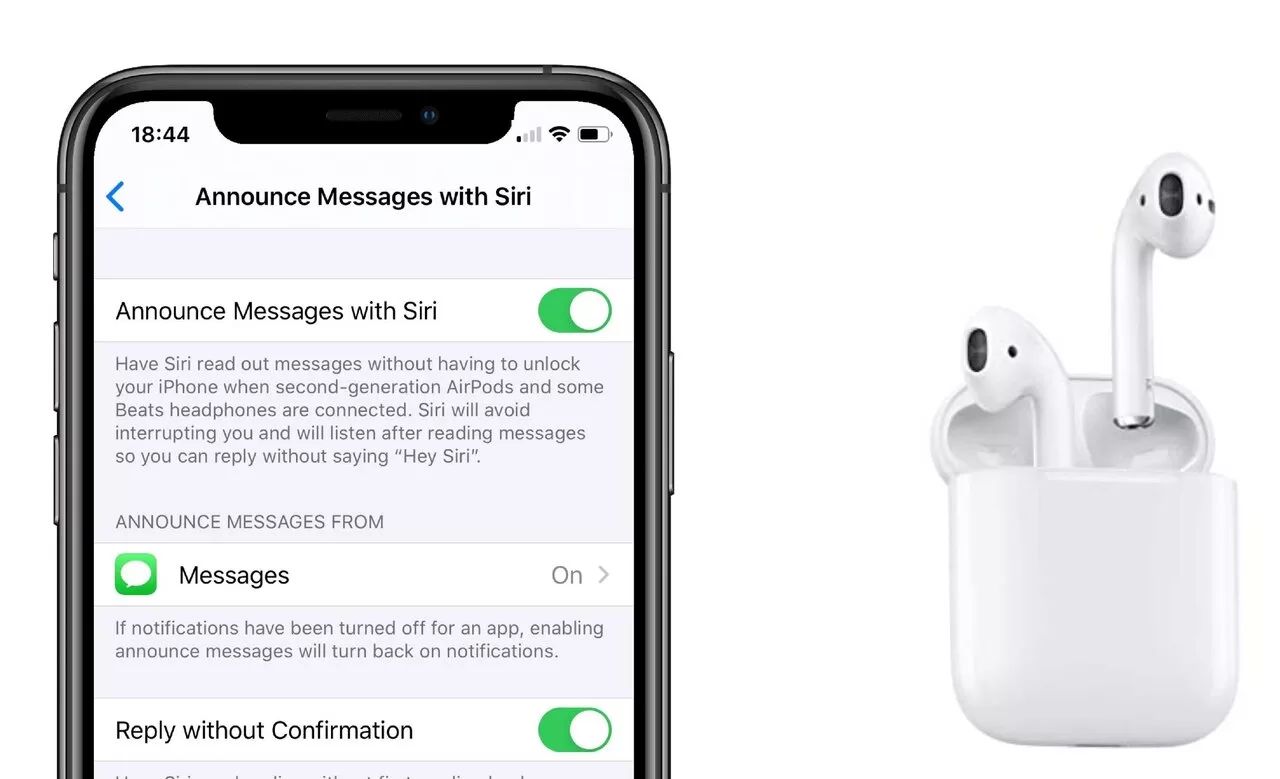
- Next, open the Settings app on your device and tap on “Bluetooth.”
- Locate your AirPods in the list of available devices and tap on the “i” icon next to them.
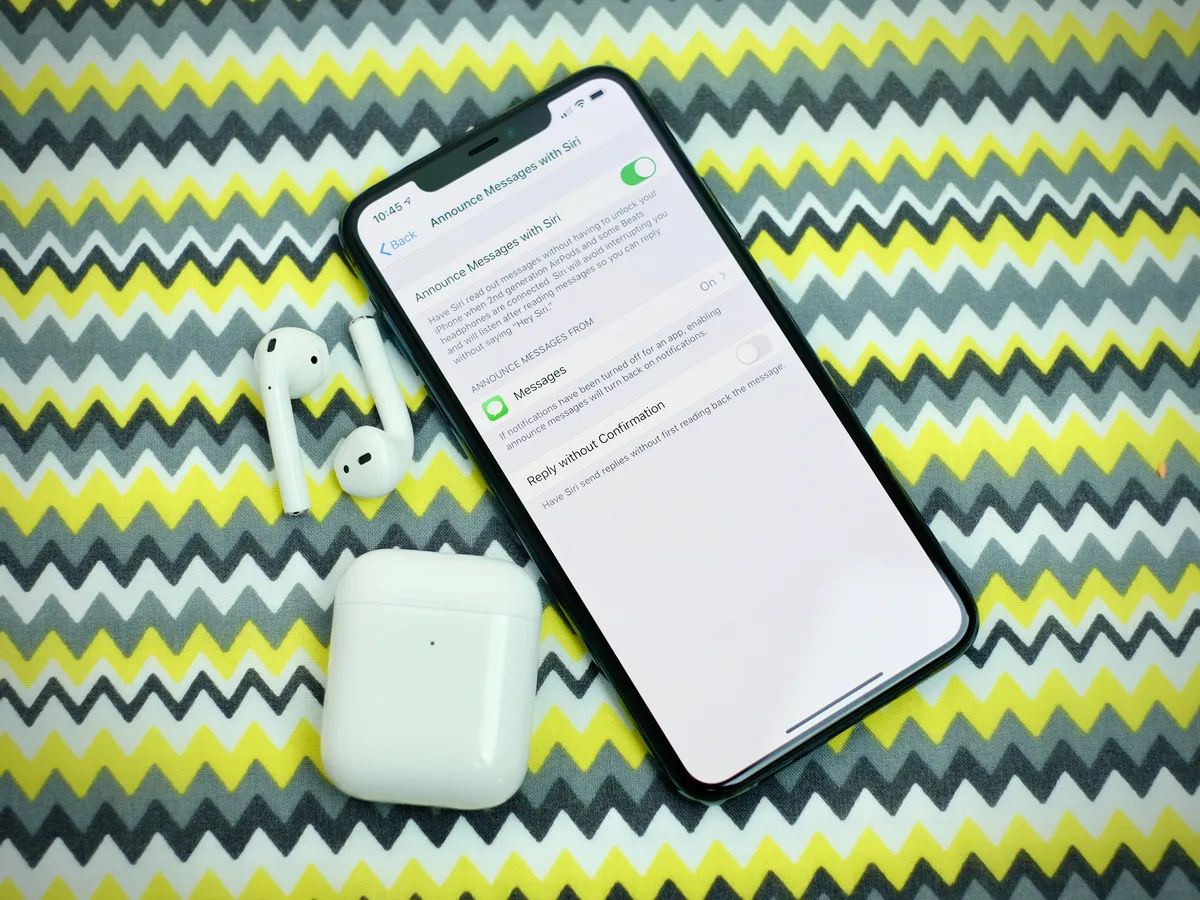
- In the AirPods settings page, you will find various options and configurations. Scroll down and look for the “Announce Messages” section.
- To turn off all announcements, tap on the “Announce Messages” option and select “Never.”
- If you only want to disable certain types of announcements, such as incoming calls or Siri requests, you can customize the settings by selecting the relevant options.
- Once you have made your desired selections, exit the Settings app and enjoy your AirPods without any interruptions.
By following these simple steps, you can easily customize the announcement settings on your AirPods according to your preferences. It’s worth noting that these settings are specific to the device you are using, so if you connect your AirPods to a different iPhone or iPad, you may need to repeat the process to disable announcements on that device as well.
Now that you know how to manage announcements on your iPhone or iPad, let’s explore another method to turn off announcements, this time using a Mac computer.
Method 2: Using Mac
If you frequently use your AirPods with your Mac computer, you can easily disable announcements by adjusting the system preferences. Here’s how:
- Make sure your AirPods are connected to your Mac computer by opening the lid of the AirPods case and placing them in your ears.
- Click on the Apple menu in the top-left corner of the screen and select “System Preferences.”
- In the System Preferences window, click on “Sound.”
- In the Sound settings, navigate to the “Sound Effects” tab.
- Here, you will find different options for system sound effects and alerts. Look for the “Play sound effects through” section.
- By default, it is set to “Internal Speakers.” To disable announcements on your AirPods, select the option for “Selected sound output device.”
- From the drop-down menu, choose your AirPods as the preferred sound output device.
- Close the System Preferences window, and your Mac will now route all sound effects, including announcements, through your AirPods.
With this simple adjustment, you can enjoy a more focused and uninterrupted audio experience on your Mac, free from announcements through your AirPods. Keep in mind that these settings are specific to your Mac, so if you use your AirPods with a different computer, you may need to repeat this process.
Now that you know how to disable announcements on your Mac, let’s move on to the next method using an Apple Watch.
Method 3: Using Apple Watch
If you often use your AirPods with your Apple Watch, you can easily turn off announcements by adjusting the settings on your watch. Here’s how:
- Ensure that your AirPods are connected to your Apple Watch by placing them in your ears.
- On your Apple Watch, open the Settings app by tapping on the icon with the gear symbol.
- Scroll down and tap on the “Sounds & Haptics” option.
- In the Sounds & Haptics settings, you will find the “Announce Messages” section.
- Tap on “Announce Messages” to access the different announcement options.
- To disable all announcements on your AirPods, select “Never.”
- If you want to customize the announcement settings further, you can choose other options such as “When Silent” or “Always” depending on your preference.
- Exit the Settings app, and your Apple Watch will no longer announce notifications or other messages through your AirPods.
With these simple steps, you can customize the announcement behavior of your AirPods when connected to your Apple Watch. Now you can enjoy a more peaceful and uninterrupted experience while wearing your AirPods and using your watch.
Now that you know how to manage announcements on your Apple Watch, let’s explore another method to turn off announcements using Siri.
Method 4: Using Siri
If you prefer a hands-free approach to managing your AirPods announcements, you can use Siri, Apple’s virtual assistant, to disable them. Here’s how:
- Ensure that your AirPods are connected to your device, whether it’s your iPhone, iPad, Mac, or Apple Watch.
- Activate Siri by saying, “Hey Siri,” or by holding down the Siri button, depending on your device.
- Once Siri is activated, simply say, “Turn off AirPods announcements.”
- Siri will process your request and disable all announcements on your AirPods.
Using Siri to turn off announcements on your AirPods is a quick and convenient method, particularly if you prefer using voice commands. This method works across different Apple devices as long as your AirPods are connected to them and Siri is enabled.
With these four methods, you now have multiple ways to turn off announcements on your AirPods. Whether you use your iPhone, iPad, Mac, Apple Watch, or rely on Siri, you have the flexibility to customize your listening experience and enjoy uninterrupted audio.
Now that you’ve learned how to disable announcements, go ahead and enjoy your AirPods exactly as you prefer, with a quieter and more personalized experience.
Conclusion
Managing announcements on your AirPods is a valuable feature that allows you to tailor your audio experience to your preferences. Whether you find the announcements repetitive, distracting, or simply unnecessary, you now have the knowledge and tools to turn them off.
In this guide, we explored four different methods for disabling announcements on your AirPods. From using your iPhone or iPad settings to adjusting the preferences on your Mac or Apple Watch, and even leveraging Siri, you have a variety of options at your disposal.
By following the step-by-step instructions in each method, you can easily customize the announcement settings on your AirPods according to your specific needs. Whether you prefer a quieter audio experience or simply want to eliminate the interruptions caused by announcements, these methods will help you achieve your desired outcome.
Remember that these settings are device-specific, so if you frequently use your AirPods with multiple devices, you may need to repeat the process on each device where you want to disable announcements.
Now, armed with the knowledge gained from this guide, enjoy a more seamless and uninterrupted listening experience with your AirPods. Whether you’re immersing yourself in music, podcasts, or any other audio content, you have the power to personalize your AirPods to suit your preferences.
Embrace the freedom of uninterrupted audio and make the most of your AirPods!