Introduction
YouTube has become a global platform for sharing and consuming video content. With millions of videos available in different languages, it’s important to ensure that your videos have accurate and high-quality subtitles to reach a wider audience. Translating YouTube subtitles can help you connect with viewers from different countries and cultures, expanding your reach and impact.
Translating YouTube subtitles might seem like a daunting task, but with the right steps and tools, it can be a straightforward process. In this article, we will guide you through the process of translating YouTube subtitles, allowing you to effectively communicate your message to a global audience.
Whether you want to translate your video subtitles from English to another language or vice versa, the following steps will help you accomplish this task with ease. We will cover everything from locating the subtitle file to editing and saving the translated version. So, let’s dive into the process and get started on translating your YouTube subtitles.
Note that while there are automated translation tools available, they may not always deliver accurate results. To ensure the highest quality translation, it is recommended to manually translate the subtitles or seek assistance from a professional translator.
By taking the time to translate your YouTube subtitles, you open the door to a larger audience and increase the accessibility of your content. So, let’s explore the step-by-step process of translating YouTube subtitles and bring your videos to a global audience.
Step 1: Finding the subtitle file
Before you can start translating your YouTube subtitles, you need to locate the subtitle file associated with your video. YouTube provides an option to generate automatic subtitles for your videos, which can be used as a starting point for translation.
To find the subtitle file for your video, follow these steps:
- Open YouTube and sign in to your account.
- Navigate to the video for which you want to translate subtitles.
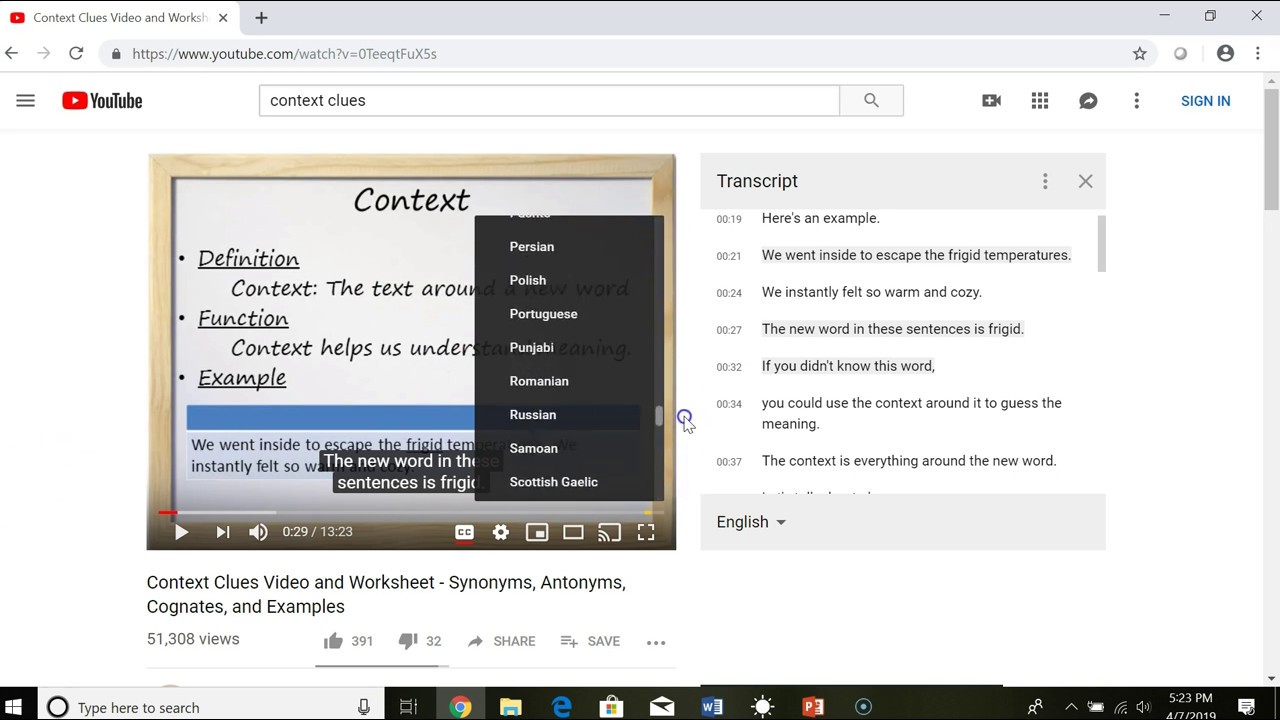
- Click on the three-dot menu icon below the video player and select “Open transcript.”
- A side panel will appear, displaying the autogenerated subtitles.
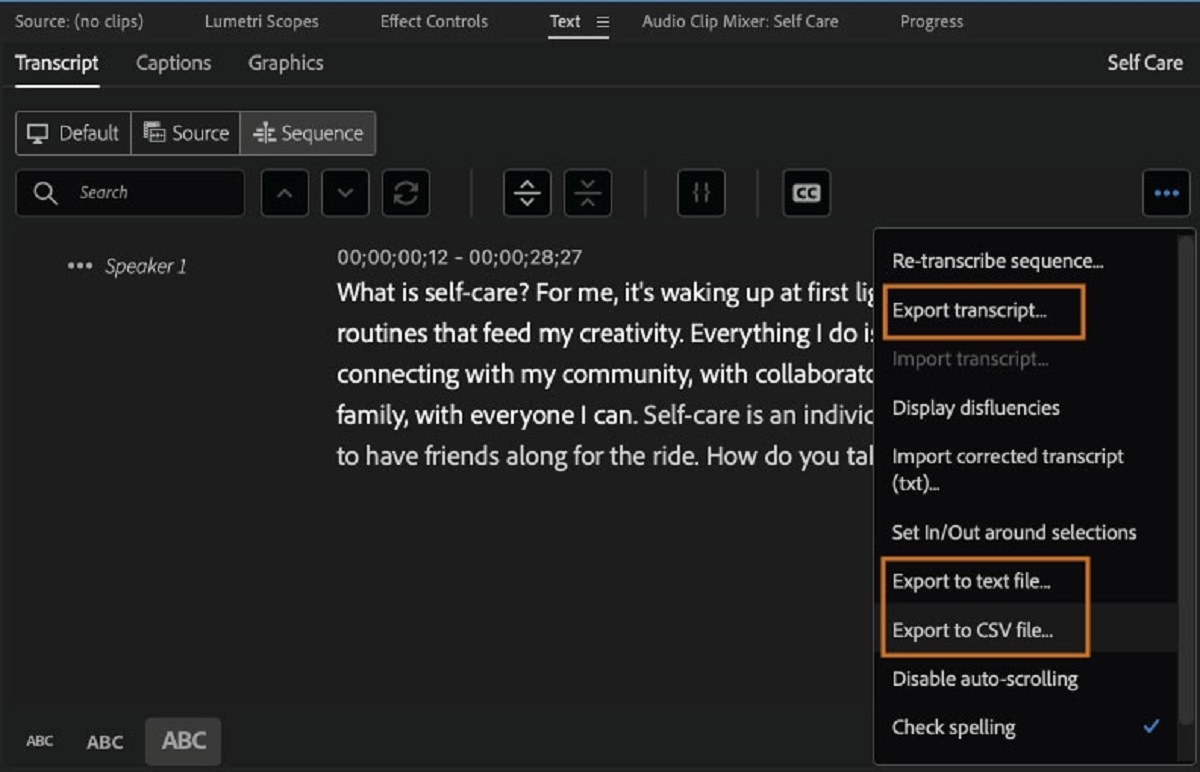
- Click on the three-dot menu icon in the top right corner of the side panel.
- Select “Export transcript.”
- Choose the format in which you want to download the subtitle file (e.g., .srt, .vtt).
- Save the subtitle file to your computer.
Once you have successfully exported the subtitle file, you are ready to proceed to the next step of translating your YouTube subtitles.
It is worth noting that if you already have a translated subtitle file in a format compatible with YouTube (.srt or .vtt), you can skip this step and directly move on to editing the translated subtitle file.
In this step, we discussed how to find and export the subtitle file from YouTube. The exported file will serve as the foundation for translating your YouTube subtitles. Let’s move on to the next step, where we will guide you through the process of downloading the subtitle file to your computer.
Step 2: Downloading the subtitle file
Now that you have identified and exported the subtitle file from YouTube, the next step is to download it to your computer. By having the subtitle file readily available, you can easily translate and edit it before uploading it back to YouTube.
Here’s how you can download the subtitle file:
- Locate the exported subtitle file on your computer. It should be saved in the format you chose during the export process (.srt or .vtt).
- Click on the file to open it. You can use a text editor or specialized subtitle editing software to access the contents of the file.
- Review the subtitle file to ensure that the text accurately represents the speech in your video. Make any necessary changes or corrections if needed.
- Save the subtitle file to your computer. It is recommended to create a separate folder to store all the files associated with your translated subtitles for organizational purposes.
By downloading and saving the subtitle file to your computer, you now have the necessary file to start the translation process. In the following steps, we will guide you through translating and editing the subtitle file to ensure accuracy and clarity in your translated subtitles.
In this step, we discussed how to download the subtitle file from YouTube and save it to your computer. The downloaded file will serve as the base for translating and editing your YouTube subtitles. Let’s move on to the next step, where we will explore the process of translating the subtitle file into the desired language.
Step 3: Translating the subtitle file
With the subtitle file downloaded and ready for translation, it’s time to start the process of translating the subtitles into the desired language. While there are various methods and tools available, we will focus on a manual approach for accurate and reliable translation.
Here’s how you can translate the subtitle file:
- Open the subtitle file using a text editor or specialized subtitle editing software.
- Read the source language subtitles and translate each line into your target language. Ensure that the translation accurately captures the meaning and context of the original subtitles.
- While translating, be mindful of the length and timing of the subtitles. Try to keep the translated text concise and within a similar time frame as the original subtitles to maintain synchronization with the video.
- Continue translating each line until you have completed the entire subtitle file.
It’s important to note that translation accuracy is crucial in maintaining the integrity and message of your video. If you’re not fluent in the target language or require professional assistance, consider hiring a translator to ensure the highest translation quality.
By manually translating the subtitle file, you have control over the accuracy and quality of the translation. Now, let’s move on to the next step, where we will discuss how to edit the translated subtitle file to refine the translated subtitles.
In this step, we explored the process of translating the subtitle file. By following these steps, you can ensure that your translated subtitles accurately convey the message of your video. Let’s proceed to the next step, where we will guide you through editing the translated subtitle file.
Step 4: Editing the translated subtitle file
After translating the subtitle file, the next step is to edit and refine the translated subtitles. This step is crucial to ensure that the subtitles are properly formatted, grammatically correct, and synchronized with the video.
To edit the translated subtitle file, follow these guidelines:
- Open the translated subtitle file using a text editor or specialized subtitle editing software.
- Review each translated subtitle line by line to check for any errors, typos, or inconsistencies.
- Ensure that the translated subtitles are properly formatted, with each subtitle line starting and ending at an appropriate time for smooth playback.
- Adjust the timing of the subtitles if necessary to maintain synchronization with the video. This step is especially important if the translated text differs in length from the original subtitles.
- Check for any linguistic or cultural nuances in the translation that may require further refinement or adaptation.
- Make any necessary edits to the translated subtitle file, including grammar, punctuation, and formatting, to enhance readability and comprehension.
By carefully editing the translated subtitle file, you can ensure that the subtitles accurately represent the intended message of your video. This step plays a significant role in delivering a seamless and enjoyable viewing experience for your audience.
Once you have finished editing the translated subtitle file, you are ready to save the file and prepare it for uploading back to YouTube. In the next step, we will guide you through the process of saving the translated subtitle file in the appropriate format.
In this step, we discussed how to edit the translated subtitle file. By following these guidelines, you can refine and improve the accuracy and quality of your translated subtitles. Let’s move on to the next step, where we will explore how to save the translated subtitle file.
Step 5: Saving the translated subtitle file
After editing and refining the translated subtitle file, it’s time to save the file in the appropriate format for uploading it back to YouTube. By following this step, you will have a finalized and ready-to-use subtitle file in the desired language.
Here’s how you can save the translated subtitle file:
- Open the edited subtitle file using a text editor or specialized subtitle editing software.
- Ensure that all changes and edits have been applied accurately and thoroughly reviewed.
- Click on the “Save” or “Save As” option in the text editor or subtitle editing software to save the file.
- Choose the appropriate file format for the translated subtitle file, typically .srt or .vtt.
- Name the file descriptively and consider including the language code as part of the file name for easy identification.
- Save the translated subtitle file to a location on your computer, preferably in a dedicated folder for organizing your translated subtitles.
By saving the translated subtitle file, you now have a completed subtitle file in the desired language, ready for upload to YouTube. The saved file will preserve all the necessary formatting, timings, and translations that you have applied during the previous steps.
Now that you have successfully saved the translated subtitle file, you can proceed to the final steps of adding the translated subtitles to your YouTube video and adjusting their timing, which we will discuss in the upcoming steps.
In this step, we explored how to save the translated subtitle file. By following these steps, you can ensure that your translated subtitles are saved in the appropriate format, ready for uploading to YouTube. Let’s move on to the next step, where we will guide you through the process of adding the translated subtitle file to YouTube.
Step 6: Adding the translated subtitle file to YouTube
Now that you have the translated subtitle file saved, it’s time to add it to your YouTube video. By adding the translated subtitles, you make your video accessible to a wider audience, allowing viewers who may not understand the original language to engage with your content.
Here’s how you can add the translated subtitle file to your YouTube video:
- Open YouTube and sign in to your account.
- Navigate to the YouTube Studio dashboard by clicking on your profile picture in the top right corner and selecting “YouTube Studio” from the dropdown menu.
- In the left sidebar, click on “Videos” to view a list of your uploaded videos.
- Locate the video to which you want to add the translated subtitles and click on its title.
- In the top menu, click on the “Subtitles” tab.
- Click on the “Add language” button and select the language of the translated subtitles.
- Choose the option to upload the subtitle file, and click on the “Upload file” button.
- Select the translated subtitle file from your computer and click on “Open” to start the upload process.
- YouTube will process the subtitle file and add it to your video. Once the process is complete, you can preview and adjust the timing of the subtitles if necessary.
- Click on the “Save” button to finalize the addition of the translated subtitles to your YouTube video.
By adding the translated subtitle file to your YouTube video, you have made it easier for viewers from different language backgrounds to engage with your content. The translated subtitles will enhance accessibility and ensure that your message reaches a global audience.
In the next step, we will discuss how to adjust the timing of the translated subtitles to ensure proper synchronization with your video. Let’s move on to the following step and explore this process in detail.
In this step, we discussed how to add the translated subtitle file to your YouTube video. By following these steps, you can successfully include the translated subtitles and make your video more accessible to viewers from different language backgrounds. Let’s move on to the next step, where we will guide you through adjusting the timing of the translated subtitles.
Step 7: Adjusting the timing of the translated subtitles
After adding the translated subtitle file to your YouTube video, it’s important to ensure that the timing of the subtitles aligns correctly with the audio and visuals. This step will guarantee that viewers can effectively understand and follow along with the translated text.
Here’s how you can adjust the timing of the translated subtitles:
- Select the video on YouTube to which you have added the translated subtitles.
- Navigate to the “Subtitles” tab in the top menu.
- Choose the language of the translated subtitles from the available options.
- Click on the “Edit” button next to the translated subtitle file.
- A text editor will open, displaying the subtitle file’s content along with a timeline.
- Review each subtitle line and adjust their start and end times as needed.
- Drag the subtitle lines on the timeline to synchronize them with the audio and visuals of the video.
- Ensure that each subtitle line appears and disappears at the appropriate moments.
- Make any necessary modifications to the subtitle text, such as spelling or grammatical corrections.
- Save the changes and exit the text editor.
By carefully adjusting the timing of the translated subtitles, you ensure that viewers can read the subtitles at the intended moments, enhancing their understanding and engagement with your video.
Once you have adjusted the timing of the translated subtitles, take the time to preview the video to ensure that the subtitles display correctly and are synchronized with the audio and visuals. Make any necessary adjustments until you are satisfied with the final result.
With the timing of the translated subtitles properly adjusted, you have successfully completed the process of translating and adding subtitles to your YouTube video. Your video is now more accessible to viewers from different language backgrounds, expanding your reach and impact.
In this step, we discussed how to adjust the timing of the translated subtitles. By following these steps, you can ensure that your translated subtitles are synchronized effectively with your video. Congratulations! You have successfully completed all the steps necessary to translate subtitles for your YouTube video.
Conclusion
Translating YouTube subtitles is a valuable process that allows you to connect with a global audience and make your videos accessible to viewers from different language backgrounds. By following the steps outlined in this article, you can effectively translate and add subtitles to your YouTube videos.
We began by finding the subtitle file associated with your video and downloading it to your computer. Then, we discussed the process of translating the subtitle file manually, ensuring accuracy and quality in the translation. After translating the subtitles, we moved on to editing the translated subtitle file to refine the subtitles and ensure proper formatting and synchronization.
Once the editing was complete, we saved the translated subtitle file in the appropriate format for uploading it back to YouTube. Adding the translated subtitle file to your YouTube video enhances accessibility and allows viewers to engage with your content in their native language.
Finally, we explored the importance of adjusting the timing of the translated subtitles to ensure synchronization with the audio and visuals of your video. By making these adjustments, you create a seamless viewing experience for your audience.
Remember, while automated translation tools can be convenient, they often lack accuracy. It is recommended to manually translate and edit your subtitles or seek professional assistance to ensure the highest quality translation.
Incorporating translated subtitles into your YouTube videos can greatly expand your reach and impact on an international level. By taking the time to translate and add subtitles, you open the door to a wider audience and foster greater engagement with your content.
So, don’t hesitate to start translating your YouTube subtitles today. By following the steps outlined in this article and keeping your audience’s needs in mind, you can effectively communicate your message to viewers around the world.