Introduction
Welcome to our guide on how to transfer DVR recordings to an external hard drive. If you’re a fan of recording your favorite shows, movies, or sports events to watch later, you may have run into the frustrating issue of limited storage space on your DVR. Fortunately, by transferring your DVR recordings to an external hard drive, you can free up space, create a backup, and even enjoy your shows on other devices.
In this article, we will walk you through the process of transferring DVR recordings to an external hard drive, step by step. We will also explore the benefits of this method and provide alternative solutions for those who may encounter any issues along the way.
Before we dive into the details, it’s essential to note that not all DVRs support the direct transfer of recordings to an external hard drive. Some cable or satellite providers may have restrictions on this feature, so it’s worth checking with your service provider first. However, if your DVR does support it, you’re in luck!
Transferring your DVR recordings to an external hard drive offers numerous advantages. Firstly, it helps you reclaim valuable storage space on your DVR, allowing you to keep recording more content without having to delete your favorite shows. Additionally, transferring recordings to an external hard drive provides a backup in case your DVR malfunctions or loses data.
Furthermore, having your DVR recordings on an external hard drive enables you to watch your shows and movies on other devices like computers, smart TVs, or media players. This flexibility allows you to enjoy your favorite content wherever and whenever you want, without being tied to the limitations of your DVR.
Now that we understand the benefits let’s discuss what you need to consider before transferring your DVR recordings to an external hard drive.
Benefits of Transferring DVR Recordings to an External Hard Drive
Transferring DVR recordings to an external hard drive comes with several advantages that can enhance your television viewing experience. Let’s explore some of the key benefits:
1. Expanded Storage Capacity: One of the primary benefits of transferring DVR recordings to an external hard drive is the ability to expand your storage capacity. DVRs often have limited internal storage, which can quickly fill up with recorded shows and movies. By offloading recordings to an external hard drive, you can significantly increase your available storage space and continue capturing your favorite content without worrying about running out of room.
2. Backup and Data Preservation: Another crucial benefit of transferring DVR recordings to an external hard drive is creating a backup of your valuable content. DVRs are electronic devices that can experience malfunctions or data loss, potentially resulting in permanent deletion of your recordings. By regularly backing up your recordings to an external hard drive, you can protect against such incidents, ensuring that your favorite shows and movies are safely stored and easily recoverable.
3. Portability and Flexibility: Transferring DVR recordings to an external hard drive gives you the freedom to watch your content on various devices. Whether you want to enjoy your shows on a different television, share them with friends or family, or take them on the go, an external hard drive allows you to do so. Simply connect the hard drive to a compatible device, and you’ll have instant access to your recorded content without the need for a DVR.
4. Improved Organization and Accessibility: Managing DVR recordings can sometimes be a hassle, especially when you have a large number of recordings saved. By transferring your recordings to an external hard drive, you can easily organize them into folders and subfolders, making it simpler to find and access specific shows or movies. This level of organization not only saves you time but also enhances your overall viewing experience.
5. Time-Shifting Capabilities: With DVR recordings on an external hard drive, you can take full advantage of the time-shifting capabilities. You have the freedom to pause, rewind, fast-forward, and even skip commercials when watching your recorded content from an external hard drive. This flexibility allows you to have a more personalized and enjoyable TV viewing experience.
By taking advantage of these benefits, you can make the most out of your DVR recordings and enhance your overall entertainment experience. Now let’s delve into the essential factors to consider before transferring your DVR recordings to an external hard drive.
Things to Consider Before Transferring DVR Recordings
Before you embark on the process of transferring your DVR recordings to an external hard drive, there are a few important factors to keep in mind. These considerations can help ensure a smooth and successful transfer without any unexpected issues. Let’s take a closer look:
1. DVR Compatibility: Not all DVRs support the direct transfer of recordings to an external hard drive. It’s crucial to check with your DVR’s manufacturer or service provider to verify whether or not your DVR is compatible with this feature. Additionally, ensure that your DVR has USB or eSATA ports, as these are typically needed to connect an external hard drive.
2. External Hard Drive Format: The format of your external hard drive plays a significant role in compatibility with your DVR. Most DVRs require an external hard drive to be formatted in a specific file system, such as FAT32 or NTFS. Check your DVR’s documentation or contact customer support to determine the recommended file system for the external hard drive.
3. Storage Capacity: Consider the storage capacity of the external hard drive you plan to use. This will depend on your recording habits and the amount of content you wish to transfer. Calculate the approximate size of your DVR recordings and ensure that the external hard drive has sufficient space to accommodate them all.
4. Data Loss: While transferring DVR recordings to an external hard drive provides a backup option, it’s essential to acknowledge that there is still a risk of data loss. Hard drives can fail or become damaged, so it’s wise to regularly back up your recordings to multiple devices or consider cloud storage as an additional precaution.
5. Copyright and Licensing: Before transferring DVR recordings, it’s essential to understand any copyright or licensing restrictions that may apply. Some shows or movies may have limitations on how they can be stored, copied, or shared. Make sure you comply with any legal obligations and restrictions to avoid any potential issues.
6. Time and Effort: Transferring DVR recordings to an external hard drive can be a time-consuming process, especially if you have a large number of recordings. Be prepared to invest the necessary time and effort to complete the transfer successfully. Additionally, familiarize yourself with the specific steps and procedures required by your DVR manufacturer to ensure a smooth transfer process.
Considering these factors before transferring DVR recordings will help you avoid any potential issues and make the transfer process as seamless as possible. In the following sections, we will provide a step-by-step guide to transferring DVR recordings, offering an alternative method and troubleshooting tips to address common issues that may arise along the way.
Step-by-Step Guide to Transferring DVR Recordings to an External Hard Drive
Transferring DVR recordings to an external hard drive may vary depending on the make and model of your DVR. However, the following step-by-step guide will provide you with a general overview of the process:
Step 1: Verify DVR Compatibility: Before you begin, confirm that your DVR supports the transfer of recordings to an external hard drive. Check the user manual or contact customer support if you are unsure.
Step 2: Format the External Hard Drive: If your DVR requires a specific file system format, connect the external hard drive to a computer and format it accordingly. Ensure that all existing data on the external hard drive is backed up, as formatting will erase all existing content.
Step 3: Prepare the External Hard Drive: Once formatted, disconnect the external hard drive from the computer and connect it to your DVR using the appropriate port (USB or eSATA).
Step 4: Access the DVR Menu: With the external hard drive connected, access the main menu of your DVR. Look for an option related to transferring or exporting recordings.
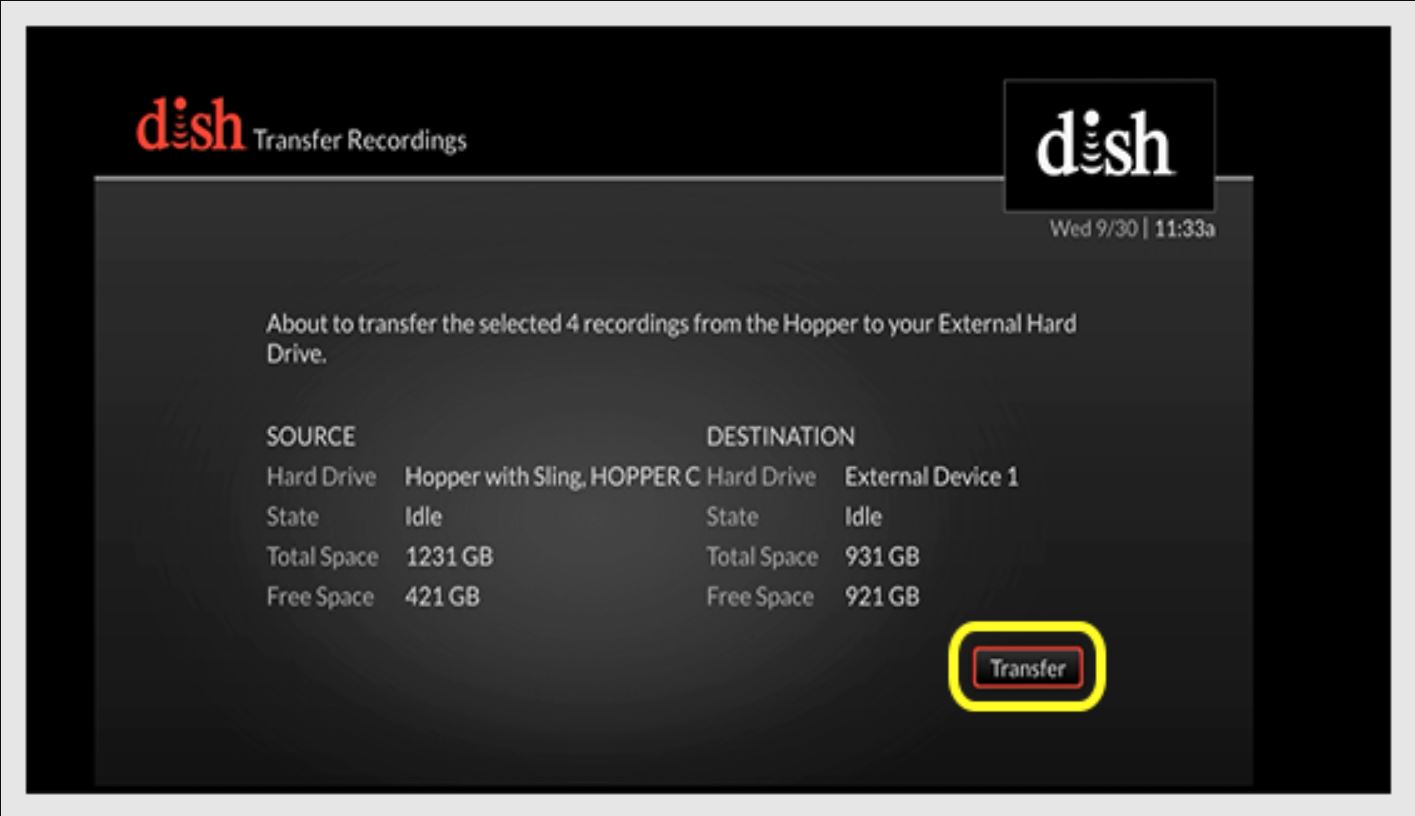
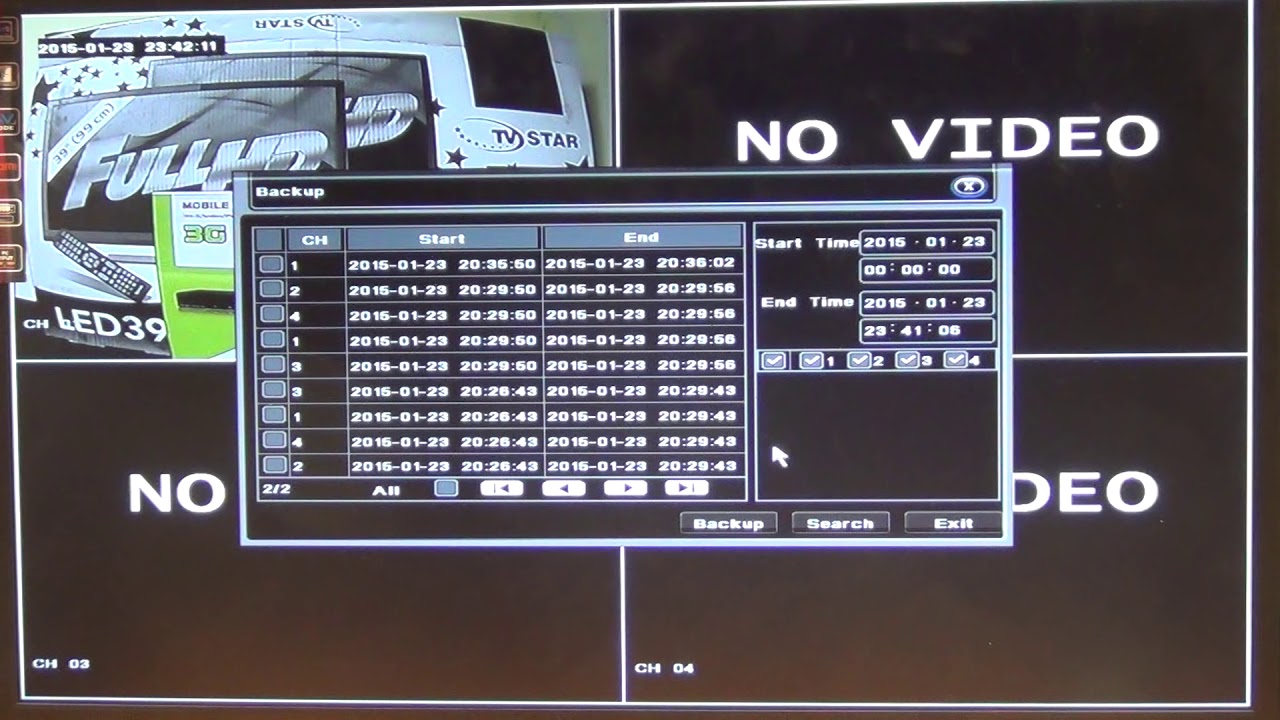
Step 5: Select Recordings to Transfer: In the DVR menu, choose the specific recordings you want to transfer to the external hard drive. You may have the option to select individual recordings or entire folders.
Step 6: Initiate the Transfer: Once you have made your selection, initiate the transfer process. This may involve pressing a specific button on your DVR remote or selecting an option within the menu.
Step 7: Monitor the Transfer Progress: While the recordings are being transferred, monitor the progress on your DVR screen. This will give you an estimate of the time remaining for the transfer to complete.
Step 8: Disconnect the External Hard Drive: Once the transfer is complete, safely disconnect the external hard drive from the DVR. Follow the recommended procedure to avoid data loss or damage to the hard drive.
Step 9: Connect External Hard Drive to Playback Device: Connect the external hard drive to a compatible device, such as a computer, smart TV, or media player, to access and play the transferred recordings. Ensure that the playback device supports the file format of the recordings.
Step 10: Enjoy Your DVR Recordings: Sit back, relax, and enjoy your DVR recordings that are now conveniently stored on the external hard drive. You can watch them at your convenience on the connected playback device, without the need for a DVR.
Keep in mind that these steps provide a general guideline, and the exact process may vary depending on your DVR model and manufacturer. Consult your DVR’s user manual or contact customer support for specific instructions tailored to your device.
Alternative Methods to Transfer DVR Recordings
If your DVR does not support transferring recordings directly to an external hard drive, or if you encounter any issues during the process, don’t worry! There are alternative methods you can try to transfer your DVR recordings. Let’s explore a few of these options:
1. DVD Recorder: If your DVR has analog video output ports, you can connect it to a DVD recorder using RCA or S-Video cables. Simply play the recordings on your DVR and simultaneously record them onto a DVD using the DVD recorder. Once the recordings are burned onto the DVD, you can play them on any DVD player or computer with a DVD drive.
2. Video Capture Device: Another alternative is to use a video capture device connected to your DVR and computer. This method involves connecting the video output of your DVR to the video input of the capture device. You can then use specialized software to record the DVR playback directly onto your computer’s hard drive. Once transferred, you can store and play the recordings as desired.
3. Network Streaming: Some DVRs offer the option to stream recordings to other devices over a local network. By connecting your DVR and a compatible device, such as a smart TV or media player, to the same network, you can access and watch your DVR recordings on the connected device. This method eliminates the need for physical transfer and allows for convenient playback on different screens.
4. Cloud Storage: If your DVR and service provider offer cloud storage options, you can consider uploading your recordings to the cloud. This method allows you to access your DVR recordings from multiple devices with an internet connection. However, keep in mind that cloud storage may come with storage limitations and potentially incur additional costs.
5. Transfer via USB or eSATA: While not all DVRs support direct transfer to an external hard drive, some models may allow you to connect a USB or eSATA drive and copy recordings manually. Check your DVR’s user manual or contact customer support to determine if this feature is available and the specific steps for transferring recordings via USB or eSATA.
These alternative methods provide you with options to transfer and access your DVR recordings, giving you more flexibility and convenience. Experiment with these methods and choose the one that best suits your needs and the capabilities of your DVR. Always refer to your DVR’s documentation or reach out to customer support for detailed instructions and troubleshooting tips specific to your device.
Troubleshooting Common Issues with Transferring DVR Recordings
While transferring DVR recordings to an external hard drive can be a straightforward process, you may encounter some common issues along the way. Here are solutions to a few troubleshooting scenarios that you might face:
1. Incompatible File System: If your DVR indicates that the external hard drive is incompatible or cannot recognize the file system, you may need to reformat the drive. Make sure to backup any existing data, connect the drive to a computer, and format it using the recommended file system (e.g., FAT32 or NTFS) specified by your DVR.
2. Recording Protection: Some DVRs have an option to protect certain recordings from being transferred or deleted. If you encounter a message indicating that a recording is protected, go into your DVR’s menu and disable the protection for that specific recording before attempting to transfer it again.
3. Insufficient Storage Space: If the external hard drive does not have enough space to accommodate all the desired recordings, prioritize or delete unnecessary content. Alternatively, consider using multiple external hard drives or transferring recordings in smaller batches to ensure you have enough space for all your recordings.
4. Slow Transfer Speed: If the transfer process is slower than expected, ensure that you are using a high-speed USB or eSATA connection between your DVR and the external hard drive. Also, check if there are any background processes or applications running on your DVR that may be impacting the transfer speed.
5. Playback Issues: If your transferred recordings do not play back properly on the connected device, verify that the playback device supports the file format of the recordings. If not, consider converting the recordings to a compatible format using video conversion software.
6. Firmware Updates: Check if your DVR’s firmware is up to date. Outdated firmware may cause compatibility issues with certain external hard drives or result in errors during the transfer process. Visit the manufacturer’s website or consult the user manual for instructions on updating the firmware.
7. Seek Technical Support: If you have followed all the recommended steps and troubleshooting solutions but still encounter issues, it may be best to contact your DVR’s customer support for further assistance. They can provide specific guidance tailored to your device and help troubleshoot any complex problems you may be facing.
Remember, troubleshooting situations may vary depending on your DVR’s make and model. Always refer to your DVR’s documentation, reach out to customer support, or explore online forums for additional support and guidance specific to your DVR.
Conclusion
In conclusion, transferring DVR recordings to an external hard drive can be an excellent solution for expanding storage capacity, creating backups, and enjoying your favorite shows and movies on various devices. While the process may differ slightly depending on your DVR model and manufacturer, the general steps involve verifying compatibility, formatting the external hard drive, selecting and transferring recordings, and connecting the external hard drive to a playback device.
However, if your DVR doesn’t support direct transfer, or if you encounter any complications along the way, alternative methods like using a DVD recorder, video capture device, network streaming, or cloud storage can come to the rescue. These options provide flexibility and allow you to access your DVR recordings in different ways.
It’s crucial to consider factors such as DVR compatibility, storage capacity, file system formats, data loss prevention, copyright restrictions, and the time and effort required before proceeding with the transfer process. Being aware of these considerations will ensure a smoother experience and prevent any unexpected issues.
If you encounter common problems during the transfer, such as incompatible file systems, recording protection, insufficient storage space, slow transfer speeds, playback issues, or firmware updates, troubleshooting steps can help resolve these issues. And if all else fails, reaching out to your DVR’s customer support can provide expert assistance for your specific device.
By following this step-by-step guide, considering the key factors, and exploring alternative methods and troubleshooting tips, you’ll be well-prepared to embark on the journey of transferring your DVR recordings to an external hard drive successfully.
We hope this guide has been helpful in empowering you to make the most of your DVR recordings and enhance your television viewing experience. Happy transferring and enjoy your favorite shows and movies at your convenience!