Introduction
Have you ever recorded your favorite shows and movies on your DirecTV DVR and wished you could easily transfer them to an external hard drive for safekeeping or additional storage? Well, you’re in luck! In this article, we will guide you through the process of copying content from your DirecTV DVR to an external hard drive.
With the ability to transfer your recorded content, you can free up space on your DVR, eliminate the fear of losing your recordings, and even take your favorite shows and movies with you when you’re on the go. Whether you want to create a backup of your recordings or simply enjoy them on other devices, this step-by-step guide will help you accomplish your goal.
Before we dive into the steps, it’s important to note that while the process may vary slightly depending on your specific DirecTV DVR model, the general principles remain the same. So, let’s gather the necessary tools and get started on this exciting endeavor to unlock the full potential of your DirecTV DVR!
Requirements
Before you begin, make sure you have the following items:
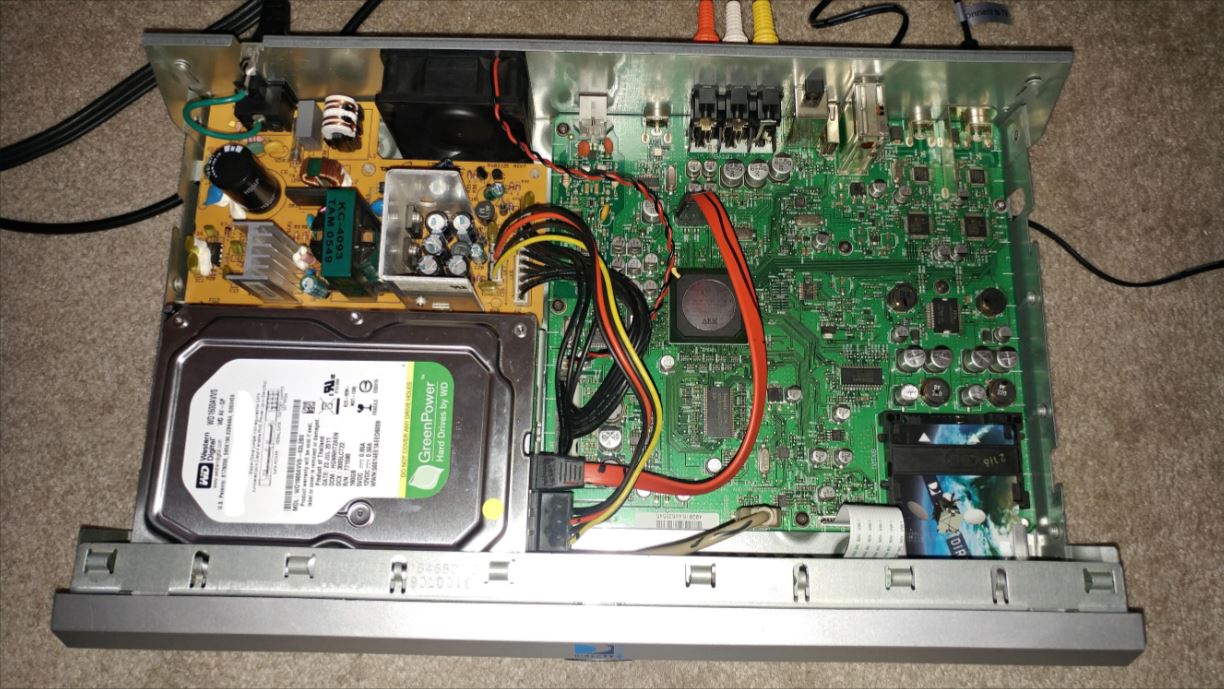
- A DirecTV DVR: You’ll need a DVR from DirecTV, such as Genie HD DVR or HR24, to be able to copy content to an external hard drive. Check the model of your DVR to ensure compatibility.
- An External Hard Drive: Choose a high-capacity external hard drive that is compatible with your DirecTV DVR. Look for a drive with USB connectivity and ample storage to accommodate your recordings.
- USB Cable: Depending on the model of your external hard drive, you may need a USB cable to connect it to your DirecTV DVR. Ensure you have the appropriate cable on hand.
- Power Supply: Some external hard drives require an external power supply, so check if your chosen drive needs one. If so, make sure you have the power supply ready.
- Remote Control: Keep your DirecTV DVR remote control within reach. You’ll need it to navigate the DVR menu and initiate the transfer process.
- Valid DirecTV Account: Ensure that your DirecTV account is active and in good standing. You’ll need access to your account settings to enable the external hard drive transfer feature.
Once you have gathered all the necessary items, you’re ready to proceed with the steps to copy content from your DirecTV DVR to an external hard drive. Go ahead and set up your equipment accordingly, and let’s get started on this exciting journey!
Step 1: Connecting the External Hard Drive to the DirecTV DVR
The first step in transferring content from your DirecTV DVR to an external hard drive is to establish a physical connection between the two devices. Follow these simple steps:
- Make sure your DirecTV DVR is turned off. Locate the USB port on the back of the DVR. It is typically labeled as “USB” or indicated with a corresponding icon.
- Connect one end of the USB cable to the USB port on your DVR.
- Connect the other end of the USB cable to the USB port on your external hard drive. Ensure a secure connection is established.
- If your external hard drive requires an external power supply, connect it to a power source. Make sure the power supply is compatible with your hard drive and functioning properly.
- Power on your DirecTV DVR and wait for it to go through the startup process. Your DVR should detect the connected external hard drive.
- If prompted on your TV screen, follow the on-screen instructions to format the external hard drive. Formatting the drive prepares it for use with your DVR and ensures compatibility.
Once the connection is established and the external hard drive is formatted, you’re ready to move on to the next step: copying content from your DirecTV DVR to the external hard drive. Stay tuned for the upcoming section to learn how to transfer your recordings seamlessly!
Step 2: Formatting the External Hard Drive
After connecting the external hard drive to your DirecTV DVR, the next step is to format the drive. This process prepares the external hard drive for use with your DVR and ensures compatibility. Follow these steps to format your external hard drive:
- On your TV screen, navigate to the menu options on your DirecTV DVR using the remote control. Look for the “Settings” or “Menu” option and select it.
- Within the menu, locate the “External Hard Drive” or “Storage” option. Select it to access the settings related to your connected external hard drive.
- Find the “Format” or “Format Drive” option and select it. This will initiate the formatting process for your external hard drive.
- Wait patiently as the formatting process can take some time, depending on the size of your hard drive. Avoid interrupting the process or turning off the DVR during formatting to prevent any potential issues.
- Once the formatting is complete, you will receive a confirmation message on your TV screen. Your external hard drive is now ready to be used with your DirecTV DVR.
It’s important to note that formatting the external hard drive will erase all the existing data on the drive. Therefore, make sure to back up any important data before proceeding with the formatting process.
With the external hard drive now formatted, you are one step closer to copying content from your DirecTV DVR. In the next section, we will guide you through the process of transferring your recordings seamlessly to the external hard drive. Stay tuned!
Step 3: Copying Content from the DirecTV DVR to the External Hard Drive
Now that you have successfully connected and formatted your external hard drive, it’s time to transfer the desired content from your DirecTV DVR. Follow these steps to copy your recordings onto the external hard drive:
- Using your DirecTV remote control, navigate to the menu options on your DVR. Look for the “Recordings”, “My Playlist”, or similar option and select it.
- Browse through your recorded content and locate the specific show, movie, or episode you want to copy to the external hard drive.
- Select the recording you wish to transfer. You may need to press a button on your remote control, such as “Options” or “More Info”, to access additional settings.
- In the options menu, look for the “Copy” or “Transfer” option and select it. This will initiate the process of copying the selected recording to the external hard drive.
- Wait patiently as the transfer process takes place. Depending on the size of the recording, it may take a few minutes to complete. Avoid interrupting the process or turning off the DVR during this time.
- Once the transfer is complete, you will receive a confirmation message on your TV screen. The selected recording has now been successfully copied to the external hard drive.
- If you have more recordings you want to copy, repeat the steps for each desired recording.
It’s important to note that not all recordings may be eligible for copying due to copyright restrictions or other limitations set by the content provider. In such cases, you may receive an error message or the “Copy” option may be disabled.
With the ability to copy your desired recordings to the external hard drive, you can now enjoy your favorite shows and movies on other devices or simply free up space on your DirecTV DVR. In the next step, we will guide you on safely disconnecting the external hard drive from your DVR.
Step 4: Disconnecting the External Hard Drive from the DirecTV DVR
Once you have successfully copied the desired content from your DirecTV DVR to the external hard drive, it’s important to follow the proper procedure for disconnecting the drive. Here’s how you can safely disconnect the external hard drive from your DVR:
- Using your DirecTV remote control, navigate to the menu options on your DVR. Look for the “Settings” or “Menu” option and select it.
- Within the menu, locate the “External Hard Drive” or “Storage” option. Select it to access the settings related to your connected external hard drive.
- Find the “Eject” or “Disconnect” option and select it. This will safely disconnect the external hard drive from your DVR.
- Once you receive the confirmation message on your TV screen, it is safe to physically disconnect the USB cable from both the DVR and the external hard drive.
- Store the external hard drive in a safe place to protect it from any potential damage or data loss.
It’s important to note that abruptly disconnecting the external hard drive without following the proper procedure may result in data loss or damage to the drive. Always ensure that you eject or disconnect the drive through the DVR settings before physically unplugging it.
By safely disconnecting the external hard drive, you have completed all the necessary steps to transfer and store your recordings. Now you can enjoy your favorite shows and movies from the external hard drive or use it as a backup for your valuable content.
Congratulations on successfully copying your content from the DirecTV DVR to an external hard drive. You have unlocked a whole new level of convenience and flexibility with your recorded media. Feel free to explore more possibilities and make the most out of your DirecTV DVR and external hard drive combination!
Conclusion
Transferring content from your DirecTV DVR to an external hard drive opens up a world of possibilities. Whether you want to free up space on your DVR, create a backup of your recordings, or take your favorite shows and movies with you on the go, this step-by-step guide has provided you with the necessary instructions.
We started by connecting the external hard drive to the DirecTV DVR, ensuring a secure and compatible setup. Then, we went through the process of formatting the drive, preparing it for use with the DVR. Once the formatting was complete, we moved on to copying content from the DVR to the external hard drive, allowing you to enjoy your recordings on other devices or create a backup for future viewing.
Finally, we discussed the importance of safely disconnecting the external hard drive from the DVR to avoid any potential data loss or damage. By following these steps, you have successfully harnessed the power of your DirecTV DVR and external hard drive combination.
Now, you have the freedom to manage your recordings, create a personal media library, and enjoy your favorite content whenever and wherever you desire. Whether you’re traveling, have limited DVR space, or simply want to keep your recordings safe, the ability to transfer content to an external hard drive offers unparalleled convenience.
Remember, compatibility and copyright restrictions may apply when transferring recordings. Some content may not be eligible for copying, so be mindful of any limitations set by the content provider.
By following the steps outlined in this guide, you can unleash the full potential of your DirecTV DVR and external hard drive, revolutionizing the way you manage and enjoy your favorite shows and movies. So, go ahead and start exploring the possibilities that await you!