Introduction
Do you have important files stored on your computer that you want to back up to an external hard drive? Are you looking for a simple and efficient way to copy files in DOS to an external hard drive? In this article, we will guide you through the process of copying files from your computer to an external hard drive using DOS commands.
DOS (Disk Operating System) is a command-line interface that was widely used on IBM-compatible computers in the 1980s and 1990s. Although DOS has been replaced by more advanced operating systems, it is still useful for performing certain tasks, such as copying files.
To accomplish this, we will be using DOSBox, an emulator that allows you to run DOS programs on modern operating systems. By following the steps outlined in this article, you will be able to copy your files smoothly and efficiently, ensuring that they are safely stored on your external hard drive.
But first, you will need to download and install DOSBox. Don’t worry, it’s a straightforward process. Once you have DOSBox up and running, you can connect your external hard drive and access the DOS prompt to begin the file copying process. Let’s get started!
Downloading and installing DOSBox
Before you can start copying files in DOS to your external hard drive, you will need to download and install DOSBox. DOSBox is a cross-platform emulator that allows you to run DOS programs on contemporary operating systems such as Windows, macOS, and Linux. Here’s a step-by-step guide to help you get started:
- Visit the official DOSBox website at www.dosbox.com.
- Navigate to the “Downloads” section and choose the appropriate version for your operating system.
- Click on the download link to start the download process.
- Once the download is complete, locate the installation file on your computer and double-click on it to begin the installation process.
- Follow the on-screen instructions to install DOSBox. The installation wizard will guide you through the necessary steps.
- After the installation is complete, you can find DOSBox in your list of installed programs or by searching for it in your computer’s search bar.
Congratulations! You have successfully downloaded and installed DOSBox on your computer. The next step is to connect your external hard drive and access the DOS prompt. We will guide you through this process in the next section.
Connecting your external hard drive
Now that you have DOSBox installed on your computer, it’s time to connect your external hard drive. Follow these steps to ensure a proper connection:
- Locate an available USB port on your computer.
- Plug in one end of the USB cable into the USB port on your computer.
- Take the other end of the USB cable and insert it into the USB port on your external hard drive.
- Once the connection is established, you should see a notification on your computer indicating that a new device has been detected.
- If prompted, install any necessary drivers for your external hard drive. Most modern operating systems will automatically recognize and install the required drivers.
- Your external hard drive should now be connected and ready to use.
It’s essential to ensure that your computer recognizes the external hard drive before proceeding. You can confirm this by checking the “My Computer” or “This PC” section on your computer’s desktop or file explorer. If you see your external hard drive listed, then it is successfully connected.
With your external hard drive connected, the next step is to access the DOS prompt. This will allow you to navigate to the location of the files you want to copy. We will explain how to do this in the following section.
Accessing the DOS prompt
In order to copy files in DOS to your external hard drive, you need to access the DOS prompt. Here’s how you can do it:
- Launch DOSBox on your computer. You can find it in your list of installed programs or by searching for it in your computer’s search bar.
- A DOSBox window will open, displaying a command prompt that looks similar to the old-fashioned MS-DOS prompt.
- To access the drive where your files are located, type the appropriate drive letter followed by a colon and press Enter. For example, if your files are on the C drive, type “C:” and hit Enter.
- You will now be in the DOS prompt, which allows you to navigate through directories and perform various commands.
It’s important to note that the DOS prompt operates using command-line instructions, so you’ll need to use a series of commands to navigate and perform file operations. Once you are in the DOS prompt, you can move on to the next step, which involves locating the files you want to copy to your external hard drive.
Now that you have successfully accessed the DOS prompt, you are ready to proceed with the file copying process. In the next section, we will guide you through the process of locating the files you want to copy using DOS commands.
Locating the files you want to copy
Now that you’re in the DOS prompt, it’s time to locate the files you want to copy to your external hard drive. The DOS command prompt provides several commands to help you navigate through directories and locate your files. Here are the essential commands you need to know:
- Dir: This command displays a list of files and subdirectories in the current directory.
- Cd: This command allows you to change the current directory. For example, if your files are located in a folder called “Documents,” you can type “cd Documents” to navigate to that directory.
- Cd..: This command allows you to move up one level in the directory structure. For example, if you’re currently in the “Documents” folder, typing “cd..” will take you back to the previous directory.
To locate the files you want to copy, you’ll need to navigate to the directory where they are stored. Use the “dir” command to list the files and subdirectories in the current directory. If necessary, use the “cd” command to change to a different directory until you find the files you want to copy. You can also use the “cd..” command to move back up the directory structure if needed.
It’s helpful to know the full path of the directory you’re navigating through. For example, if your files are stored in the “Documents” folder on the C drive, the full path would be “C:\Documents.” Keep in mind that DOS has a maximum file path length of 260 characters, so be sure to keep your file and folder names concise.
With the files you want to copy located, you’re ready to proceed with the actual file copying process. In the next section, we will guide you through the necessary DOS commands to copy your files to the external hard drive.
Copying files using DOS commands
Now that you have navigated to the directory containing the files you want to copy, it’s time to use DOS commands to copy the files to your external hard drive. There are a few commands you can utilize for this purpose:
- Copy: This command allows you to copy one or more files from a source location to a destination location. To use this command, type “copy [source file(s)] [destination].” For example, if you want to copy a file named “example.txt” to the root directory of your external hard drive, you can type “copy example.txt [external drive letter]:\” and press Enter.
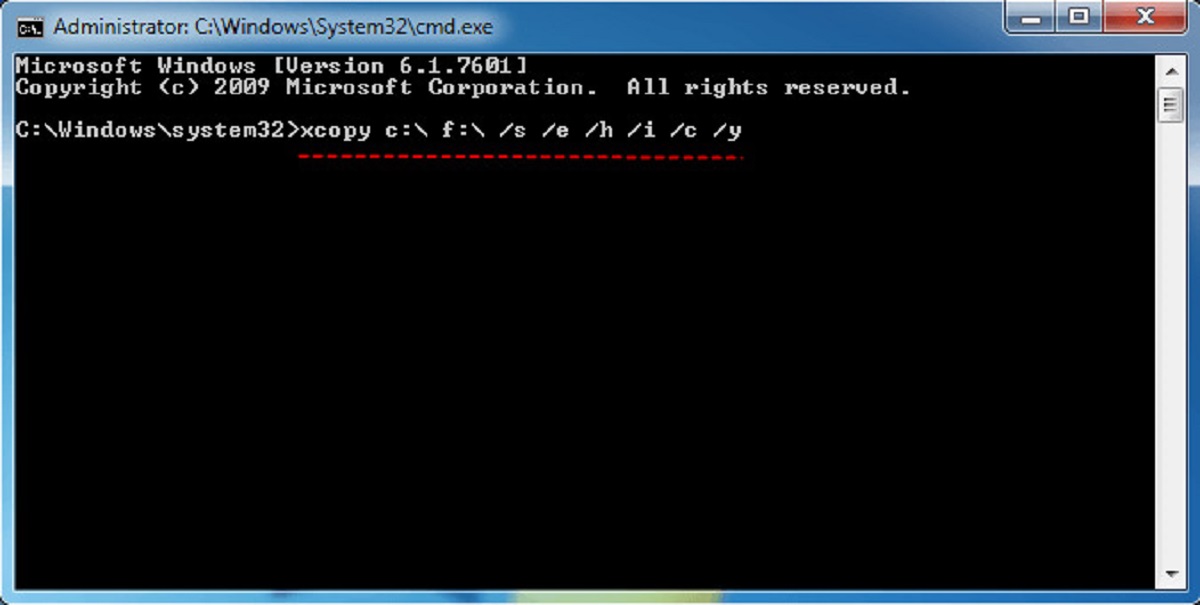
- Xcopy: This command enables you to copy entire directories, including all subdirectories and files. To use this command, type “xcopy [source directory] [destination directory]” and hit Enter. You can also include additional parameters such as “/s” to copy subdirectories or “/e” to include empty directories.
When using the “copy” or “xcopy” command, make sure to specify the correct file or directory names along with their respective locations. Take note of the drive letter assigned to your external hard drive and use it in the destination path.
For example, to copy a folder named “Photos” from the current directory to the “MyPictures” folder on your external hard drive, you can type “xcopy Photos [external drive letter]:\MyPictures /s” and press Enter.
Remember to double-check the file or directory names and verify that the destination path is correct to avoid any data loss or overwriting existing files.
With the necessary DOS commands, you can now copy your files to the external hard drive efficiently. In the next section, we will discuss how you can verify the copied files to ensure the process was successful.
Verifying the copied files
Once you have successfully copied the files to your external hard drive using DOS commands, it’s important to verify that the copying process was successful. Verifying the copied files ensures that you have a reliable backup and helps to avoid any unexpected data loss. Here are a few methods to verify the copied files:
- Manual Inspection: One way to verify the copied files is by manually inspecting them. Use file explorer or any other file management software to navigate to the destination folder on your external hard drive. Compare the file names and sizes of the copied files with the original files to ensure they are identical.
- Checksum: Another method to verify the integrity of your copied files is by using checksums. A checksum is a string of characters generated using an algorithm, such as MD5 or SHA, that uniquely represents the contents of a file. Before copying the files, calculate the checksum of the original files. After copying, calculate the checksum of the copied files. Compare the checksums to ensure they match, indicating that the files were copied accurately.
- File Comparison Software: You can also use file comparison software to compare the source and destination files. These tools analyze the content and structure of the files to determine if they are identical or have any differences. Examples of file comparison software include WinMerge, Beyond Compare, and ExamDiff.
Whichever method you choose, it is essential to ensure that the copied files are accurate and complete. Unexpected errors and data loss can occur during the copying process, so taking the time to verify the copied files is crucial for the integrity of your data.
With the files verified and confirmed to be copied correctly, you can proceed to the final step of safely ejecting your external hard drive.
Safely ejecting your external hard drive
After successfully copying your files to the external hard drive, it’s important to follow the proper procedure to safely eject the drive. This ensures that all data has been written and prevents any potential data corruption. Here’s how you can safely eject your external hard drive:
- Close any open files or folders that are stored on the external hard drive.
- Save any pending changes or modifications to the files on the external hard drive.
- Make sure that no active processes or programs are using the external hard drive.
- Find the safely eject hardware icon in your system tray (usually located in the bottom-right corner of the screen).
- Click on the hardware icon and locate your external hard drive in the list of devices.
- Click on the eject option next to your external hard drive.
- Wait for the computer to notify you that it is safe to disconnect the drive.
- Once you receive the notification, carefully disconnect the USB cable from the computer.
It’s crucial to follow these steps to prevent any potential data loss or damage to your external hard drive. Sudden disconnection without properly ejecting the drive can lead to corruption of files and possibly even damage the drive itself.
By safely ejecting your external hard drive, you protect your data and ensure its integrity. It’s a good practice to wait for the confirmation message before physically disconnecting the drive, as it guarantees that the operating system has finished all read/write operations.
Congratulations! You have now successfully copied your files to your external hard drive and safely ejected it from your computer. Your important data is now securely stored and readily accessible whenever you need it.
Conclusion
In this guide, we have walked you through the process of copying files in DOS to an external hard drive. By following the steps outlined in this article, you can easily and efficiently back up your important files and ensure their safety.
We started by downloading and installing DOSBox, an emulator that allows you to run DOS programs on modern operating systems. We then discussed how to connect your external hard drive to your computer and access the DOS prompt. From there, we explained how to navigate to the directory containing the files you want to copy.
Using DOS commands like “copy” and “xcopy,” we showed you how to copy individual files or entire directories to your external hard drive. We also emphasized the importance of verifying the copied files to ensure the accuracy and completeness of your backup.
Lastly, we discussed the crucial step of safely ejecting your external hard drive from the computer to prevent data corruption or loss. Following these steps will help ensure the security and integrity of your important files.
Copying files in DOS to an external hard drive may seem like a complex process, but with the right guidance, it becomes straightforward and efficient. By utilizing the power of DOSBox and familiarizing yourself with the necessary commands, you can seamlessly transfer your files and have peace of mind knowing your data is safe.
We hope this guide has been helpful to you. Now, armed with the knowledge and steps provided, you are ready to back up your files to an external hard drive using DOS. Happy file copying!