Introduction
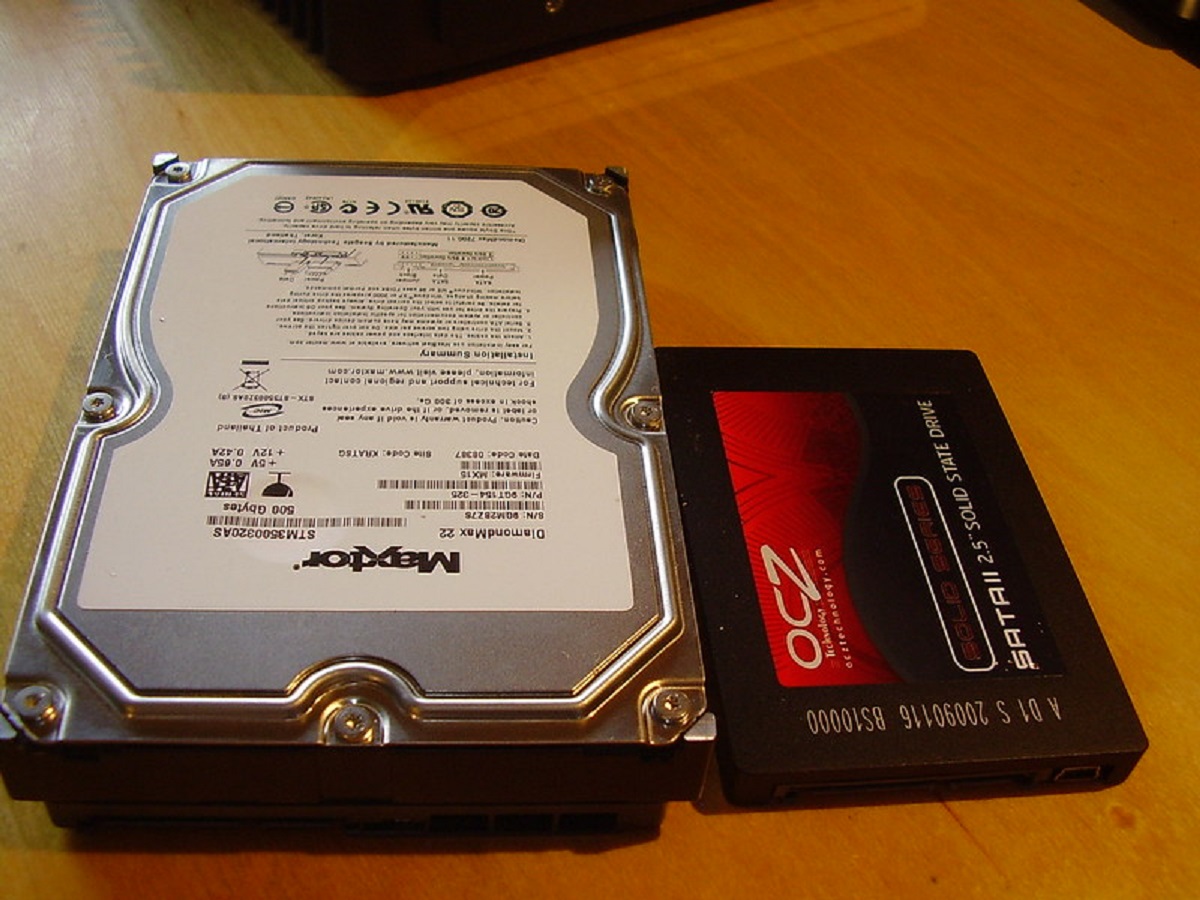
Transferring data from a traditional hard disk drive (HDD) to a solid-state drive (SSD) is a process that can greatly enhance the performance and speed of your computer. While HDDs have been the standard storage option for years, SSDs offer faster data access, improved reliability, and reduced power consumption. Whether you are upgrading your existing computer or building a new system, transferring your data from HDD to SSD can provide significant benefits.
By making the switch from HDD to SSD, you can experience faster boot-up times, reduced program loading times, and overall improved system responsiveness. SSDs utilize flash memory technology, which allows for much faster data access compared to the spinning platters of traditional HDDs. This means that tasks such as opening applications, accessing files, and transferring data will be noticeably faster and more efficient.
In addition to speed, SSDs also offer increased durability and reliability compared to HDDs. Since SSDs have no moving parts, there is a lower risk of mechanical failure and damage due to drops or impacts. This makes SSDs an excellent choice for laptops and portable devices.
Another benefit of transferring your data to an SSD is decreased power consumption. SSDs require less energy to operate compared to HDDs, resulting in longer battery life for laptops and lower energy costs for desktop computers. In a time where energy efficiency is becoming increasingly important, the switch to an SSD contributes to a greener and more sustainable computing environment.
It is important to note that while SSDs offer many advantages, they are typically more expensive per gigabyte compared to HDDs. Therefore, it is recommended to transfer only the necessary data from your HDD to SSD, optimizing the usage of both storage devices.
In this guide, we will walk you through the process of transferring your data from HDD to SSD. From prepping your system to cloning your data and finally removing the HDD, we will provide step-by-step instructions to ensure a smooth and successful transfer. So, let’s get started on maximizing the potential of your computer!
Benefits of Transferring Data from HDD to SSD
Transferring your data from a traditional HDD to an SSD offers several notable advantages that can greatly enhance your computing experience. Let’s explore some of these benefits:
- Improved Speed and Performance: One of the key benefits of using an SSD is its remarkable speed. SSDs offer significantly faster read and write speeds, leading to faster boot times and application load times. This means you can start up your computer and access your files in a fraction of the time compared to an HDD.
- Enhanced System Responsiveness: With an SSD, your computer will feel more responsive and snappy. Tasks such as opening programs, copying files, and searching for documents will be noticeably quicker. You’ll no longer have to endure lag or delays while waiting for applications to respond.
- Reliability and Durability: Unlike HDDs that have spinning platters and moving parts, SSDs have no mechanical components. This makes them less prone to damage from physical shock and vibration. SSDs are also more resistant to wear and tear over time, increasing their reliability and lifespan.
- Energy Efficiency: SSDs consume less power than traditional HDDs. This not only results in longer battery life for laptops but also reduces electricity consumption for desktop computers. By transferring your data to an SSD, you contribute to a more energy-efficient and environmentally-friendly computing setup.
- Noisy-Free Operation: HDDs generate noise due to the spinning platters and moving mechanical components. On the other hand, SSDs are completely silent since they don’t have any moving parts. This creates a quieter and more peaceful computing environment.
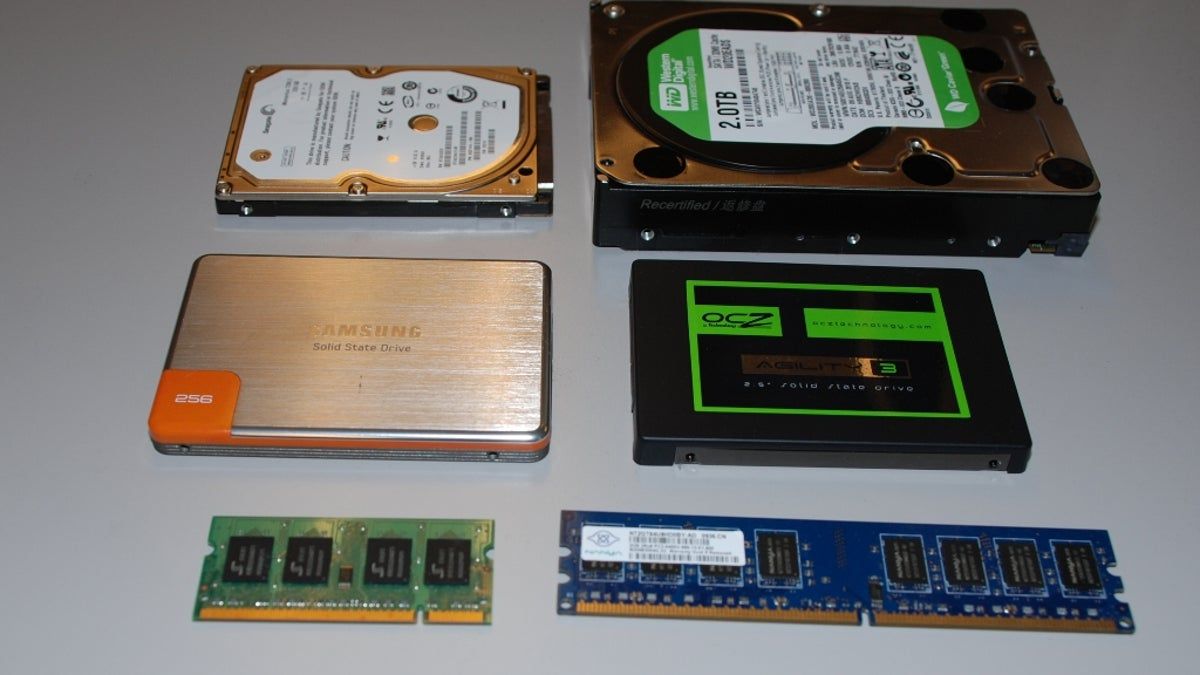
- Compact and Lightweight: SSDs are smaller and lighter than HDDs, making them ideal for laptops and portable devices. By transferring your data to an SSD, you can enjoy increased storage capacity without adding unnecessary weight to your device.
Overall, transferring your data from an HDD to an SSD is a worthwhile investment that pays off in terms of improved speed, performance, reliability, and energy efficiency. While SSDs may have a higher cost per gigabyte, the benefits they offer justify the switch. The next section will guide you through the necessary steps and preparations to ensure a successful transfer.
Preparing for the Transfer
Before you begin the process of transferring your data from an HDD to an SSD, it’s important to make some necessary preparations. These preparations will ensure a smooth and error-free transfer. Here are the key steps to follow:
- Backup Your Data: It is crucial to create a backup of all your important files and documents before transferring them to the SSD. This serves as a precaution in case anything goes wrong during the transfer process. You can back up your data using external hard drives, cloud storage solutions, or even by burning them onto DVDs or CDs.
- Check Compatibility: Verify that your SSD is compatible with your computer’s motherboard and operating system. Ensure that it has the correct interface (such as SATA, NVMe, or M.2) and is supported by your computer’s BIOS. Refer to the specifications of both your computer and the SSD to confirm compatibility.
- Prepare Suitable Cables: Depending on the type of SSD and your computer’s ports, you may need specific cables or adapters. For example, if you’re using an M.2 SSD, you might need an M.2 to SATA or M.2 to USB adapter. Have these cables ready to ensure a proper connection during the transfer.
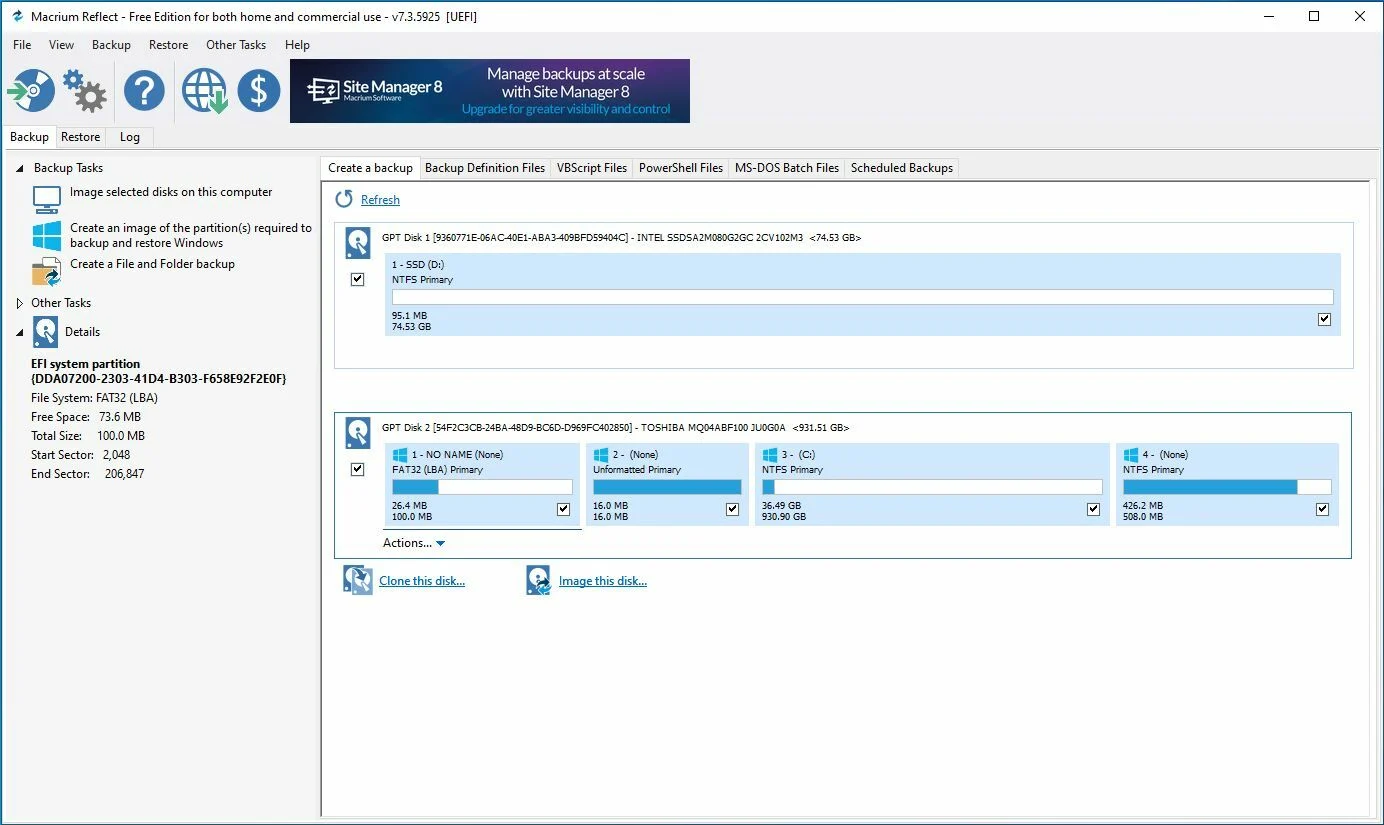
- Select the Right Software: To transfer your data from the HDD to the SSD, you’ll need cloning software. This software will make an exact copy of your HDD and transfer it to the SSD. There are several reliable cloning tools available, such as Clonezilla, Macrium Reflect, and Samsung Data Migration Software. Choose the one that best suits your needs and download it onto your computer.
- Prepare Your SSD: Before the transfer, connect your SSD to your computer using the appropriate cables or adapters. Ensure that it is recognized by your computer and format it if necessary. Formatting the SSD will erase any existing data, so make sure you’ve backed up your files before proceeding with this step.
By taking these preparation steps, you’ll be ready to transfer your data from the HDD to the SSD smoothly and efficiently. Next, we will dive into the process of cloning your data using the selected software. Follow along with the detailed instructions to ensure a successful transfer without any data loss.
Backup Your Data
Before you embark on the process of transferring your data from an HDD to an SSD, it is crucial to create a backup of all your important files and documents. This step is essential as it acts as a safeguard in case anything unexpected happens during the transfer process. Here are some key points to consider when backing up your data:
Identify and Prioritize: Take the time to identify the files and folders that hold critical information and prioritize them for backup. This includes documents, photos, videos, music files, and any other personal or professional data that you cannot afford to lose.
External Hard Drives: Using an external hard drive is one of the most common and reliable methods of backing up data. Connect the external hard drive to your computer and navigate to the files and folders you want to back up. Copy and paste them onto the external hard drive, ensuring that the data is safely transferred.
Cloud Storage: Another option for backing up your data is to utilize cloud storage solutions. Popular cloud storage services such as Google Drive, Dropbox, or Microsoft OneDrive offer a certain amount of free storage space and allow you to upload your important files and folders to their servers. This ensures that your data is securely stored off-site.
Burning to Discs: For those who prefer physical backups, burning your data onto DVDs or CDs can be a viable option. This method is especially useful for archiving important files that don’t require frequent access. Ensure that you have a compatible optical disc burner and use reliable disc burning software to create the backups.
Verify Your Backups: After you have completed the backup process, it is crucial to verify the integrity of your backups. Double-check that the files are successfully copied and can be accessed from the external hard drive, cloud storage, or DVDs/CDs. This step ensures that your backup is not corrupted and can be used to restore your data if needed.
Remember to keep your backups in a safe and secure location. Store external hard drives in a cool and dry place, away from direct sunlight and potential physical damage. For cloud storage, ensure that you have a strong and secure password to protect your data. Additionally, label your burned discs properly and store them in a protective case to prevent scratches or damage.
By diligently backing up your data, you can proceed with the transfer process to the SSD confidently, knowing that your important files are safely stored. Next, we will discuss how to check the compatibility between your computer and the SSD to ensure a seamless transfer.
Check Compatibility
Before proceeding with the transfer of your data from the HDD to the SSD, it is essential to check the compatibility between your computer and the SSD. This will ensure that the SSD is compatible with your system’s hardware and software, avoiding any potential issues during the transfer process. Here are some key considerations when checking compatibility:
Interface and Form Factor: The first aspect to consider is the interface and form factor of the SSD. Check whether your computer supports the interface used by the SSD, such as SATA, NVMe, or M.2. Additionally, determine the form factor required for installation, whether it is a 2.5-inch SSD for laptops or a PCIe card for desktop computers.
Capacity and Connectors: Verify that your computer’s motherboard has the necessary connectors for the SSD. If you are replacing the existing HDD, ensure that the capacity of the SSD is sufficient to accommodate all your data. It is recommended to choose an SSD with a capacity larger than your current HDD to allow for future expansion.
Operating System Support: Confirm that your computer’s operating system supports the SSD. Most modern operating systems, such as Windows 10, macOS, and Linux distributions, have built-in support for SSDs. However, it is always a good idea to double-check the specific requirements and compatibility with the manufacturer’s documentation or website.
BIOS and Firmware: Check if your computer’s BIOS or firmware requires an update to support the SSD. Visit your computer manufacturer’s website or the motherboard manufacturer’s website to check for any available updates. Updating the BIOS or firmware ensures optimal performance and compatibility with the SSD.
Additional Requirements: Some SSDs may have additional requirements, such as specific software or drivers, for optimal performance. Check the manufacturer’s documentation or website to see if any additional steps or software installations are recommended.
By checking the compatibility between your computer and the SSD, you can ensure a smooth and trouble-free transfer process. This step helps avoid any potential compatibility issues that may arise and allows you to proceed confidently. Next, we will discuss the process of connecting the appropriate cables to enable successful data transfer from the HDD to the SSD.
Connect Suitable Cables
Once you have confirmed the compatibility between your computer and the SSD, the next step is to connect the suitable cables to facilitate the data transfer process. Proper cable connections ensure a reliable and efficient transfer from your HDD to the SSD. Follow these steps to connect the necessary cables:
SATA Cables: If you are using a 2.5-inch SATA SSD, you will need a SATA cable to connect it to your computer’s motherboard. Locate an available SATA port on the motherboard and connect one end of the SATA cable to it. The other end of the cable should be connected to the SATA port on the SSD. Make sure the connections are snug and secure.
Power Cables: In addition to the SATA cable, you will also need to connect a power cable to the SSD. Most SSDs require a standard SATA power cable, which can be connected to the power supply unit (PSU) in your computer. Locate an available SATA power connector from the PSU and connect it to the power port on the SSD.
M.2 SSDs: If you are using an M.2 SSD, the connection process may vary depending on the specific motherboard and M.2 slot. Some M.2 SSDs require a specific adapter or cable to connect to the motherboard. Refer to the motherboard’s user manual or manufacturer’s documentation to determine the appropriate connection method for your specific M.2 SSD.
Adapter Cables: In certain cases, you may require adapter cables to connect the SSD to your computer. For example, if your SSD uses a different interface or form factor than your computer supports, you will need the appropriate adapter cable to make the connection possible. Ensure that the adapter cables are properly connected and secure.
It is crucial to ensure that all cable connections are made securely and firmly. Loose connections can lead to data transfer issues or unstable performance. Double-check all cable connections before proceeding to the next step of the transfer process.
By connecting the suitable cables, you have set the stage for a successful data transfer from your HDD to the SSD. In the next section, we will discuss how to select the right software for cloning your data, which is a crucial step in the transfer process.
Selecting the Right Software
When transferring your data from an HDD to an SSD, selecting the right software is essential to ensure a successful and seamless transfer. Clone software allows you to make an exact copy of your HDD and transfer it to the SSD, preserving all your files, programs, and settings. Here are some factors to consider when selecting the appropriate software:
Compatibility: Ensure that the software you choose is compatible with your operating system. Most cloning software programs support popular operating systems such as Windows, macOS, and Linux. Check the software’s system requirements and compatibility information to ensure it will work with your computer.
User-Friendliness: Look for software that is user-friendly and offers a straightforward interface. A user-friendly software will make the cloning process easier, especially for those who are less experienced with computer operations. Look for features like a step-by-step guide or an intuitive user interface to facilitate the process.
Reliability and Reputation: Consider the reliability and reputation of the software provider. Look for reviews, recommendations, and testimonials from other users to ensure that the software is reliable and performs the cloning process accurately. Choose software that has a good track record and positive feedback from users.
Additional Features: Some cloning software offers additional features that can enhance the transfer process. Look for features such as partition resizing, disk optimization, or the ability to exclude certain files or folders from the cloning process. These additional features can provide more customization options and optimize the performance of the SSD.
Support and Updates: Consider the level of support provided by the software provider. Look for software that offers timely updates to ensure compatibility with the latest technologies and bug fixes. Additionally, check if the software provider offers customer support, such as documentation, forums, or a helpdesk, in case you encounter any issues during the cloning process.
Some popular cloning software options include Clonezilla, Macrium Reflect, Acronis True Image, and Samsung Data Migration Software. Research and compare different software options to find the one that best suits your needs and requirements.
By selecting the right software for cloning your data, you can ensure a smooth and efficient transfer process from the HDD to the SSD. In the next section, we will guide you through the step-by-step process of cloning your data using the selected software.
Cloning Data from HDD to SSD
Cloning your data from the HDD to the SSD is the crucial step in the transfer process. This process involves creating an exact copy of your existing HDD and transferring it to the SSD. Follow these step-by-step instructions to ensure a successful data cloning:
Step 1: Open the Cloning Software: Launch the cloning software that you have selected. Make sure both the HDD and SSD are properly connected to your computer.
Step 2: Select the Source and Destination Drives: In the cloning software, select your HDD as the source drive (the drive you want to clone) and your SSD as the destination drive (the drive where you want to transfer the data).
Step 3: Configure Cloning Options: Depending on the software you are using, you may have options to customize the cloning process. This can include choosing specific partitions to clone, resizing partitions, or excluding files and folders. Adjust these options according to your preferences, or you can choose the default settings if you’re unsure.
Step 4: Start the Cloning Process: Once you have configured the cloning options, initiate the cloning process. The software will start copying data from your HDD to the SSD. The time required for cloning depends on the size of your data and the speed of your storage devices.
Step 5: Monitor the Progress: During the cloning process, the software will provide progress updates. Monitor the progress and ensure that there are no errors or interruptions. It is crucial to allow the cloning process to complete without any interruptions to avoid data loss or corruption.
Step 6: Verify the Cloning Process: After the cloning process is complete, verify that the data has been successfully transferred to the SSD. You can do this by checking that all files, folders, and programs are intact and accessible on the SSD.
Step 7: Set SSD as the Boot Drive (Optional): If you want to use the SSD as the primary boot drive, you may need to change the boot order in your computer’s BIOS settings. Access the BIOS settings and set the SSD as the first boot device. Consult your computer’s motherboard manual or manufacturer’s website for specific instructions on how to modify the boot order.
By following these steps, you can successfully clone your data from the HDD to the SSD. Once the cloning process is complete and verified, you can now experience the enhanced performance, speed, and reliability that an SSD offers.
Note: After cloning, you may choose to keep the HDD connected to the computer as additional storage or repurpose it for other uses. Alternatively, you can remove the HDD if you no longer need it or to free up space in your computer.
Cleaning Up Your HDD
After successfully cloning your data from the HDD to the SSD and verifying that the transfer was successful, it is essential to clean up your HDD to optimize storage space and ensure efficient usage. Here are some steps you can take to clean up your HDD:
1. Review and Organize Files: Start by reviewing the files on your HDD and organizing them into relevant folders. Identify and delete any unnecessary files, duplicates, or temporary files that are no longer needed. This will help free up storage space and make it easier to locate and access important files.
2. Uninstall Unused Applications: Remove any applications or programs that you no longer use or need. Go through the list of installed programs and uninstall those that are redundant or have become obsolete. This will not only free up storage space but also improve system performance.
3. Clear Browser Data: Clearing browser data, such as cache, cookies, and browsing history, can free up a significant amount of storage space. Use the settings or preferences in your web browser to clear this data periodically. This will help improve browser performance and reduce the storage footprint on your HDD.
4. Utilize Disk Cleanup Utility: Use the built-in Disk Cleanup utility on your operating system to remove unnecessary system files and temporary files. This utility scans your HDD and suggests files that can be safely removed. Follow the prompts and select the file types you want to clean up to free up additional storage space.
5. Consider Compression and Archiving: If you have files that are not constantly accessed but still need to be kept, consider compressing them into a zip file or archiving them. This will reduce the file size and save valuable HDD space.
6. Transfer Files to External Storage: If you have large files or media that you don’t need immediate access to, consider transferring them to external storage devices such as external hard drives or cloud storage services. This will help free up space on your HDD without permanently deleting the files.
7. Securely Delete Sensitive Data: If you have sensitive or confidential data that you no longer need, make sure to securely delete it. Make use of secure deletion software or tools that overwrite the data multiple times to ensure that it cannot be recovered by unauthorized individuals.
By following these steps, you can clean up your HDD and optimize storage space. This will not only improve the performance of your computer but also help you maintain a clutter-free and organized storage system. With your data successfully transferred to the SSD, you can enjoy the benefits of faster access times and enhanced system responsiveness.
Verifying the Transfer
After completing the process of transferring your data from the HDD to the SSD, it is important to verify the transfer to ensure that all files and data have been successfully moved. This step is crucial to ensure that no data has been lost or corrupted during the transfer process. Here are some steps for verifying the transfer:
1. Double-Check Files and Folders: Take some time to go through your files and folders on the SSD and ensure that all the important files and folders have been successfully transferred. Check for any missing files or folders, and compare them with the ones on the original HDD to ensure that everything is intact.
2. Verify File Sizes and Properties: Compare the file sizes and properties of specific files on both the HDD and the SSD. Check file sizes, date modified, and other properties to ensure that they match between the two drives. This will help confirm that the files have been accurately transferred.
3. Test Access and Functionality: Open various files, documents, and applications stored on the SSD to ensure that they are accessible and functioning correctly. Test different file types, such as documents, images, videos, and programs, to verify that they open without any errors or issues.
4. Check System Performance: Assess the overall performance of your computer after the transfer. Pay attention to the speed of booting up, the responsiveness of applications, and the overall smoothness of the system. If you notice a significant improvement in speed and responsiveness, it indicates that the transfer was successful.
5. Perform System Updates: After verifying the transfer, it’s a good idea to update your operating system and install any necessary driver updates. This ensures that your computer is up to date with the latest software and drivers, providing optimal compatibility and performance for the new SSD.
6. Keep the HDD as Backup: As an additional measure, it is recommended to keep your HDD as a backup for some time after the transfer. This allows you to access any files that may have been missed during the verification process and ensures that you have a backup of your data in case of unexpected issues.
By following these steps to verify the transfer, you can ensure that your data has been successfully moved from the HDD to the SSD without any loss or corruption. Verifying the transfer gives you peace of mind and confidence in the reliability of the new storage solution.
Removing the HDD
Once you have verified that the data transfer from the HDD to the SSD was successful, you can proceed with removing the HDD from your computer. Removing the HDD will not only free up physical space but also prevent any confusion or potential conflicts between the HDD and SSD during system boot-up. Here are the steps to safely remove the HDD:
1. Shut Down Your Computer: Ensure that your computer is completely powered off before proceeding with any hardware changes. This will prevent any potential damage to the components and ensure your safety.
2. Disconnect Power and Cables: Before removing the HDD, disconnect all power and data cables connected to it. This includes the power cable and any SATA or other data cables that are connected to the HDD. Remember to handle the cables gently and avoid putting excessive force on them.
3. Remove Mounting Screws: Most HDDs are secured to the computer case using mounting screws. Locate the screws that secure the HDD to the case and use a screwdriver to remove them. Keep track of the screws to avoid misplacing them.
4. Slide out the HDD: Once the mounting screws are removed, gently slide the HDD out of its housing or bay. Be careful not to apply excessive force or twist the HDD during the removal process. If the HDD is tightly secured, you may need to consult your computer’s documentation or manufacturer’s website for specific instructions on removing it.
5. Store the HDD Properly: If you have no further use for the removed HDD, it is important to store it properly. Place it in an anti-static bag or wrap it with an anti-static material to protect it from electrostatic discharge. Store it in a safe and dry location to prevent any physical damage or exposure to moisture.
6. Update Boot Settings (Optional): If you removed the HDD that was previously set as the boot drive, you may need to update the boot settings in your computer’s BIOS. Access the BIOS settings, navigate to the boot options, and select the SSD as the primary boot device. Save the changes and exit the BIOS to ensure that your computer boots from the SSD.
By following these steps, you can safely remove the HDD from your computer now that the data has been successfully transferred to the SSD. Removing the HDD will enable you to fully maximize the benefits of the new storage solution and increase the overall efficiency and performance of your computer.
Conclusion
Transferring your data from an HDD to an SSD can significantly enhance the performance, speed, and reliability of your computer. With faster boot-up times, reduced program loading times, and improved system responsiveness, upgrading to an SSD offers a noticeable improvement in overall computing experience.
In this guide, we discussed the benefits of transferring data from an HDD to an SSD, including improved speed, enhanced system responsiveness, reliability, energy efficiency, and silent operation. We highlighted the importance of backing up your data before starting the transfer and checking compatibility between your computer and the SSD.
We walked through the necessary steps, such as connecting suitable cables, selecting the right software for cloning the data, and verifying the successful transfer from the HDD to the SSD. Additionally, we covered the importance of cleaning up your HDD and securely removing it from your computer once the transfer is complete.
It is important to note that while SSDs offer numerous advantages, they are typically more expensive per gigabyte compared to HDDs. Therefore, it is recommended to transfer only the necessary data to optimize the usage of both storage devices.
By following the steps outlined in this guide, you can confidently transfer your data from an HDD to an SSD, unlocking the full potential of your computer. Enjoy the benefits of faster performance, improved reliability, and a more efficient computing experience with your newly upgraded SSD.
Remember to refer back to this guide whenever you need to transfer data from an HDD to an SSD, ensuring you complete each step accurately and securely. Stay up to date with the latest advancements in SSD technology to make informed choices when upgrading your storage solution in the future.