Introduction
When it comes to managing the storage on our smartphones, having the option to download files directly to an SD card can be a game-changer. Not only does it free up precious internal storage space, but it also allows for easy transfer of files between devices. However, not all smartphones have the ability to download files directly to an SD card by default.
In this article, we will guide you through the steps to set your phone to download files directly to the SD card. Whether you want to save photos and videos, music files, or documents, we’ve got you covered.
Please note that the steps may vary depending on the make and model of your phone and the version of the operating system you are using. However, the general process should be similar across different Android devices.
Let’s dive in and explore how you can unlock the potential of your SD card and enjoy the convenience of downloading files directly to it.
Step 1: Check if your phone supports external storage
The first step in setting your phone to download files to an SD card is to ensure that your device actually supports external storage. While most Android smartphones can accommodate an SD card, it’s essential to double-check this feature before proceeding.
To confirm if your phone supports external storage:
- Go to the Settings app on your device. You can usually find it by swiping down from the top of the screen and tapping the gear icon or by accessing the app drawer and locating the Settings app.
- Scroll down and look for the “Storage” or “Storage & USB” option. The specific name may vary depending on your device.
- Tap on the “Storage” option to open the storage settings.
Here you will find information about your device’s storage, including both internal and external storage (if available). Look for the mention of an SD card or external storage option. If you see it listed, then your phone supports external storage, and you can proceed to the next step.
If you don’t see an option for external storage, it means that your phone does not have the capability to use an SD card for additional storage. In such cases, you may need to explore alternative methods of managing your phone’s internal storage, such as deleting unnecessary files or moving them to cloud storage solutions.
Once you have confirmed that your phone supports external storage, you can proceed with the next steps to set up your SD card for downloading files.
Step 2: Insert your SD card into your phone
Now that you have confirmed that your phone supports external storage, it’s time to insert your SD card into your device. Follow these steps to ensure a successful installation:
- Locate the SD card slot on your phone. The placement may vary depending on the make and model of your device. Typically, it is located on the side or top of the phone.
- Using a SIM card removal tool, a small pin, or the included ejector tool, gently insert it into the small hole near the SD card slot to release the tray.
- Remove the tray and place your SD card into the designated slot. Make sure to align the contacts on the SD card with those on the tray.
- Gently push the tray back into the slot until it locks into place.
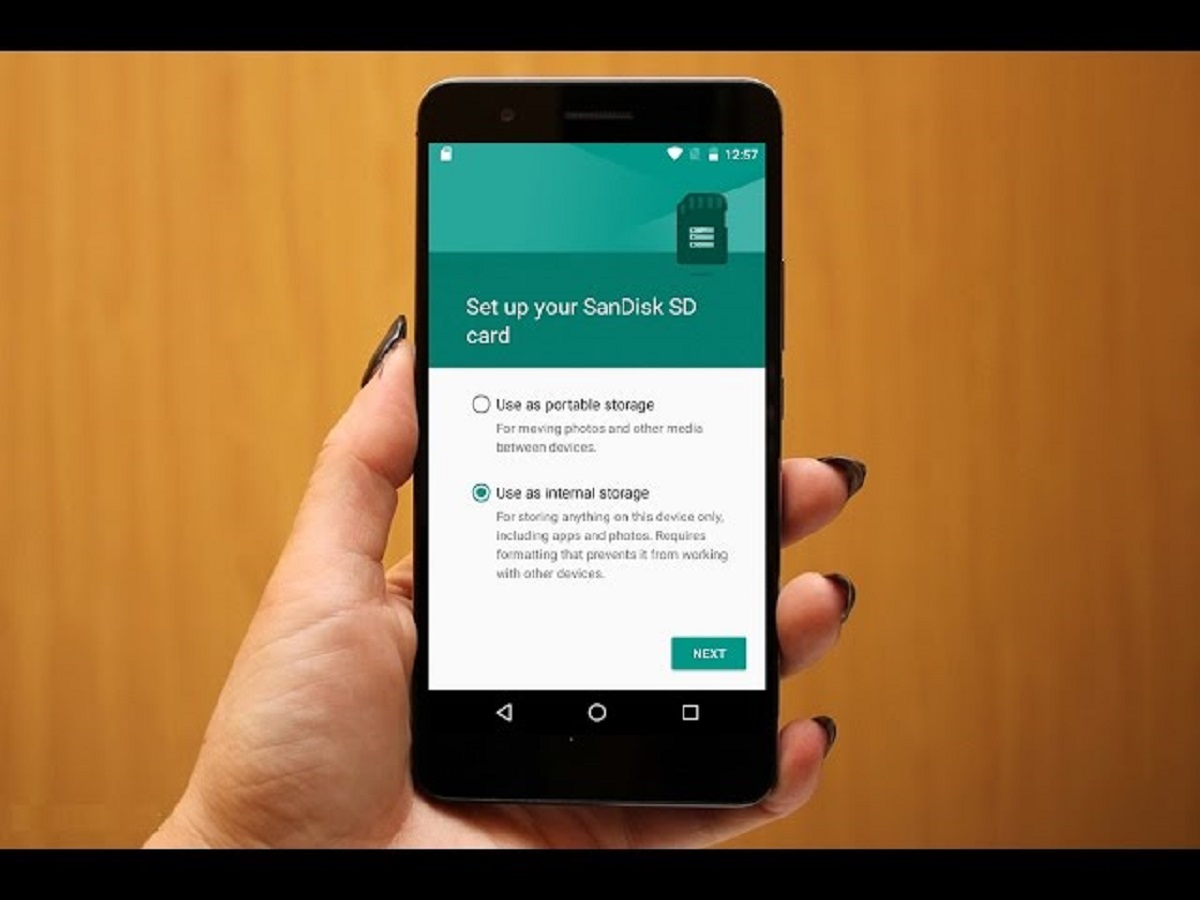
Once you have inserted the SD card, your phone will recognize it as external storage. In some cases, a notification may appear on your phone indicating that the SD card has been detected. If this happens, you can follow the prompts to set up the SD card as portable storage. If not, don’t worry – we will cover this process in the next step.
It’s important to note that before removing your SD card, always ensure to safely eject it through your phone’s settings to avoid data corruption. Now that your SD card is securely inserted into your phone, you’re ready to move on to the next step.
Step 3: Format the SD card as portable storage
After inserting the SD card into your phone, you may need to format it as portable storage to ensure it can be used for downloading files. The process may slightly vary depending on your Android device, but the general steps are as follows:
- Head to the Settings app on your phone.
- Scroll down and look for the “Storage” or “Storage & USB” option.
- Tap on the “Storage” option to access the storage settings.
- Locate the SD card section, usually labeled as “SD card” or with the manufacturer’s name.
- Tap on the SD card option to open the settings specific to the card.
- You should see an option to format the SD card. It may be labeled as “Format” or “Format as portable storage.” Tap on it to proceed.
- A warning message may appear, informing you that formatting the SD card will erase all data stored on it. Make sure to back up any important files before proceeding. If you don’t have any essential data on the SD card, tap “Format” to initiate the formatting process.
- Wait for the formatting process to complete. It may take a few moments.
Once the formatting is finished, your SD card will be ready to use as portable storage. This means that apps can now be installed and files can be downloaded directly to the SD card. The SD card will act as an extension of your device’s internal storage, allowing for additional space to store files without taking up precious internal storage.
Now that your SD card is formatted and ready, it’s time to move on to the next step to set the default storage location for downloads on your phone.
Step 4: Set the default storage location for downloads
Setting the default storage location for downloads is crucial to ensure that any files you download are automatically saved to your SD card. Here’s how to do it:
- Go to the Settings app on your Android device.
- Scroll down and look for the “Storage” or “Storage & USB” option.
- Tap on the “Storage” option to access the storage settings.
- Look for an option called “Default write disk” or something similar. The exact wording may differ depending on your device.
- Tap on this option to open the storage preferences.
- You should see a list of available storage options, including the phone’s internal storage and the SD card.
- Select the SD card as the default write disk by tapping on it. This will set the SD card as the primary location for downloads.
Once you have selected the SD card as the default write disk, all future downloads will be automatically saved to the card. This includes files downloaded from the internet, apps, and any other sources.
It’s important to note that setting the default storage location for downloads does not automatically move existing files to the SD card. We will cover how to move existing downloads in the next step.
Now that you have set the default storage location for downloads, you can rest assured that any new files you download will be saved directly to your SD card, thus freeing up space on your device’s internal storage.
Step 5: Change storage settings for specific apps
While setting the default storage location for downloads ensures that most apps save their files directly to the SD card, some apps may have their own storage settings that need to be adjusted individually. Here’s how you can change the storage settings for specific apps:
- Open the Settings app on your Android device.
- Scroll down and tap on the “Apps” or “Applications” option.
- Locate and select the app for which you want to change the storage settings.
- In the app settings, look for an option such as “Storage” or “Storage settings.”
- Tap on the storage option to open the storage settings for that app.
- You may see an option to “Change storage location” or something similar. Tap on it.
- Select the SD card as the preferred storage location for that particular app.
By changing the storage settings for specific apps, you can ensure that they save their data and files directly to your SD card. This is particularly useful for apps that consume a significant amount of storage space, such as media players, camera apps, or gaming apps.
Keep in mind that not all apps support changing the storage location, and the availability of this option may vary. If you don’t find a storage settings option for a particular app, it means that the app is designed to save data only on the device’s internal storage.
With the ability to change storage settings for specific apps, you have more control over which data is stored on the SD card, allowing you to maximize the utilization of external storage.
Step 6: Move existing downloads to the SD card
If you have already downloaded files to your device’s internal storage and want to free up space by moving them to the SD card, you can easily do so by following these steps:
- Open the file manager app on your phone. This app is sometimes pre-installed on your device, but if not, you can download a file manager app from the Google Play Store.
- Navigate to the location where your downloads are currently stored. This is typically the “Downloads” folder, but it may vary depending on your device and settings.
- Long-press on the file or files you want to move to the SD card. You can select multiple files at once by tapping on each of them.
- Once you have selected the files, look for a “Move” or “Move to” option in the file manager app.
- Select the “Move” or “Move to” option and browse to the SD card location where you want to move the files. You may have to choose the SD card as the destination storage in the file manager app.
- Tap on the destination folder on the SD card where you want to save the files and confirm the move.
The files you selected will now be moved from the internal storage to the SD card. This process may take some time depending on the size of the files and the speed of your device’s storage.
After moving the existing downloads to the SD card, you can access them from the new location. Keep in mind that the file manager app may have different organization options, so make sure to explore the app and familiarize yourself with its features.
By moving existing downloads to the SD card, you can free up valuable space on your device’s internal storage and maximize the storage capacity of your SD card.
Conclusion
Managing storage on your smartphone becomes easier and more efficient when you can download files directly to an SD card. By following the steps outlined in this guide, you can set your phone to download files directly to your SD card, freeing up valuable space on your device’s internal storage.
We started by checking if your phone supports external storage, ensuring that you have the necessary hardware for this process. After confirming that your device supports an SD card, we walked you through the steps to insert the SD card into your phone and format it as portable storage. This allows your phone to recognize and utilize the SD card for downloading files.
We then explored how to set the default storage location for downloads and change storage settings for specific apps. By doing this, you can control where files are saved and ensure that they are directed to the SD card by default. This helps to optimize storage usage and make the most of your external storage option.
Lastly, we discussed how to move existing downloads to the SD card, allowing you to free up space on your device’s internal storage by relocating files already on your phone.
Remember, the steps may vary slightly depending on your specific Android device and operating system version, but the general process remains the same. Always consult your device’s user manual or online resources for device-specific instructions.
By following these steps, you can take advantage of the power of external storage and enjoy the benefits of downloading files directly to your SD card. This not only helps you manage storage space but also provides more flexibility in transferring files between devices. Now you can optimize your smartphone’s storage capacity and have more control over your files and downloads.