Introduction
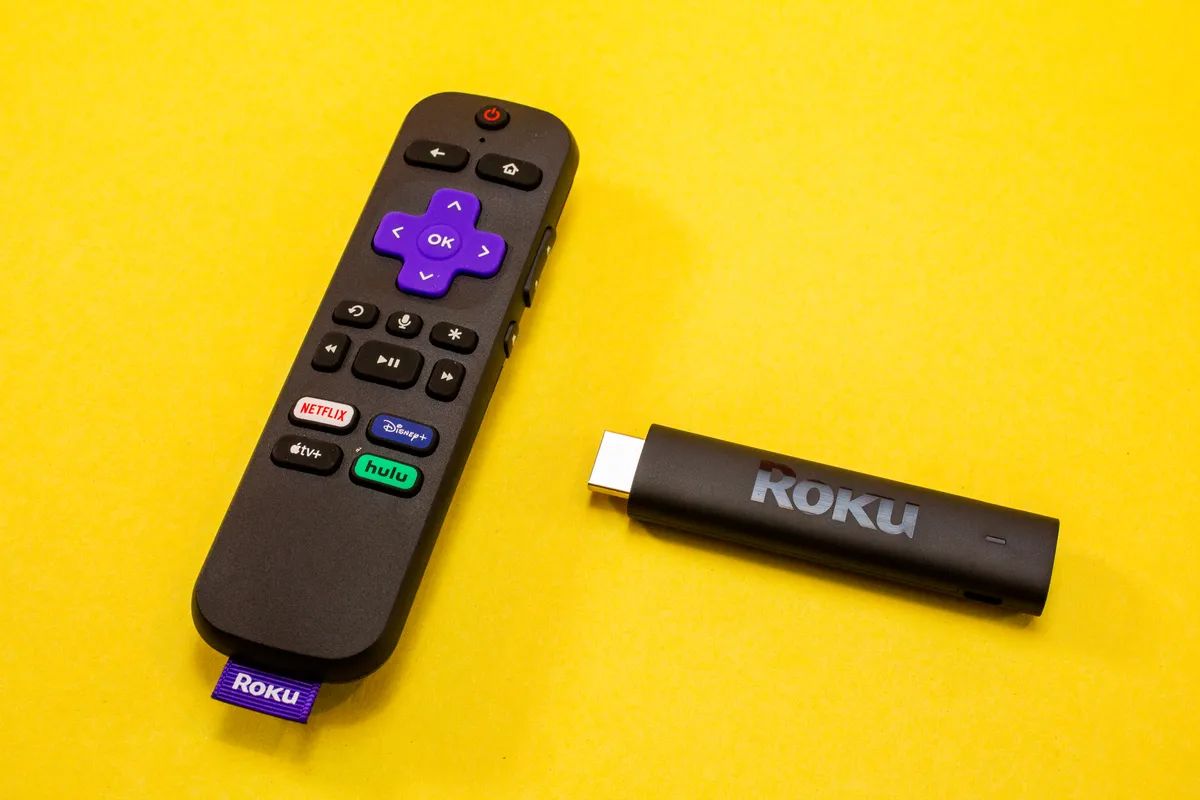
Welcome to our guide on how to reset a Roku. Roku is a popular streaming device that allows you to enjoy your favorite movies, TV shows, and music on your TV. While Roku devices are generally reliable, there may be times when you encounter issues that can be resolved by resetting your Roku.
Resetting a Roku can help resolve various issues such as freezing, slow performance, or connectivity problems. It essentially allows you to start fresh with your device by restoring its settings to the default state. There are two methods to reset a Roku: the soft reset and the factory reset.
In this article, we will walk you through each method step by step, providing clear instructions on how to access the necessary settings and perform the reset. Whether you’re experiencing technical difficulties or just want to start over with your Roku device, we’ve got you covered.
Before we dive into the reset process, it’s important to note that performing a reset will erase all your settings, including installed channels and login information. So, it’s essential to make a note of any important details or preferences you have carefully documented.
Now that you understand the importance of resetting a Roku and the potential impact it can have on your device’s settings, let’s explore the two methods in detail. First, we will cover the soft reset, which is typically the preferred method for resolving minor issues without affecting your customizations. If the soft reset doesn’t resolve the issue, we will then move on to the factory reset, which is more comprehensive and should only be used as a last resort.
Why Reset a Roku?
There are several reasons why you might need to reset your Roku. While the device is designed to provide a seamless streaming experience, technical glitches and software conflicts can occasionally occur. By performing a reset, you can often resolve these issues and restore your Roku to optimal functionality. Here are some common situations where resetting your Roku may be necessary:
- Resolving Performance Issues: If your Roku is experiencing slow performance, freezing, or buffering issues, a reset can help clear temporary files and refresh the system, improving overall performance.
- Fixing Networking Problems: Sometimes, connectivity issues arise, resulting from a loss of network configuration or conflicts with the wireless network. Resetting the Roku can give you a fresh start to establish a stable connection.
- Clearing Storage: Over time, your Roku may accumulate a large amount of temporary files, cache, and outdated data. These can take up valuable storage space and potentially impact performance. A reset will clear out these unnecessary files, reclaiming storage for a smoother streaming experience.
- Removing Glitches: If you encounter strange behavior, such as apps not launching properly, missing features, or intermittent errors, a reset can often resolve these glitches by restoring the Roku’s default settings.
- Starting Fresh: Sometimes, you may want to start anew with your Roku, perhaps if you’ve changed streaming preferences or want to remove any customized settings. A reset allows you to begin from scratch, as if you just unboxed your device.
It’s important to note that while resetting your Roku can help resolve many issues, it should be considered as a last resort. Before initiating a reset, always check for other troubleshooting steps, such as updating the Roku software, restarting your router, or checking for app-specific issues. Additionally, keep in mind that performing a reset will erase all your settings and remove any installed channels. So, be sure to take note of your preferred settings and make a list of any installed channels you want to reinstall after the reset.
Method 1: Soft Reset
The soft reset is the first method you should try when you encounter minor issues with your Roku. This method will refresh the device without erasing your personal settings and installed channels. Here’s how to perform a soft reset on your Roku:
- Step 1: Accessing the Roku settings
- Step 2: Selecting the reset option
- Step 3: Confirming the reset
- Step 4: Setting up the Roku again
To begin, grab your Roku remote and press the Home button. This will take you to the Roku home screen. From there, navigate to the Settings option using the arrow keys on your remote. Once you’ve highlighted the Settings option, press the OK button to enter the settings menu.
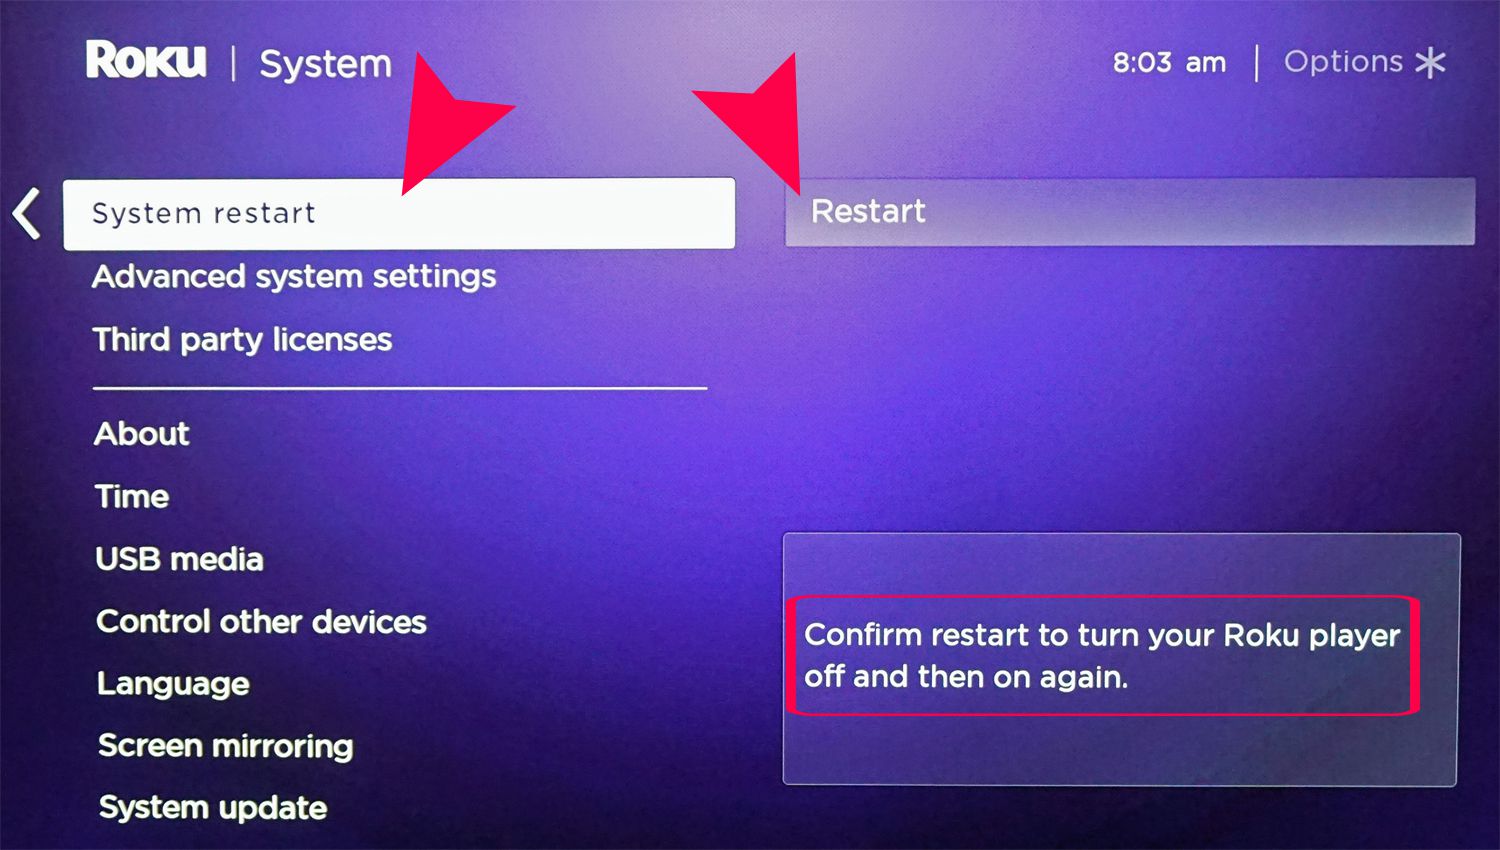
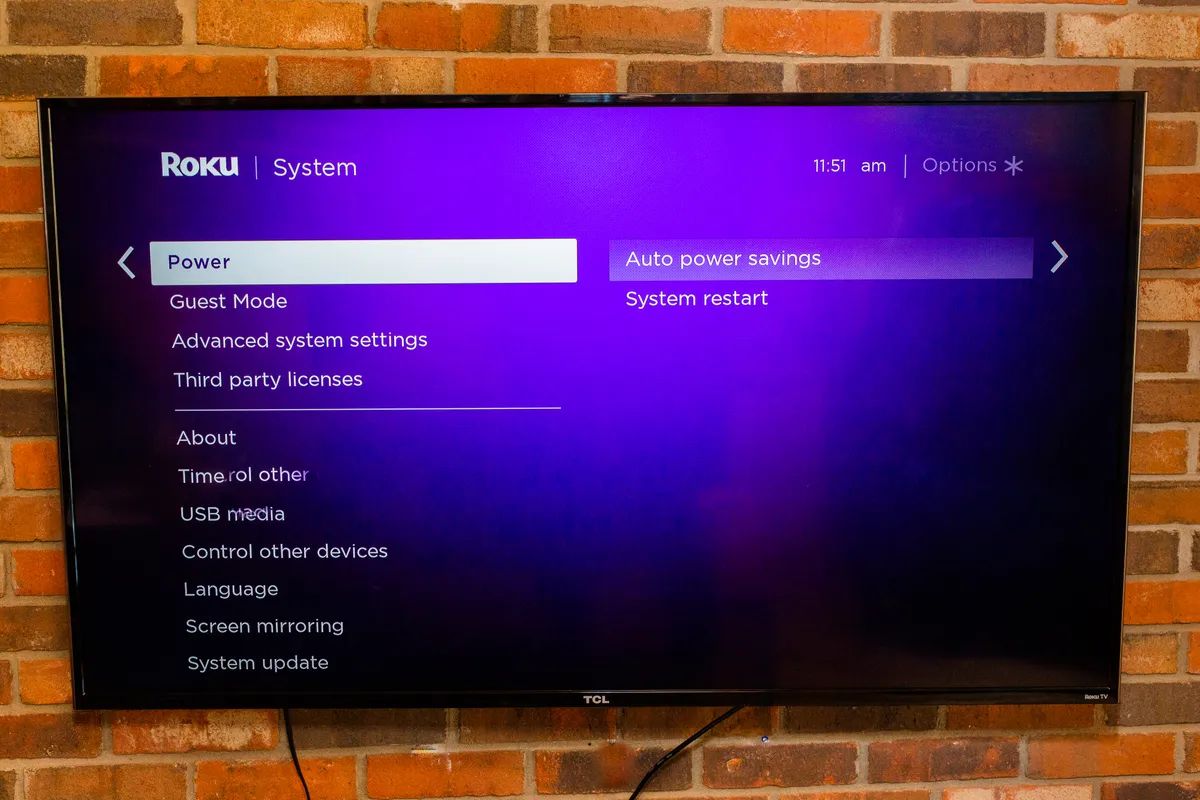
In the settings menu, scroll down to find the System option. Once you’ve located it, press the OK button to enter the System settings. Inside the System settings, you’ll find the Advanced System Settings option. Highlight it and press the OK button to proceed.
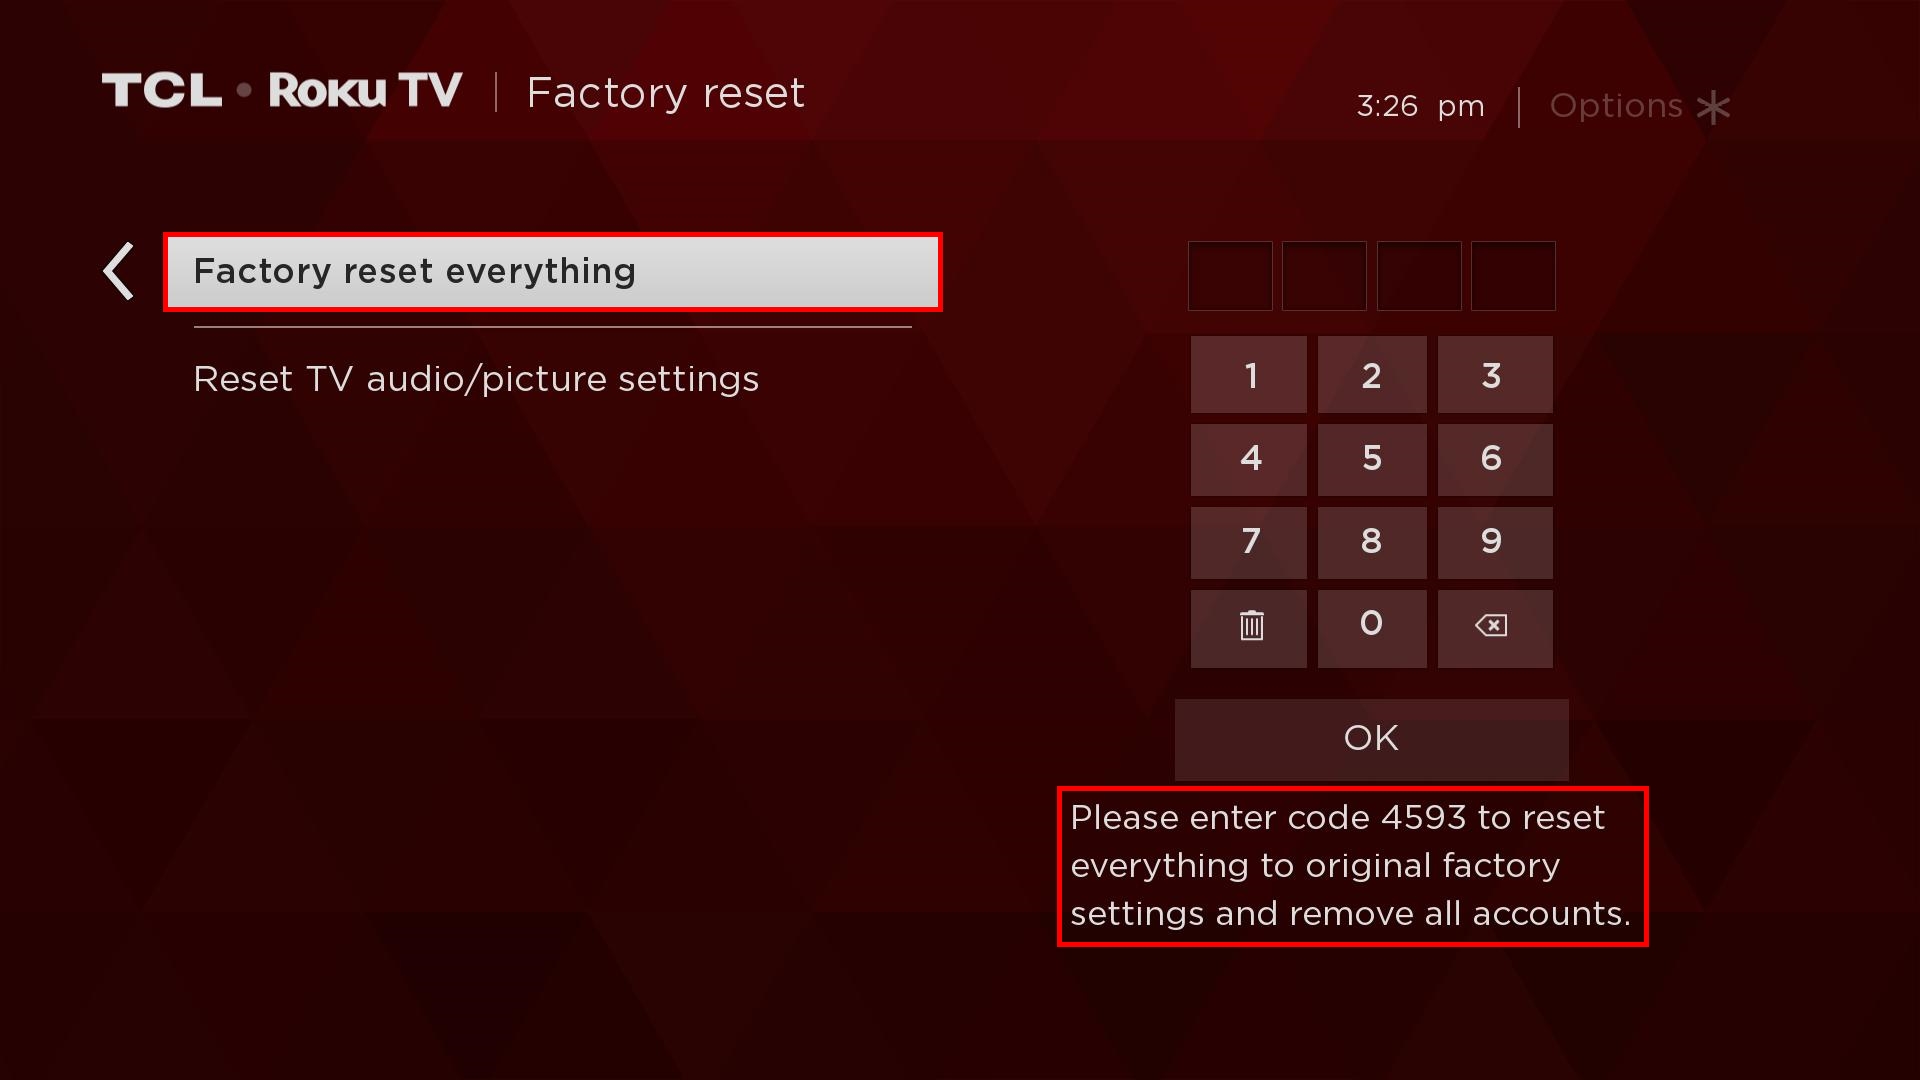
Within the Advanced System Settings, you’ll see a list of options. Look for the Factory Reset option and highlight it. Press the OK button to select it. You will then be prompted with a warning message about the reset process. Confirm your decision by selecting the Reset option.
Once you confirm the reset, your Roku device will restart and automatically revert to its original state. You will need to go through the guided setup process again, similar to when you first set up your Roku. Follow the on-screen instructions to connect to your network, sign in to your Roku account, and reinstall any desired channels.
Performing a soft reset should resolve most minor issues you may encounter with your Roku. However, if you’re still experiencing significant problems, or if the soft reset did not resolve the issue, you may need to perform a factory reset. In the next section, we’ll explain how to do just that.
Method 2: Factory Reset
If you’ve tried the soft reset and are still experiencing issues with your Roku, a factory reset may be necessary. Unlike the soft reset, a factory reset will erase all your settings, preferences, and installed channels. It essentially returns your Roku to its original out-of-the-box state. Here’s how to perform a factory reset on your Roku:
- Step 1: Accessing the Roku settings
- Step 2: Selecting the reset option
- Step 3: Confirming the reset
- Step 4: Setting up the Roku again
Start by pressing the Home button on your Roku remote to go to the home screen. Navigate to the Settings option using the arrow keys and press the OK button to enter the settings menu.
Within the settings menu, find the System option and select it. Inside the System settings, locate the Advanced System Settings option and press the OK button to enter.
Within the Advanced System Settings menu, locate the Factory Reset option. Highlight it and press the OK button to select it. You will then see a warning message informing you that a factory reset will erase all your settings and channels. Confirm by selecting the Reset option.
After confirming the reset, your Roku will restart and begin the factory reset process. Follow the on-screen instructions to complete the initial setup. You’ll need to connect to your network, sign in to your Roku account, and reinstall any desired channels.
It’s important to note that a factory reset is a more drastic solution and should only be used when absolutely necessary. Before performing a factory reset, try other troubleshooting steps, such as updating the Roku software or checking for app-specific issues. Remember to take note of your preferred settings and make a list of any installed channels you’ll want to reinstall after the reset.
By following these steps, you can perform a factory reset on your Roku and start fresh. This should help resolve any persistent issues you’ve been experiencing and restore your Roku to its default settings.
Step 1: Accessing the Roku Settings
In order to perform a soft or factory reset on your Roku, the first step is to access the Roku settings. Here’s a step-by-step guide on how to do this:
- Using your Roku remote, press the Home button.
- Navigate to the Settings option using the arrow keys.
- Press the OK button to enter the Settings menu.
- Find the desired option within the Settings menu.
When you press the Home button, it will take you to the Roku home screen. This screen is the starting point for accessing all the settings and features on your Roku device.
Once you’re on the Roku home screen, use the arrow keys on your remote control to navigate to the Settings option. The Settings icon usually looks like a gear or a toolbox, and it can be found in the Roku menu.
Once you’ve highlighted the Settings option, press the OK button on your remote to enter the Settings menu. This will bring up a list of different settings and options that you can customize on your Roku device.
Inside the Settings menu, you’ll have access to various options related to your Roku device. These options may include Network, Display, System, and more. Depending on what specific setting you need to access, navigate through the Settings menu using the arrow keys on your remote to locate the desired option.
Accessing the Roku settings is the first step to perform a reset or make any other adjustments to your Roku device. Whether you’re looking to troubleshoot issues, change network settings, or personalize your Roku experience, accessing the settings menu is the gateway to these options. Remember to use the arrow keys on your remote to navigate and the OK button to select an option within the menu.
Once you’re in the Settings menu, you can proceed with the necessary steps to perform a soft reset or factory reset, as outlined in the previous sections of this guide. It’s important to follow the subsequent steps carefully to ensure a successful reset and a smooth experience with your Roku device.
Step 2: Selecting the Reset Option
Once you have accessed the Roku settings, the next step is to select the reset option. This step is crucial for initiating the reset process on your Roku device. Here’s a detailed guide on how to select the reset option:
- Within the settings menu, navigate to the desired option.
- Highlight the reset option.
- Press the OK button to select the reset option.
Once you’re in the Settings menu, use the arrow keys on your Roku remote to navigate through the different options. Depending on your specific Roku model and firmware version, the reset option may be located in different areas of the Settings menu. Look for options such as “System,” “Advanced System Settings,” or “Factory Reset.”
Once you have located the appropriate option, use the arrow keys on your remote to highlight it. This will typically involve moving the cursor up, down, left, or right until the desired option is selected.
Once you have highlighted the reset option, press the OK button on your remote to select it. This action will confirm your choice and proceed to the next step of the reset process.
It’s worth noting that the specific labels and locations of the reset options may vary slightly based on your Roku model and firmware version. Familiarize yourself with the structure of the Settings menu on your specific device to locate the reset option accurately.
By selecting the reset option within the Settings menu, you are signaling to your Roku device that you want to proceed with the reset process. Moving forward, follow the subsequent steps outlined in the previous sections of this guide to finalize the reset and restore your Roku to its default settings.
Keep in mind that a soft reset will refresh your Roku without erasing personal customization, while a factory reset will remove all settings and channels. Choose the appropriate reset option based on your specific needs and the severity of the issues you are encountering with your Roku.
Step 3: Confirming the Reset
Once you have selected the reset option in the Roku settings menu, the next step is to confirm the reset. Confirming the reset ensures that you are intentionally initiating the process and understand the consequences. Here’s a step-by-step guide on how to confirm the reset:
- Within the reset option, read any warning messages.
- Highlight the “Reset” or “Confirm” option.
- Press the OK button to confirm.
After selecting the reset option, it is common to encounter a warning message or confirmation prompt. These messages usually inform you about the consequences of the reset and remind you that it will erase certain settings and channels. It’s important to take the time to read and understand these messages before proceeding.
Once you’ve read the warning message, use the arrow keys on your remote to highlight the “Reset” or “Confirm” option. This option is typically located within the reset menu or immediately after the warning message.
With the “Reset” or “Confirm” option highlighted, press the OK button on your remote to confirm the reset. This will initiate the reset process on your Roku device.
It’s crucial to thoroughly understand the consequences of a reset and make sure it is the appropriate action for resolving the issues you are experiencing. Keep in mind that a soft reset will preserve personal customizations and installed channels, while a factory reset will remove all settings and channels.
By confirming the reset, you are effectively signaling to your Roku device that you are ready to proceed with the reset process. This step is crucial for ensuring that the reset occurs deliberately and prevents any accidental resets.
Once you have confirmed the reset, your Roku device will begin the process of restoring its default settings or performing the selected reset action. Stay tuned for the subsequent steps in the reset process to complete the reset successfully and address any issues you were encountering with your Roku.
Step 4: Setting Up the Roku Again
After confirming the reset, your Roku device will begin the process of resetting and restoring its default settings. Once the reset is complete, you will need to set up your Roku again. Here’s a step-by-step guide on how to set up your Roku after a reset:
- Follow the on-screen instructions.
- Connect to your network.
- Sign in to your Roku account.
- Reinstall desired channels.
After the reset, your Roku device will guide you through a series of on-screen instructions to set it up again. These instructions may include selecting a language, connecting to a network, and signing in to your Roku account.
Using your Roku remote, select your network from the available list and enter the password if required. Ensure that you have a stable internet connection to enjoy uninterrupted streaming.
If you had a Roku account before the reset, you will need to sign in again. Enter your Roku account credentials, including your email address and password. If you don’t have a Roku account, you can create one during the setup process.
Once you have completed the initial setup, you can proceed to reinstall your desired channels. Go to the Roku Channel Store and browse through the available channels. Select the channels you want to install and follow the prompts to add them to your Roku device.
During the setup process, make sure to take note of any preferences or settings you had previously customized on your Roku. You will need to reconfigure these settings after the reset.
It’s important to mention that after a reset, you will need to reinstall all the channels you had previously installed on your Roku. This includes both free and paid channels. Be selective in reinstalling the channels to avoid cluttering your Roku’s interface.
By following these steps, you can successfully set up your Roku device again after performing a reset. Once the setup is complete, you will be able to resume streaming your favorite movies, TV shows, and music with a fresh start and restored default settings.
Conclusion
Resetting a Roku can be a useful troubleshooting step to resolve various issues, such as freezing, slow performance, connectivity problems, or glitches. Whether you choose to perform a soft reset or a factory reset, understanding the steps involved is essential. By following the instructions provided in this guide, you can easily reset your Roku device and restore it to its default settings.
With the soft reset, you can refresh your Roku device without losing your personal settings or installed channels. This method is typically effective for resolving minor issues. On the other hand, a factory reset is a more comprehensive option that erases all settings and channels, returning your Roku to its original state. It is recommended as a last resort when other troubleshooting steps have failed to address the problem.
Remember to carefully read any warning messages and take note of important settings and installed channels before proceeding with a reset. After the reset, you will need to go through the setup process again, connecting to your network, signing in to your Roku account, and reinstalling desired channels.
By resetting your Roku, you can often resolve common issues and enjoy a smoother streaming experience. However, if the issues persist after a reset, it may be beneficial to reach out to Roku support for further assistance.
We hope this guide has been helpful in guiding you through the process of resetting a Roku. Enjoy your streaming experience with a refreshed and optimized Roku device!