Introduction
Removing the stand from your Dell monitor may be necessary if you want to mount it on a wall or use a different stand for better ergonomics. While it may seem like a daunting task, it is actually quite simple and can be done with just a few steps. In this guide, we will walk you through the process of removing the stand from your Dell monitor.
Before we begin, it’s important to note that the specific steps may vary depending on the model of your Dell monitor. It’s always a good idea to consult the user manual for your particular monitor model for any specific instructions. Additionally, make sure to gather all the necessary tools before you start the process.
Removing the stand from your Dell monitor is a relatively quick and easy process. By following the steps outlined below, you’ll be able to detach the stand and prepare your monitor for wall mounting or a new stand in no time.
Tools Needed
Before you begin the process of removing the stand from your Dell monitor, it’s important to gather the necessary tools. Luckily, you won’t need any specialized or complex equipment for this task. Here are the tools you’ll need:
- Phillips screwdriver: You may need this tool to remove any screws that are securing the stand to the monitor.
- Clean cloth or towel: Having a clean cloth or towel handy will help you protect the monitor’s screen from any scratches or dust that may be present during the removal process.
- Flat surface: Find a flat surface where you can comfortably lay your monitor down during the process. This will make it easier to access and remove the stand.
Make sure you have these tools ready before you proceed with the removal process. Taking the time to gather the necessary tools beforehand will help ensure a smooth and hassle-free experience.
Step 1: Turn off the monitor
The first step in removing the stand from your Dell monitor is to turn it off. Locate the power button on the monitor and press it to shut down the display. This step is essential to ensure your safety and prevent any damage to the monitor during the removal process.
When turning off the monitor, it’s important to wait a few moments to allow it to fully power down. This ensures that all internal components have properly shut off before you proceed with the next steps.
Additionally, it’s a good idea to unplug the power cable from the wall outlet to eliminate any risk of electric shock while working on the monitor. Safety should always be a top priority when performing any maintenance or adjustment tasks on your electronic devices.
Once you have turned off the monitor and unplugged the power cable, you can proceed to the next step of removing the stand from your Dell monitor.
Step 2: Unplug the power cable and any other connected cables
Before you continue with the removal process, it’s important to disconnect all cables connected to your Dell monitor. This includes the power cable as well as any other cables such as HDMI, DisplayPort, or USB cables.
Start by locating the power cable at the back of the monitor. Gently pull on the connector to unplug it from the monitor. Make sure to handle the cable by the plug rather than yanking on the cable itself to avoid any damage.
Next, inspect the back of your monitor for any other cables that are connected. These may include video cables like HDMI or DisplayPort cables, as well as USB cables for peripherals like keyboards or mice. Carefully unplug these cables one by one, being mindful of any locking mechanisms or clips that may be present.
By disconnecting all cables, you ensure that the stand removal process can be done smoothly and without any obstructions. Removing the cables also helps prevent any accidental damage to the connectors or the cables themselves.
Once you have unplugged all the necessary cables, you can move on to the next step of removing the stand from your Dell monitor.
Step 3: Find the release button or lever
After unplugging all the cables, the next step in removing the stand from your Dell monitor is to locate the release button or lever. This is the mechanism that locks the stand onto the monitor and needs to be disengaged to remove the stand.
The location of the release button or lever can vary depending on the model of your Dell monitor. It is usually located on the back of the monitor, near the bottom or side of the stand. Look for any buttons, switches, or levers that are specifically designated for releasing the stand.
If you have trouble finding the release mechanism, consult the user manual for your Dell monitor. The manual will provide detailed instructions and illustrations to help you locate the release button or lever.
It’s important to take your time and be gentle when handling the monitor and searching for the release mechanism. Applying too much force or using excessive pressure may cause damage to the monitor or the stand.
Once you have located the release button or lever, you can move on to the next step of removing the stand from your Dell monitor.
Step 4: Press the release button or move the lever to unlock the stand
With the release button or lever located, it’s time to unlock the stand from your Dell monitor. Depending on the model of your monitor, you may need to press a button or move a lever to disengage the stand.
If there is a release button, gently press it while holding the monitor securely. You may need to press and hold the button for a few seconds until you feel or hear a click. This click indicates that the stand has been successfully unlocked.
If there is a lever, carefully move it in the designated direction to release the stand from the monitor. The lever may need to be lifted, pushed, or slid to unlock the stand. Pay close attention to any markings or instructions near the lever to ensure you are moving it correctly.
During this step, it’s important to handle the monitor with care and not apply excessive force. The release mechanism should function smoothly without any need for excessive pressure. If you encounter any difficulties, refer to the user manual for your monitor or contact Dell’s support for assistance.
Once you have pressed the release button or moved the lever to unlock the stand, you are ready to proceed to the next step of removing the stand from your Dell monitor.
Step 5: Gently lift and separate the stand from the monitor
Now that the stand is unlocked, it’s time to remove it from your Dell monitor. This step requires a gentle hand and careful maneuvering to ensure the safety of both the monitor and yourself.
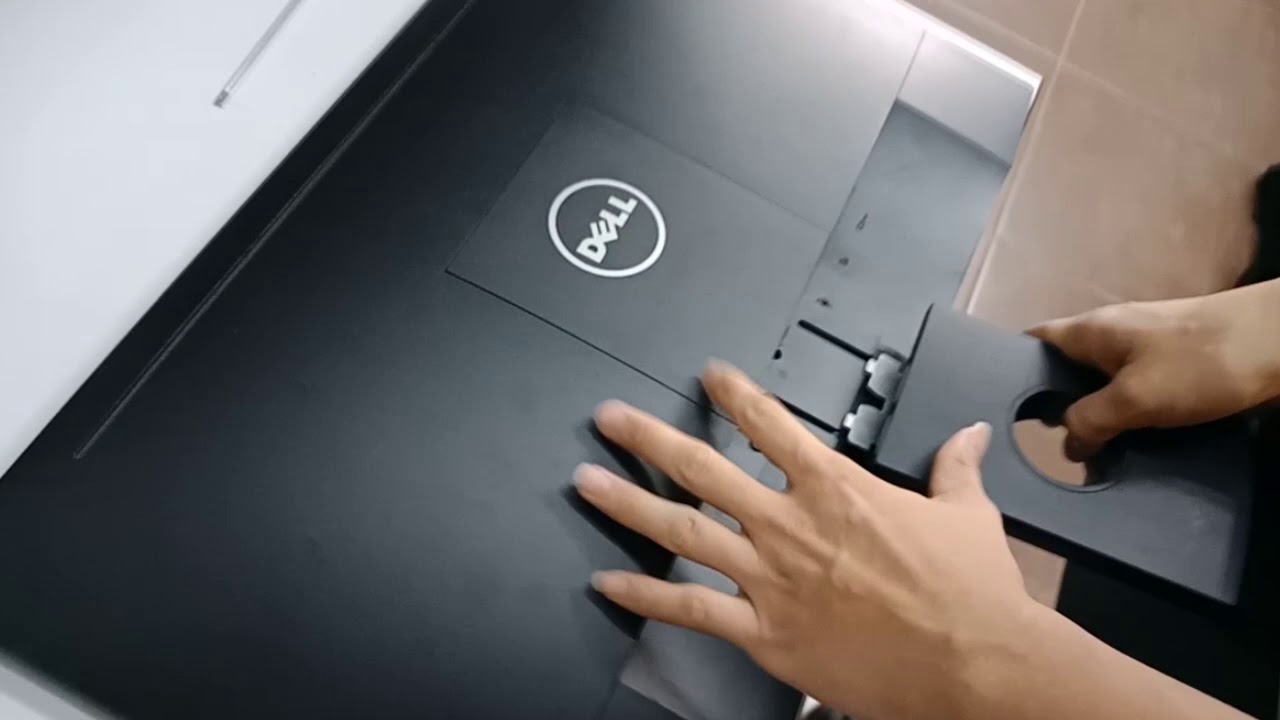
Begin by firmly holding the edges of the monitor with one hand. Make sure you have a good grip and can support the weight of the monitor. With your other hand, grasp the stand near the base or where it attaches to the monitor.
Slowly and steadily lift the monitor while simultaneously applying slight pressure to separate the stand from the monitor. Be cautious not to tilt or twist the monitor too much, as this can cause strain on the connectors or potentially damage the screen.
If there are any locking mechanisms or clips still holding the stand in place, gently release them while lifting the monitor. Take your time and ensure that the stand is completely detached from the monitor before proceeding.
Once the stand is successfully separated from the monitor, set it aside in a safe place. Pay attention to any instructions or precautions in the user manual regarding the storage or disposal of the stand.
With the stand removed, your Dell monitor is now ready to be mounted on a wall or to be paired with a different stand for optimal positioning and comfort.
Please note that the specific steps of lifting and separating the stand may vary depending on the model of your Dell monitor. If you have any concerns or confusion, it’s always best to consult the user manual or reach out to Dell’s support for assistance.
Step 6: Store the stand in a safe place
Once you have successfully removed the stand from your Dell monitor, it’s important to store it in a safe and secure location. This will ensure that the stand remains in good condition and can be easily located if needed in the future.
Start by finding a clean and dry area where you can store the stand. It’s best to choose a location away from any potential hazards or heavy objects that may cause damage. This could be a designated storage area, a cupboard, or even a sturdy box specifically designated for accessories.
Before storing the stand, it is a good idea to clean it to remove any dust or debris that may have accumulated. Use a soft cloth or a mild cleaning solution to gently wipe down the stand. Avoid using harsh chemicals or abrasive materials that could damage the surface.
If your stand has any removable parts, such as adjustable height mechanisms or cable management clips, it’s a good idea to keep these together to prevent loss or damage. You can use small storage containers or bags to keep these parts organized.
Once the stand is clean and any loose parts are securely stored, carefully place it in the designated storage area. Make sure it is positioned in a way that minimizes the risk of it falling or getting damaged.
Remember to keep the user manual of your Dell monitor handy, as it may provide specific instructions on how to store the stand or any special considerations.
By taking the time to store the stand properly, you’ll ensure that it remains in good condition and can be easily accessed if needed in the future.
Conclusion
Removing the stand from your Dell monitor is a relatively straightforward process that can be accomplished with just a few steps. By following the steps outlined in this guide and referring to the user manual specific to your monitor model, you can successfully detach the stand and prepare your monitor for wall mounting or alternative stand usage.
It is important to remember to always prioritize safety when working with electronic devices. Before proceeding with the stand removal, turn off your monitor and disconnect all cables. Take your time to locate the release button or lever, and gently unlock the stand from the monitor.
During the process, it is crucial to handle the monitor with care and avoid applying excessive force. Ensure a secure grip while lifting and separating the stand from the monitor, making sure to readjust any locking mechanisms or clips if necessary.
Once the stand is removed, store it in a safe place and keep it clean to maintain its condition. Refer to the user manual for any specific instructions on storing the stand or adhesive parts.
Remember that the steps provided in this guide serve as a general outline, and your Dell monitor model may have specific instructions that deviate slightly. Always consult the user manual or contact Dell’s support if you encounter any difficulties or require additional guidance.
With the stand successfully removed, you can now explore alternative mounting options or improve your workspace ergonomics with a new stand. Enjoy the added flexibility and customization that comes with removing the stand from your Dell monitor!


