Introduction
Welcome to the world of external hard drive partitioning! If you own a WD (Western Digital) external hard drive and need to optimize its storage capacity, partitioning is a useful technique to consider. With partitioning, you can divide your hard drive into multiple sections or partitions, each with its own file system and storage capabilities. This can be especially handy if you want to separate your personal files from work-related data, or if you need to create a dedicated partition for backups.
Partitioning your WD external hard drive allows for better organization and efficient utilization of available space. By dividing it into multiple partitions, you can manage your data more effectively, ensuring easier access and minimizing the risk of accidental data loss. Whether you’re a professional who needs separate storage spaces for different projects or a casual user looking to tidy up your drive, the process doesn’t have to be complicated.
In this guide, we’ll walk you through the steps of partitioning your WD external hard drive. We’ll cover important information, such as the basics of hard drive partitioning, the necessary considerations before partitioning, and the steps to follow for creating and formatting partitions. So, let’s dive in and unlock the full potential of your WD external hard drive!
Important Information
Before you jump into partitioning your WD external hard drive, it’s crucial to understand a few key points that will help ensure a smooth and successful process. Here are some important pieces of information to keep in mind:
- Data Backup: Prior to partitioning your hard drive, it’s highly recommended to back up all the data you currently have stored on it. Although the partitioning process itself should not cause data loss, there’s always a small risk involved. It’s better to be safe than sorry, so make sure you have a copy of all your important files stored elsewhere.
- Partitioning Limitations: While partitioning allows for better organization and storage management, keep in mind that there are limitations. Each partition will have a maximum limit on the amount of data it can hold, depending on the file system used. Additionally, altering the partition structure may affect the overall performance of your hard drive, so it’s important to choose a partitioning scheme that suits your specific needs.
- Master Boot Record (MBR) vs. GUID Partition Table (GPT): It’s essential to understand the difference between these two partitioning schemes. MBR is the traditional method and is compatible with most older operating systems. GPT, on the other hand, is the newer standard that offers support for larger drives and has additional features. Before proceeding with partitioning, make sure your operating system and system requirements are compatible with your chosen partitioning scheme.
- Resizing or Reshaping Existing Partitions: If you already have existing partitions on your WD external hard drive, be aware that resizing or reshaping them during the partitioning process may result in data loss. Therefore, it’s crucial to back up any important data on those partitions before making any changes.
- Formatting Partitions: After creating and configuring your partitions, keep in mind that you will need to format each partition with the desired file system. Formatting erases all the data on the partition, so be sure to back up any important files before proceeding with formatting.
By considering these crucial points and preparing accordingly, you’ll be well-equipped to successfully partition your WD external hard drive without any unexpected setbacks. Now that you have a solid understanding of the important information, let’s move on to the step-by-step process of partitioning.
Step 1: Understanding Hard Drive Partitioning
Before diving into the process of partitioning your WD external hard drive, it’s essential to have a clear understanding of what hard drive partitioning entails. Essentially, hard drive partitioning involves dividing your physical hard drive into separate sections or partitions, each of which acts as an independent storage unit.
Here are some key points to help you better comprehend the concept of hard drive partitioning:
- Functionality: Each partition functions as a separate drive, complete with its own file system and storage capacity. This means you can have multiple drive letters or mount points, each representing a distinct partition on your WD external hard drive.
- Organization: Partitioning allows you to organize your files and data more effectively. For example, you can create separate partitions for personal files, work-related documents, multimedia files, or even a dedicated partition for backups. This way, you can easily access and manage your data based on specific categories without sifting through a cluttered drive.
- Improved Performance: By partitioning your external hard drive, you can potentially improve the overall performance of your system. For instance, if you’re running applications or accessing files from one partition, it won’t interfere with the performance of other partitions.
- Data Protection: Partitioning your WD external hard drive can enhance data protection. If one partition becomes corrupted or affected by malware, other partitions may still remain unaffected, reducing the risk of complete data loss.
- Compatibility: Partitioning ensures compatibility with different operating systems. For instance, you can create one partition formatted in NTFS for Windows and another partition formatted in HFS+ for macOS, allowing seamless file transfer and compatibility across different platforms.
Understanding these aspects of hard drive partitioning will empower you to make informed decisions about how to structure your WD external hard drive. By delineating your storage space into logical partitions, you can optimize your workflow, protect your data, and improve the overall performance of your WD external hard drive. With this knowledge in mind, let’s move on to the next step of preparing your hard drive for partitioning.
Step 2: Preparing the Hard Drive
Before you start partitioning your WD external hard drive, it’s important to properly prepare the drive to ensure a smooth and successful partitioning process. Here are the key steps to follow:
- Connect and Back Up: Begin by connecting your WD external hard drive to your computer using the provided USB cable. Ensure that your computer recognizes the drive and then proceed to back up any important data stored on the drive. This step is crucial to safeguard your data in case of any unforeseen issues during the partitioning process.
- Check Disk Integrity: It’s a good practice to check the integrity of your hard drive before proceeding with partitioning. This helps identify any potential errors or bad sectors on the disk. To do this, open the Command Prompt (Windows) or Terminal (Mac), and enter the appropriate command to scan and repair the drive using built-in tools like CHKDSK (Windows) or FSCK (Mac).
- Free Up Space: Ensure that you have enough free space on your WD external hard drive to accommodate the new partitions you plan to create. If necessary, delete unnecessary files or transfer them to another storage device to free up space.
- Disconnect Unnecessary Devices: To avoid any interruptions during the partitioning process, disconnect any other external storage devices connected to your computer. This helps ensure that your computer focuses solely on the WD external hard drive that you’re partitioning.
- Disable Security Software: Temporarily disable any antivirus or security software on your computer. While these programs are essential for protecting your system, they can sometimes interfere with the partitioning process by preventing certain operations or falsely identifying them as potential threats.
By following these steps to properly prepare your WD external hard drive, you’ll minimize the risk of encountering any issues or data loss during the partitioning process. With the drive connected, checked for integrity, and cleared of unnecessary files, you’re now ready to move on to Step 3, where we’ll discuss determining the partitioning scheme that best suits your needs.
Step 3: Determining the Partitioning Scheme
Once you’ve prepared your WD external hard drive, the next step in the partitioning process is to determine the partitioning scheme that best suits your needs. A partitioning scheme defines how the available space on the hard drive will be divided into individual partitions. Here are some common partitioning options to consider:
- Single Partition: If you have a specific need for a large, single partition without any subdivisions, the single partition scheme might be the right choice. This is useful if you want to utilize the entire capacity of the drive as a single storage space.
- Multiple Equal-Sized Partitions: If you want to divide your hard drive into several partitions with equal storage capacities, the multiple equal-sized partitions scheme is a good option. This allows for better organization and the allocation of separate spaces for different types of files or projects.
- Customized Partitions: If you have specific storage requirements, you can create custom-sized partitions tailored to your needs. For example, you can allocate more space to a partition meant for multimedia files and less to one for regular documents.
- System and Data Partition: Another option is to create separate partitions for your operating system and your data. This can be helpful if you ever need to reinstall your operating system without affecting your data partition.
- Boot Camp Partition: For Mac users who want to install Windows on their WD external hard drive using Boot Camp, a dedicated Boot Camp partition can be created. This enables the installation of Windows alongside macOS.
Consider your specific needs, how you plan to utilize the partitions, and the available storage capacity when determining the best partitioning scheme for your WD external hard drive. It’s worth noting that the chosen scheme is not permanent, and you can always adjust it later by resizing or creating new partitions.
Once you have a clear idea of the partitioning scheme that suits your requirements, you’re ready to move on to the next step: creating the actual partitions on your WD external hard drive.
Step 4: Creating Partitions
With your partitioning scheme determined, it’s time to create the actual partitions on your WD external hard drive. Follow these steps to create partitions:
- Backup: Before proceeding, ensure that you have backed up all important data on your WD external hard drive. While the partitioning process typically does not result in data loss, it’s always better to be safe than sorry.
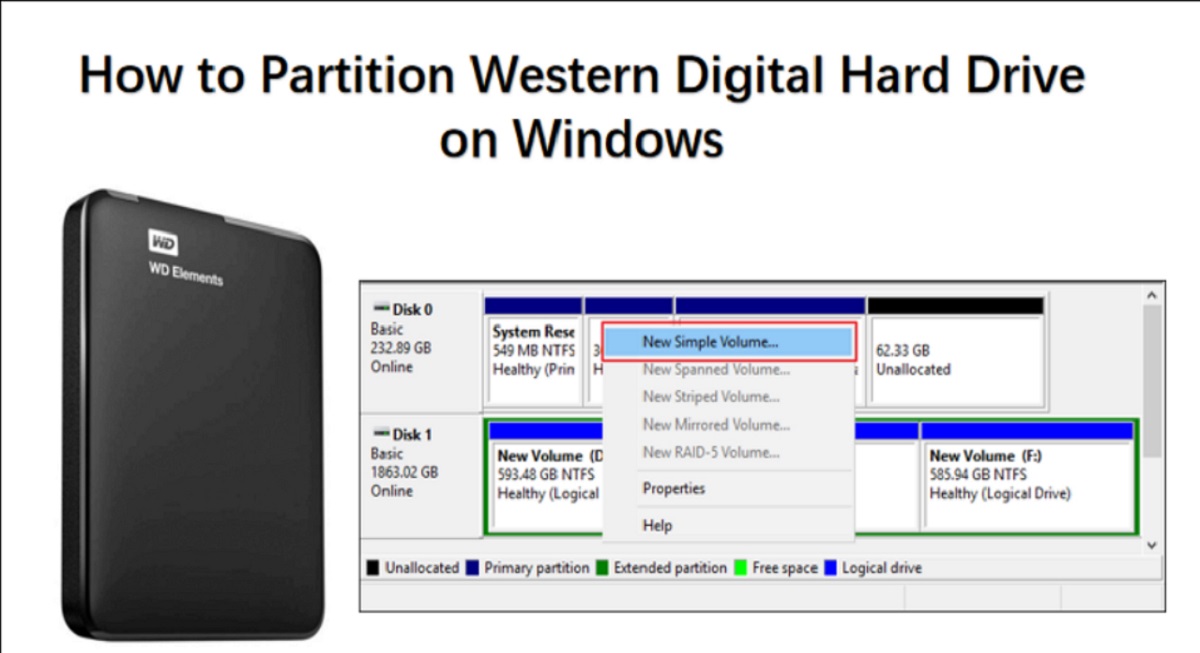
- Open Disk Management (Windows) or Disk Utility (Mac): On Windows, right-click on the Start button and select “Disk Management.” On Mac, open “Disk Utility” from the Applications > Utilities folder.
- Identify the WD External Hard Drive: In the Disk Management or Disk Utility window, locate your WD external hard drive. It will be listed along with other drives connected to your computer.
- Select Unallocated Space: If there is unallocated space on your WD external hard drive, right-click on it (Windows) or click on the “+” button (Mac) to create a new partition within that space. If there is no unallocated space, you may need to shrink an existing partition to create free space.
- Specify Partition Size and Format: In the partition creation dialog box, specify the size for the new partition. You can set it either in megabytes (MB) or as a percentage of the available space. Additionally, choose the desired file system for the partition (e.g., NTFS for Windows or APFS/HFS+ for Mac).
- Repeat for Additional Partitions: If you plan to create more than one partition, repeat the above steps for each partition, ensuring that you allocate the desired size and choose the appropriate file system. Adjust the sizes and formats as needed for each partition.
- Apply the Changes: Once you have created all the desired partitions, review your selections and then proceed to apply the changes. This will initialize and create the partitions on your WD external hard drive.
- Verify the Created Partitions: After the partition creation process is complete, verify that the new partitions are visible in Disk Management (Windows) or Disk Utility (Mac). You should see the separate partitions listed with their respective names and file systems.
By following these steps, you can successfully create partitions on your WD external hard drive according to your chosen partitioning scheme. Remember to double-check all your settings before applying the changes to ensure that you create the desired partitions with the correct sizes and file systems.
With the partitions created, we are ready to move on to the final step: formatting the newly created partitions.
Step 5: Formatting Partitions
After creating the partitions on your WD external hard drive, the next step is to format each partition with the appropriate file system. Formatting prepares the partitions for data storage and ensures compatibility with your operating system. Here’s how to format the partitions:
- Open Disk Management (Windows) or Disk Utility (Mac): If you closed the disk management or disk utility tool in the previous step, open it again.
- Locate the Partitions: In the disk management or disk utility window, locate the newly created partitions on your WD external hard drive. They should be listed as separate disk volumes.
- Right-click on the First Partition (Windows) or Select the First Partition (Mac): Choose the first partition that you want to format. Right-click on it in Disk Management (Windows), or select it in Disk Utility (Mac).
- Choose the Format Option: In the context menu (Windows) or the toolbar (Mac), select the format option. Choose the appropriate file system for your partition, such as NTFS (Windows) or APFS/HFS+ (Mac).
- Adjust the Formatting Settings: Depending on the operating system, you may have the option to customize the formatting settings. You can typically leave the default settings, or adjust the allocation unit size, volume label, and other settings as desired.
- Confirm and Start Formatting: Review the formatting settings, making sure they match your requirements. Once satisfied, click on the “Format” button or equivalent option to initiate the formatting process.
- Repeat for Each Partition: Repeat the above steps for each partition on your WD external hard drive, ensuring that you format each partition with the desired file system.
- Monitor the Formatting Process: As the formatting process begins, monitor its progress. Larger partitions may take more time to format, so be patient and let the process complete.
- Verify the Formatted Partitions: After the formatting process is complete, check Disk Management (Windows) or Disk Utility (Mac) again to ensure that each partition is now properly formatted and ready for use.
By following these steps, you can successfully format the partitions on your WD external hard drive. Once the formatting is complete, the partitions will be ready for storing data in their respective file system formats. Remember to repeat these steps for each partition you created, ensuring that each partition is correctly formatted according to your requirements.
Congratulations! You have successfully partitioned and formatted your WD external hard drive. You can now utilize the separate partitions to efficiently manage and access your data, making the most out of the available storage space.
Conclusion
Partitioning your WD external hard drive is a valuable technique to optimize storage capacity and manage your data more effectively. By following the steps outlined in this guide, you can successfully partition your WD external hard drive and enjoy the benefits of better organization, improved performance, and enhanced data protection.
Throughout this process, we’ve covered important information to consider, such as the need for data backup, the limitations of partitioning, and the importance of choosing the right partitioning scheme. We’ve also discussed the steps involved in preparing your hard drive, determining the partitioning scheme, creating the partitions, and formatting them with the appropriate file system.
Remember to always back up your data before proceeding with any partitioning or formatting operations. Additionally, ensure that you follow the specific instructions for your operating system, as the steps may vary slightly between Windows and Mac.
By partitioning your WD external hard drive, you can take control of your storage space and enhance your overall computing experience. Whether you’re a professional seeking better organization for different projects or a casual user looking to separate personal and work-related files, partitioning can provide the solution you need.
So, go ahead and put this knowledge into practice. Partition your WD external hard drive and enjoy the benefits of improved storage management and data organization. Start utilizing the separate partitions to simplify your workflow, protect your data, and ensure efficient utilization of your WD external hard drive.
Remember, you have the power to optimize your digital storage experience. Happy partitioning!