Introduction
Welcome to this guide on how to partition a Seagate external hard drive. Whether you have just purchased a new Seagate external hard drive or you want to reorganize your existing drive, partitioning can be a useful technique to optimize storage and improve data management. By dividing your hard drive into multiple partitions, you can separate your data into different areas, allowing for easier organization and enhanced data security.
Partitioning a Seagate external hard drive can also be beneficial if you want to set up separate spaces for different types of files, such as documents, media, or backups. It can help prevent data loss by isolating problems to specific partitions rather than affecting the entire drive. Additionally, partitioning can make it easier to format or reinstall your operating system without affecting your personal files.
Before embarking on the partitioning process, it is crucial to understand the steps involved and any potential risks. This guide will walk you through the process, ensuring that you can partition your Seagate external hard drive smoothly and efficiently. By following the steps outlined, you will be able to create new partitions, assign drive letters, customize partition settings, and format the partitions to suit your specific needs.
Partitioning a Seagate external hard drive is a relatively straightforward process, but it is important to note that it will erase all existing data on the drive. Therefore, it is crucial to back up any important files before proceeding. Additionally, it is recommended to have the latest drivers and firmware for your Seagate external hard drive to ensure compatibility and optimal performance.
In the following sections, we will guide you through the step-by-step process of partitioning your Seagate external hard drive. From connecting the drive to formatting the partitions, we will cover each stage in detail, enabling you to partition your Seagate external hard drive with confidence and ease.
Reasons for Partitioning a Seagate External Hard Drive
Partitioning a Seagate external hard drive can offer a multitude of benefits that can improve your overall storage experience. Let’s explore some of the key reasons why you might consider partitioning your Seagate external hard drive:
1. Organization and Data Management: Partitioning allows you to create distinct sections on your hard drive for different types of files. For example, you can have a partition for documents, another for media files, and yet another for backups. This organization makes it easier to locate and manage specific files, reducing the clutter and improving efficiency.
2. Enhanced Data Security: By partitioning your Seagate external hard drive, you can isolate your data into separate sections. In case of a system or drive failure, the issue may only affect one partition, keeping the data in other partitions safe and accessible. This provides an added layer of data security, ensuring that critical files are protected.
3. Increased Performance: Partitioning your external hard drive can enhance its overall performance. By separating your data into different partitions, the drive’s read and write speeds can be optimized. This is especially beneficial when working with large files or applications that require high-speed data access.
4. Flexibility and Versatility: Partitioning allows you to allocate different file systems to each partition based on your specific needs. For example, you can use NTFS for your personal files, exFAT for cross-platform compatibility, and FAT32 for older devices. Having multiple file systems enables you to use the hard drive on different operating systems and devices without any compatibility issues.
5. Ease of Maintenance and Troubleshooting: When you need to perform maintenance tasks, such as formatting your operating system or reinstalling software, having separate partitions can save time and effort. Instead of backing up and restoring the entire drive, you can focus on the specific partition housing the necessary files.
Partitioning a Seagate external hard drive offers a range of benefits that can greatly improve your storage experience. Whether you need better organization, enhanced data security, increased performance, flexibility, or simplified maintenance, partitioning is a valuable tool that can cater to your specific needs. Now that you understand the reasons for partitioning, let’s move on to the steps involved in partitioning your Seagate external hard drive.
Before You Begin
Before diving into the process of partitioning your Seagate external hard drive, there are a few key considerations and preparations you should make:
1. Backup Your Data: Partitioning a hard drive involves modifying the disk’s structure, which can result in data loss if not done correctly. Therefore, it is crucial to back up any important files or data on your Seagate external hard drive before proceeding. This ensures that even if something goes wrong during the partitioning process, your data remains safe and accessible.
2. Check Compatibility: Ensure that your Seagate external hard drive is compatible with the computer or operating system you plan to use for partitioning. Check for compatibility requirements and ensure you have the necessary drivers and firmware updates for your Seagate drive from the manufacturer’s website.
3. Understand the Risks: Keep in mind that partitioning a drive carries some level of risk, as it involves modifying the disk’s structure and can potentially lead to data loss if not done correctly. It is important to proceed with caution, follow the steps outlined in this guide, and double-check your actions before making any changes to the partitions on your Seagate external hard drive.
4. Empty the Drive: If you have any important files or data on your Seagate external hard drive, make sure to transfer them to another storage location to avoid accidental deletion during the partitioning process. It is recommended to have a clean drive without any data on it to start the partitioning procedure.
5. Gather Necessary Tools: To partition your Seagate external hard drive, you will need access to a computer with administrative rights and Disk Management utility. Disk Management is a built-in Windows tool that allows you to manage disk partitions. Ensure that your computer is functioning properly and you have the necessary access and tools before proceeding.
6. Read the User Manual: Familiarize yourself with the user manual or documentation provided by Seagate for your external hard drive. The manufacturer may have specific instructions or recommendations for partitioning their drives, and it is always beneficial to have a thorough understanding of your device before making any changes.
By taking these precautions and making the necessary preparations, you can ensure a smoother and safer partitioning process for your Seagate external hard drive. Once you have completed these steps, you are ready to move on to the actual process of partitioning your drive, which we will cover in the following sections of this guide.
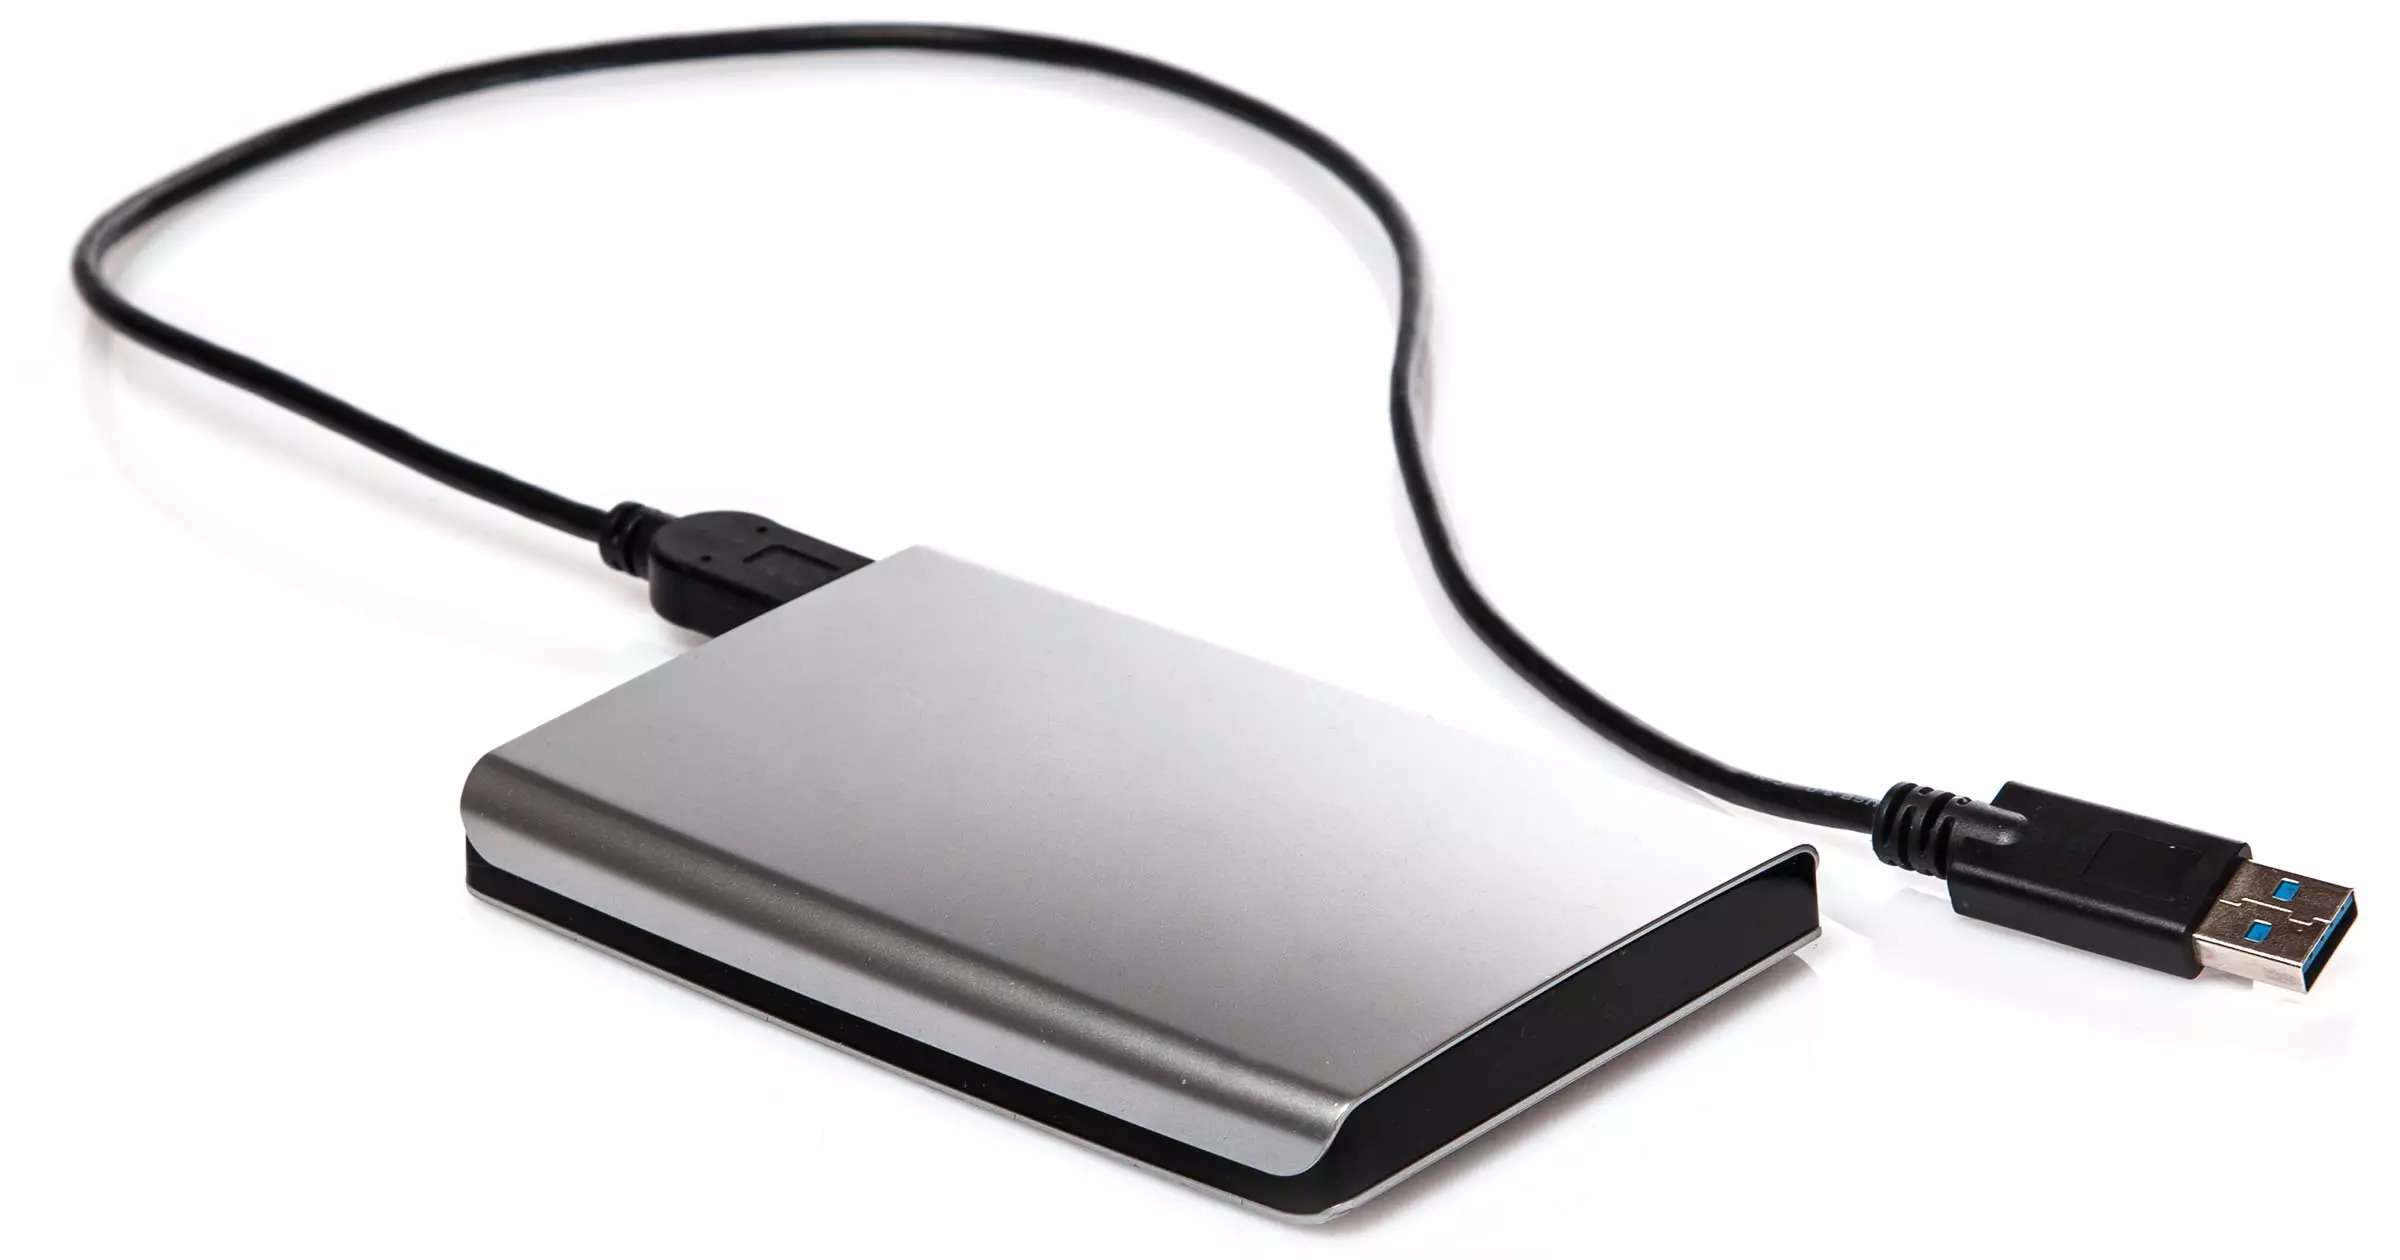
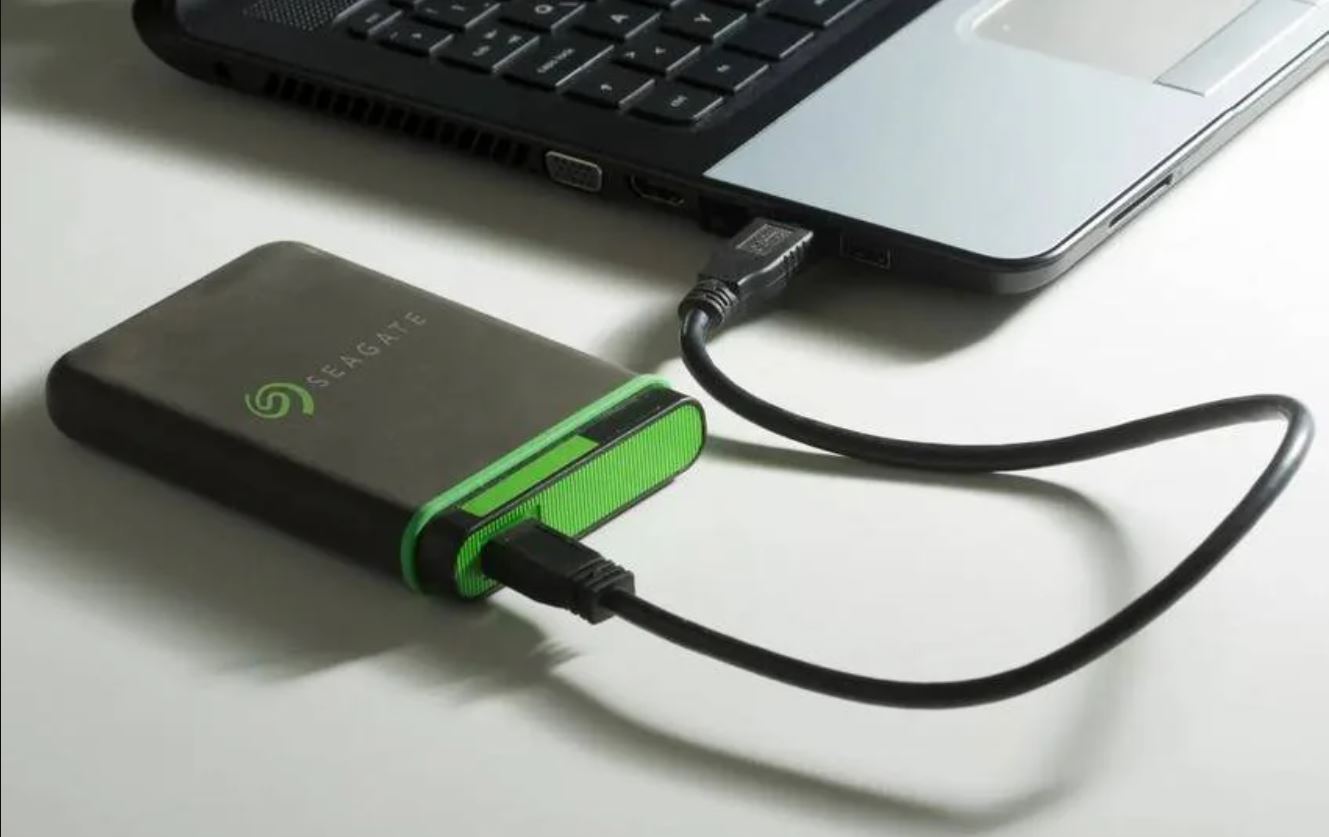
Step 1: Connect the Seagate External Hard Drive
The first step in partitioning your Seagate external hard drive is to ensure it is properly connected to your computer. Follow these simple steps:
1.1. Verify the Connection: Check that the Seagate external hard drive is correctly connected to your computer. Use the provided USB cable to connect the drive to an available USB port on your computer. Make sure the connection is secure and that the drive is powered on.
1.2. Detect the Drive: Once connected, your computer should automatically detect the Seagate external hard drive. Depending on your computer’s settings, you may hear a notification sound or see a pop-up message indicating the drive’s presence.
1.3. Open File Explorer: Open File Explorer (Windows) or Finder (Mac) to confirm that your Seagate external hard drive is recognized and appears as a new storage device. You should see the drive listed as a separate device or under “My PC” or “This PC” on Windows or under “Devices” on Mac.
1.4. Safely Eject Any Existing Drives: If you have any other external storage devices connected to your computer, ensure they are safely ejected before proceeding. This prevents any potential conflicts or issues during the partitioning process.
1.5. Ensure Sufficient Power Supply: It is important to ensure that your Seagate external hard drive is receiving sufficient power. If your drive requires an external power supply, make sure it is properly connected and functioning. Failure to provide adequate power may cause issues during the partitioning process.
By following these steps, you can ensure that your Seagate external hard drive is properly connected to your computer and ready for the partitioning process. Once you have confirmed a successful connection, you can proceed to the next step: opening Disk Management to begin partitioning the drive. This will be covered in detail in the next section.
Step 2: Open Disk Management
To begin the partitioning process for your Seagate external hard drive, you need to open the Disk Management utility. Follow these steps:
2.1. Open the Start Menu: Click on the Start menu button located in the bottom left corner of your Windows desktop. Alternatively, you can press the Windows key on your keyboard.
2.2. Search for Disk Management: In the search bar, type “Disk Management” and select the “Create and format hard disk partitions” option that appears in the search results. This will open the Disk Management utility.
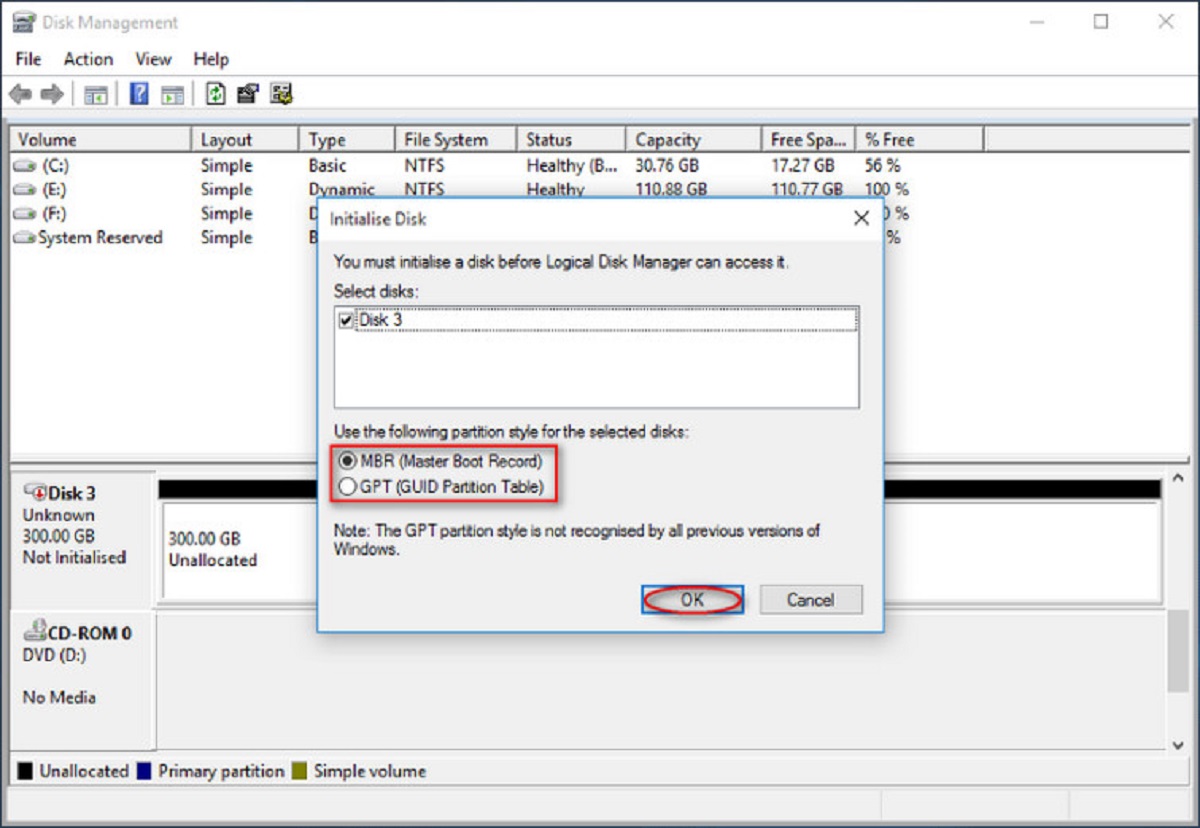
2.3. Identify the Seagate External Hard Drive: In the Disk Management window, look for the list of available disks and volumes. Locate your Seagate external hard drive in the list. It may be labeled with the brand name “Seagate” or have a generic name like “Disk 1”. Take note of the disk’s size to ensure you are selecting the correct drive, especially if you have multiple storage devices connected to your computer.
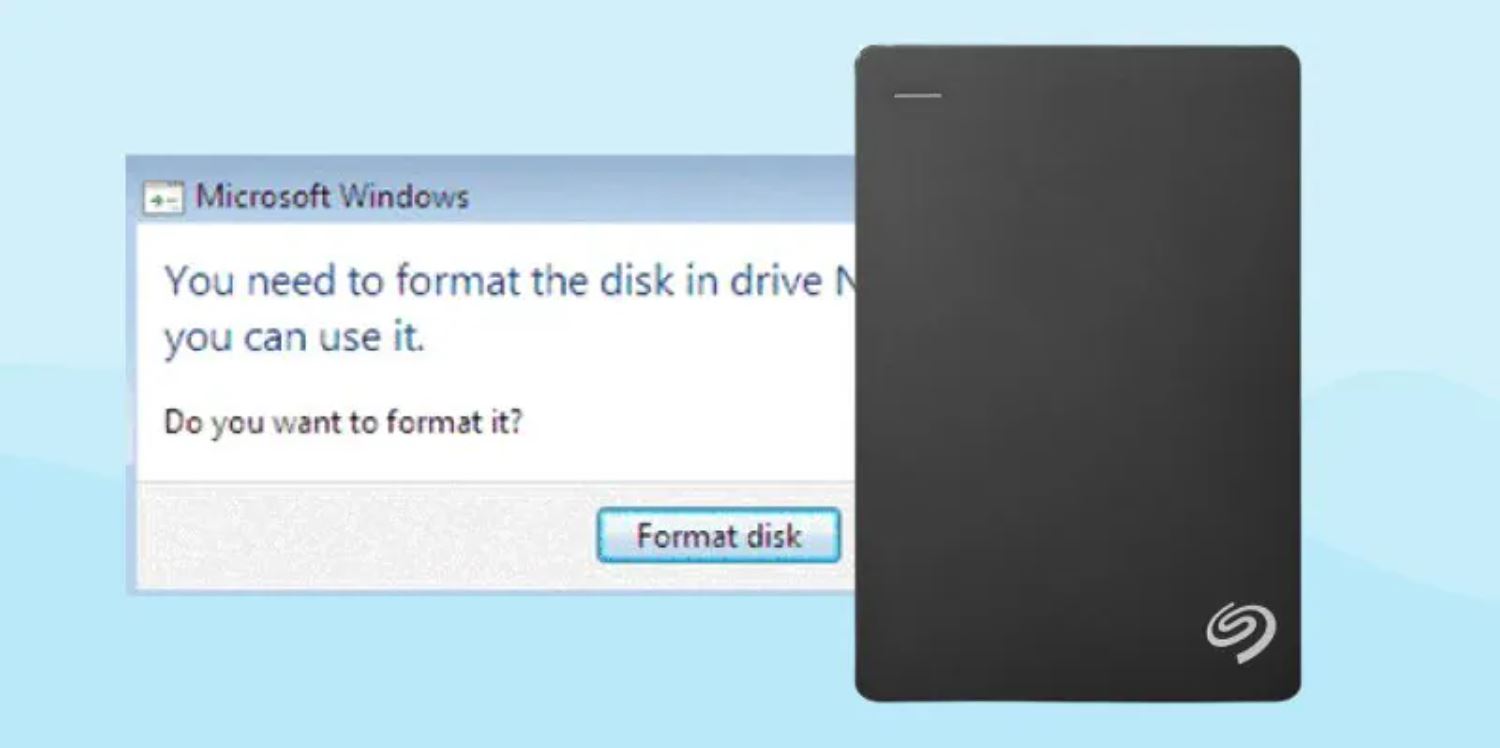
2.4. Additional Steps (if prompted): In some cases, if it is the first time you are connecting the Seagate external hard drive to your computer, you may be prompted with a window asking you to initialize the disk. Follow the on-screen instructions to proceed with disk initialization, selecting the appropriate options (usually MBR or GPT) based on your needs. If you are not prompted with this window, proceed to the next step.
Opening the Disk Management utility provides you with the necessary tools and information to manage your hard drives and create partitions. In the next step, we will cover the process of deleting existing partitions (if any) to prepare the Seagate external hard drive for new partitions. Stay tuned!
Step 3: Delete Existing Partitions (if any)
In order to create new partitions on your Seagate external hard drive, you may need to delete any existing partitions that are currently on the drive. Follow these steps to delete existing partitions:
3.1. Identify Existing Partitions: In the Disk Management window, locate the existing partitions on your Seagate external hard drive. They will be displayed as individual blocks of colored bars, representing the allocated space on the drive.
3.2. Right-click on the Partition to Delete: Right-click on the partition you want to delete and select “Delete Volume” from the context menu. You may encounter a warning message informing you that all data on the partition will be lost. Make sure you have backed up any important files before proceeding.
3.3. Confirm the Deletion: After selecting “Delete Volume,” a confirmation prompt will appear. Review the information and click “Yes” to confirm the deletion of the partition. The process may take a few moments, depending on the size of the partition.
3.4. Repeat for Additional Partitions: If there are multiple partitions on your Seagate external hard drive that you want to delete, repeat the above steps for each partition until all existing partitions have been removed.
3.5. Verify Unallocated Space: Once the partitions have been deleted, you will see “Unallocated” space on your Seagate external hard drive. This indicates that the space is now available for creating new partitions.
Deleting existing partitions is an essential step to make room for new partitions on your Seagate external hard drive. By following the steps outlined above, you can clear the drive’s space and prepare it for the process of creating new partitions. In the next step, we will cover the process of creating new partitions on the unallocated space. Keep on reading!
Step 4: Create New Partitions
Now that you have cleared the existing partitions on your Seagate external hard drive, it’s time to create new partitions to allocate the available space. Follow these steps to create new partitions:
4.1. Right-click on the Unallocated Space: In the Disk Management window, right-click on the unallocated space and select “New Simple Volume” from the context menu. This will open the New Simple Volume Wizard, which will guide you through the process of creating a new partition.
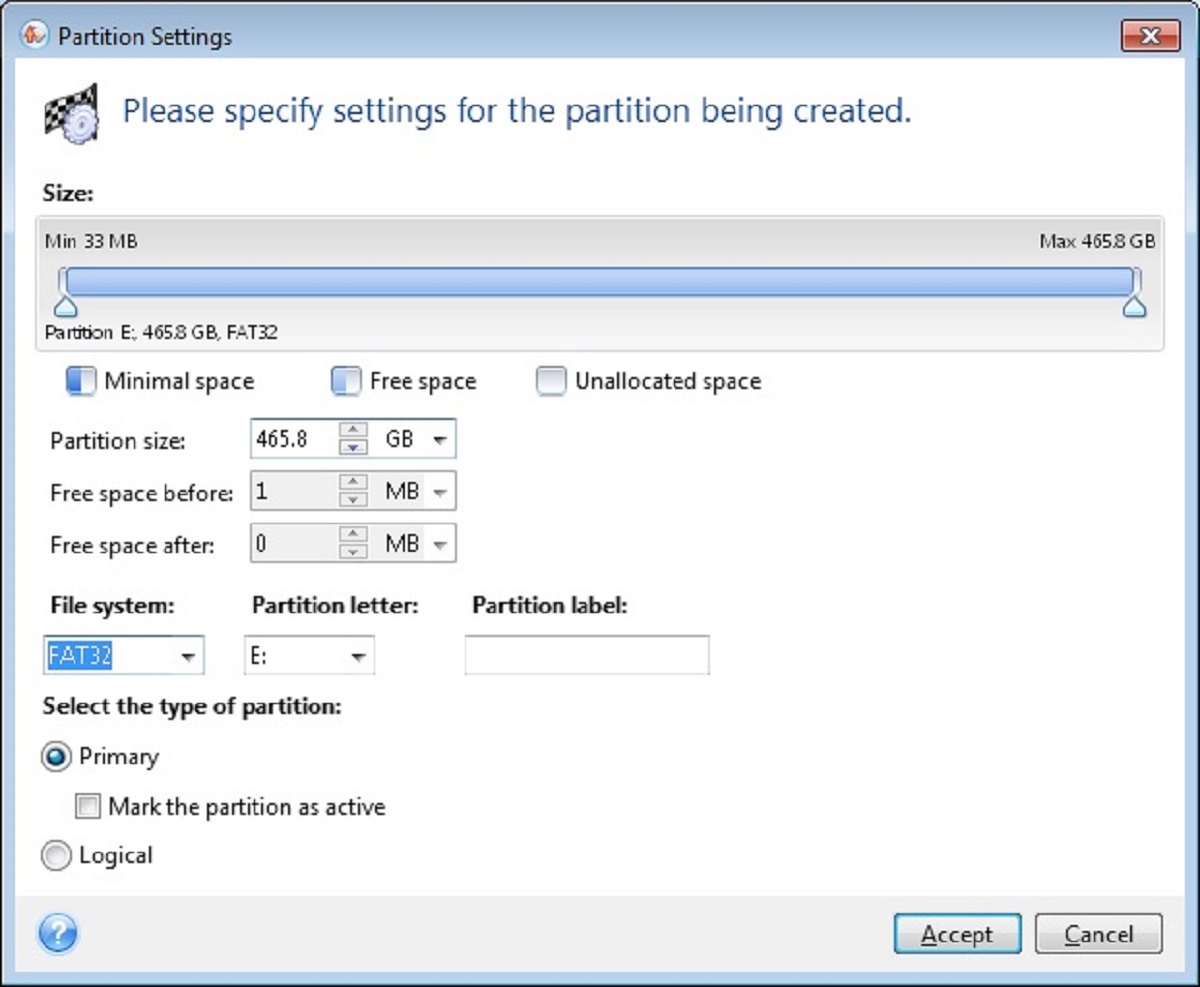
4.2. Configure the Partition Size: In the New Simple Volume Wizard, specify the size of the partition you want to create. You can either allocate the entire unallocated space to a single partition or divide it into multiple partitions by entering the desired size in megabytes (MB) or gigabytes (GB). You can also choose to leave a portion of the unallocated space for future partitions.
4.3. Assign a Drive Letter or Mount Point: Next, you will be prompted to assign a drive letter or mount point to the new partition. A drive letter is a single letter of the alphabet (e.g., E:, F:, etc.) that will be used to identify the partition in File Explorer. Alternatively, you can choose to mount the partition as an empty folder on an existing NTFS volume.
4.4. Format the Partition: In the next step, you will be asked to specify the file system and file allocation unit size for the partition. The file system determines how the data on the partition is organized and can be FAT32, NTFS, exFAT, or others. Choose the appropriate file system based on your needs and select the default allocation unit size for optimal performance, unless you have specific requirements.
4.5. Complete the Wizard: Review the settings you have configured for the new partition and click “Finish” to complete the New Simple Volume Wizard. The wizard will apply the changes and format the partition, which may take some time depending on the size of the partition.
4.6. Repeat for Additional Partitions: If you want to create multiple partitions on your Seagate external hard drive, repeat the above steps for each partition you want to create. Assign different drive letters or mount points for each partition to distinguish between them.
By following these steps, you can create new partitions on your Seagate external hard drive. These partitions will allow you to organize your data more efficiently and improve the overall management of your storage. In the next step, we will cover the process of assigning drive letters to the new partitions. Stay tuned!
Step 5: Assign Drive Letters
After creating new partitions on your Seagate external hard drive, the next step is to assign drive letters to these partitions. Follow these steps to assign drive letters:
5.1. Open Disk Management: If you have closed the Disk Management window, reopen it by following the steps mentioned in Step 2.
5.2. Locate the New Partitions: In the Disk Management window, you will see the newly created partitions labeled as “New Volume” or “Unallocated”. Identify the partitions that you want to assign drive letters to.
5.3. Right-click on the Partition: Right-click on the partition and select “Change Drive Letter and Paths” from the context menu. This will open a new window displaying the current drive letter (if any) and providing options to modify it.
5.4. Click on “Change”: In the Change Drive Letter and Paths window, click on the “Change” button to assign a new drive letter.
5.5. Select a Drive Letter: From the drop-down menu, select an available drive letter that you want to assign to the partition. It is recommended to choose a letter that is not already in use by another drive to avoid conflicts.
5.6. Confirm the Change: After selecting the new drive letter, click on “OK” to confirm the change. A warning message might appear stating that programs that rely on drive letters might not run correctly. Click “Yes” to proceed.
5.7. Repeat for Additional Partitions: If you have created multiple partitions, repeat the above steps for each partition to assign drive letters to them.
Assigning drive letters to the new partitions on your Seagate external hard drive makes them easily identifiable in File Explorer or any other file management tool. Each partition will have its own unique drive letter, which allows you to access and manage the data within them seamlessly.
In the next step, we will cover the process of formatting the partitions on your Seagate external hard drive. Formatting is an essential step to prepare the partitions for storing data. Let’s proceed!
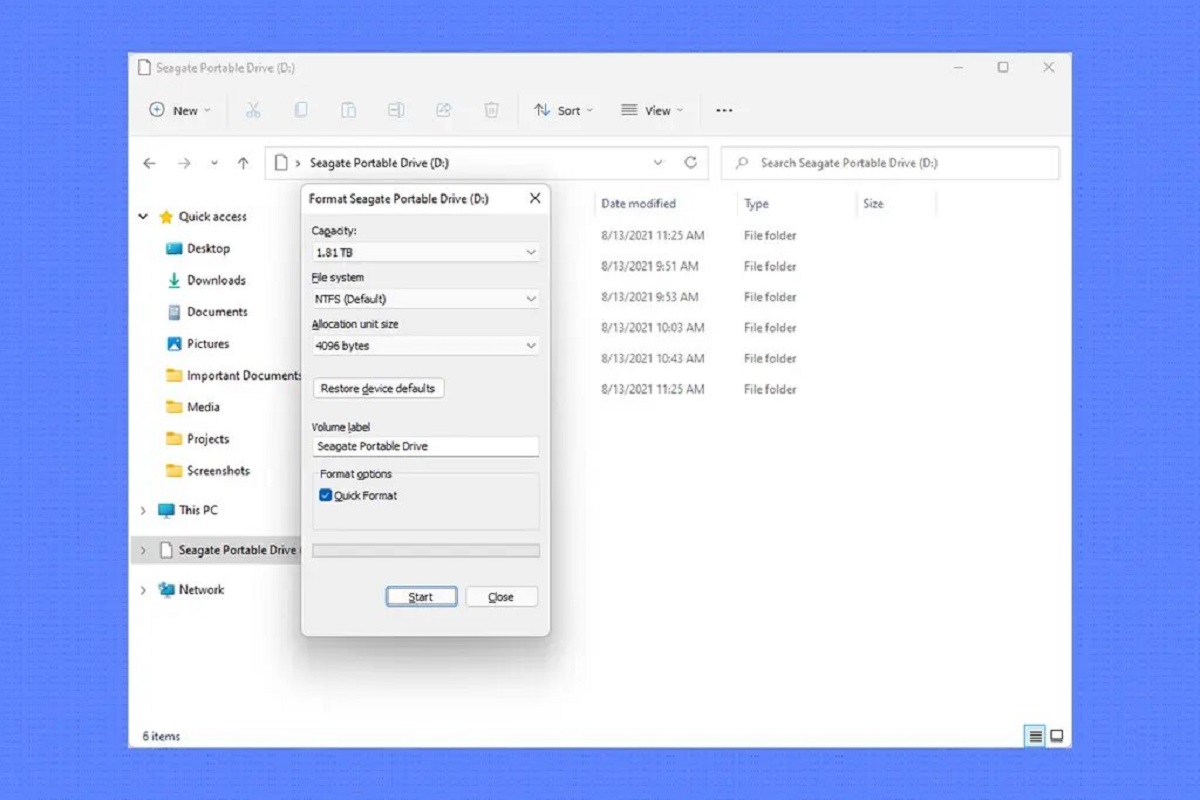
Step 6: Format the Partitions
Once you have assigned drive letters to your newly created partitions on the Seagate external hard drive, the next step is to format these partitions. Formatting prepares the partitions for storing data and determines the file system that will be used. Follow these steps to format the partitions:
6.1. Open Disk Management: If you have closed the Disk Management window, reopen it by following the steps mentioned in Step 2.
6.2. Locate the New Partitions: In the Disk Management window, you will see the newly created partitions labeled with their assigned drive letters. Identify the partitions that you want to format.
6.3. Right-click on the Partition: Right-click on the partition you want to format and select “Format” from the context menu. This will open the Format window.
6.4. Configure File System and Allocation Unit Size: In the Format window, you can choose the file system for the partition. The available options typically include NTFS, FAT32, and exFAT. Select the desired file system based on your needs, keeping in mind the compatibility requirements of the devices that will access the partition. You can also specify the allocation unit size, which is the minimum space used to store data on the partition. The default allocation unit size is recommended for most scenarios.
6.5. Enter a Volume Label: Optionally, you can enter a volume label or a name for the partition to help you easily identify its purpose or content. This label will be displayed in File Explorer or any file management tool.
6.6. Perform a Quick Format (optional): By default, the “Quick Format” option is selected, which quickly formats the partition without checking for bad sectors. If you want to perform a more thorough format that checks for bad sectors, you can uncheck this option. Keep in mind that a full format may take longer to complete.
6.7. Start the Format: Click on the “Format” button to initiate the formatting process. A warning message might appear, stating that all data on the partition will be deleted. Ensure that you have backed up any important data before proceeding. Confirm the format and wait for the process to complete.
6.8. Repeat for Additional Partitions: If you have created multiple partitions, repeat the above steps for each partition to format them.
Formatting the partitions on your Seagate external hard drive prepares them for storing data and ensures compatibility with your system and devices. Once formatted, the partitions are ready to be accessed and used for file storage, backups, or any other purpose you have in mind.
In the next step, we will cover optional steps to customize partition settings, such as changing drive letters or altering file system settings. Let’s continue with the customization process!
Step 7: Customize Partition Settings (optional)
After formatting the partitions on your Seagate external hard drive, you have the option to further customize the partition settings based on your specific needs. These optional customization steps can include changing drive letters, modifying file system settings, or adjusting other advanced settings. Follow these steps to customize the partition settings:
7.1. Open Disk Management: If you have closed the Disk Management window, reopen it by following the steps mentioned in Step 2.
7.2. Locate the Partition: In the Disk Management window, locate the partition that you want to customize. It should now be listed with the assigned drive letter and be labeled as a healthy partition.
7.3. Right-click on the Partition: Right-click on the partition and select the desired customization option from the context menu. You have several customizable options available:
– Change Drive Letter and Paths: Use this option to change the drive letter assigned to the partition. Select “Change Drive Letter and Paths” and follow the prompts to assign a new drive letter.
– Extend Volume: This option allows you to expand the size of the partition if there is unallocated space available adjacent to it. Select “Extend Volume” and follow the prompts to increase the partition size.
– Shrink Volume: If you want to decrease the size of the partition, select “Shrink Volume” and follow the prompts to specify the new size.
– Properties: Selecting “Properties” will display additional information and settings for the partition, such as the file system, capacity, and used/free space.
7.4. Customize Settings: Based on the option you selected, customize the settings as desired. For example, you can change the drive letter to a different available letter, extend or shrink the partition size, or explore the properties to gather more information about the partition.
7.5. Apply Changes (if applicable): After customizing the partition settings, follow the prompts to apply the changes. Depending on the customization option selected, the changes may be applied immediately or might require confirmation before being implemented.
7.6. Repeat for Additional Partitions (if applicable): If you have created multiple partitions and want to customize their settings, repeat the above steps for each partition individually.
Customizing the partition settings is an optional step that allows you to further tailor the setup of your Seagate external hard drive to meet your specific needs. By changing drive letters, adjusting partition sizes, or exploring properties, you can optimize the storage experience and make the most out of your partitions.
Congratulations! You have successfully completed the process of partitioning and customizing your Seagate external hard drive. Your drive is now organized, optimized, and ready for efficient storage and data management.
Conclusion
Partitioning a Seagate external hard drive can greatly enhance storage organization, data management, and overall system performance. In this guide, we have outlined the step-by-step process to successfully partition your Seagate external hard drive.
We began by discussing the reasons for partitioning, such as improving organization, increasing data security, and enhancing performance. We then explored important considerations before diving into the partitioning process, including the need to back up data, checking compatibility, and understanding the associated risks.
Next, we walked through each step, starting with connecting the Seagate external hard drive to your computer, opening the Disk Management utility, deleting existing partitions (if any), creating new partitions, assigning drive letters, formatting the partitions, and customizing partition settings as desired.
Throughout the guide, we emphasized the importance of backing up data before making any changes to the drive’s structure and highlighted specific considerations at each stage to ensure the process is executed smoothly and safely.
By following these instructions, you can effectively partition your Seagate external hard drive and optimize its storage capabilities. Whether you’re looking to separate files for better organization, secure data in individual partitions, or improve system performance, partitioning provides a powerful solution.
Remember to regularly back up your data and keep your Seagate external hard drive firmware and drivers up to date to ensure optimal performance and compatibility with your system.
With your newly partitioned Seagate external hard drive, you can now enjoy an organized and efficient storage solution that meets your specific needs. Take advantage of the benefits partitioning offers, such as improved data management, easy formatting, and the flexibility to customize settings as required.
Now that you have successfully partitioned your Seagate external hard drive, you can make the most of your storage space and unleash the full potential of your device. Best of luck with your newly partitioned drive!