Introduction
Welcome to our guide on how to make an SSD bootable! In today’s digital age, speed is of utmost importance, and having a solid-state drive (SSD) as your boot drive can significantly improve the performance and overall responsiveness of your computer. Whether you’re a power user, a gamer, or simply someone who wants their computer to run faster, upgrading to an SSD as your boot drive is a worthwhile investment.
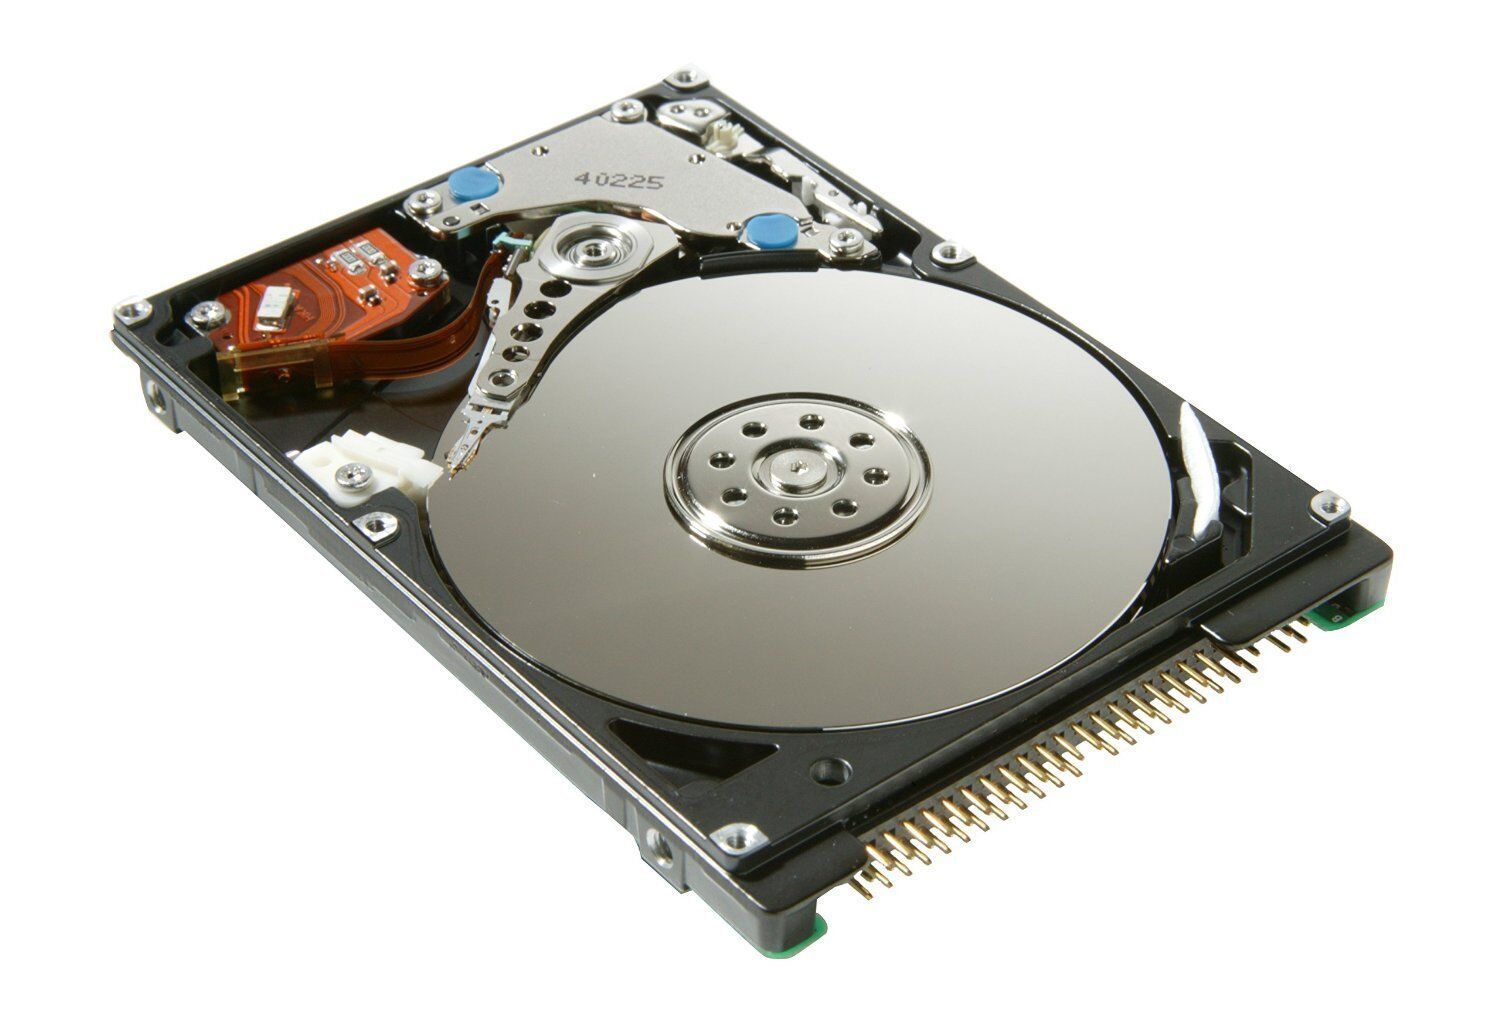
Before we dive into the technical aspects of making an SSD bootable, let’s first understand what an SSD is. Unlike traditional hard disk drives (HDDs) that use spinning platters and magnetic storage, SSDs rely on flash memory to store data. This flash memory technology allows for faster data access, reduced power consumption, and increased durability compared to HDDs.
Now, you might be wondering, what are the benefits of using an SSD as a boot drive? Well, there are several advantages to consider. First and foremost, an SSD can significantly reduce boot times, allowing you to start up your computer in a matter of seconds rather than minutes. Additionally, SSDs can improve the overall performance of your operating system by speeding up tasks such as opening applications, launching games, and accessing files.
Another key benefit of using an SSD as a boot drive is its reliability. Since there are no moving parts in an SSD, the risk of mechanical failure is significantly reduced compared to an HDD. This means fewer chances of data loss and a more dependable computing experience.
Now that we’ve discussed the advantages of using an SSD as a boot drive, let’s move on to preparing for the installation process. In the next section, we’ll talk about the necessary steps you need to take before making the switch to an SSD boot drive.
What is an SSD?
An SSD, or solid-state drive, is a storage device that uses flash memory to store data. Unlike traditional hard disk drives (HDDs) that rely on spinning platters and magnetic storage, SSDs utilize a semiconductor-based memory. This flash memory technology allows for faster data access, improved performance, and increased durability.
Inside an SSD, you’ll find a controller that manages the data flow and memory cells where the data is stored. These memory cells are divided into pages, which can be read from or written to individually. The pages are grouped into blocks, and when data needs to be deleted or modified, the entire block is erased and rewritten.
One of the key advantages of SSDs is their incredible speed. Unlike HDDs, which have mechanical components that introduce latency, SSDs can access data almost instantaneously. This means faster boot times, quicker application launches, and snappier overall performance.
SSDs also have a lower power consumption compared to HDDs. With no spinning platters or moving parts, SSDs require less energy to operate. This not only results in lower electricity bills but also contributes to longer battery life for laptops and other portable devices.
Another major advantage of SSDs is their reliability. Since they have no moving parts, the risk of mechanical failure is greatly reduced. This means a lower chance of data loss and a more durable storage solution. Additionally, SSDs are less susceptible to shock and vibration, making them ideal for portable devices that are frequently moved.
While SSDs were initially more expensive than HDDs, the prices have significantly dropped over the years, making them more accessible to consumers. Furthermore, the increasing demand for SSDs has driven advancements in technology, resulting in larger capacities and faster speeds.
In summary, an SSD is a storage device that uses flash memory technology to store data. It offers faster speeds, improved performance, lower power consumption, enhanced reliability, and increased durability compared to traditional HDDs. With these benefits, SSDs have become an essential component in modern computing, providing users with a faster and more efficient experience.
Benefits of using an SSD as a Boot Drive
Using an SSD as a boot drive can bring numerous advantages to your computer’s performance and overall user experience. Let’s delve into some of the key benefits:
1. Faster Boot Times: One of the most noticeable benefits of using an SSD as a boot drive is the significant reduction in boot times. Unlike traditional hard disk drives (HDDs), which require time to spin up and locate data on mechanical platters, SSDs provide near-instantaneous access to the operating system. This means you can start up your computer in just a matter of seconds, eliminating those long waiting periods.
2. Improved Overall Performance: In addition to faster boot times, an SSD as a boot drive can enhance the overall performance of your computer. Everything from loading applications and launching games to accessing files and multitasking will be noticeably faster and more responsive. This means you can get more done in less time and enjoy a smoother computing experience.
3. Reduced Loading Times: SSDs excel at reducing loading times for various tasks and applications. Whether you’re opening large documents, editing multimedia files, or running resource-intensive software, an SSD can significantly speed up these operations. This is particularly beneficial for professionals who rely on efficient workflows and need quick access to their work files.
4. Energy Efficiency: SSDs typically consume less power than HDDs due to their lack of mechanical components. This not only results in reduced electricity consumption but also contributes to extended battery life for laptops and other portable devices. With an SSD as your boot drive, you can enjoy longer usage times on the go before needing to recharge.
5. Enhanced Durability: Since SSDs have no moving parts, they are more resistant to physical damage caused by shocks, drops, or vibrations. This makes them ideal for portable devices that are susceptible to movement, such as laptops and tablets. By using an SSD as your boot drive, you can have peace of mind knowing that your data is better protected against mechanical failure.
6. Quieter Operation: HDDs can generate noise due to the movement of their mechanical components. In contrast, SSDs operate silently as there are no moving parts involved. By upgrading to an SSD boot drive, you’ll enjoy a quieter computing environment without the distracting sound of spinning disks.
7. Improved Longevity: SSDs typically have a longer lifespan compared to HDDs, thanks to their enhanced durability and lack of mechanical wear and tear. This means you can expect your SSD boot drive to last longer, reducing the frequency of replacements and ensuring a reliable storage solution for years to come.
Overall, using an SSD as a boot drive brings a multitude of benefits, including faster boot times, improved performance, reduced loading times, energy efficiency, enhanced durability, quieter operation, and improved longevity. By making the switch to an SSD, you’ll experience a noticeable upgrade in your computer’s speed and responsiveness, allowing you to work more efficiently and enjoy a smoother computing experience.
Preparing for the SSD Installation
Before you can install your SSD as a boot drive, there are a few essential steps you need to take to ensure a smooth transition. These preparations will help you avoid potential issues and ensure that the installation process goes smoothly. Let’s explore the key steps:
1. Backup Your Data: Before making any changes to your computer’s storage configuration, it’s crucial to back up all your data. This includes important files, documents, photos, videos, and any other data you don’t want to lose. You can use an external hard drive, cloud storage, or a backup software solution to create a copy of your data. This step acts as a safety net in case anything goes wrong during the installation process.
2. Choose the Right SSD: Consider the storage capacity you require for your boot drive. SSDs come in various sizes, so make sure to choose one that accommodates your needs. Additionally, check if your computer supports the SSD interface, such as SATA or NVMe. This will ensure compatibility with your system and maximize the performance benefits of your new SSD.
3. Gather Necessary Tools: Depending on your computer’s design, you may need specific tools to install the SSD. Common tools include a small screwdriver, mounting brackets, and cables. Refer to your computer’s manual or manufacturer’s instructions to determine the tools required for the installation. Having these tools on hand beforehand will make the process much easier and quicker.
4. Clear Space for the SSD: Since most computers come with limited drive bays, you may need to free up space for the SSD. Assess your current storage configuration and determine if any drives can be removed or replaced. If necessary, back up the data from the drive you plan to remove and uninstall it from your system. This step ensures that you have a vacant drive bay to install your new SSD.
5. Prepare Windows Installation Media: If you are performing a fresh installation of the operating system on your new SSD, you’ll need a Windows installation media. This can be a USB drive or a DVD with the Windows installation files. Create the installation media by following the instructions provided by Microsoft on their official website. Having the installation media ready will allow you to proceed with the installation process smoothly.
6. Familiarize Yourself with BIOS Settings: Depending on your computer’s BIOS configuration, you may need to make specific adjustments to recognize the SSD as the boot drive. Consult your computer’s manual or manufacturer’s website to understand how to access the BIOS settings and make the necessary changes. Being familiar with these settings will help you navigate the BIOS menu with ease during the installation process.
By following these preparation steps, you’ll be well-equipped to install your SSD as a boot drive. Remember to back up your data, choose the right SSD, gather the necessary tools, clear space for the SSD, prepare Windows installation media, and familiarize yourself with the BIOS settings. These preparations will ensure a seamless installation experience and help you maximize the performance benefits of your new SSD boot drive.
Cloning Your Current Boot Drive to the SSD
Once you have prepared for the installation of your SSD as a boot drive, the next step is to clone your current boot drive to the SSD. Cloning allows you to transfer the contents of your existing drive, including the operating system, applications, and data, to the new SSD. This ensures that you can seamlessly transition to the SSD without reinstalling everything from scratch. Here’s how to clone your current boot drive:
1. Choose a Cloning Tool: There are several cloning tools available, both free and paid, that can facilitate the cloning process. Popular options include Macrium Reflect, Clonezilla, and EaseUS Todo Backup. Research and select a tool that best suits your needs and download it from the official website.
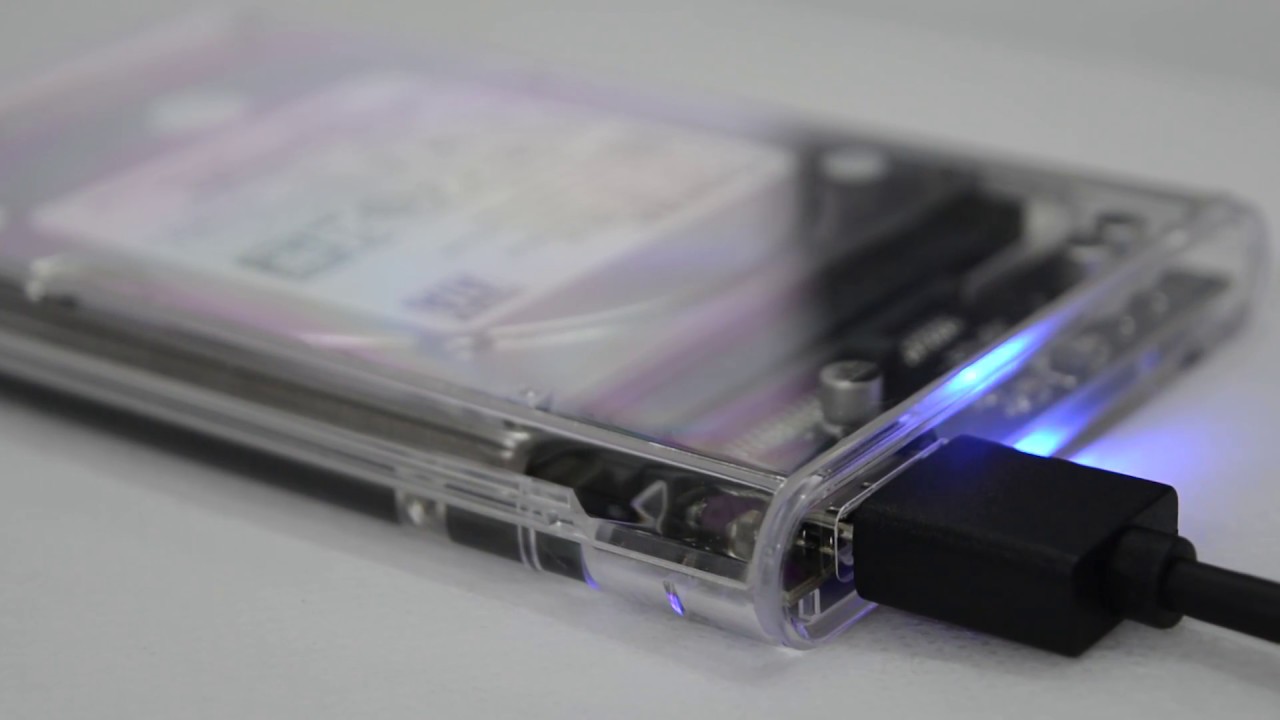
2. Connect the SSD to Your Computer: Install the SSD into your computer, either by connecting it directly to an available SATA port or installing it into a drive bay. Ensure that the SSD is properly connected and recognized by your system before proceeding with the cloning process.
3. Launch the Cloning Tool: Open the cloning tool you have chosen and follow the instructions to launch the software. Make sure to select the option to clone your current boot drive to the SSD. The interface of the cloning tool may differ depending on the software you are using, but the general process remains similar.
4. Select the Source and Destination Drives: In the cloning tool, you will need to specify the source drive (your current boot drive) and the destination drive (the SSD). Double-check that you have selected the correct drives, as any data on the destination drive will be overwritten during the cloning process.
5. Adjust the Cloning Options: Some cloning tools offer additional options that you can adjust according to your preferences. These options may include resizing partitions, excluding certain files or folders from the cloning process, or optimizing the layout of the cloned drive. Review the available options and make any necessary adjustments based on your requirements.
6. Start the Cloning Process: Once you have reviewed and confirmed the cloning settings, click on the “Start” or “Clone” button to initiate the cloning process. The time required for the cloning process to complete will depend on the size of your current boot drive and the performance speed of your SSD.
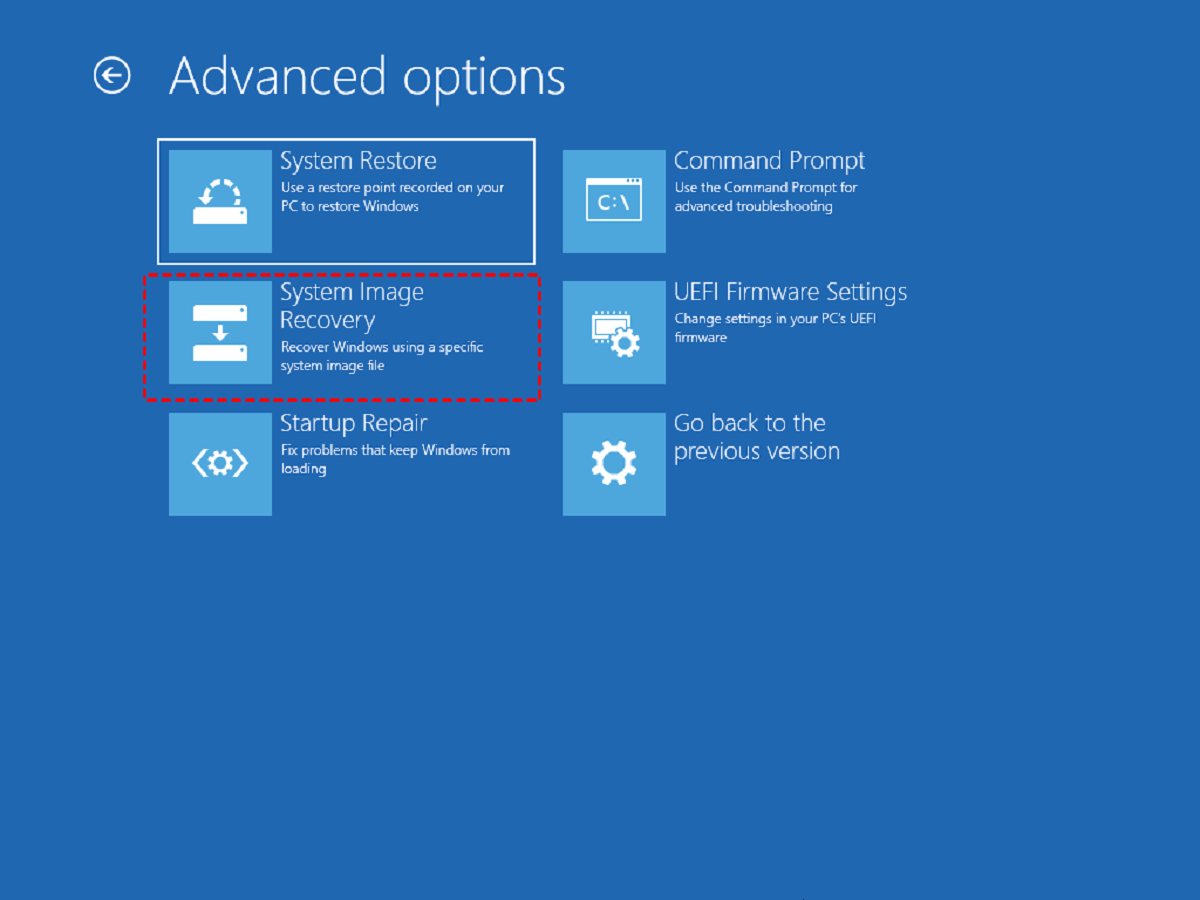
7. Verify the Cloned Drive: After the cloning process is finished, verify that the SSD has been cloned successfully. You can do this by restarting your computer and ensuring that the system boots from the new SSD rather than the old boot drive. In your computer’s BIOS or UEFI settings, set the SSD as the primary boot device to confirm its functionality.
8. Keep the Original Drive as a Backup: Once you have confirmed that the cloned SSD is working correctly, it is recommended to keep the original boot drive as a backup for some time. This provides an additional layer of security in case any issues arise with the cloned drive.
By following these steps, you can clone your current boot drive to the SSD and seamlessly transition to the faster and more efficient storage solution. Remember to choose a cloning tool, connect the SSD, launch the software, select the source and destination drives, adjust the cloning options, start the cloning process, verify the cloned drive, and keep the original drive as a backup. With the cloning process completed, your computer will be ready to take full advantage of the benefits provided by an SSD boot drive.
Installing the SSD into Your Computer
Once you have successfully cloned your current boot drive to the SSD, the next step is to physically install the SSD into your computer. Here are the steps to follow to install the SSD:
1. Power Off and Disconnect Your Computer: Before working on the internals of your computer, make sure to power off your computer and disconnect it from the power source. This ensures your safety and prevents any damage to the components.
2. Open Your Computer Case: Depending on the design of your computer, you will need to open the case to access the internal components. Refer to your computer’s manual or manufacturer’s instructions on how to open the case properly.
3. Locate an Available Drive Bay: Look inside your computer case and locate an available drive bay where you can install the SSD. If there are multiple drive bays, choose one that provides easy access and proper connections.
4. Mount the SSD into the Drive Bay: Depending on the type of SSD and drive bay, you may need to use mounting brackets or screws to secure the SSD in place. Ensure that the SSD is inserted securely and that the connectors align properly with the corresponding ports.
5. Connect Power and Data Cables: Connect the necessary power and data cables to the SSD. The power cable will usually come from your power supply unit, and the data cable can be connected to an available SATA port on your motherboard. Refer to the cables’ connectors and corresponding ports to ensure a secure and proper connection.
6. Close Your Computer Case: Once the SSD is properly installed and connected, close your computer case and secure it using the appropriate screws or latches. Ensure that all connections are secure and that no cables or components are obstructing the case’s closure.
7. Reconnect and Power On Your Computer: Reconnect your computer to the power source and power it on. Allow the computer to boot up and check if the SSD is recognized by the system.
8. Format and Initialize the SSD: If the SSD is not recognized by your operating system, you may need to format and initialize it. Follow the instructions provided by your operating system to perform this task. Ensure that you select the correct SSD to avoid formatting or initializing other drives inadvertently.
9. Verify the SSD’s Functionality: Once the SSD is recognized and initialized, verify its functionality by accessing it and confirming that it is functioning correctly. You can use file management tools or check the properties of the drive to ensure the correct capacity and other specifications are displayed.
By following these steps, you can successfully install the SSD into your computer. Remember to power off and disconnect your computer, open the case, locate an available drive bay, mount the SSD, connect the power and data cables, close the case, reconnect and power on your computer, format and initialize the SSD if necessary, and verify its functionality. With the SSD installed, you are now ready to experience the improved speed and performance provided by your new SSD boot drive.
Configuring the BIOS Settings
After installing the SSD into your computer, it is essential to configure the BIOS settings to ensure that your system recognizes the SSD as the boot drive. The BIOS (Basic Input/Output System) is firmware that initializes hardware and manages the booting process of the computer. Here’s how to configure the BIOS settings:
1. Power on or Restart Your Computer: Start by turning on your computer or restarting it if it is already powered on. During the boot-up process, you will need to access the BIOS settings.
2. Access the BIOS Menu: The key to access the BIOS settings may vary depending on the computer’s manufacturer. Common keys include Esc, F2, F10, or Del. Look for the message displayed on the screen during boot-up that indicates which key to press to enter the BIOS menu.
3. Navigate to the Boot Options: Once you are in the BIOS menu, navigate through the options using the arrow keys on your keyboard. Look for the “Boot” or “Boot Order” section, which controls the booting sequence of devices.
4. Set the SSD as the Primary Boot Device: In the Boot or Boot Order section, locate the option to set the boot device priority. Select the option that corresponds to the SSD or the SATA port to which it is connected. Move it to the top of the boot device list, indicating that it is the primary boot device.
5. Save and Exit: After setting the SSD as the primary boot device, save the changes made to the BIOS settings and exit the menu. The key combination to save and exit varies between different BIOS interfaces, but it is typically F10 or Esc followed by the confirmation to save and exit.
6. Restart Your Computer: Once you have saved the BIOS settings and exited the menu, your computer will restart. During the restart, the system will now recognize the SSD as the primary boot device and initiate the boot process from it.
7. Check for Successful Boot: After the restart, pay attention to the boot-up sequence. If your operating system loads successfully, it means that the BIOS settings have been configured correctly, and the system is booting from the SSD. You can also check the system information or use disk management tools to verify that the SSD is recognized as the boot drive.
8. Verify Boot Order in the BIOS: It is a good practice to revisit the BIOS menu and ensure that the SSD is indeed set as the primary boot device. This step can be helpful in case you make any changes to the system configuration in the future and need to ensure that the boot order remains unchanged.
By following these steps, you can configure the BIOS settings to recognize the SSD as the boot drive. Remember to access the BIOS menu, navigate to the boot options, set the SSD as the primary boot device, save and exit the BIOS, restart your computer, check for successful boot, and verify the boot order in the BIOS. Configuring the BIOS settings correctly ensures that your system utilizes the full potential of the SSD as the primary boot drive.
Verifying the SSD Boot Drive
After configuring the BIOS settings and setting the SSD as the primary boot device, it is crucial to verify that the system is indeed booting from the SSD. Performing a verification ensures that the SSD is functioning correctly as the boot drive and that the desired performance benefits are being realized. Here’s how to verify the SSD boot drive:
1. Restart Your Computer: Start by restarting your computer. During the boot-up process, pay attention to any messages or indicators displayed on the screen.
2. Observe the Boot Time: As the computer restarts, note the time it takes for the system to boot up. If the SSD is functioning as the boot drive, you should observe a significant decrease in boot times compared to your previous boot drive.
3. Check System Information: Once your computer has fully booted into the operating system, access the system information or system settings to verify the primary boot drive. Look for information related to the storage devices or disk drives, and ensure that the SSD is identified as the primary boot drive.
4. Validate Storage Capacity: Verify that the storage capacity of the SSD is accurately identified by the operating system. Check the available storage space in the file explorer or use disk management tools to ensure that the SSD’s capacity matches your expectations.
5. Test Application Launch Times: Open various applications and note the launch times. Pay attention to any significant improvement compared to the previous boot drive. Applications should open faster and be more responsive when launching from the SSD.
6. Copy and Access Files: Copy some files to and from the SSD and check the transfer speeds. The SSD should provide faster read and write speeds compared to a traditional hard disk drive (HDD). Additionally, open files and folders stored on the SSD to verify that they open quickly and smoothly.
7. Run Disk Benchmarking Tools: Utilize disk benchmarking software to measure the performance of the SSD. These tools provide detailed information about the SSD’s read and write speeds, input/output operations per second (IOPS), and other performance metrics. Compare the results to the expected performance specifications for your SSD.
8. Monitor System Performance: Observe the overall system performance while using various applications or performing resource-intensive tasks. The SSD should contribute to smoother multitasking, reduced lag, and improved overall responsiveness of your computer.
9. Periodic Monitoring: It is beneficial to periodically monitor the performance of your SSD as the boot drive. Keep an eye on boot times, application launch times, file transfer speeds, and overall system performance to ensure the continued optimal functioning of the SSD.
By following these steps, you can effectively verify that the SSD is functioning as the boot drive. Remember to restart your computer, observe boot times, check system information, validate storage capacity, test application launch times, copy and access files, run disk benchmarking tools, monitor system performance, and perform periodic monitoring. Verifying the SSD boot drive ensures that you are reaping the benefits of faster speeds, improved responsiveness, and enhanced overall system performance.
Troubleshooting Common Issues
While installing and configuring an SSD as a boot drive is generally straightforward, there may be occasions when you encounter common issues that can hinder the proper functioning of the SSD. Here are some troubleshooting steps to address these issues:
1. SSD Not Detected: If the SSD is not detected by the system, double-check the connections to ensure they are secure. Try connecting the SSD to a different SATA port or using a different SATA cable. If the issue persists, update the motherboard’s BIOS firmware and ensure that the BIOS is set to recognize SATA devices correctly.
2. Incorrect Boot Order: If the system is not booting from the SSD, enter the BIOS settings and verify that the SSD is set as the primary boot device. Ensure that the boot order is set correctly, with the SSD listed as the first device in the boot sequence. Make any necessary adjustments and save the changes before restarting your computer.
3. Slow Boot Times: If the SSD is booting slowly, ensure that unnecessary startup programs are disabled. Scan for malware or viruses that may be negatively impacting boot performance. Additionally, check the BIOS settings for any power-saving options that could be affecting SSD performance and disable them if necessary.
4. Insufficient Storage Space: If you encounter low storage space on the SSD, consider freeing up space by moving files to secondary storage or deleting unnecessary files and applications. Regularly perform disk cleanup or utilize disk management tools to optimize storage usage on the SSD.
5. Incompatibility Issues: If you experience compatibility issues with the SSD, ensure that you have installed the latest drivers and firmware updates for the SSD and your motherboard. Check the manufacturer’s website for any compatibility information or firmware updates specific to your SSD model.
6. File Corruption or Errors: If you notice file corruption or errors on the SSD, run disk error checking tools provided by your operating system. These tools can scan and repair any file system errors that may be causing the issues. Additionally, ensure that you have a reliable backup system in place to prevent data loss and regularly back up important files.
7. Overheating Issues: If the SSD is experiencing overheating issues, ensure that proper airflow is maintained within your computer case. Check that the SSD’s temperature is within the specified operating range. If necessary, add additional cooling solutions such as case fans or consider relocating the SSD to a cooler location within your computer.
8. Update SSD Firmware: Periodically check for firmware updates specific to your SSD model. This can rectify any bugs or issues identified by the SSD manufacturer and improve the overall performance and stability of the SSD. Follow the manufacturer’s instructions to update the firmware safely.
9. Seek Professional Help: If you have attempted troubleshooting steps without success, it may be beneficial to seek assistance from professional computer technicians or contact the customer support of the SSD manufacturer for further guidance and resolution.
By following these troubleshooting steps, you can address common issues that may arise when using an SSD as a boot drive. Remember to check connections, adjust BIOS settings, optimize storage space, update drivers and firmware, run error checking tools, address overheating issues, and seek professional help if needed. Understanding and resolving these issues ensures a smooth and efficient experience with your SSD boot drive.
Conclusion
Congratulations! You have successfully learned how to make an SSD bootable and experienced the numerous benefits it brings to your computer’s performance. By switching to an SSD as your boot drive, you have significantly reduced boot times, improved overall system responsiveness, and enhanced your computing experience.
We started by understanding what an SSD is and how it differs from traditional hard disk drives (HDDs). We explored the advantages of using an SSD as a boot drive, including faster boot times, improved performance, reduced loading times, enhanced durability, and energy efficiency.
We then discussed the essential steps to prepare for the installation, including backing up your data, selecting the right SSD, gathering necessary tools, clearing space for the SSD, preparing Windows installation media, and familiarizing yourself with the BIOS settings. These preparations are crucial for a smooth installation process.
We covered the cloning process, which allows you to transfer the contents of your current boot drive to the new SSD. Cloning eliminates the need to reinstall your operating system and applications, ensuring a seamless transition to the SSD boot drive.
Installing the SSD physically into your computer was the next step. We covered how to open the computer case, locate the drive bay, mount the SSD securely, connect the necessary cables, and close the case properly. These steps ensure that the SSD is installed correctly and ready for use.
Configuring the BIOS settings ensured that your system recognizes the SSD as the primary boot device. We discussed accessing the BIOS menu, navigating to the boot options, setting the SSD as the primary boot device, and verifying the changes made to the BIOS settings. This step guarantees that your computer efficiently boots from the SSD.
Verifying the SSD boot drive allowed you to confirm that everything is functioning as intended. We highlighted ways to verify the boot drive, such as observing boot times, checking the system information, validating storage capacity, testing application launch times, and running disk benchmarking tools.
Lastly, we discussed troubleshooting common issues that may arise during the process. By following the suggested troubleshooting steps, you can address problems related to SSD detection, boot order, slow boot times, storage space, compatibility, file corruption, overheating, and firmware updates.
With these knowledge and skills, you can now enjoy the full benefits of an SSD boot drive. Your computer’s performance will be faster, more responsive, and efficient. Remember to periodically monitor the performance of your SSD and stay up-to-date with firmware updates to ensure the optimal operation of your SSD boot drive.
Thank you for following this guide, and we hope that you continue to explore and make the most of your SSD boot drive experience!