Introduction
Welcome to this informative guide on how to make a pinhole projector for the upcoming solar eclipse! If you’re excited about witnessing this celestial event but don’t have access to special eclipse glasses or telescopes, fear not! A pinhole projector is a simple, safe, and inexpensive way to observe the eclipse without directly looking at the sun.
On [insert date], millions of people will gather to witness an awe-inspiring natural phenomenon: a solar eclipse. During a solar eclipse, the moon passes between the sun and the Earth, casting a shadow and obscuring the sun’s light. This is a rare occurrence that captivates both professional astronomers and curious sky-gazers alike.
While it is crucial to follow proper safety guidelines when viewing a solar eclipse, a pinhole projector offers a unique opportunity to experience the eclipse in a safe and educational manner. This DIY device allows you to indirectly observe the eclipse by projecting its image onto a surface, such as a piece of paper or cardboard.
With just a few simple materials, you can create your very own pinhole projector at home. Whether you’re planning a family gathering, hosting an eclipse-viewing party, or embarking on a solo adventure, this guide will walk you through the process, step by step.
So, let’s gather our supplies and get ready to witness the magic of a solar eclipse firsthand with our homemade pinhole projector!
Understanding the Solar Eclipse
Before we dive into the details of creating a pinhole projector, it’s important to understand what exactly a solar eclipse is and why it’s such a remarkable event. A solar eclipse occurs when the moon passes directly between the Earth and the sun, casting a shadow on the Earth’s surface.
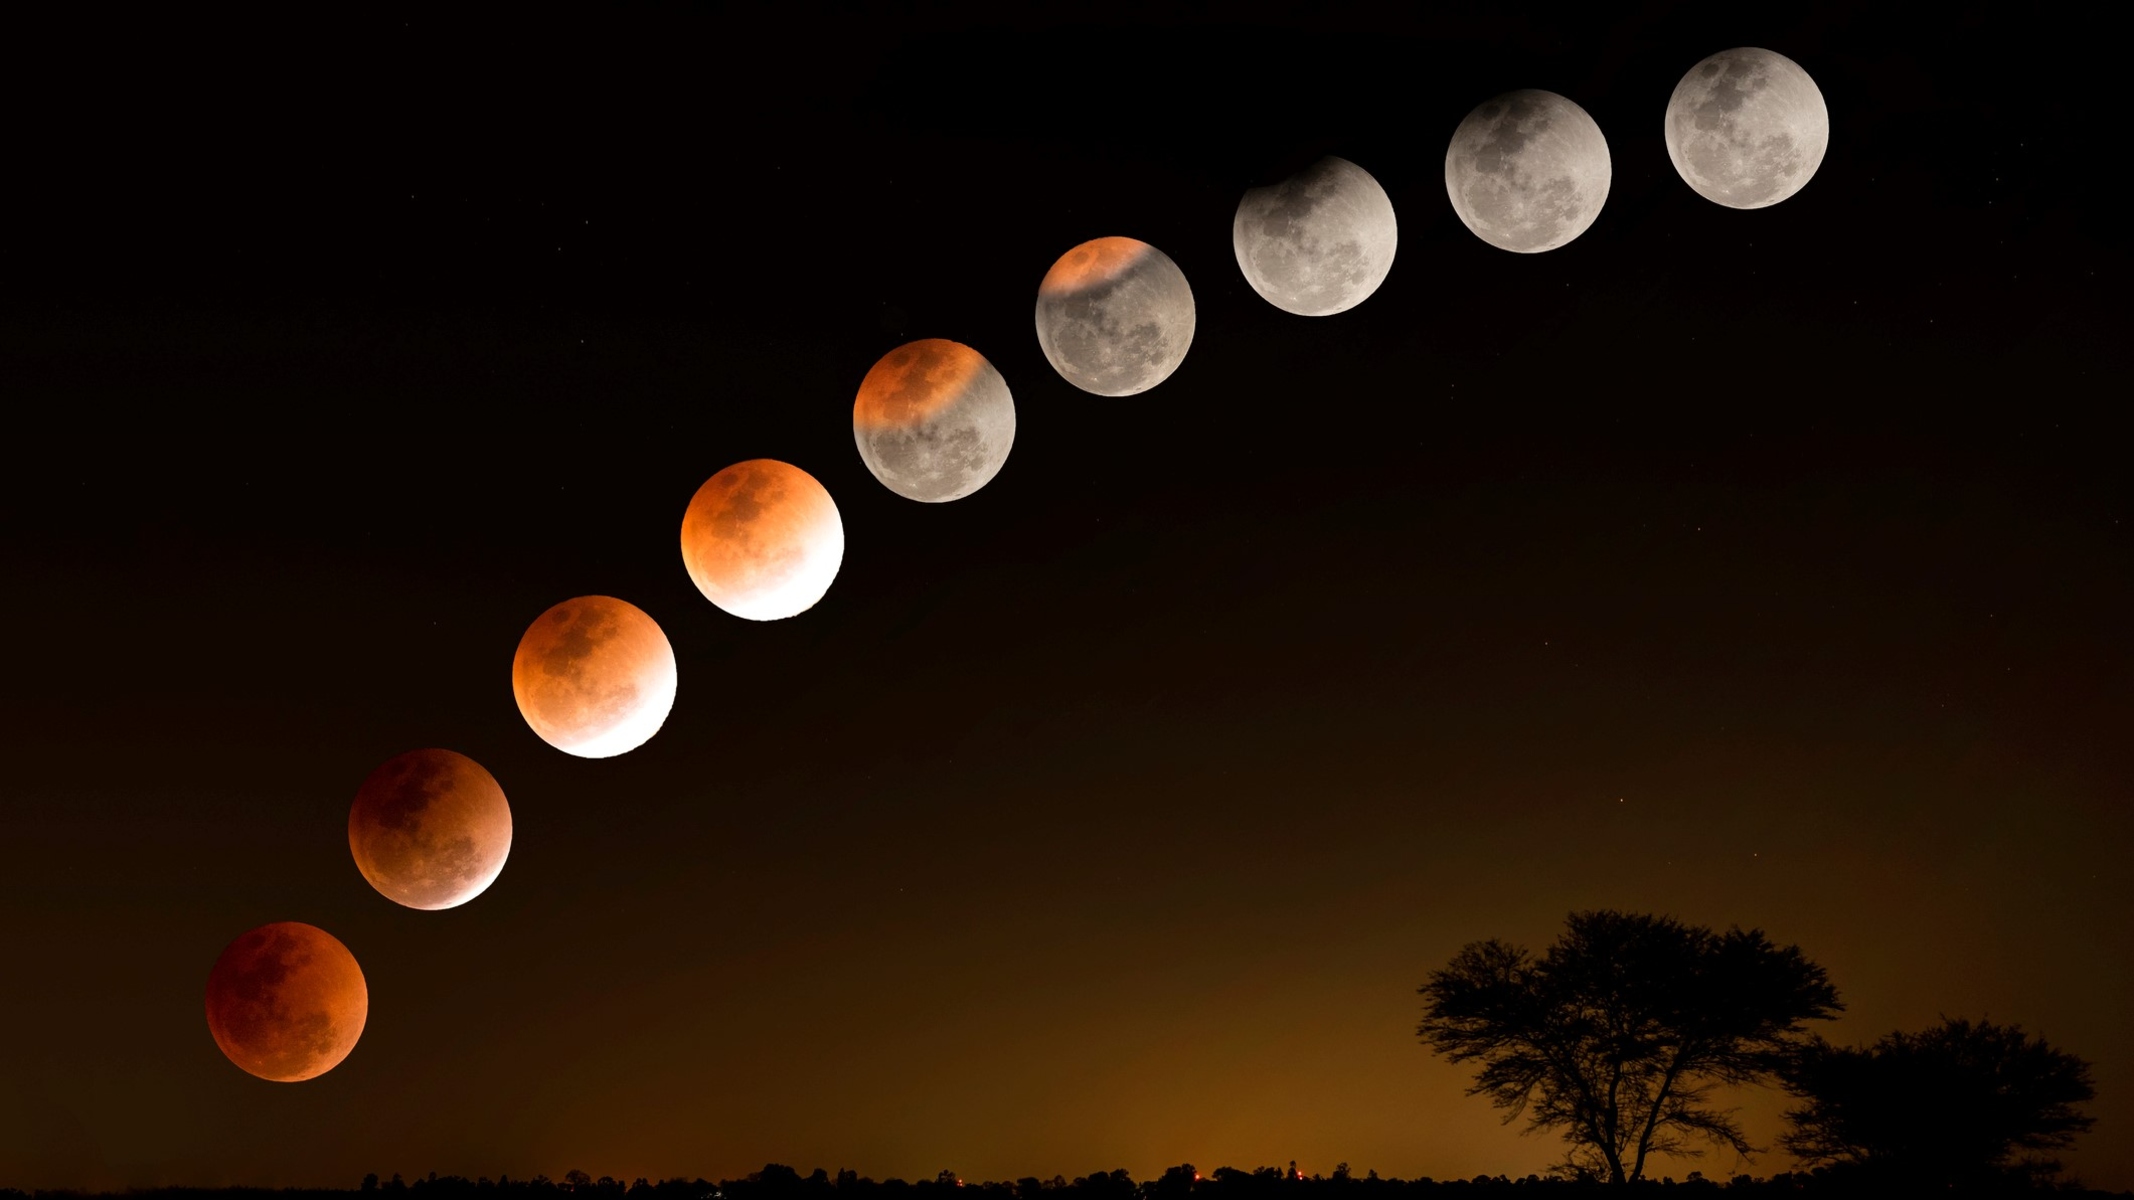
There are three types of solar eclipses: total, partial, and annular. During a total solar eclipse, the moon completely covers the sun, creating a stunning display of darkness during the daytime. A partial solar eclipse occurs when the moon only partially covers the sun, leaving a crescent-shaped sliver of sunlight visible. An annular solar eclipse happens when the moon is at its farthest point from the Earth, resulting in a “ring of fire” effect.
One of the most awe-inspiring aspects of a solar eclipse is the significant decrease in daylight during the event. As the moon blocks the sun’s rays, the sky darkens, the temperature drops, and stars and planets become visible in the daytime sky. It’s a surreal experience that unites people across the world in their shared fascination for the wonders of the universe.
Not only are solar eclipses visually stunning, but they also offer a unique opportunity for scientists and researchers to study the sun and its surrounding environment. During a total solar eclipse, the moon’s shadow allows us to observe the sun’s outer atmosphere, known as the corona, in extraordinary detail. This provides valuable insights into solar activity, helping us better understand the sun’s complex behavior.
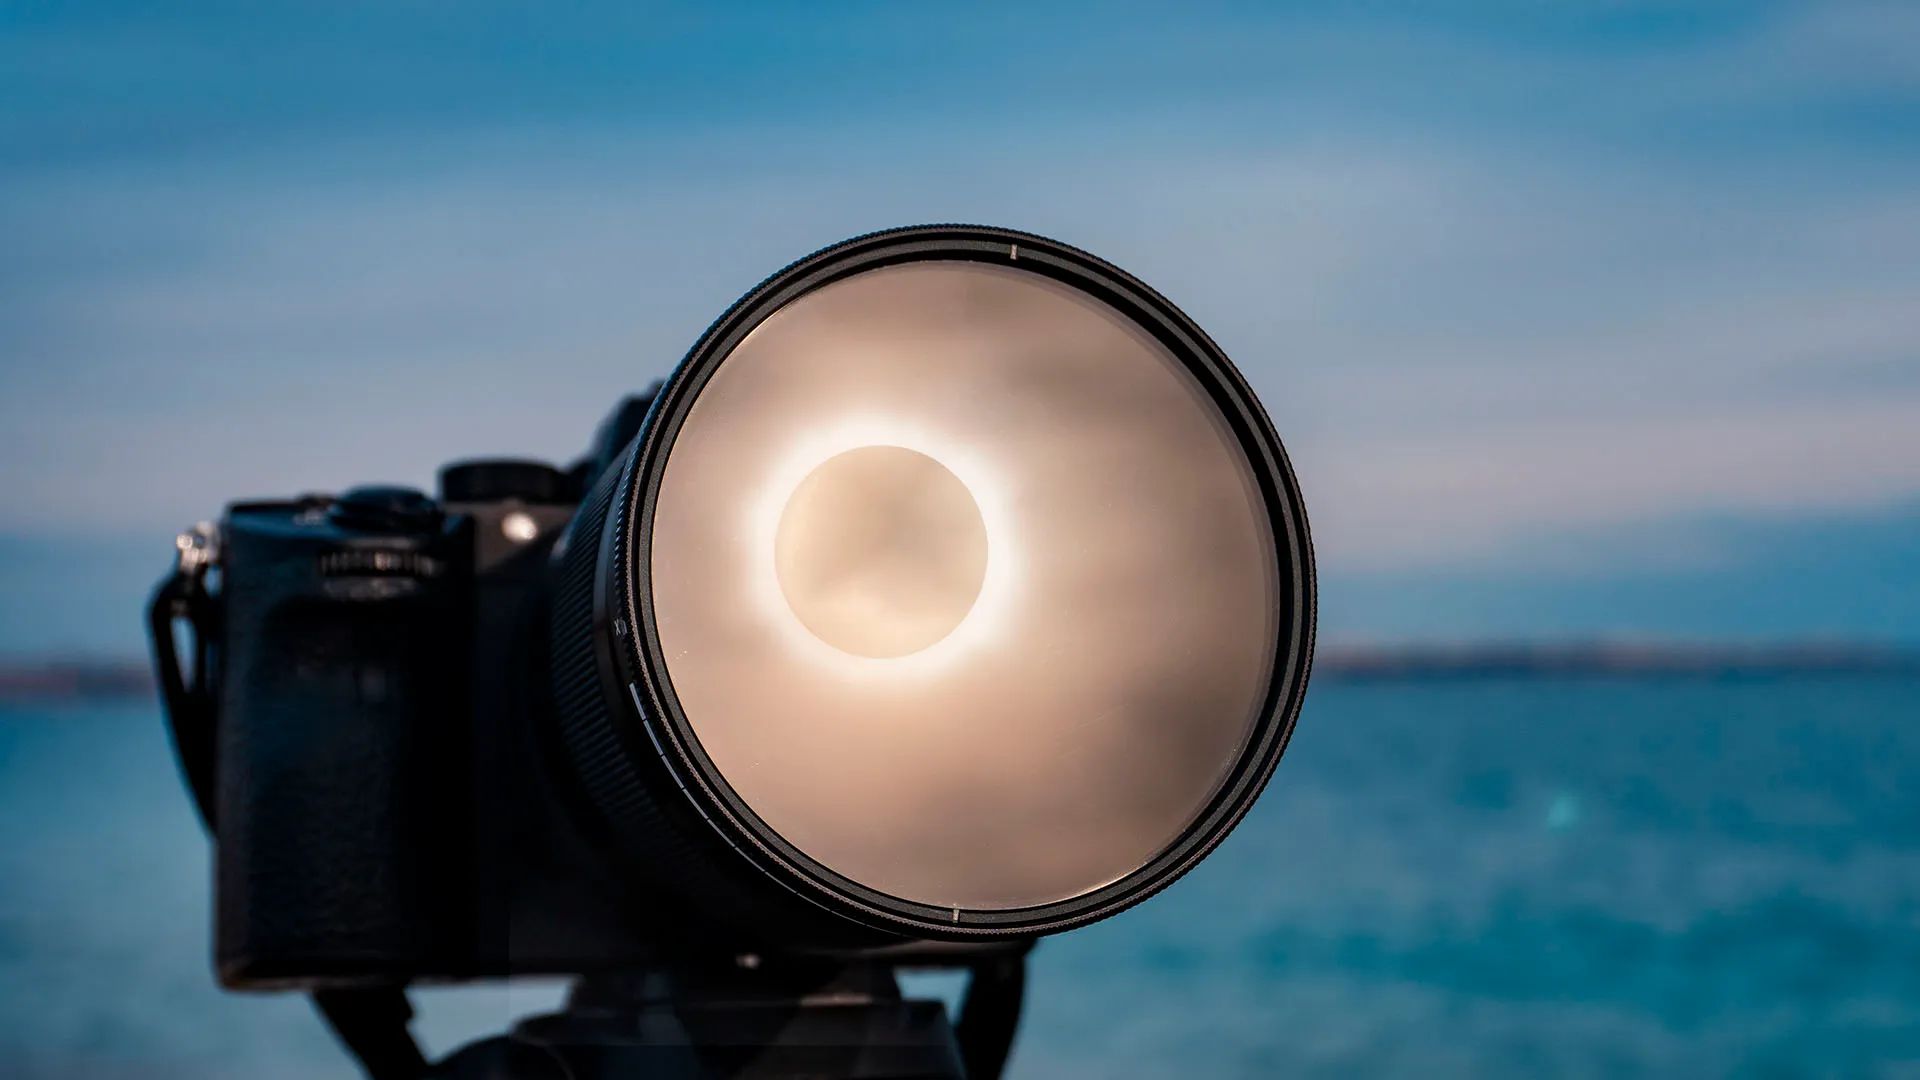
It’s important to note that observing a solar eclipse directly with the naked eye can be extremely dangerous as the intense solar radiation can cause permanent eye damage and even blindness. That’s why it’s crucial to use proper safety measures, such as a pinhole projector, to view the eclipse safely.
Now that we have a foundational understanding of what a solar eclipse is and its significance, let’s move on to creating our very own pinhole projector to witness this incredible celestial event.
What is a Pinhole Projector?
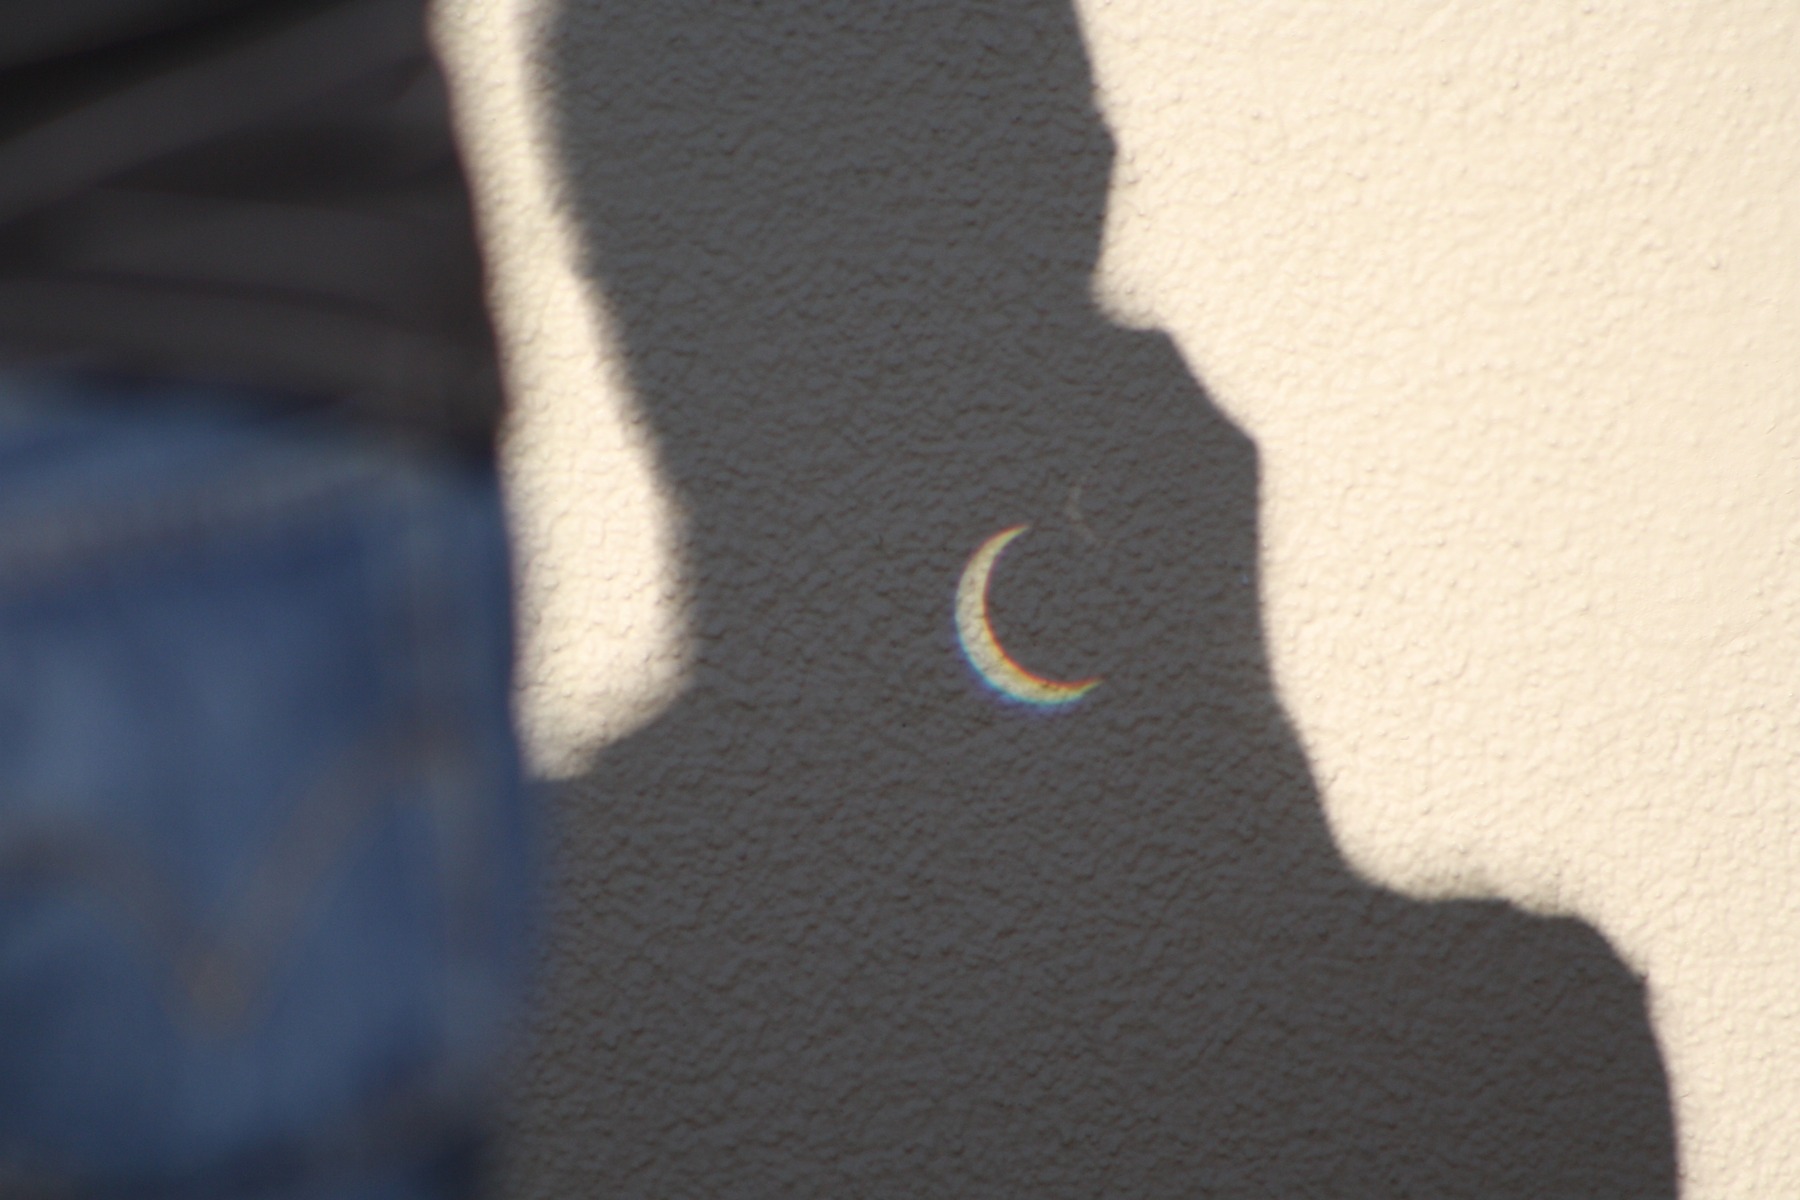
A pinhole projector is a simple device that allows you to view a solar eclipse indirectly. It works by projecting the image of the eclipse onto a surface, such as a piece of paper or cardboard, through a small hole or aperture.
The basic principle behind a pinhole projector is the concept of light traveling in straight lines. When light passes through a small hole, it creates an inverted image on a surface placed opposite the hole. This is known as the “pinhole effect” or camera obscura.
Unlike specialized eclipse glasses or telescopes, a pinhole projector does not require any complex optics or filters. It can be easily crafted using everyday items found around your home or purchased inexpensively from a local store.
The beauty of a pinhole projector lies in its simplicity and accessibility. Whether you’re a science enthusiast, a student, or someone simply curious about the magic of an eclipse, you can create a pinhole projector with just a handful of materials.
By using a pinhole projector, you can safely observe the solar eclipse without staring directly at the sun. The projected image allows you to see the moon gradually covering the sun’s disk, experiencing the mesmerizing phenomenon of an eclipse.
Furthermore, creating and using a pinhole projector can also be an educational and interactive experience. It provides an opportunity to engage in discussions about optics, light, and the mechanics of solar eclipses. By involving friends, family, or even classmates, you can share the excitement and collective wonder of this celestial event.
Now that we understand what a pinhole projector is and how it works, let’s gather the materials needed and dive into the step-by-step process of making our own pinhole projector.
Materials Needed
Creating a pinhole projector requires a few basic materials that are easy to find and inexpensive. Before you begin, gather the following items:
- A sturdy cardboard box or a cereal box
- A small piece of aluminum foil
- A pin or needle
- A pair of scissors
- A tape or glue
- A white sheet of paper or a white wall
The cardboard box will serve as the main structure of your pinhole projector. You can repurpose an old shoebox or any other cardboard box that is large enough to accommodate your setup.
The aluminum foil will be used to create a small pinhole through which light will pass. You can cut a small square of aluminum foil, approximately 2-3 inches in size, to ensure a clean and precise hole.
A pin or needle will be used to carefully pierce the aluminum foil, creating a tiny aperture for the light to pass through. Make sure the pin or needle is sharp and clean to ensure a smooth and accurate puncture.
A pair of scissors will be needed to cut out a viewing screen on one side of the box. You can also use scissors to trim the cardboard box to the desired size and shape, depending on the projector design you prefer.
Tape or glue will be used to secure the aluminum foil over the viewing screen and to assemble the different components of the pinhole projector. Make sure to use tape or glue that can firmly hold the materials together, but can also be easily removed if needed.
Lastly, you will need a white sheet of paper or a white wall to project the image onto. This surface will capture the projected image of the eclipse, allowing you to view it clearly and comfortably. Make sure the surface is flat and free from any obstructions or distractions.
Once you have gathered all the necessary materials, you’re ready to proceed with making your pinhole projector. Let’s move on to the step-by-step guide to create your very own eclipse viewing device.
Step-by-Step Guide to Making a Pinhole Projector
Now that you have all the materials ready, let’s dive into the step-by-step process of creating your own pinhole projector:
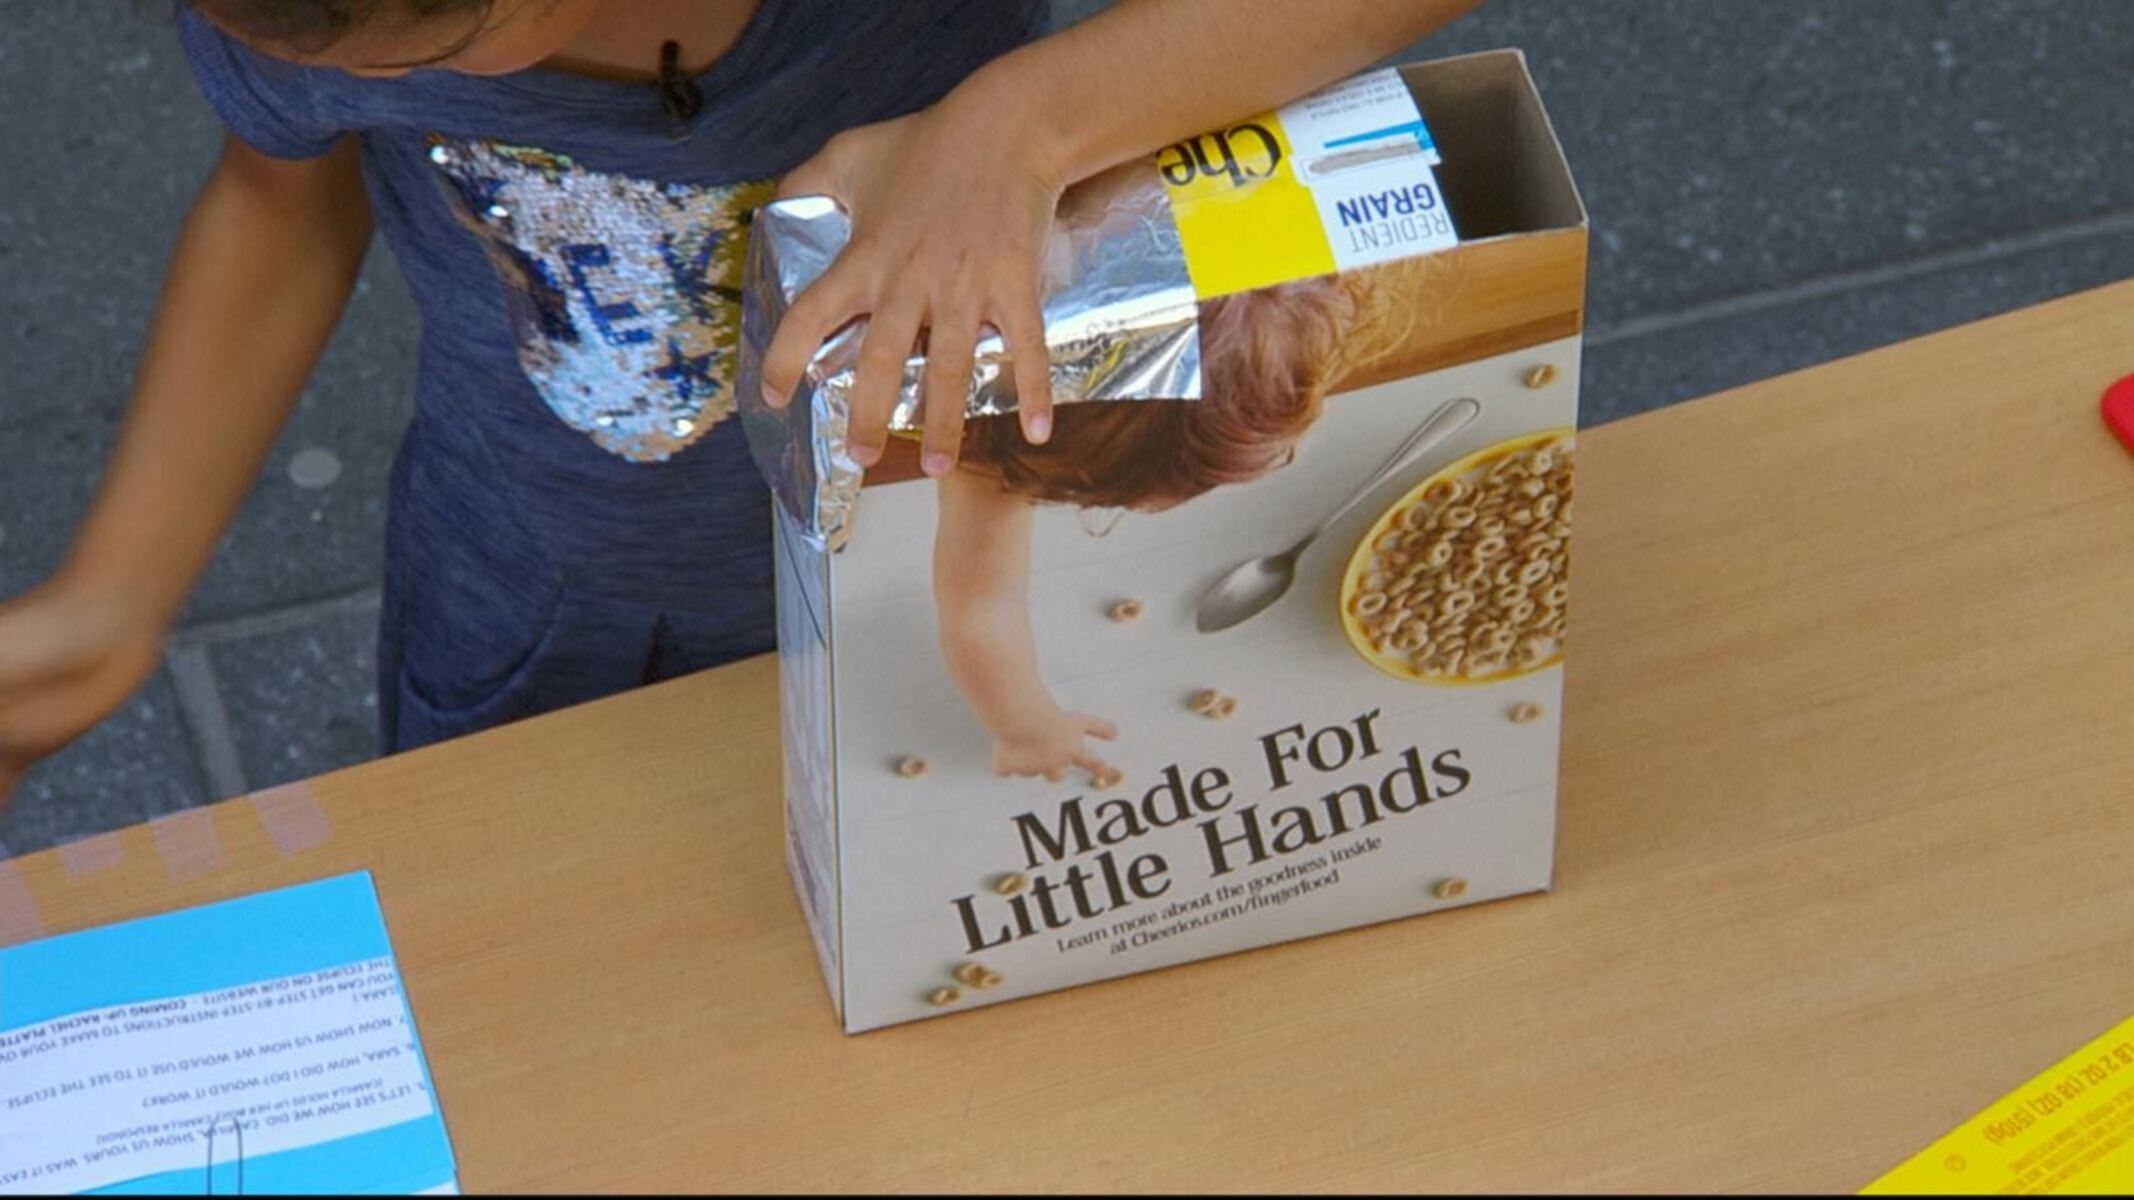
- Start by selecting a sturdy cardboard box or a cereal box to serve as the main structure of your pinhole projector. If using a cereal box, make sure to remove any inner packaging or plastic liners.
- Using scissors, cut out one side of the box to create a viewing screen. This will be where the projected image of the eclipse will appear.
- Cover the opening of the box with a small piece of aluminum foil and use tape or glue to secure it in place.
- Take a pin or needle and carefully pierce a small hole in the center of the aluminum foil. This will serve as the aperture through which light will pass.
- On the opposite side of the box, create a small viewing window by cutting out a square or rectangular opening. This will allow you to see the projected image on the white surface.
- Position the pinhole projector towards the sun, with the aluminum foil facing the sun and the viewing screen facing away from the sun.
- Hold the pinhole projector steady and adjust the distance between the box and the white surface until a clear and focused image of the sun is projected onto it. You may need to experiment with the distance to achieve the best results.
- Once you have a clear image of the sun, you can observe the eclipse by looking at the projected image on the white surface. Do not look directly at the sun or through the pinhole.
Remember to be patient and take your time to align the pinhole projector properly. It may require some adjustments to get the best image quality. It’s always a good idea to practice setting up and using the pinhole projector before the actual day of the eclipse.
With your homemade pinhole projector, you can safely view the solar eclipse and marvel at the wonders of the universe.
Now that you’ve successfully created your pinhole projector, it’s time to test it and ensure everything is working as expected. In the next section, we’ll discuss how to test your pinhole projector to make sure it’s ready for the upcoming solar eclipse.
Testing Your Pinhole Projector
After creating your pinhole projector, it is important to test it before the solar eclipse to ensure that it functions properly. Testing your pinhole projector will help you identify any issues and make necessary adjustments for optimal viewing. Follow these steps to test your pinhole projector:
- Find a well-lit area indoors, such as a room with ample sunlight or a well-lit hallway.
- Position your pinhole projector with the aluminum foil facing the light source. This could be a window or a bright light.
- Hold a sheet of white paper or a white wall in front of the viewing screen on the opposite side of the box.
- Ensure that the pinhole is pointed towards the light source and adjust the distance between the projector and the viewing screen until you see a focused, inverted image of the light source on the white surface.
- Move the sheet of paper or the viewing screen closer or farther away until the image is clear and sharp. Experiment with positioning and distances to achieve the best results.
- If you encounter any issues, such as a dim or blurry image, check if the pinhole is clear and unobstructed. You may also need to adjust the size of the pinhole for better focus.
- Once you are satisfied with the clarity and sharpness of the projected image, you can be confident that your pinhole projector is ready for the solar eclipse!
Testing your pinhole projector allows you to troubleshoot any problems and make necessary adjustments beforehand. This way, when the day of the solar eclipse arrives, you will be well-prepared to view the phenomenon in a safe and enjoyable manner.
Now that you have successfully tested your pinhole projector, it’s time to learn some important tips for safely viewing the solar eclipse. These tips will help you protect your eyes and enhance your overall eclipse-watching experience. Continue reading to find out more!
Tips for Viewing the Eclipse Safely
When it comes to viewing a solar eclipse, safety should always be a top priority. While a pinhole projector is a safe way to observe the eclipse, it’s essential to follow a few guidelines to protect your eyes and ensure a memorable experience. Here are some tips for safely viewing the eclipse:
- Never look directly at the sun: Looking directly at the sun, even during a solar eclipse, can cause severe eye damage or even blindness. Always use a safe viewing method, such as a pinhole projector, to project the image onto a surface.
- Use proper eye protection: If you have access to certified eclipse glasses, wear them when not using your pinhole projector. Ensure that the glasses are from a reputable source and meet the required safety standards to protect your eyes from harmful solar radiation.
- Keep children under adult supervision: Children may be curious about the eclipse, so it’s crucial to educate them about the potential dangers and make sure they use the pinhole projector or eclipse glasses properly under adult supervision.
- Ensure the pinhole projector is stable: Make sure your pinhole projector is secure and stable during use. Avoid any sudden movements or adjustments to prevent accidental damage to the projector or the potential for looking directly at the sun.
- Always test your pinhole projector: Before using your pinhole projector for the eclipse, test it in a well-lit area to ensure the projected image is clear and focused. Take the time to adjust distances and fine-tune the setup for optimal results.
- Plan for weather conditions: Check the weather forecast before the eclipse event and consider any potential obstacles like clouds or rain. Clear skies will provide the best visibility, allowing you to fully enjoy the eclipse.
- Share the experience: Watching a solar eclipse is an exciting experience, so consider sharing it with others. Invite friends, family, or neighbors to join you in observing the eclipse safely and make it a memorable event for everyone.
By following these safety tips, you can ensure a safe and enjoyable viewing experience during the solar eclipse. Remember, protecting your eyes should always be the highest priority when observing any celestial event.
Now that you are armed with safety precautions and a reliable pinhole projector, it’s time to prepare for the upcoming solar eclipse. In the next section, you’ll find additional resources to further your knowledge and enhance your eclipse-watching experience.
Additional Resources
As you prepare for the upcoming solar eclipse, you may want to dive deeper into the fascinating world of space and astronomy. Here are some additional resources that can provide you with valuable information and enhance your eclipse-watching experience:
- Websites and Online Articles: Explore reputable websites dedicated to astronomy and space science. NASA’s official website is a treasure trove of information about eclipses, including detailed articles, interactive maps, and live-streaming events.
- Mobile Apps: Download astronomy-related mobile apps that provide real-time updates on astronomical events and offer interactive features to educate and engage users. Some popular apps include SkyView, Stellarium, and NASA’s official app.
- Books and Publications: Visit your local library or bookstore to find books and publications on the topic of eclipses, astronomy, and space exploration. Look for titles written by renowned astronomers or recommended by experts in the field.
- Local Astronomy Clubs: Connect with local astronomy clubs or organizations that host events, stargazing sessions, and educational workshops. These communities provide a great opportunity to interact with fellow astronomy enthusiasts and learn from experienced individuals.
- Social Media and Online Forums: Engage with online communities on social media platforms and forums dedicated to astronomy. Join conversations, ask questions, and share your experiences with other enthusiasts who are also excited about the solar eclipse.
- Documentaries and Videos: Watch documentaries or educational videos that explore the wonders of the universe, including solar eclipses. Platforms like YouTube, Netflix, and specialized streaming services offer a wide variety of documentaries and videos on astronomy that can expand your knowledge and spark your curiosity.
These additional resources will not only deepen your understanding of solar eclipses but also ignite a lifelong fascination with astronomy. Remember to verify the credibility of the sources you utilize and rely on reputable and trustworthy information.
As you continue your journey into the world of astronomy and space exploration, cherishing the memories of witnessing a solar eclipse, you’ll become part of a community united by a shared passion for the marvels of the universe.
Now, armed with knowledge, a homemade pinhole projector, and a thirst for discovery, you are ready to embark on an extraordinary journey to witness the awe-inspiring solar eclipse. Enjoy the experience, stay safe, and savor the wonders of the cosmos!
Conclusion
As the solar eclipse approaches, you are now equipped with the knowledge and tools to safely and enjoyably witness this celestial spectacle. By creating your own pinhole projector, you have provided yourself with a simple, yet effective way to indirectly observe and marvel at the wonders of an eclipse.
Throughout this guide, we have explored the concept of a solar eclipse, the importance of using a pinhole projector for safe viewing, and the step-by-step process of creating your own projector. We also discussed the significance of understanding the eclipse, testing your projector, and following important safety tips.
Remember, never look directly at the sun during a solar eclipse, as this can cause severe eye damage. Always use proper eye protection, such as certified eclipse glasses, and remember to keep children under adult supervision.
Our journey has also touched upon additional resources that can enhance your eclipse-watching experience, including websites, apps, books, local astronomy clubs, and educational documentaries. These resources will allow you to further explore the fascinating world of astronomy and deepen your understanding of the universe.
As you prepare for the solar eclipse, take a moment to reflect on the beauty and grandeur of this natural phenomenon. It is a reminder of the vastness of space and our place within the universe, igniting a sense of wonder and curiosity.
Now, with your homemade pinhole projector in hand and armed with valuable information and resources, you are ready to embark on an unforgettable journey to witness the magic of a solar eclipse. Enjoy the experience, cherish the memories, and continue to explore the mysteries of the cosmos.