Introduction
Welcome to the world of Discord, a popular platform for gamers, communities, and businesses to connect and communicate. Creating an announcement channel in Discord is a fantastic way to keep your members informed about important updates, events, and news. Whether you’re a community manager, server owner, or content creator, this guide will walk you through the steps to create and utilize an announcement channel effectively.
An announcement channel is a dedicated space where you can share important information with your community. Unlike regular text channels, an announcement channel allows you to highlight your updates, announcements, and news at the top of your server’s channel list to ensure maximum visibility. By utilizing this feature, you can gather everyone’s attention and deliver your message effectively.
With an announcement channel, you’ll be able to streamline your information dissemination process and ensure that your community members are well informed. Whether it’s announcing a new product, sharing an upcoming event, or updating your community about server maintenance, having a dedicated channel will help you reach out to your members in a clear and organized manner. It eliminates the noise and confusion that may arise from posting various announcements across different channels, ensuring that important information is easily accessible.
In this guide, we’ll walk you through the step-by-step process of creating your announcement channel on Discord. We’ll also dive into customizing the channel to fit your needs and explore strategies for effectively sending announcements that capture the attention of your community members.
So, let’s get started and learn how to create an announcement channel that will keep your community engaged, updated, and involved!
Step 1: Create a new text channel
The first step in creating an announcement channel on Discord is to create a new text channel specifically for announcements. Follow these simple steps:
- Open your Discord server and navigate to the server settings by clicking on the server name at the top left corner of the screen.
- In the server settings, click on the “Channels” tab located on the left-hand side of the screen. Here, you will find the list of all the current channels on your server.
- Click on the “+ Create Channel” button at the top of the channel list. A window will pop up, prompting you to select the channel type.
- Choose the “Text Channel” option and give your new channel a name. It is recommended to name it something like “announcements” or “updates” to indicate its purpose clearly.
- Once you’ve given your channel a name, click on the “Create Channel” button to finalize the creation of your new text channel.
Congratulations! You have successfully created a new text channel for your announcements. Now, it’s time to move on to the next step of setting the channel permissions to ensure that only authorized individuals can send announcements to this channel.
Remember, the clarity and specificity of your channel name will help your community members identify and access the announcements channel easily. Avoid using generic or ambiguous names that may confuse your audience.
Now that the foundation is laid, let’s move on to the next step of configuring the channel permissions to control who can send announcements in your Discord server!
Step 2: Set channel permissions
After creating a new text channel for your announcements, it’s essential to set the channel permissions to ensure that only authorized individuals can send messages to this channel. Here’s how you can do it:
- Open your Discord server and navigate to the server settings by clicking on the server name at the top left corner of the screen.
- In the server settings, click on the “Roles” tab located on the left-hand side of the screen. Here, you can manage the roles and permissions within your server.
- Review the existing roles or create a new role by clicking on the “+ Create Role” button. Assign a name to the role and customize its permissions according to your preference.
- Once your role is created or selected, go back to the “Channels” tab in the server settings and find your newly created announcement channel.
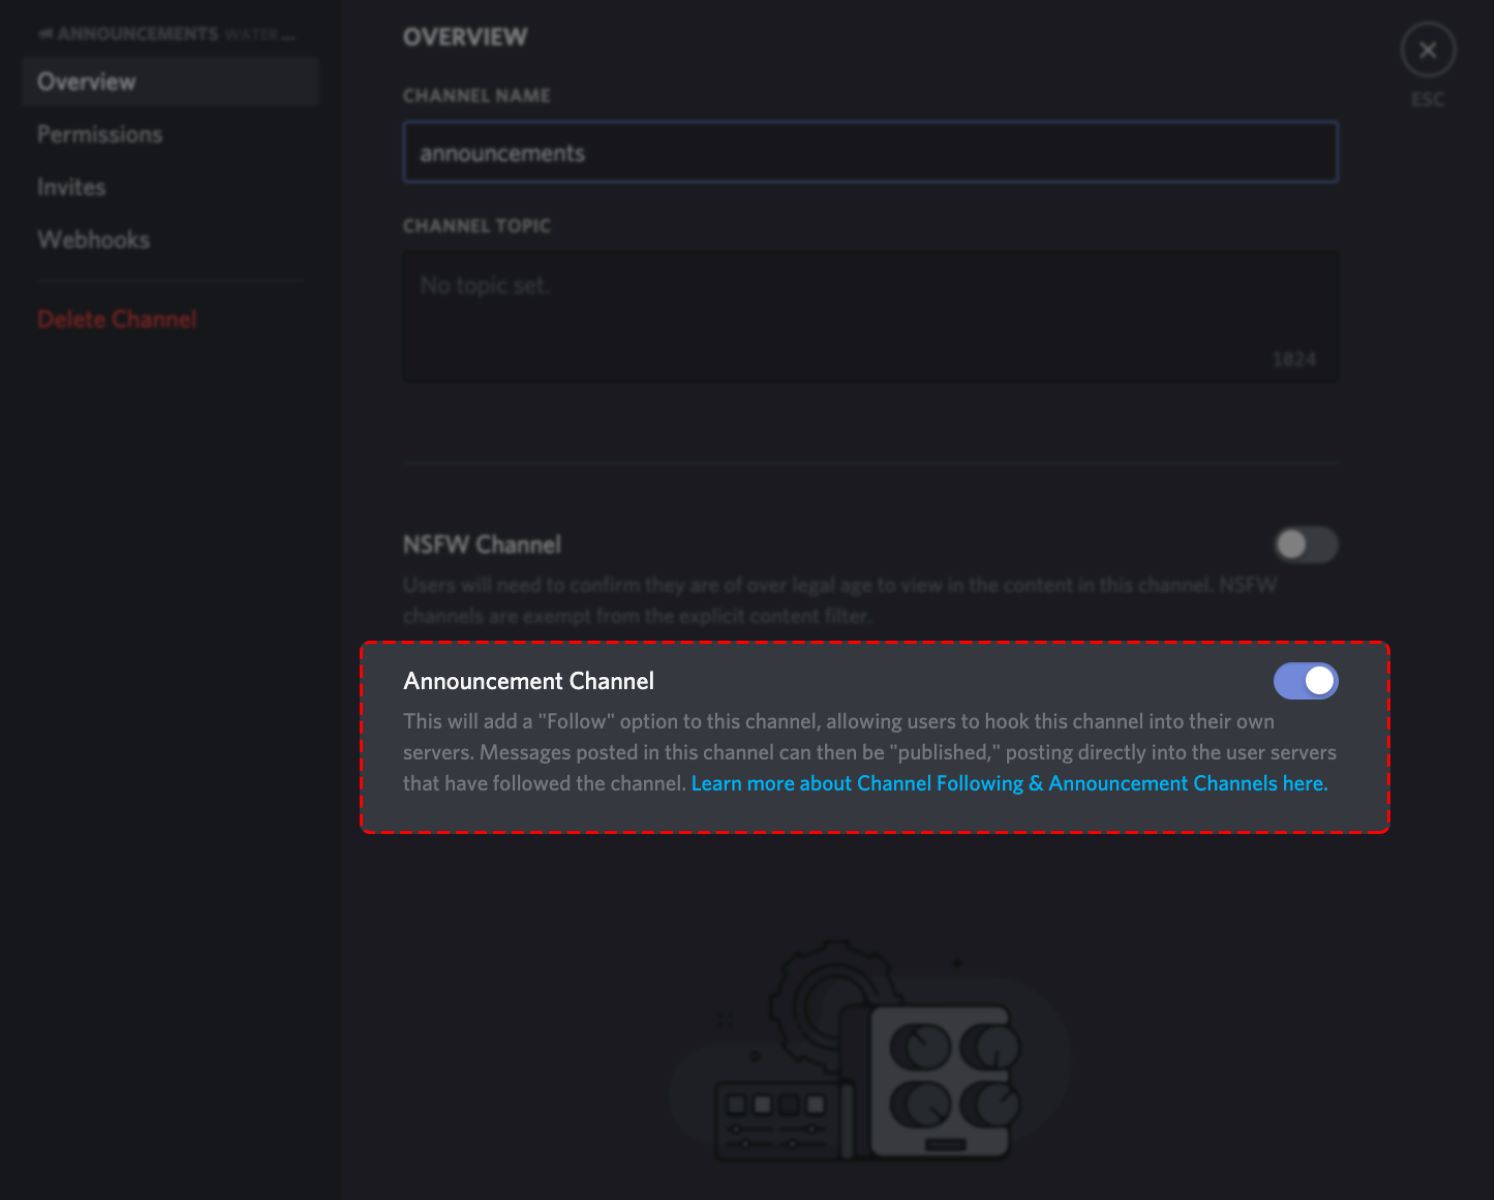
- Click on the settings icon (⚙️) next to the channel name and select “Edit Channel”. A window will open with various settings options.
- Navigate to the “Permissions” tab in the channel settings. Here, you can manage the permissions for the roles and members within your server.
- Scroll down to the “Send Messages” permission and ensure that only the authorized role(s) have the permission to send messages in this channel. Remove the permission for other roles that should not be able to send announcements.
- Once you have configured the permissions as desired, click on the “Save Changes” button to apply the new settings to your announcement channel.
By setting the channel permissions, you can ensure that only designated users with the appropriate roles have the ability to send announcements in your Discord server. This feature helps you maintain control over the information shared and prevents unauthorized messages from being sent to the announcements channel.
Remember to periodically review and update the channel permissions as needed, based on the changes in your server’s roles and responsibilities. Regularly monitor the security and access control of your announcement channel to maintain a secure and well-managed community environment.
Now that you have successfully set up the channel permissions, it’s time to move on to the next step of customizing your announcement channel to make it visually appealing and engaging!
Step 3: Customize your announcement channel
Customizing your announcement channel is crucial to make it visually appealing and engaging for your community members. Here are some customization options you can consider:
- To change the channel’s name, hover over the channel in the channel list, click on the settings icon (⚙️), and select “Edit Channel”. Here, you can modify the channel’s name to something more descriptive or aligned with your brand.
- Next, you can set a topic for your announcement channel. The channel topic appears at the top of the channel, giving a brief overview or reminder to your community members about the purpose of the channel. To set the topic, click on the settings icon (⚙️), select “Edit Channel”, and enter the desired text in the “Channel Topic” field.
- Consider choosing a distinct color for your announcement channel. By selecting a unique color, you can easily differentiate it from other channels, making it more noticeable to your community members. To change the channel’s color, click on the settings icon (⚙️), select “Edit Channel”, and choose the desired color from the dropdown menu.
- If you want to add an icon or emoji to your announcement channel, you can use a custom channel icon. This icon will appear next to the channel’s name in the channel list, adding a personal touch to your announcement channel. To set a custom icon, click on the settings icon (⚙️), select “Edit Channel”, click on the “Change” button under “Channel Icon”, and select your desired icon.
- If you want to make your announcements more prominent, you can pin them to the top of the channel. Pinned messages stay at the top of the channel, ensuring that important updates are easily visible to your community members. To pin a message, simply hover over the desired message, click on the three dots (⋯) that appear, and select “Pin Message”.
- Consider using formatting options to make your announcements more visually appealing. You can use markdown formatting, such as bold text, italics, bullet points, and headings, to emphasize key information and make your announcements stand out.
By customizing your announcement channel, you can create a visually appealing and engaging space that captures the attention of your community members. It helps in building a strong brand identity and enhances the overall experience for everyone involved.
Now that your announcement channel is customized, you’re ready to move on to the next step of creating and sending impactful announcements to your community. Let’s explore some strategies and best practices for effective announcement messaging!
Step 4: Create and send announcements
Now that your announcement channel is ready, it’s time to create and send impactful announcements to keep your community members informed and engaged. Here are some strategies to consider:
- Plan your announcements: Before sending any announcement, take some time to plan what you want to communicate. Decide on the key points, ensure accuracy, and consider the most effective way to convey your message.
- Keep it clear and concise: Make sure your announcements are clear, concise, and easy to understand. Avoid using complex or technical language that may confuse your community members. Get straight to the point and provide relevant information.
- Use visuals: Incorporate visuals, such as images or videos, in your announcements whenever appropriate. Visuals can help grab attention, enhance understanding, and make your announcements more engaging.
- Use formatting options: Take advantage of formatting options available in Discord, such as bold text, italics, bullet points, and headings, to make your announcements visually appealing and easy to read. However, use formatting sparingly to avoid overwhelming the reader.
- Include relevant links: If your announcement includes external resources, events, or further information, provide clickable links to direct community members to the relevant sources. This makes it convenient for them to access additional details.
- Consider @mentions: If your announcement is directed to a specific group or individual, you can use @mentions to notify and grab their attention. However, use this feature judiciously to avoid spamming or overusing @mentions.
- Engage with your community: Encourage community members to ask questions, provide feedback, or discuss the announcement in the designated announcement channel. Engaging with your community fosters a sense of inclusiveness and creates a platform for further interaction.
- Schedule announcements: If you have multiple announcements to make, consider scheduling them to avoid overwhelming your community members with frequent updates. This allows for better organization and comprehension of the information shared.
- Regularly review and update: Continuously evaluate the effectiveness of your announcements. Assess community feedback, analyze engagement levels, and make necessary adjustments to improve your future announcements.
By following these strategies and best practices, you can ensure that your announcements are well received and effectively communicate with your community members. Remember, the quality and relevance of your announcements play a significant role in keeping your community engaged, informed, and involved.
Now that you have learned how to create and send impactful announcements, take advantage of this feature to keep your community up to date, foster engagement, and create a thriving environment within your Discord server!
Conclusion
Creating an announcement channel in Discord is a powerful tool for keeping your community informed, engaged, and connected. By following these steps, you can easily set up and customize an announcement channel that suits your needs.
First, create a new text channel specifically for announcements, ensuring that it has a clear and descriptive name. Next, set the channel permissions to allow only authorized individuals to send announcements. Customize the channel by setting a topic, choosing a distinct color, and adding a custom icon or emoji.
When it comes to creating and sending announcements, remember to plan your messages, keep them clear and concise, and utilize visuals and formatting options to make them visually appealing. Include relevant links and consider @mentions to grab attention when necessary. Engage with your community by encouraging discussion, and regularly review and update your approach based on feedback.
By effectively utilizing the announcement channel, you can streamline the communication process, enhance community engagement, and provide timely and relevant information to your community members.
Now that you have the knowledge and tools to create an announcement channel, it’s time to put it into action and take your community management to the next level. Start creating impactful announcements and watch your community thrive!