Introduction
Welcome to the world of music where sharing and discovering new tracks is a way of life. In this digital age, music enthusiasts have found a unique way to connect with others through listening parties. These gatherings provide a platform for like-minded individuals to come together and enjoy music in a communal and interactive setting.
One popular platform for hosting listening parties is Spotify Discord. Discord, a communication tool primarily used by gamers, offers a space for users to create their own servers and connect with others who share similar interests. By combining Spotify and Discord, you can create an immersive listening experience where you can enjoy music with friends and fellow music lovers from all around the world.
In this article, we will guide you through the process of starting a listening party on Spotify Discord. We will help you set up a Spotify account, create a Discord server, add the necessary bots, and provide tips on how to make your listening party a success. Whether you want to share your favorite tracks, discover new music, or simply enjoy a virtual jam session with friends, hosting a listening party on Spotify Discord is an exciting way to engage with the online music community.
So, if you are ready to dive into the world of collaborative listening experiences, let’s get started on this step-by-step guide to hosting your own listening party on Spotify Discord. Get your headphones on, crank up the volume, and prepare for an unforgettable musical journey!
What is a Listening Party?
A listening party is a social gathering or virtual event where people come together to listen to and discuss music. It offers a unique opportunity to share and explore new tracks, albums, or playlists with friends, fellow music enthusiasts, or fans of a particular artist or genre. It is an interactive experience that allows participants to bond over their shared love for music and discover new songs in a collaborative setting.
During a listening party, the host curates a playlist or selects a specific album or set of tracks for everyone to listen to simultaneously. Participants then come together either in-person or through online platforms like Spotify Discord to listen to the music in real-time. This synchronized listening experience creates a sense of unity and shared enthusiasm among the participants.
One of the key elements of a listening party is the opportunity for discussion. Participants can share their thoughts, emotions, and reactions to the music being played. This can be done through chat platforms, video calls, or simply by talking to each other during an in-person gathering. It allows for a deeper engagement with the music and creates a sense of community among the participants.
Listening parties can be organized around various themes or occasions. It could be a celebration of a new album release, a tribute to a particular artist, a genre-specific event, or just a casual get-together where friends share their favorite tracks. The possibilities are endless, and the beauty of a listening party lies in its flexibility and adaptability to cater to the preferences and interests of the participants.
Overall, a listening party offers a unique and engaging way to connect with music and other music enthusiasts. It brings people together, promotes conversation and interaction, and creates a shared experience centered around the joy of discovering and appreciating music.
The Benefits of Hosting a Listening Party on Spotify Discord
Hosting a listening party on Spotify Discord comes with a host of benefits that enhance the overall experience for both the host and the participants. Let’s explore some of these advantages:
- Global Reach: Spotify Discord allows you to connect with music lovers from all around the world. You can invite friends, acquaintances, or even strangers who share similar musical tastes to join your listening party. This global reach expands your music community, exposes you to new tracks, and fosters connections with people who appreciate the same genres and artists.
- Real-time Synchronization: Spotify Discord ensures that everyone in the listening party is hearing the music simultaneously. This synchronization creates a shared experience, almost as if you were all in the same physical space. It allows for immediate reactions, discussions, and a sense of togetherness as you listen and react to the same songs or albums in real-time.
- Interactive Communication: Discord offers various communication features like chat channels and voice chat, enabling participants to engage in conversations during the listening party. This interactive communication enhances the experience by allowing participants to share their thoughts, opinions, and emotions about the music. It fosters discussions, deepens connections, and promotes a sense of community.
- Creative Customization: Discord allows you to customize your server to suit the theme or vibe of your listening party. You can create dedicated channels for music recommendations, share playlists, or even showcase artwork related to the featured tracks or albums. These customizable options add a creative touch to your listening party, making it visually appealing and engaging.
- Multiple Listening Formats: With Spotify Discord, you can choose from different listening formats. You can opt for a curated playlist, where the host selects a variety of tracks or albums for everyone to enjoy. Alternatively, you can choose a specific album or artist and dive deep into their discography. This flexibility allows you to cater to the preferences and interests of the participants, ensuring an engaging and enjoyable experience for all.
By harnessing the power of Spotify Discord, hosting a listening party becomes an immersive and interactive experience. It brings people together, fosters connections, and creates memories centered around a shared love for music. So, whether you want to discover new tracks, connect with music enthusiasts, or simply have a good time with friends, hosting a listening party on Spotify Discord is a fantastic way to amplify your musical journey.
Step 1: Set Up a Spotify Account
In order to host a listening party on Spotify Discord, the first step is to set up a Spotify account if you don’t already have one. Spotify is a popular music streaming platform that provides access to millions of songs and playlists.
To create a Spotify account, follow the steps below:
- Visit the Spotify website or download the Spotify app on your device.
- Click on the “Sign Up” or “Get Spotify” button to start the registration process.
- You will be asked to choose between a free or premium account. The free account allows you to listen to music with ads, while the premium account offers an ad-free experience with additional features like offline listening and high-quality audio. Choose the desired option and proceed.
- Enter your email address, create a strong password, and choose a username.
- Alternatively, you can sign up with your Facebook account by clicking on the “Continue with Facebook” option.
- Complete any additional steps required to verify your account.
Once you have successfully created your Spotify account, you can start exploring the vast library of music available and create playlists of your favorite tracks.
Having a Spotify account is essential for hosting a listening party because you will need to connect Spotify with Discord to play music in your server. Your Spotify account will also allow you to curate playlists, access new releases, and engage with the music community on Spotify.
Now that you have set up your Spotify account, you are ready to move on to the next step of creating a Discord server to host your listening party on Spotify Discord.
Step 2: Create a Discord Server
To host a listening party on Spotify Discord, you’ll need to create a Discord server where you and your participants can gather. Discord is a free communication platform that allows for chat, voice, and video communication.
Follow these steps to create a Discord server:
- Visit the Discord website or download the Discord app on your device.
- Click on the “Register” or “Open Discord” button to start the registration process.
- Fill in your desired username and password, along with a valid email address.
- Click on the verification link sent to your email to confirm your account.
- Once your account is verified, you can choose to add a profile picture and customize your username as per your preference.
- On the left-hand side of the Discord interface, click on the plus icon (+) next to the server menu. This will open the server creation window.
- Choose the “Create a Server” option, which will prompt you to give your server a name.
- Select a region for your server. This selection determines the server’s voice region.
- Click on the “Create” button to finalize the creation of your Discord server.
Congratulations! You have successfully created your own Discord server. Take some time to explore the server settings and options. You can customize the server’s appearance, set roles and permissions for participants, and create various text and voice channels based on your listening party’s needs.
Now that your Discord server is ready, you can proceed to the next step of customizing your server to create a unique and engaging environment for your listening party on Spotify Discord.
Step 3: Customize Your Discord Server
After creating your Discord server, it’s time to customize it to enhance the experience for your listening party participants. Discord offers a range of customization options that allow you to personalize your server and make it visually appealing.
Follow these steps to customize your Discord server:
- Select your server from the left-hand side menu to access the server settings.
- Click on the down arrow next to your server’s name to expand the server options.
- Navigate to the “Server Settings” section and click on it.
- In the “Overview” tab, you can customize the server name and change the server’s icon or banner by clicking on the respective options.
- Explore the “Roles” tab to create and assign roles to participants. Roles allow you to manage permissions and control the access levels of different members of your server.
- Head over to the “Channels” tab to create dedicated channels for your listening party. You can create text channels for discussions, announcements, and sharing playlists, as well as voice channels for participants to join and listen to music together.
- Under the “Integration” tab, you can connect other platforms like Spotify to your Discord server. This will allow you to integrate music functionalities, such as playing Spotify tracks directly within Discord, enhancing the listening party experience.
- Take the time to explore other settings, such as the “Moderation” options and the ability to enable or disable certain features within your server.
- Once you have customized your server to your liking, click on the “Save Changes” button to apply the modifications.
Customizing your Discord server not only adds a personal touch, but it also ensures that the server aligns with the theme and purpose of your listening party. Participants will appreciate the thought and effort put into creating a unique and engaging environment.
Now that you have customized your Discord server, you are one step closer to hosting an unforgettable listening party. The next step is to add the Spotify bot to your server, which will allow you to connect Spotify with Discord seamlessly.
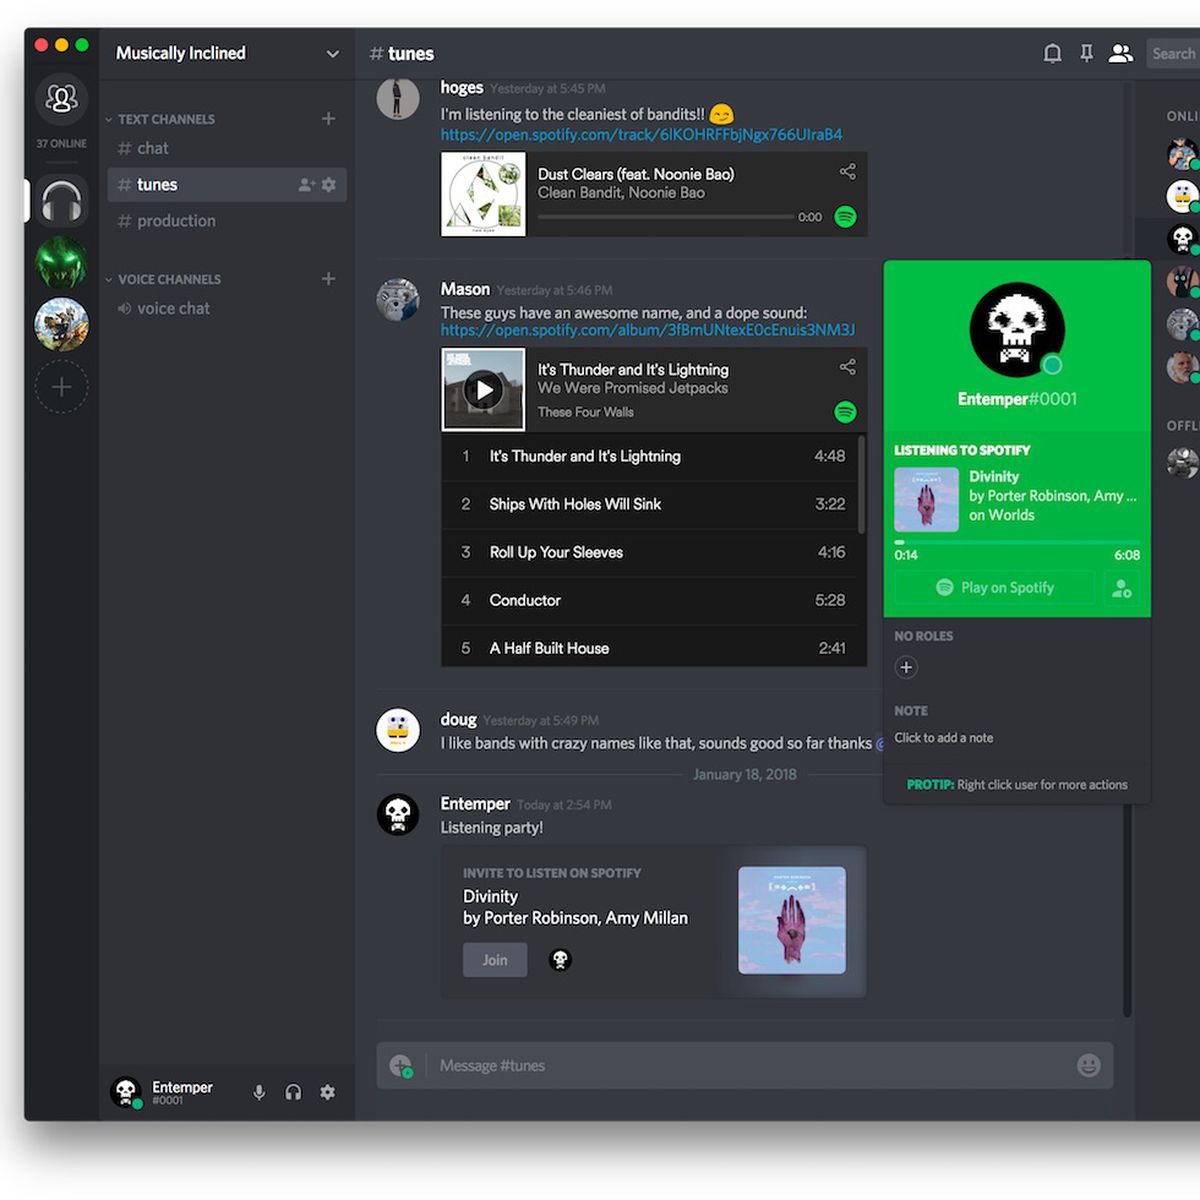
Step 4: Add the Spotify Bot to Your Discord Server
The Spotify bot is a valuable addition to your Discord server as it enables seamless integration between Spotify and Discord. This integration allows you to play Spotify tracks directly within your Discord server, enhancing the listening party experience.
Follow these steps to add the Spotify bot to your Discord server:
- Visit the Discord Bot List website or any reputable bot listing platform.
- Search for a Spotify bot, such as “Rythm,” “Groovy,” or “FredBoat.”
- Select the bot that suits your preferences and has good ratings and reviews.
- Click on the bot’s profile or website to access the bot’s invite link.
- On the bot’s page, click on the “Invite” or “Add to Server” button.
- Authorize the bot’s access to your Discord server by selecting the desired server.
- Follow the prompted steps to grant the necessary permissions and authorize the bot.
- Ensure that the bot has the necessary permissions to join voice channels and play music. If needed, adjust the role permissions within your server settings.
Once you have successfully added the Spotify bot to your Discord server, it will appear in your server’s member list. The bot will now have the ability to play Spotify tracks and playlists in voice channels, allowing you to create a seamless listening experience for your participants.
It is worth noting that different Spotify bots may have varying features and commands. It is recommended to familiarize yourself with the bot’s documentation or website to fully understand its capabilities and how to utilize them effectively during your listening party.
With the Spotify bot successfully added to your Discord server, you are now ready for the next step: connecting and authorizing Spotify with Discord. This connection will allow you to access your Spotify account and music library within the Discord server.
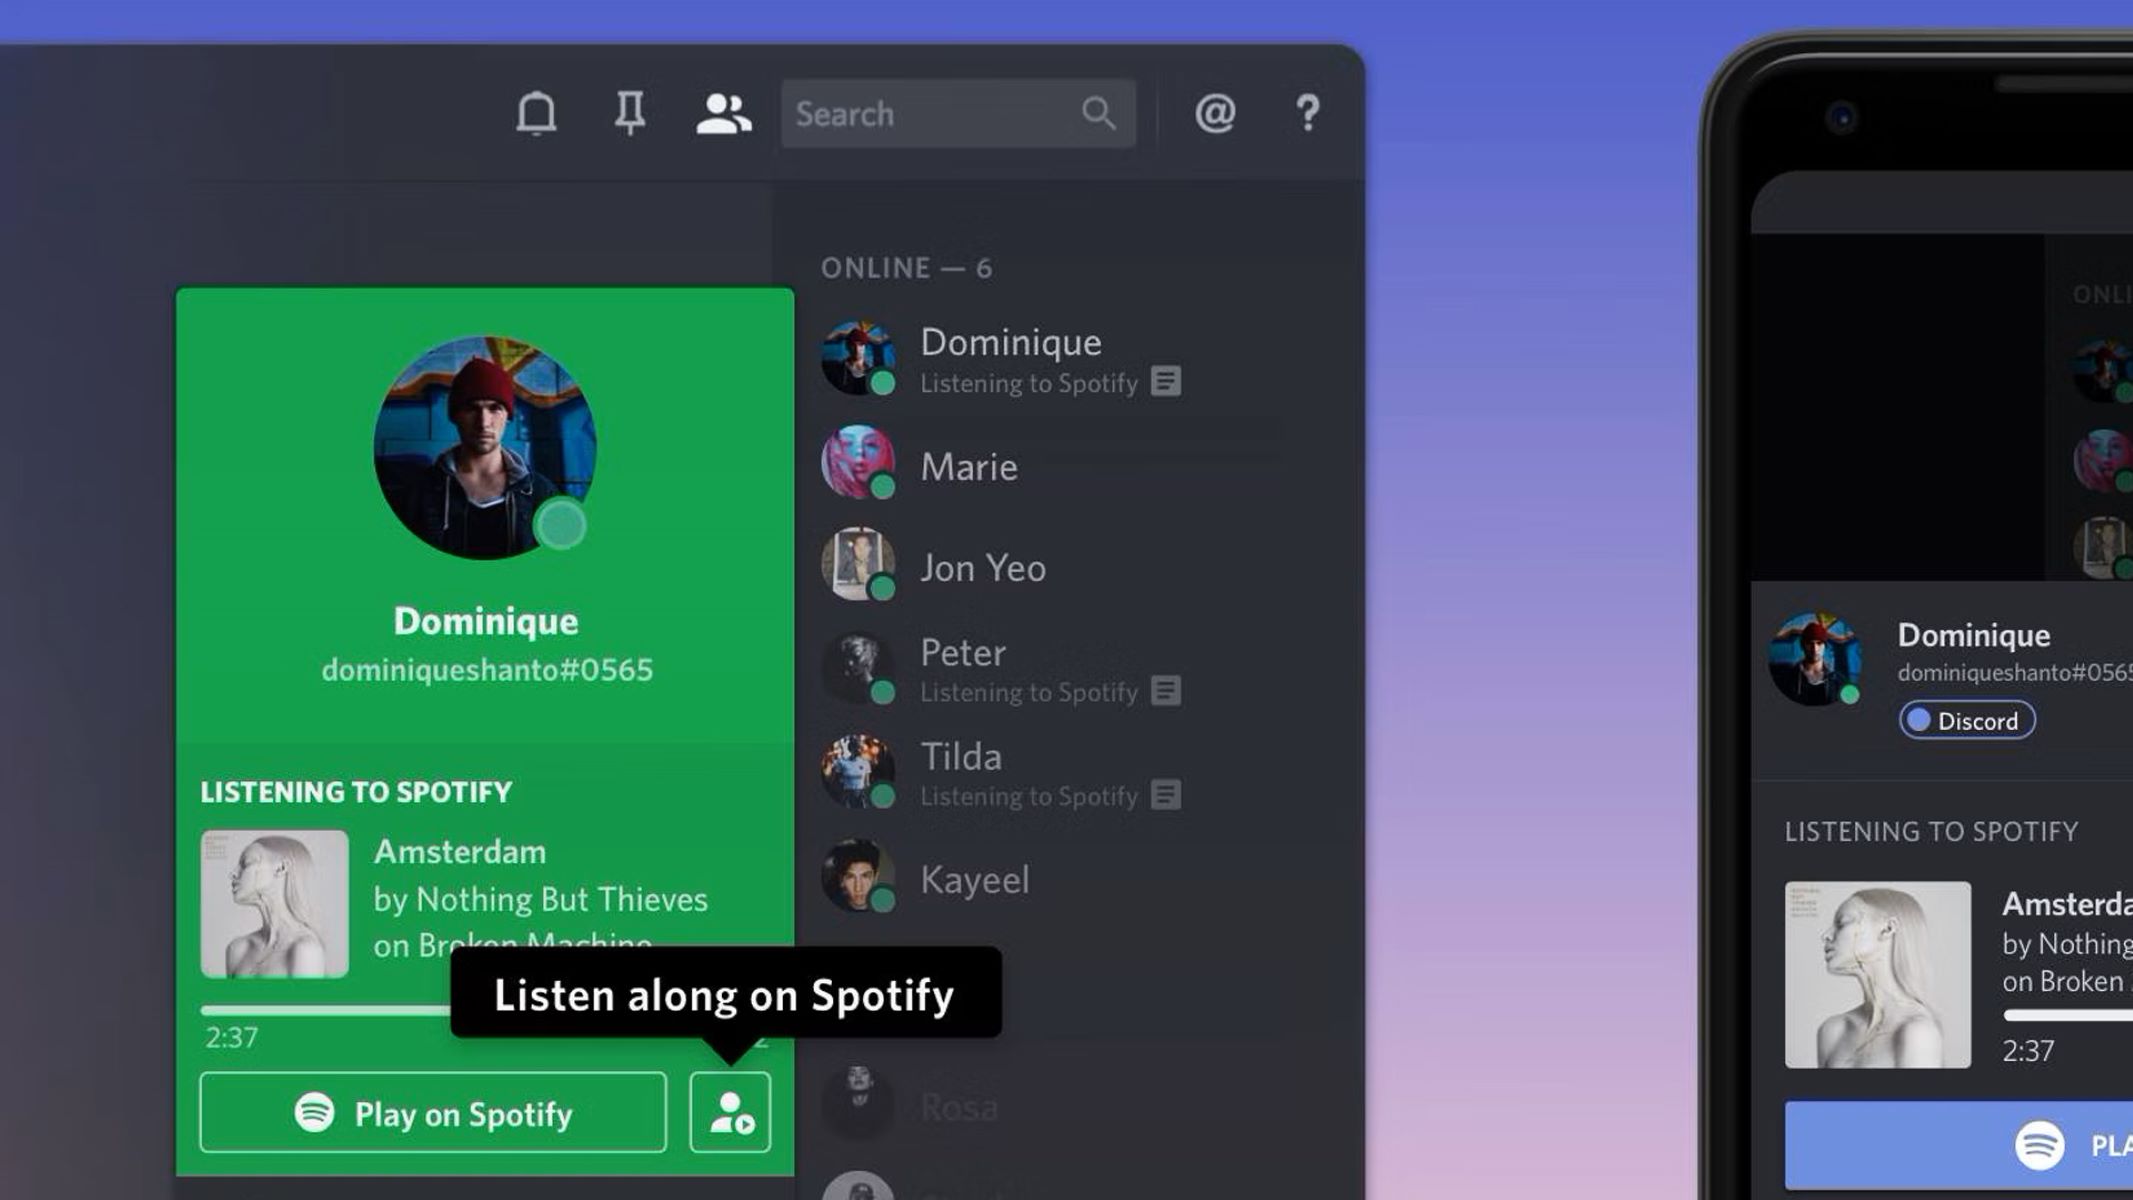
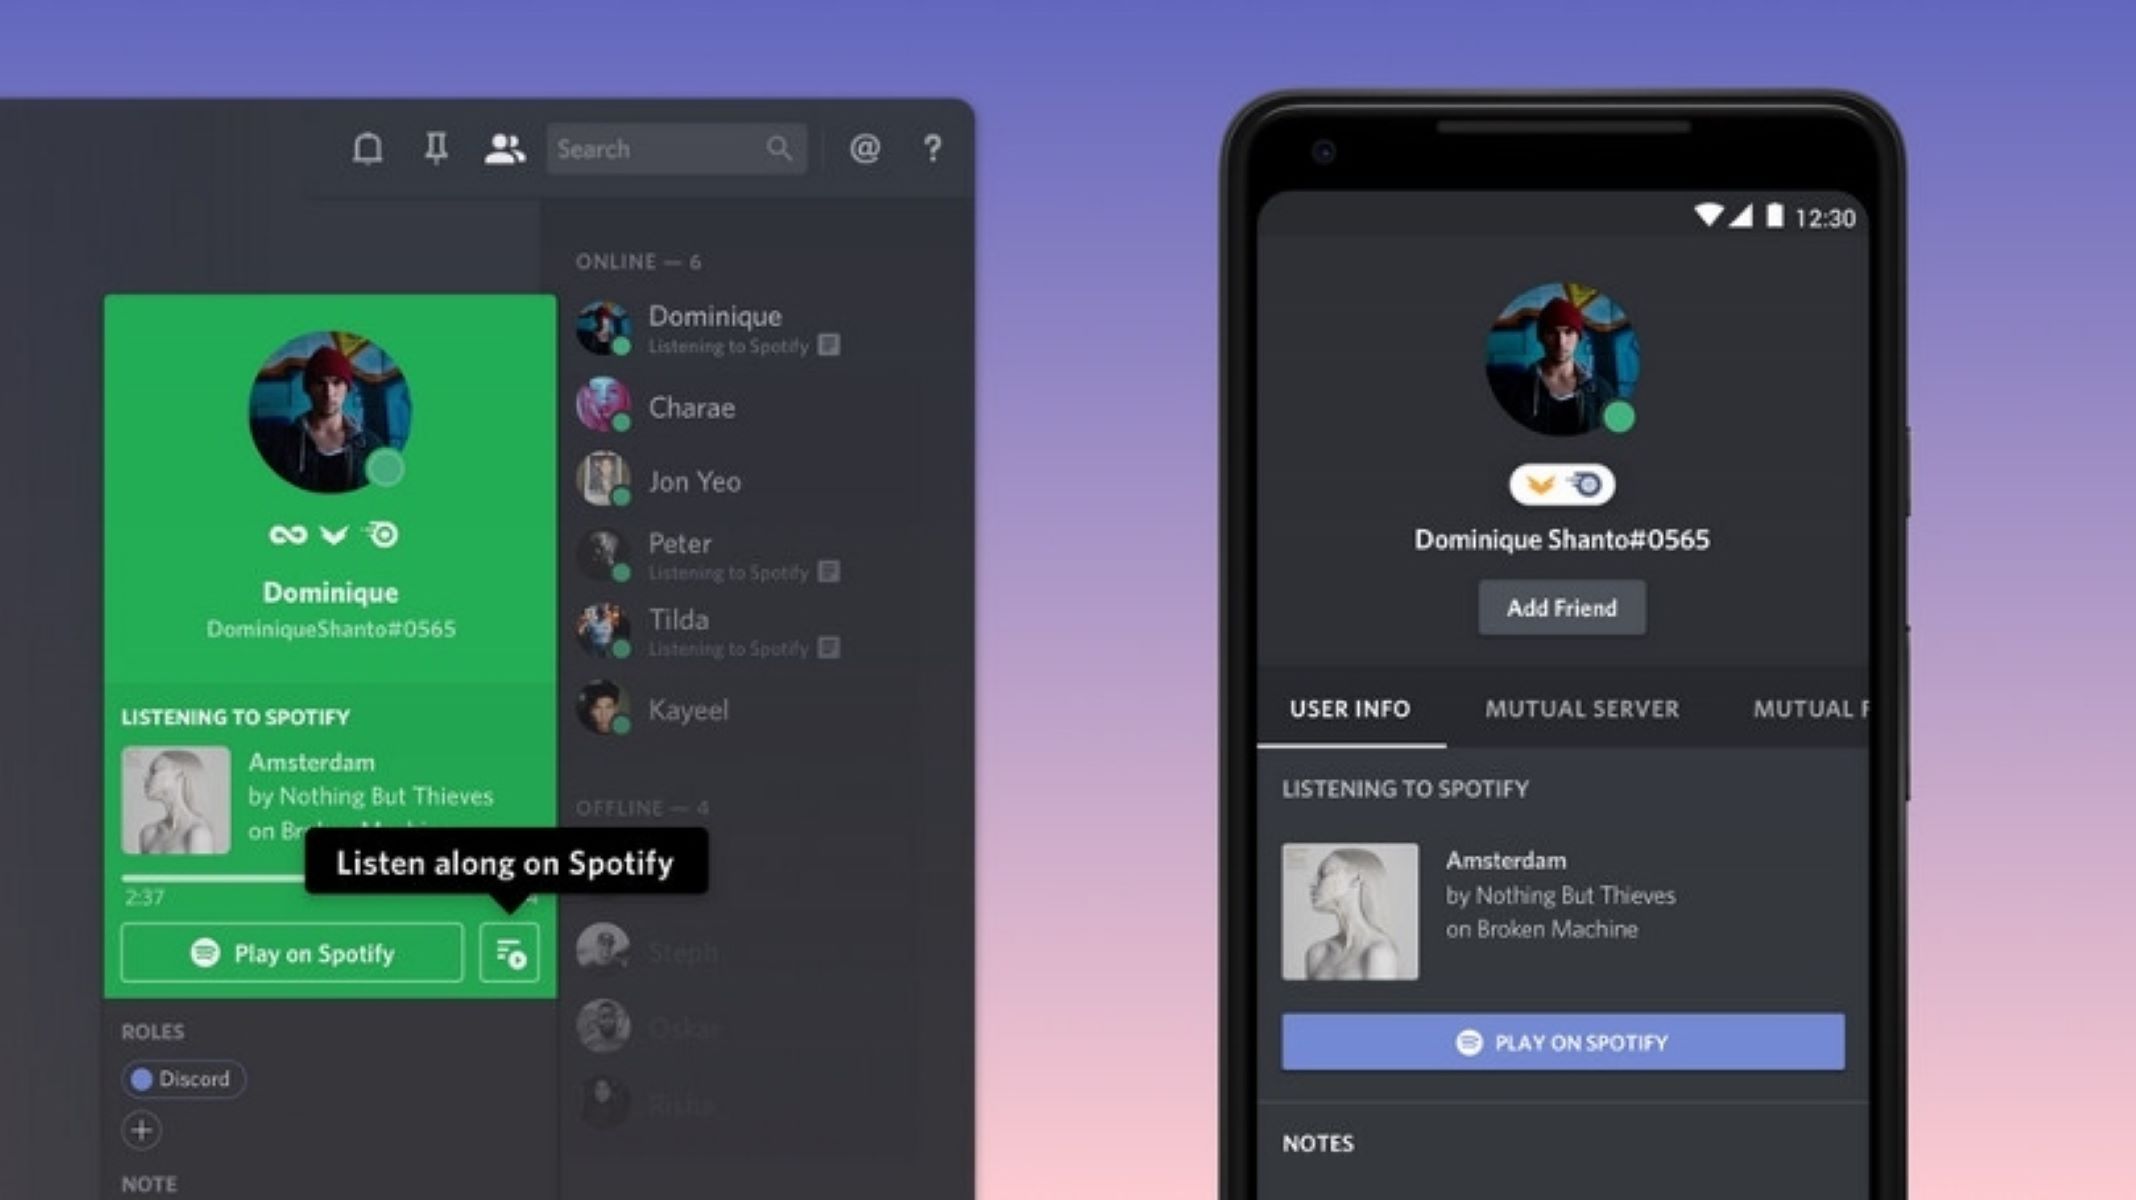
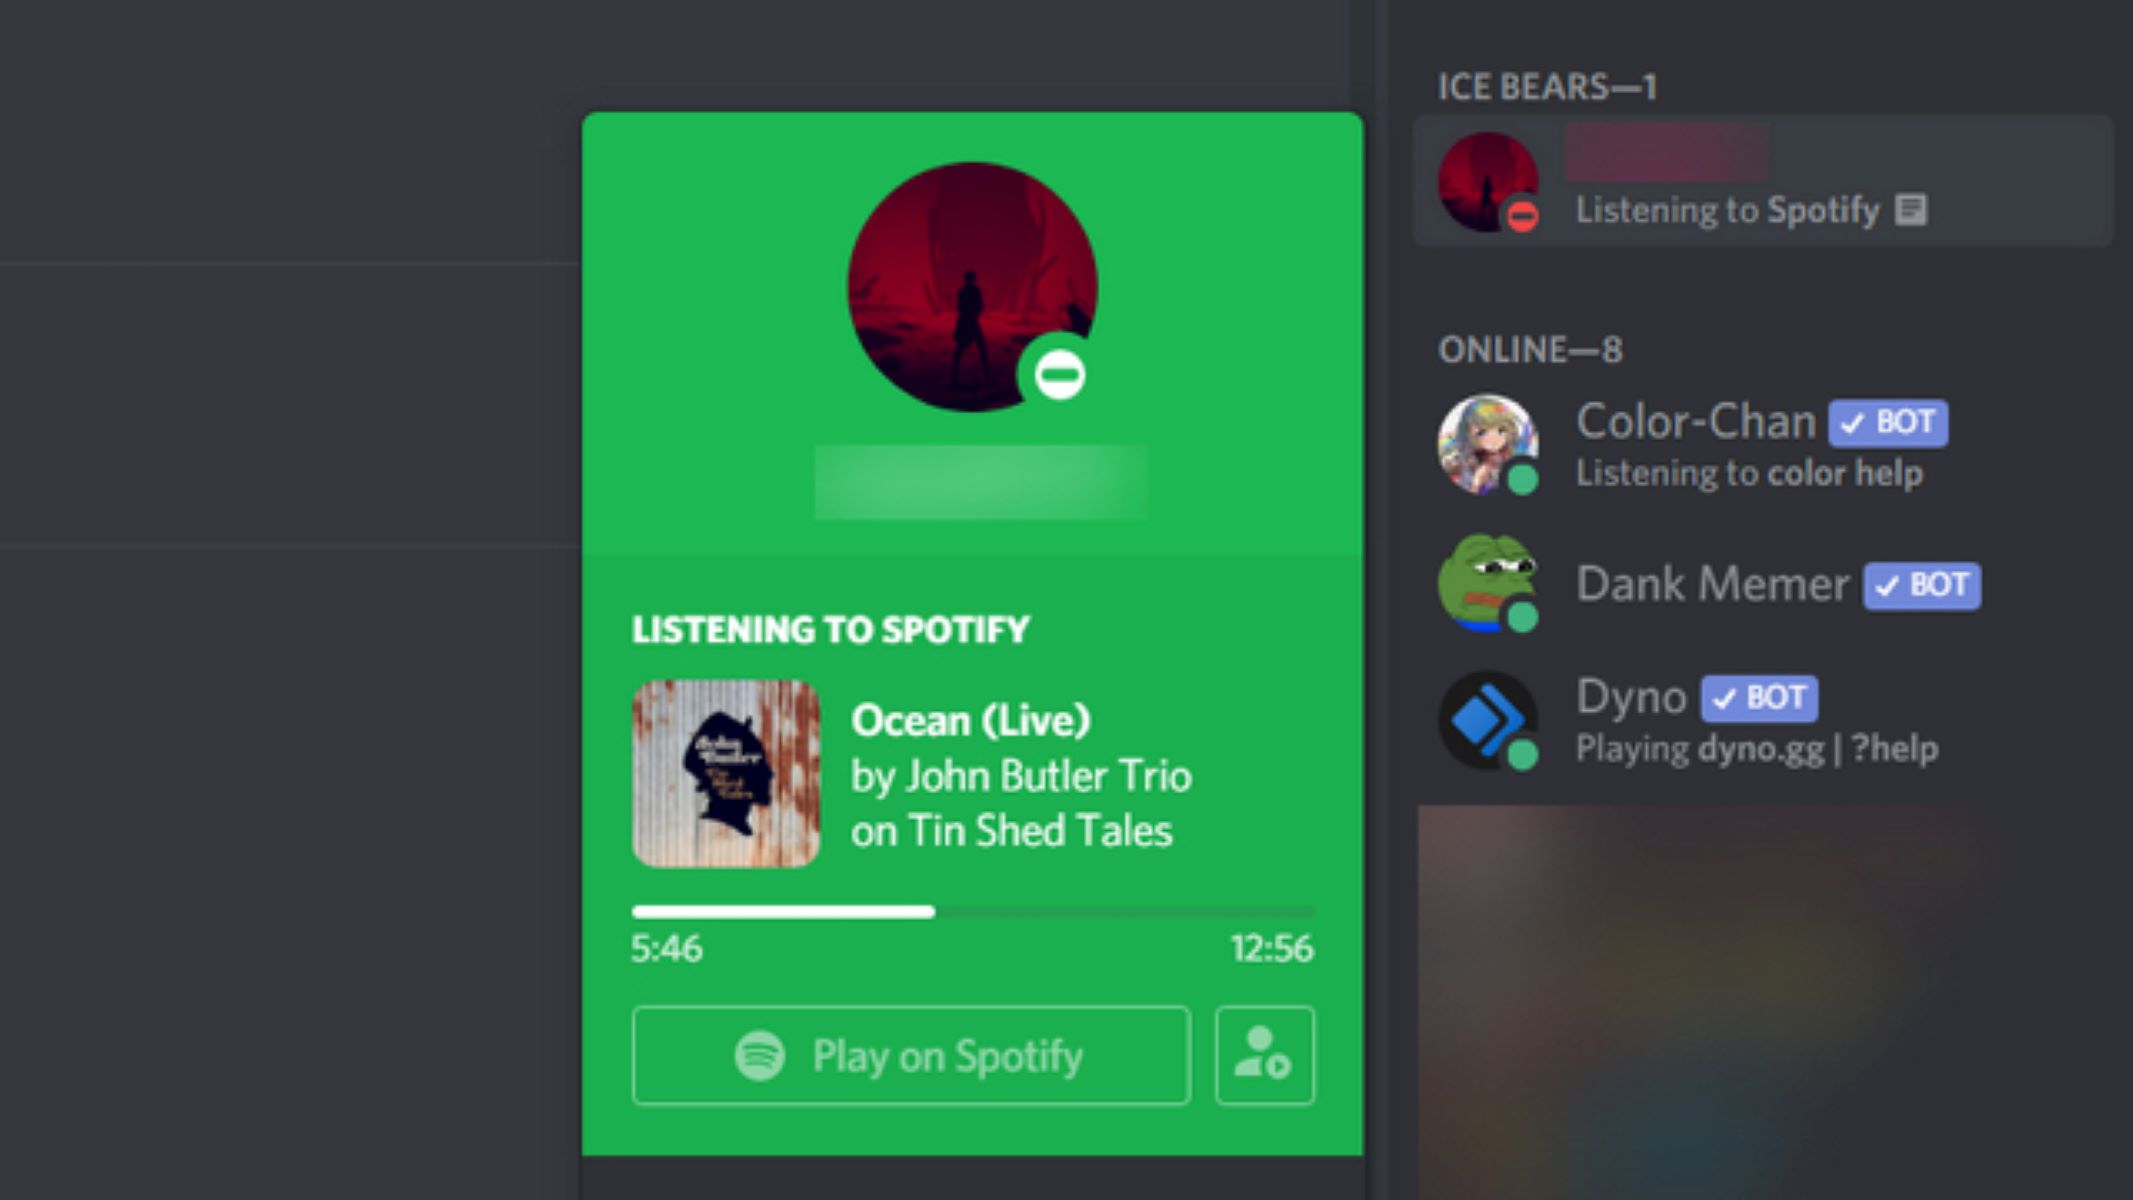
Step 5: Connect and Authorize Spotify with Discord
To fully utilize the Spotify integration within your Discord server, you need to connect and authorize Spotify with Discord. This will grant Discord access to your Spotify account and music library, allowing you to play tracks and playlists directly from Spotify during your listening party.
Follow these steps to connect and authorize Spotify with Discord:
- Ensure that you have the Spotify desktop app or web player installed on your device.
- Open Discord and navigate to your server where you want to host the listening party.
- Click on the server settings icon (represented by a gear) to access the server settings.
- In the left-hand menu, select the “Connections” tab.
- Scroll down until you find the Spotify icon and click on the “Connect” button beside it.
- You will be redirected to a Spotify login page. Enter your Spotify account credentials and log in.
- A pop-up window will appear, asking for permission to access your Spotify account. Click on the “Agree” button to authorize Discord’s access.
- Once authorized, the connection between Spotify and Discord will be established.
With Spotify now connected and authorized with Discord, you can start playing tracks and playlists from your Spotify library directly in your Discord voice channels. This integration allows all participants in the listening party to listen to the music simultaneously, creating a synchronized musical experience.
It’s important to note that only one Spotify account can be connected to Discord at a time. If multiple participants want to contribute to the music selection, they can use the Spotify bot commands and share Spotify track or playlist links in designated text channels.
Now that Spotify is successfully connected and authorized with Discord, you can proceed to the next step of setting up a dedicated listening party channel within your Discord server.
Step 6: Set Up a Listening Party Channel
Setting up a dedicated listening party channel within your Discord server is essential to provide a central space for participants to discuss, share, and engage with the music being played. This channel will serve as the hub for all communication and interaction related to the listening party.
Follow these steps to set up a listening party channel:
- Select your Discord server where the listening party will take place.
- Click on the “+” icon next to the text channels in the left-hand menu to create a new channel.
- Give your channel a name that reflects the theme or purpose of the listening party, such as “Listening Party” or “Music Discussion.”
- Customize the channel settings, such as permissions, visibility, and message formatting, according to your preferences.
- Consider adding additional text channels for specific discussions or topics, such as “Song Suggestions” or “Favorite Tracks.” This allows participants to focus on specific aspects of the listening party and engage in targeted conversations.
- You may also create designated voice channels for the actual listening session. For example, you can create a voice channel called “Listening Room” or “Music Lounge” where participants can join to listen to and discuss the music being played.
- Adjust the channel order, if necessary, to make the listening party channel and voice channels more easily accessible to participants.
- Communicate to your participants the existence and purpose of the listening party channel, encouraging them to join and actively participate in the discussions.
The listening party channel will serve as a central platform for participants to share their thoughts, reactions, song recommendations, and engage in lively conversations about the music being played. Encourage participants to interact, ask questions, and express their opinions to create an inclusive and engaging atmosphere.
With the dedicated listening party channel set up, you are now ready to invite guests and announce the details of the listening party. Share the excitement and get ready for a memorable and enjoyable listening experience!
Step 7: Invite Guests and Announce the Listening Party
Now that your listening party setup is complete, it’s time to invite guests and announce the details of the event. The success of any listening party lies in the participation and engagement of the attendees. Here’s how you can invite guests and create a buzz around your listening party:
- Create a captivating and informative announcement message about your listening party. Include details such as the date, time, and theme of the event. Mention any special tracks, albums, or artists that will be featured.
- Post the announcement in your Discord server’s general chat or an announcement channel, ensuring that all participants can easily access it.
- Consider creating a graphic or visual representation to accompany the announcement. This can catch the eye and generate excitement among potential participants.
- Encourage participants to invite their friends or share the announcement with other music enthusiasts who might be interested in joining the listening party. Word-of-mouth promotion can significantly increase the number of attendees.
- Reach out to specific individuals or communities with a shared interest in the theme or genre of your listening party. This targeted approach can help attract participants who are particularly passionate about the type of music being featured.
- Ensure that the announcement includes the specific Discord server details, such as the server name and invite link. This makes it easy for potential participants to join the server.
- Remind guests to connect their Spotify accounts with Discord if they haven’t done so already. Provide clear instructions on how to connect and authorize Spotify with Discord to ensure a smooth listening experience.
- Keep the conversation going by engaging with participants in the announcement thread. Answer any questions, address concerns, and encourage participants to share their excitement or song suggestions for the listening party.
By actively promoting and announcing your listening party within your Discord server and beyond, you can generate interest and build anticipation among potential participants. The more enthusiastic and engaged your guests are, the more memorable and enjoyable the listening party experience will be for everyone involved.
With guests invited and the excitement building, it’s time to prepare a curated playlist for the listening party. In the next step, we’ll guide you through the process of selecting and organizing the perfect tracks for a seamless musical journey.
Step 8: Prepare a Playlist for the Listening Party
One of the key elements of a successful listening party is a well-curated playlist. The playlist sets the tone, creates the mood, and guides the musical journey for the participants. Here’s how you can prepare a captivating playlist for your listening party:
- Define the theme or concept of your playlist. It could be a specific genre, artist, album, or even a mix of different tracks that fit a particular mood or atmosphere.
- Consider the duration of your listening party and the number of tracks you want to include in your playlist. Aim for a balance between variety and cohesion to keep the participants engaged throughout the event.
- Explore different sources, such as Spotify’s vast library, to discover tracks that align with your theme. Utilize Spotify’s recommendation features, curated playlists, or even reach out to fellow music enthusiasts for suggestions.
- Sequencing is crucial in creating a seamless listening experience. Arrange the tracks in a way that flows smoothly from one song to the next, taking into account tempo, energy levels, and transitions between genres or moods.
- Consider incorporating a mix of familiar favorites and lesser-known gems to keep the playlist interesting and introduce participants to new music.
- If possible, add a couple of surprise tracks or hidden gems to delight and surprise the participants. These unexpected additions can spark excitement and conversation during the listening party.
- Create a relevant and engaging title for the playlist that reflects the theme or mood of the listening party. This adds to the overall experience and piques the interest of potential participants.
- Once your playlist is ready, share it with the participants in the listening party channel or any designated communication channels. Provide clear instructions on how to access and play the playlist.
- Encourage participants to preview the playlist beforehand to familiarize themselves with the tracks and generate excitement for the listening party.
- Ensure that your playlist is easily accessible and playable, either through Spotify directly or by utilizing the Spotify bot commands within your Discord server.
Remember, the playlist is the heart and soul of your listening party. By putting thought and effort into curating a captivating selection of tracks, you set the stage for a memorable and engaging musical journey for all participants.
With your playlist prepared, it’s time to move on to the next step: starting the tracks and commencing the listening party.
Step 9: Start Playing the Tracks
With the playlist prepared and participants gathered, it’s time to start playing the tracks and kick off the listening party. Follow these steps to ensure a smooth and enjoyable music-sharing experience:
- Make sure the Spotify bot is connected and authorized on your Discord server. This allows you to play tracks directly from Spotify within the server.
- Announce the start of the listening party and let participants know that the music is about to begin. Build anticipation and excitement for the upcoming tracks.
- Use the Spotify bot’s commands to start playing the first track from your curated playlist. For example, you can use the command “!play [track name]” to initiate the playback.
- Ensure that the audio settings on your Discord are properly configured. Double-check that the correct output device is selected and that the volume levels are suitable for all participants.
- Encourage participants to use headphones for optimal audio quality and to minimize any background noise during the listening session.
- Consider providing additional context or insights about the tracks as they are played. You can share interesting facts, personal anecdotes, or thoughts on why you included certain songs in the playlist.
- Allow each track to play in its entirety or set a specific duration for each song before moving onto the next. This depends on the time constraints and preferences of your listening party.
- Monitor the chat or voice channels for any feedback, reactions, or discussions from the participants. Encourage active engagement and interaction throughout the listening experience.
- Take occasional breaks between tracks or at natural intervals to allow participants to share their thoughts, ask questions, or suggest upcoming songs from the playlist.
- Enjoy the music together! Remember to immerse yourself in the tracks, appreciate the artistry, and celebrate the shared joy of music.
By following these steps and maintaining an open and engaging atmosphere, you can create a memorable and immersive listening experience for all participants. The power of music lies in its ability to connect people, and through this listening party, you have provided a platform for music lovers to come together and share their passion.
Now that the tracks are playing and the participants are fully engaged, it’s time to move on to the final step: encouraging discussion and interaction among the participants.
Step 10: Encourage Discussion and Interaction
One of the key elements of a successful listening party is fostering discussion and interaction among the participants. By encouraging active engagement and conversation, you can create a vibrant and interactive atmosphere that enhances the overall experience. Here’s how you can encourage discussion and interaction during the listening party:
- Set the tone by being actively involved in the chat or voice channels. Initiate conversations, ask open-ended questions, and share your own thoughts and reactions to the music being played.
- Prompt participants to share their opinions and thoughts about the tracks. Encourage them to express their favorite moments, personal connections, or any emotions evoked by the music.
- Consider organizing specific discussion prompts or icebreaker questions related to the playlist theme or individual tracks. This can stimulate conversation and encourage participants to share their unique perspectives.
- Address participants by name when responding to their messages or contributions. This personal touch helps create a sense of community and makes participants feel valued and included.
- Encourage participants to engage with one another by responding to each other’s comments, posing follow-up questions, and building upon the discussions happening within the listening party channel.
- Use reaction emojis or custom bot commands to allow participants to express their immediate reactions to the music, such as clapping hands, heart emojis, or thumbs up.
- Keep an eye on the chat or voice channels and actively respond to any questions or comments. This shows your participants that their input is being acknowledged and appreciated.
- Allow for moments of silence between tracks to give participants the opportunity to gather their thoughts, reflect on the music, or type out longer responses to share with the group.
- Highlight interesting or insightful comments from participants and provide encouragement to keep the discussions flowing. This recognition can motivate others to contribute and share their own thoughts.
- Create a sense of inclusivity and respect by moderating the discussions and ensuring that all participants feel comfortable expressing their opinions and engaging in meaningful dialogue.
Remember, the goal of the listening party is to create a collaborative and interactive environment where participants can bond over their shared love for music. By encouraging discussion and interaction, you facilitate a deeper connection to the music and each other, making the listening party a rich and fulfilling experience for all.
Congratulations on successfully hosting a listening party on Spotify Discord! Your efforts have brought people together, sparked meaningful conversations, and allowed for the discovery and appreciation of music. We hope this guide has been helpful, and we wish you continued enjoyment and success in your future listening parties.
Conclusion
Hosting a listening party on Spotify Discord is a fantastic way to connect with music enthusiasts, share your favorite tracks, and discover new music. By following the steps outlined in this guide, you can create an immersive and interactive experience where participants can come together to enjoy music in a communal setting.
Throughout the process, we have covered essential steps such as setting up a Spotify account, creating a Discord server, customizing the server, adding the Spotify bot, connecting and authorizing Spotify with Discord, setting up a listening party channel, preparing a captivating playlist, starting the tracks, and encouraging discussion and interaction among the participants.
Remember, the success of a listening party lies in the engagement, connection, and enjoyment of the participants. By fostering a welcoming and interactive space, providing opportunities for conversation, and curating a carefully selected playlist, you can create a memorable and enjoyable experience for everyone involved.
Take the time to experiment with different themes, genres, and tracks for future listening parties. Continuously explore new music and engage with your community to keep the momentum going. Each listening party can offer a unique and enriching experience, allowing you to deepen your appreciation for music and develop meaningful connections with fellow music lovers.
So, gather your friends, send out the invites, and get ready for an unforgettable musical journey on Spotify Discord. Embrace the power of music to bring people together and create magical moments that will be cherished for years to come.
Now, go ahead and kick-start your next listening party. Have fun, enjoy the music, and let the melodies guide you into a world of shared joy and harmony.