Choosing a Discord Server Name
When setting up a Discord server, one of the first tasks is to choose a captivating and appropriate server name. The server name plays a crucial role in attracting potential members and setting the overall tone and theme of your community. Here are some tips to help you choose the perfect server name:
- Reflect the Purpose: Select a name that reflects the main purpose or focus of your server. Whether it’s a gaming community, a hobby group, or a professional network, the server name should represent the core concept.
- Be Descriptive: Use descriptive words or phrases in your server name that give users a clear idea of what to expect. For example, if your server is dedicated to a specific game like “Mystic Warriors Guild,” it immediately signals a gaming-oriented community.
- Keep It Concise: Opt for a relatively short and concise server name. Avoid long and complex names that might be difficult for users to remember or type. A shorter name is more likely to leave a lasting impression.
- Catchy and Memorable: Create a server name that is catchy and memorable. It should pique the interest of potential members and make them curious to explore your server further.
- Avoid Offensive or Controversial Terms: Be mindful of the potential impact of your server name on different audiences. Steer clear of offensive or controversial terms that may discourage individuals from joining.
- Originality: Strive for originality by choosing a unique server name. This will help set your community apart from others and build a distinct brand identity.
- Consider SEO: If you want your server to be discoverable through search engines, consider incorporating relevant keywords in the server name. This can improve your server’s visibility and attract like-minded individuals.
Remember, your server name is like a first impression, so take the time to brainstorm and choose a name that accurately represents your community’s purpose and values. A well-chosen server name can make a significant difference in attracting the right audience and laying the foundation for a thriving Discord community.
Creating a Discord Server
Creating a Discord server is a straightforward process that allows you to establish an online community for like-minded individuals. Follow these steps to get started:
- Access Discord: First, ensure that you have a Discord account. If you don’t have one, you can create an account at discord.com.
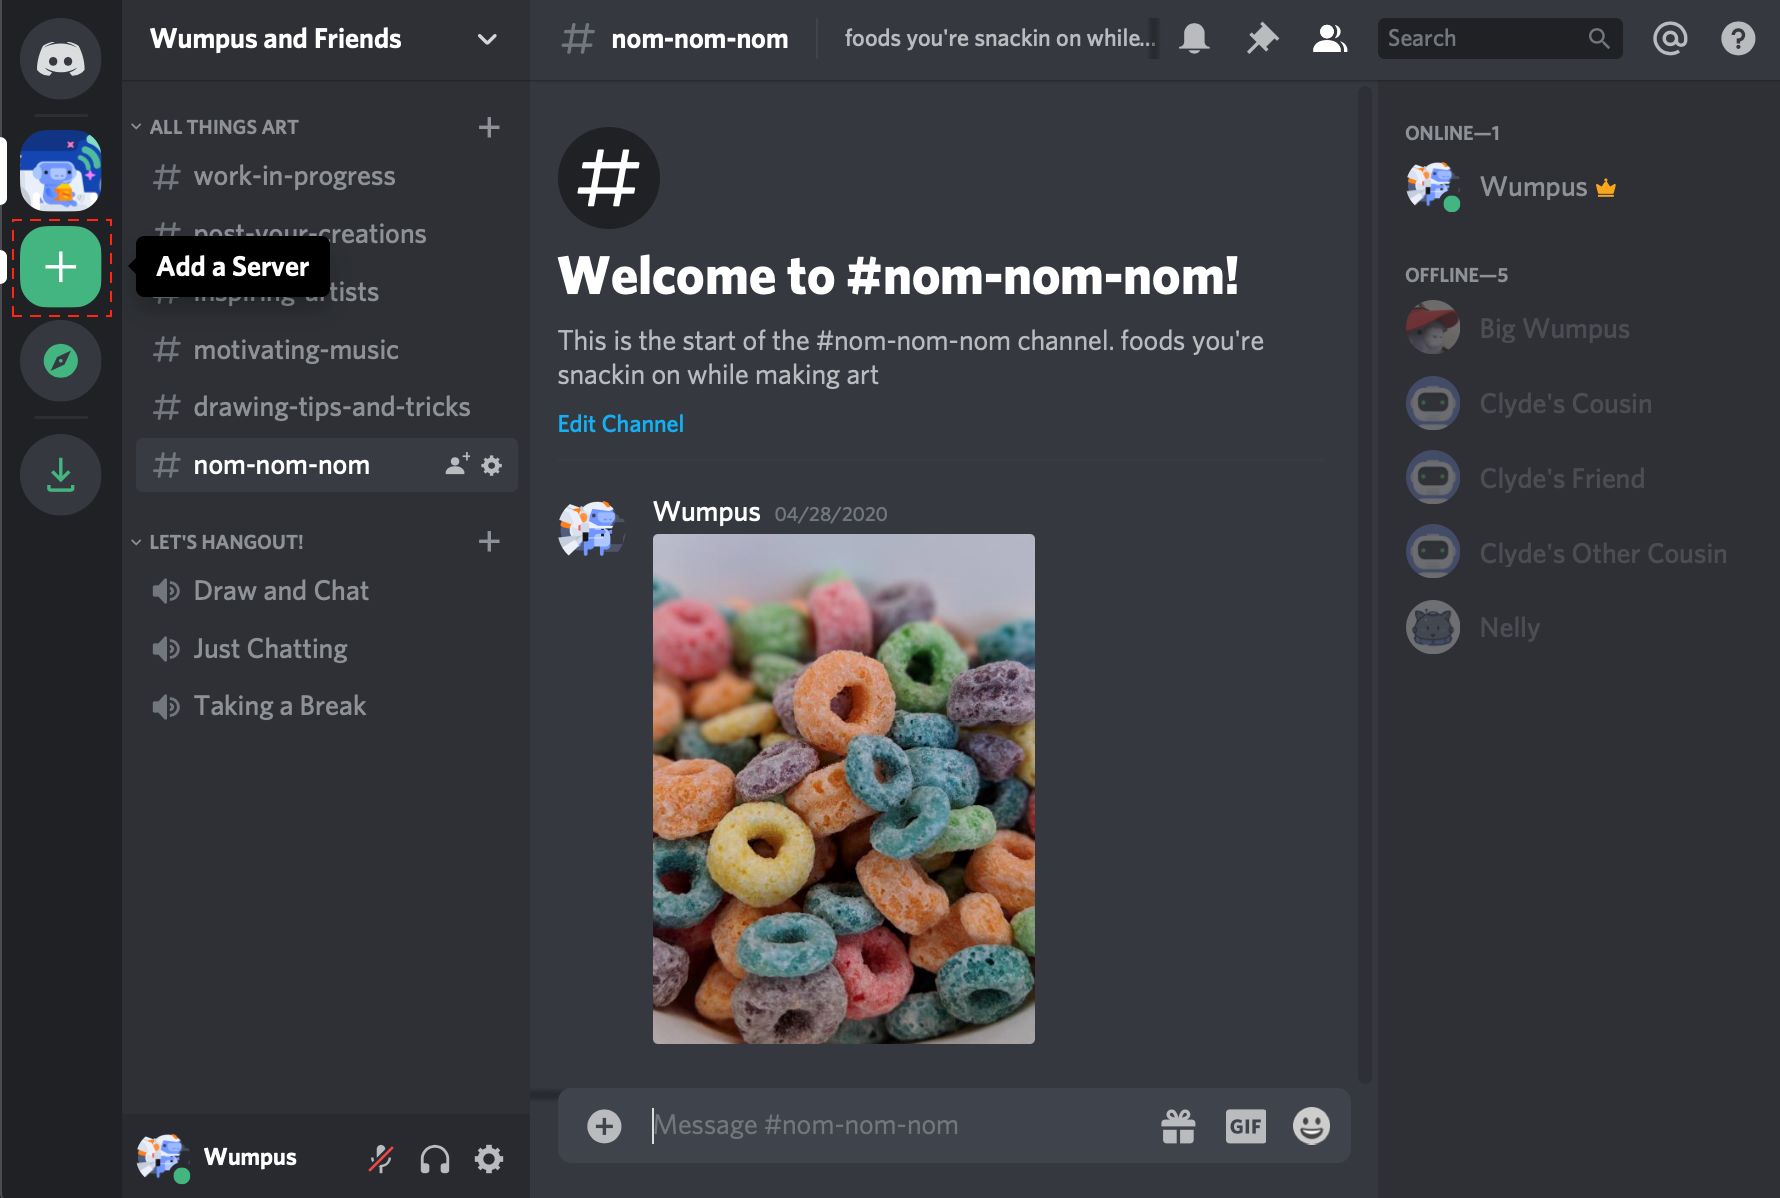
- Click on the “+” Button: On the Discord homepage, locate the “+” button on the left sidebar and click on it. This will initiate the server creation process.
- Select “Create My Own”: Choose the “Create My Own” option to start building your server from scratch. If you want to create a server based on a template, you can select one of the available templates instead.
- Choose a Server Region: Select the server region closest to your location to optimize server performance. Discord offers a variety of server regions worldwide.
- Enter a Server Name: Input your desired server name. Remember the tips from the previous section when choosing a name that accurately reflects your community’s purpose and is easy to remember.
- Upload a Server Icon (Optional): You can personalize your server by uploading a custom server icon. This icon will be displayed next to your server name throughout Discord.
- Choose Verification Level: Determine the level of verification required for members to join your server. You can select from options like none, low, medium, or high, depending on your community’s needs.
- Configure Privacy Settings: Set your preferred privacy settings, such as allowing direct messages from server members or preventing members from adding new members to the server.
- Create the Server: Once you have completed all the necessary configurations, click on the “Create” button to establish your Discord server.
After creating the server, you will be directed to your server dashboard, where you can further customize the server, manage channels, assign roles, and invite members to join. It’s important to familiarize yourself with the various server settings and options to create a tailored experience for your community.
Remember, creating a Discord server is just the first step. You’ll need to invest time and effort into managing and growing your server to foster an engaging and thriving community.
Setting Up Channels and Categories
Once you have created your Discord server, it’s time to set up channels and categories to organize and structure your community’s conversations. Here’s how to effectively set up channels and categories:
- Create Categories: Start by creating categories to group related channels together. Categories serve as a way to organize and visually separate different types of channels. For example, you can create categories for “General,” “Announcements,” “Gaming,” and “Off-topic.”
- Add Channels: Within each category, you can add channels to facilitate specific discussions or activities. Consider the purpose of each channel and select appropriate names. For example, you can have channels like “General Chat,” “Game Strategies,” or “Music Recommendations.”
- Choose Channel Types: Discord offers different channel types to suit your community’s needs. Text channels allow members to communicate via text messages, while voice channels provide a space for voice conversations. You can also create announcement channels for important updates.
- Set Channel Permissions: Determine who can access and interact with each channel by adjusting channel permissions. You can assign roles to members and specify which roles have the ability to read, send messages, or manage the channel.
- Create Channel Rules and Guidelines: Establish clear rules and guidelines for each channel to maintain a healthy and respectful community. Display these rules in a pinned message or a designated rules channel to ensure that all members are aware of the expectations.
- Customize Channel Settings: Customize channel settings to enhance the user experience. For example, you can enable slow mode to limit how frequently members can send messages, or enable channel-specific notifications to ensure important conversations are not missed.
- Consider Adding Voice Channels: If your server involves voice communication, create voice channels to allow members to join voice chats. These channels can be named based on specific activities or game titles.
- Regularly Review and Adjust: As your community evolves, regularly review the effectiveness of your channel structure. Adjust or create new channels and categories based on member preferences and growing interests.
Setting up channels and categories in an organized manner provides clarity and ease of navigation for your server members. Take the time to consider the needs of your community and ensure that the channel structure aligns with your server’s purpose and goals.
Managing Roles and Permissions
One of the key aspects of maintaining a well-organized and secure Discord server is managing roles and permissions. By assigning different roles to your server members, you can control their access to channels, moderation abilities, and overall engagement within the community. Here’s how you can effectively manage roles and permissions:
- Define Role Hierarchy: Start by establishing a clear role hierarchy. Higher roles have more permissions and authority than lower roles. Ensure that the hierarchy aligns with your server’s structure and management needs.
- Create and Assign Roles: Create roles that correspond to different levels of access, responsibilities, or user types within your community. Assign these roles to members based on their engagement and involvement.
- Set Channel Permissions: Determine which roles have access to specific channels and what level of interaction they are allowed. Consider the functionality of the channel and the responsibilities of each role when configuring permissions.
- Manage Server-wide Permissions: Configure server-wide permissions for each role to define their capabilities outside of individual channels. You can restrict or grant permissions related to managing roles, deleting messages, creating invites, etc.
- Use Moderator Roles: Create dedicated roles for moderators and administrators who will help manage and enforce the server rules. These roles should have additional permissions, such as the ability to kick or ban members, manage channels, and handle moderation tasks.
- Communicate Role Guidelines: Clearly communicate the responsibilities and expectations associated with each role to your server members. This helps them understand their level of access and aids in maintaining a respectful and engaged community.
- Regularly Review and Update Roles: As your server grows or community dynamics change, periodically review and adjust roles and permissions to ensure they align with the evolving needs of your server.
- Be Consistent and Fair: When managing roles and permissions, it’s essential to be consistent and fair. Apply rules and permissions consistently across all members to avoid favoritism or conflicts.
By effectively managing roles and permissions, you can maintain a well-structured and secure Discord server. This allows you to delegate responsibilities, ensure adherence to server rules, and foster a positive community environment for all members.
Customizing Server Settings
Customizing your server settings in Discord allows you to tailor the experience for your community members and create a unique environment that reflects your server’s theme and brand. Here are some essential server settings you can customize:
- Server Icon and Banner: Personalize your server’s appearance by uploading a custom server icon and banner. These visual elements can help establish your server’s identity and make it memorable for members.
- Server Description: Craft a compelling server description that highlights the purpose, rules, and any unique features of your community. This description will provide potential members with a brief overview of what to expect when joining.
- Server Region: Select the server region that is closest to your target audience to optimize voice chat performance and reduce latency.
- Server Verification Level: Determine the level of verification required for new members to join your server. You can choose from various levels, such as none, low, medium, or high, depending on the level of security you prefer.
- Default Notification Settings: Set the default notification settings for members joining your server. You can customize whether they receive notifications for all messages, only mentions, or none at all.
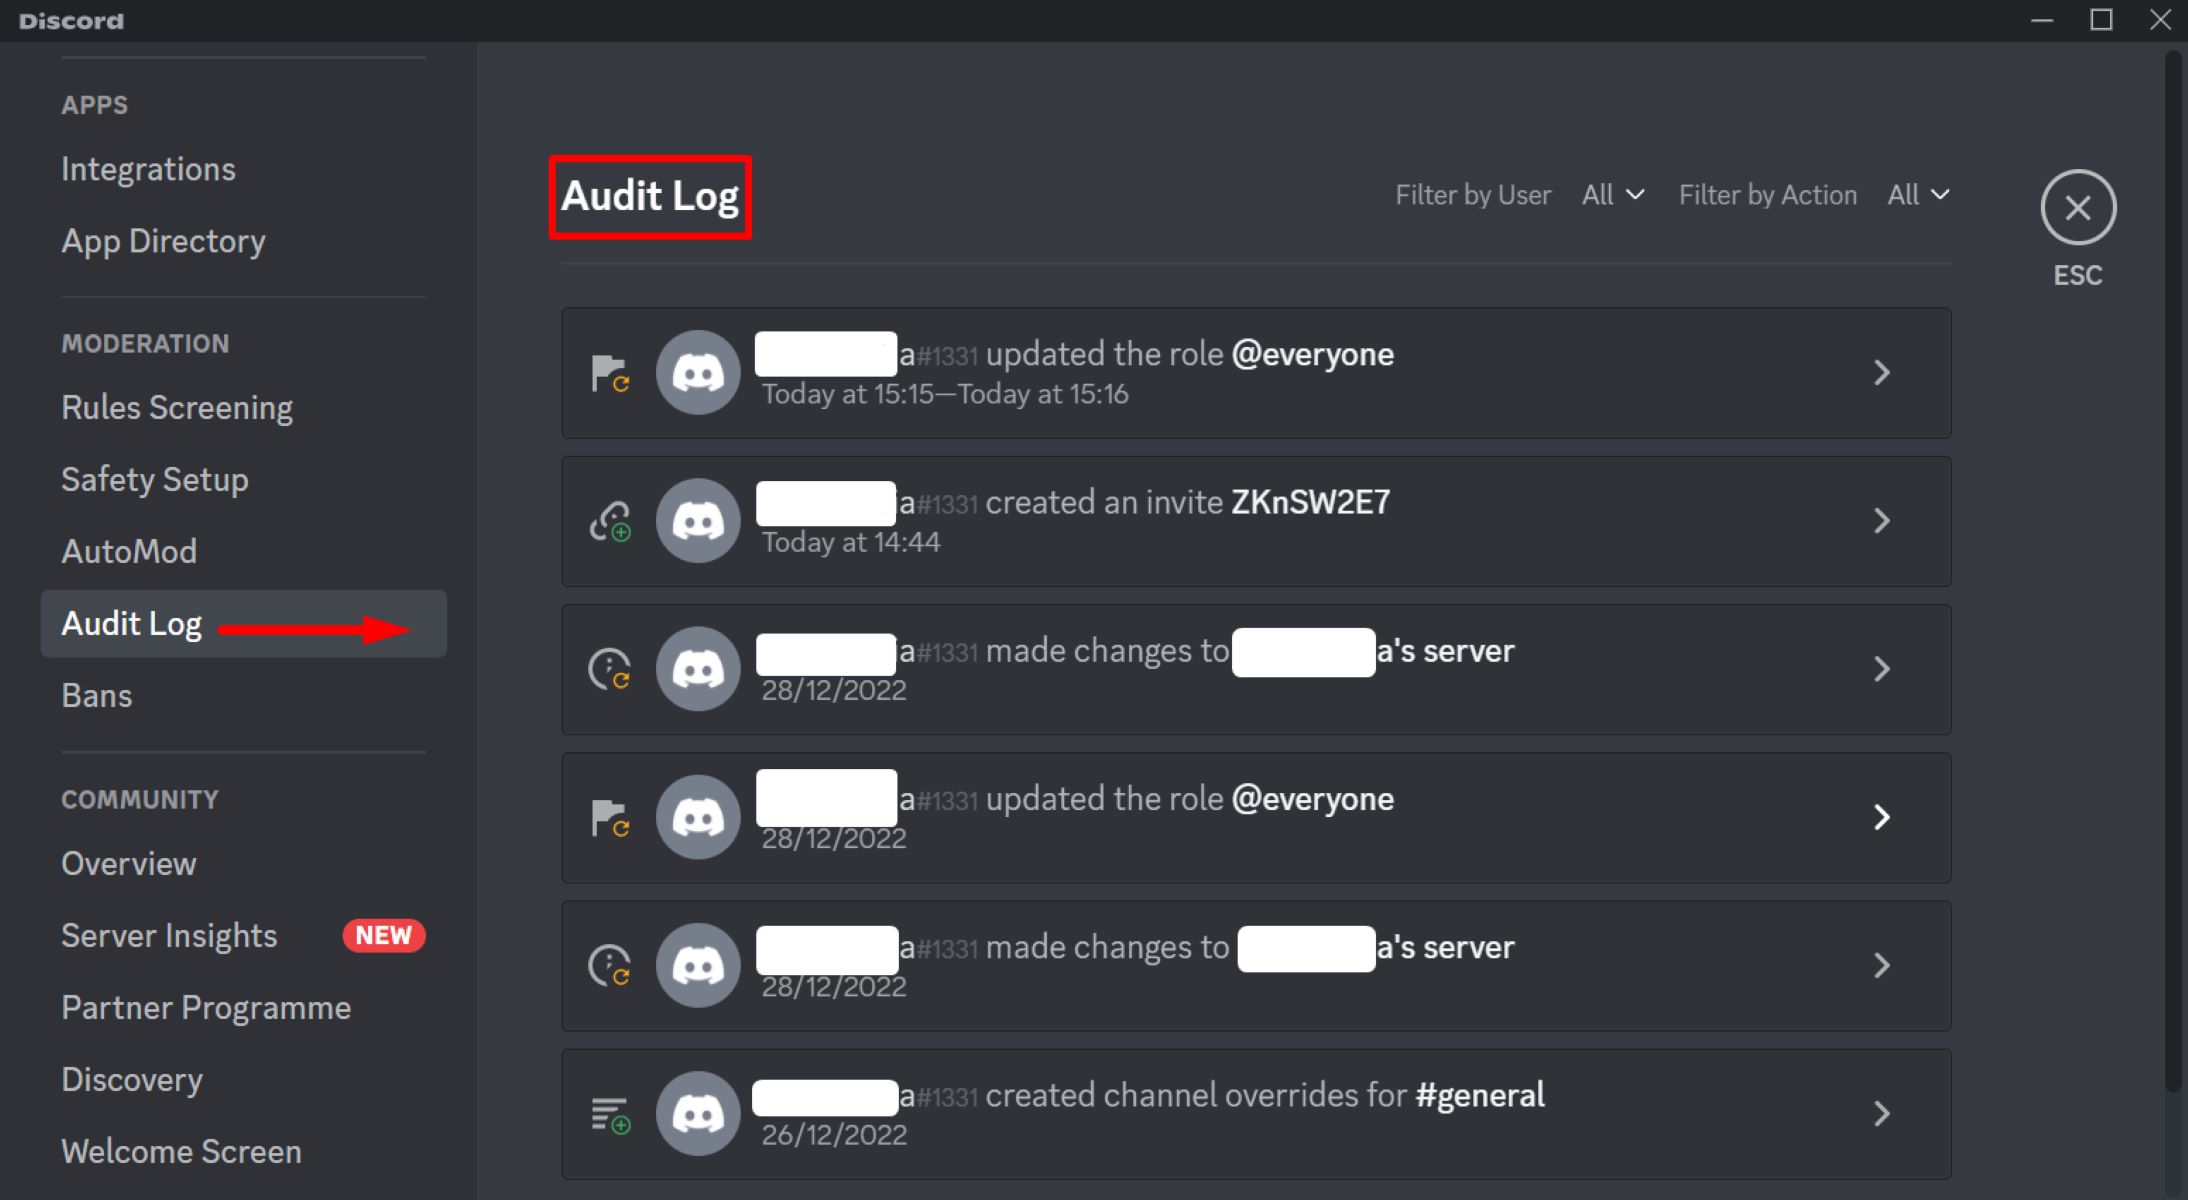
- Audit Logs: Enable audit logs to keep track of important actions taken by members or moderators. This helps with server transparency and allows you to identify and address any inappropriate behavior.
- Community Guidelines: Create and pin community guidelines that outline expected behavior, rules, and consequences for violations. This ensures that all members are aware of the server’s expectations and helps maintain a respectful environment.
- Control @everyone and @here Mentions: Manage @everyone and @here mentions to prevent spam and excessive notifications. Set permissions for specific roles to control who can use these mentions.
- Emojis and Stickers: Customize your server’s emoji library by adding emojis that align with your community’s interests and theme. Consider creating custom emojis or using Discord’s built-in library of emojis and stickers.
- Server Boosting: Encourage members to boost your server by offering benefits such as additional emoji slots, enhanced audio quality, or access to exclusive channels. Server boosting shows member support and helps your server reach higher levels of service.
- Integration with External Services: Integrate your server with external services such as Twitch, YouTube, or Spotify to enhance the user experience and provide additional functionality for members.
By customizing your server settings, you can create a unique and inviting environment for your Discord community. Take the time to consider the preferences and needs of your members, and tailor the settings accordingly to optimize their experience and engagement within the server.
Inviting and Managing Members
Inviting and managing members is a crucial aspect of running a Discord server. You want to ensure a smooth onboarding process for new members while maintaining a well-regulated and engaged community. Here’s how you can effectively invite and manage members:
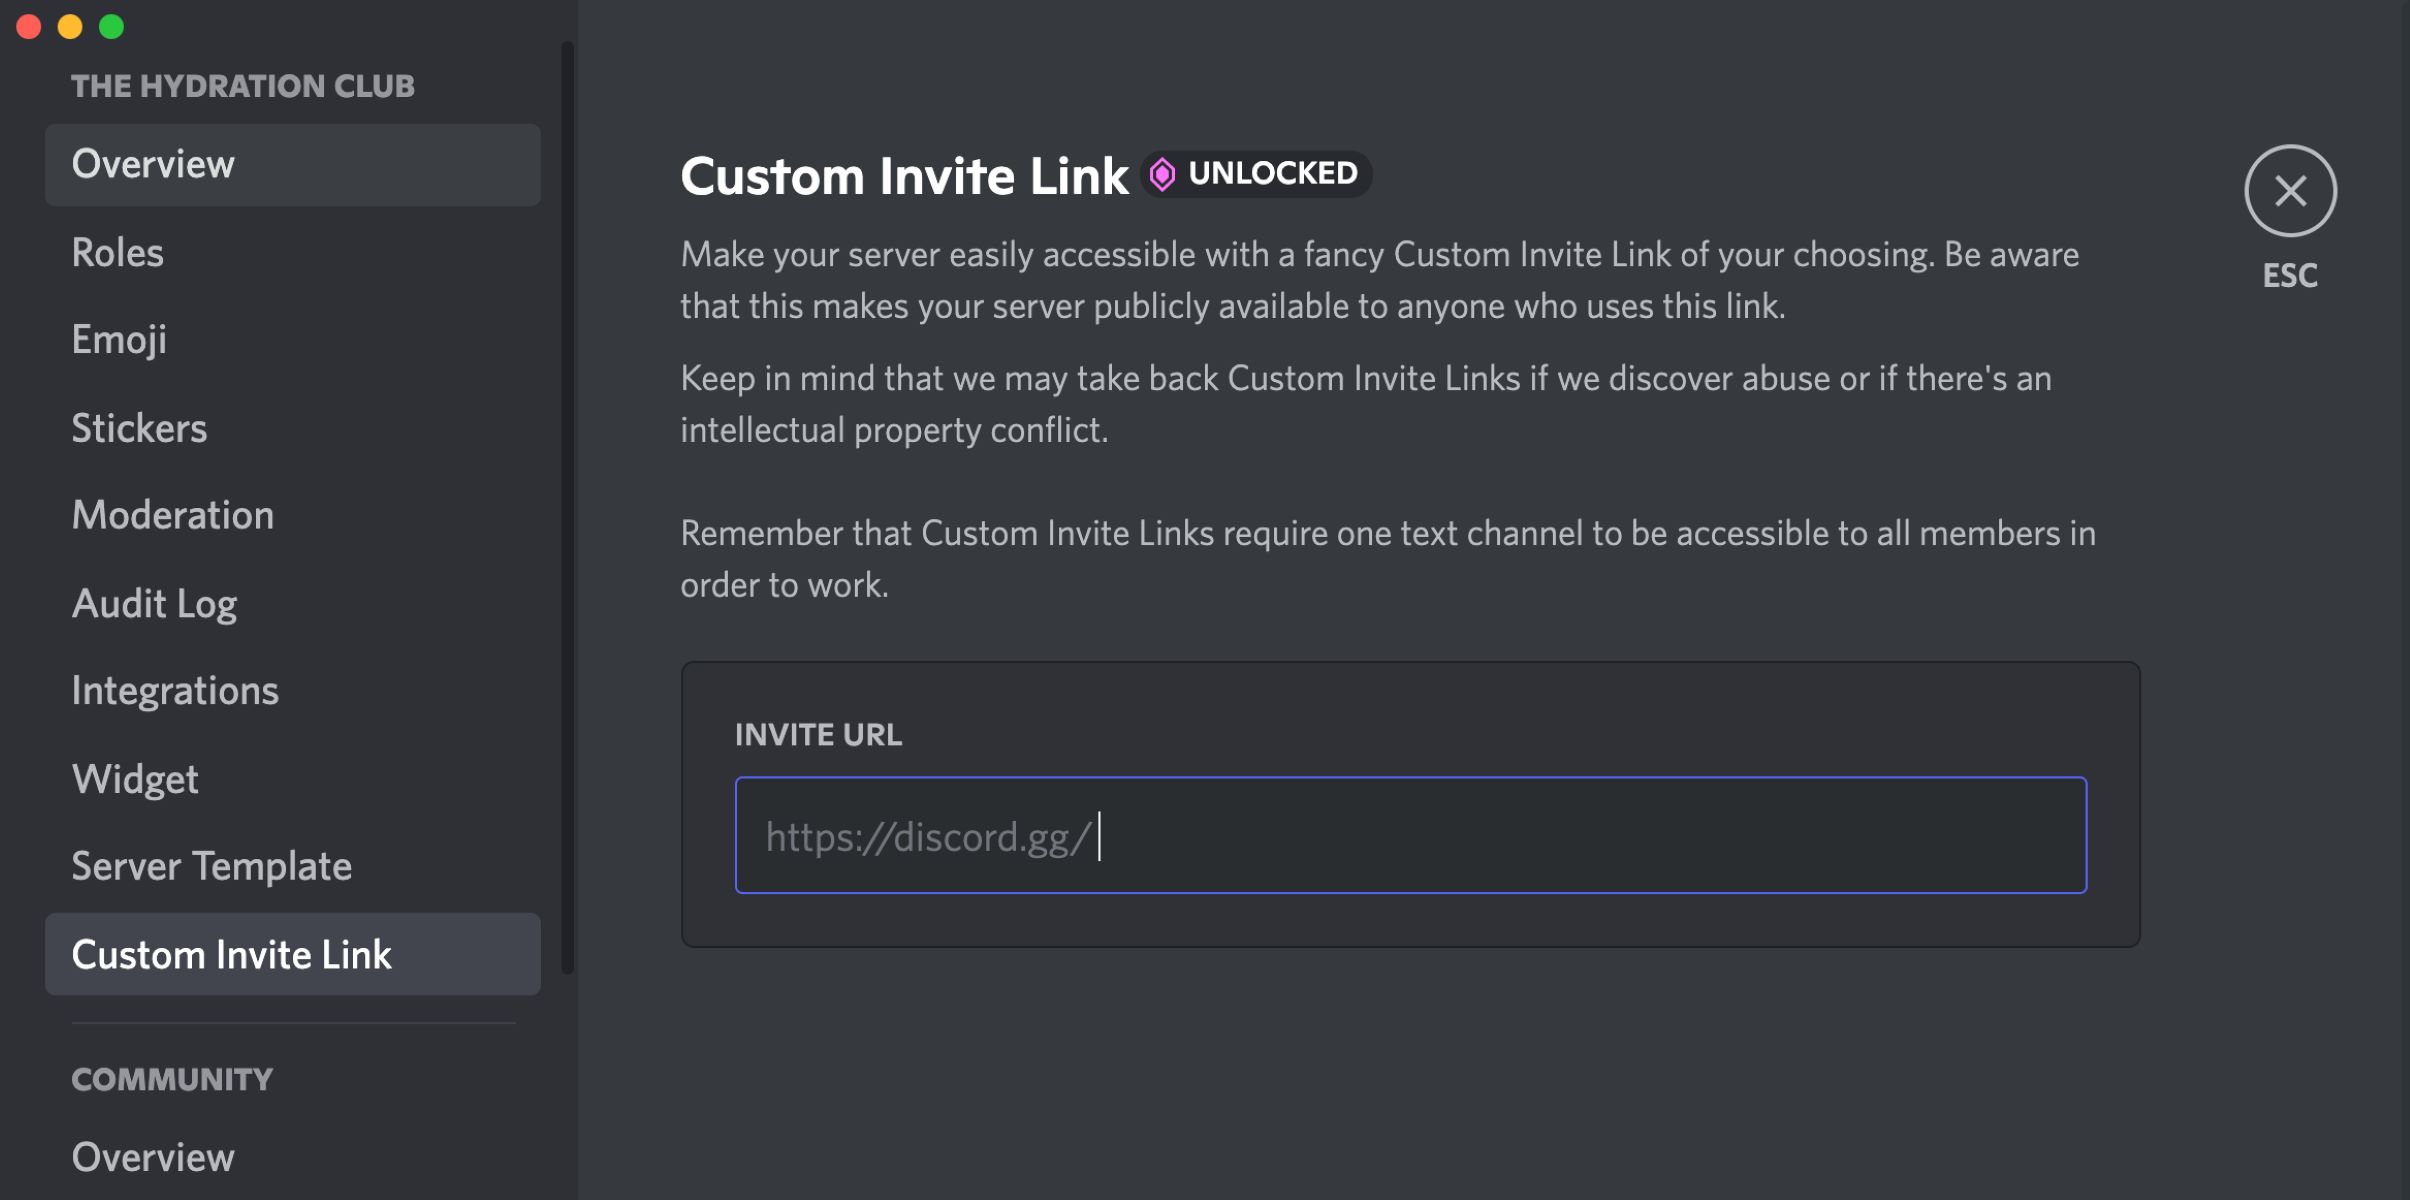
- Generating Invites: Use Discord’s invite feature to generate invitation links. These links can be shared with potential members via social media, forums, or other platforms to encourage them to join your server.
- Welcoming New Members: Create a welcoming atmosphere by sending a welcome message to new server members. This can be done through a designated welcome channel or by using Discord bots with automated welcome messages.
- Assigning Roles: Assign appropriate roles to new members based on their interests or any introductory information they provide. Roles can help categorize members and give them access to specific channels or permissions.
- Monitoring Member Activity: Regularly monitor member activity to ensure adherence to server rules and guidelines. Address any inappropriate behavior or conflicts promptly to maintain a positive and inclusive community atmosphere.
- Encouraging Engagement: Foster engagement by creating opportunities for members to participate in discussions, events, or competitions. This can be achieved through dedicated channels, regular server updates, or by using Discord bots with gamification features.
- Providing Member Support: Establish channels or dedicated roles for members to seek assistance or support. Encourage experienced community members to help answer questions or provide guidance to new members.
- Handling Member Reports: Establish a clear process for handling member reports and complaints. Ensure that members feel comfortable reporting issues and provide a confidential means to do so.
- Promoting Active Members: Recognize and reward active and valuable members by bestowing them with special roles, badges, or other perks. This encourages continued engagement and motivates others to contribute positively.
- Managing Inactive Members: Regularly review server activity and identify inactive members. Consider implementing a system to periodically clean up inactive accounts or create separate roles for active and inactive members.
- Encouraging Feedback: Solicit feedback from your community members to understand their needs and preferences. This can be achieved through polls, suggestion channels, or regular surveys to ensure that you are meeting their expectations.
By effectively inviting and managing members, you can create a vibrant and thriving Discord community. Focus on building a welcoming environment, promoting engagement, and addressing any conflicts or issues promptly to maintain a positive and inclusive community for all members to enjoy.
Adding Bots and Integrations
Adding bots and integrations to your Discord server can enhance its functionality and provide additional features and entertainment for your community members. Bots and integrations can automate tasks, provide moderation tools, play music, and much more. Here’s how you can effectively add bots and integrations:
- Research and Choose Bots: Explore the various bot directories and websites that offer Discord bots. Look for bots that align with your server’s needs, such as moderation bots, music bots, or role-playing game bots.
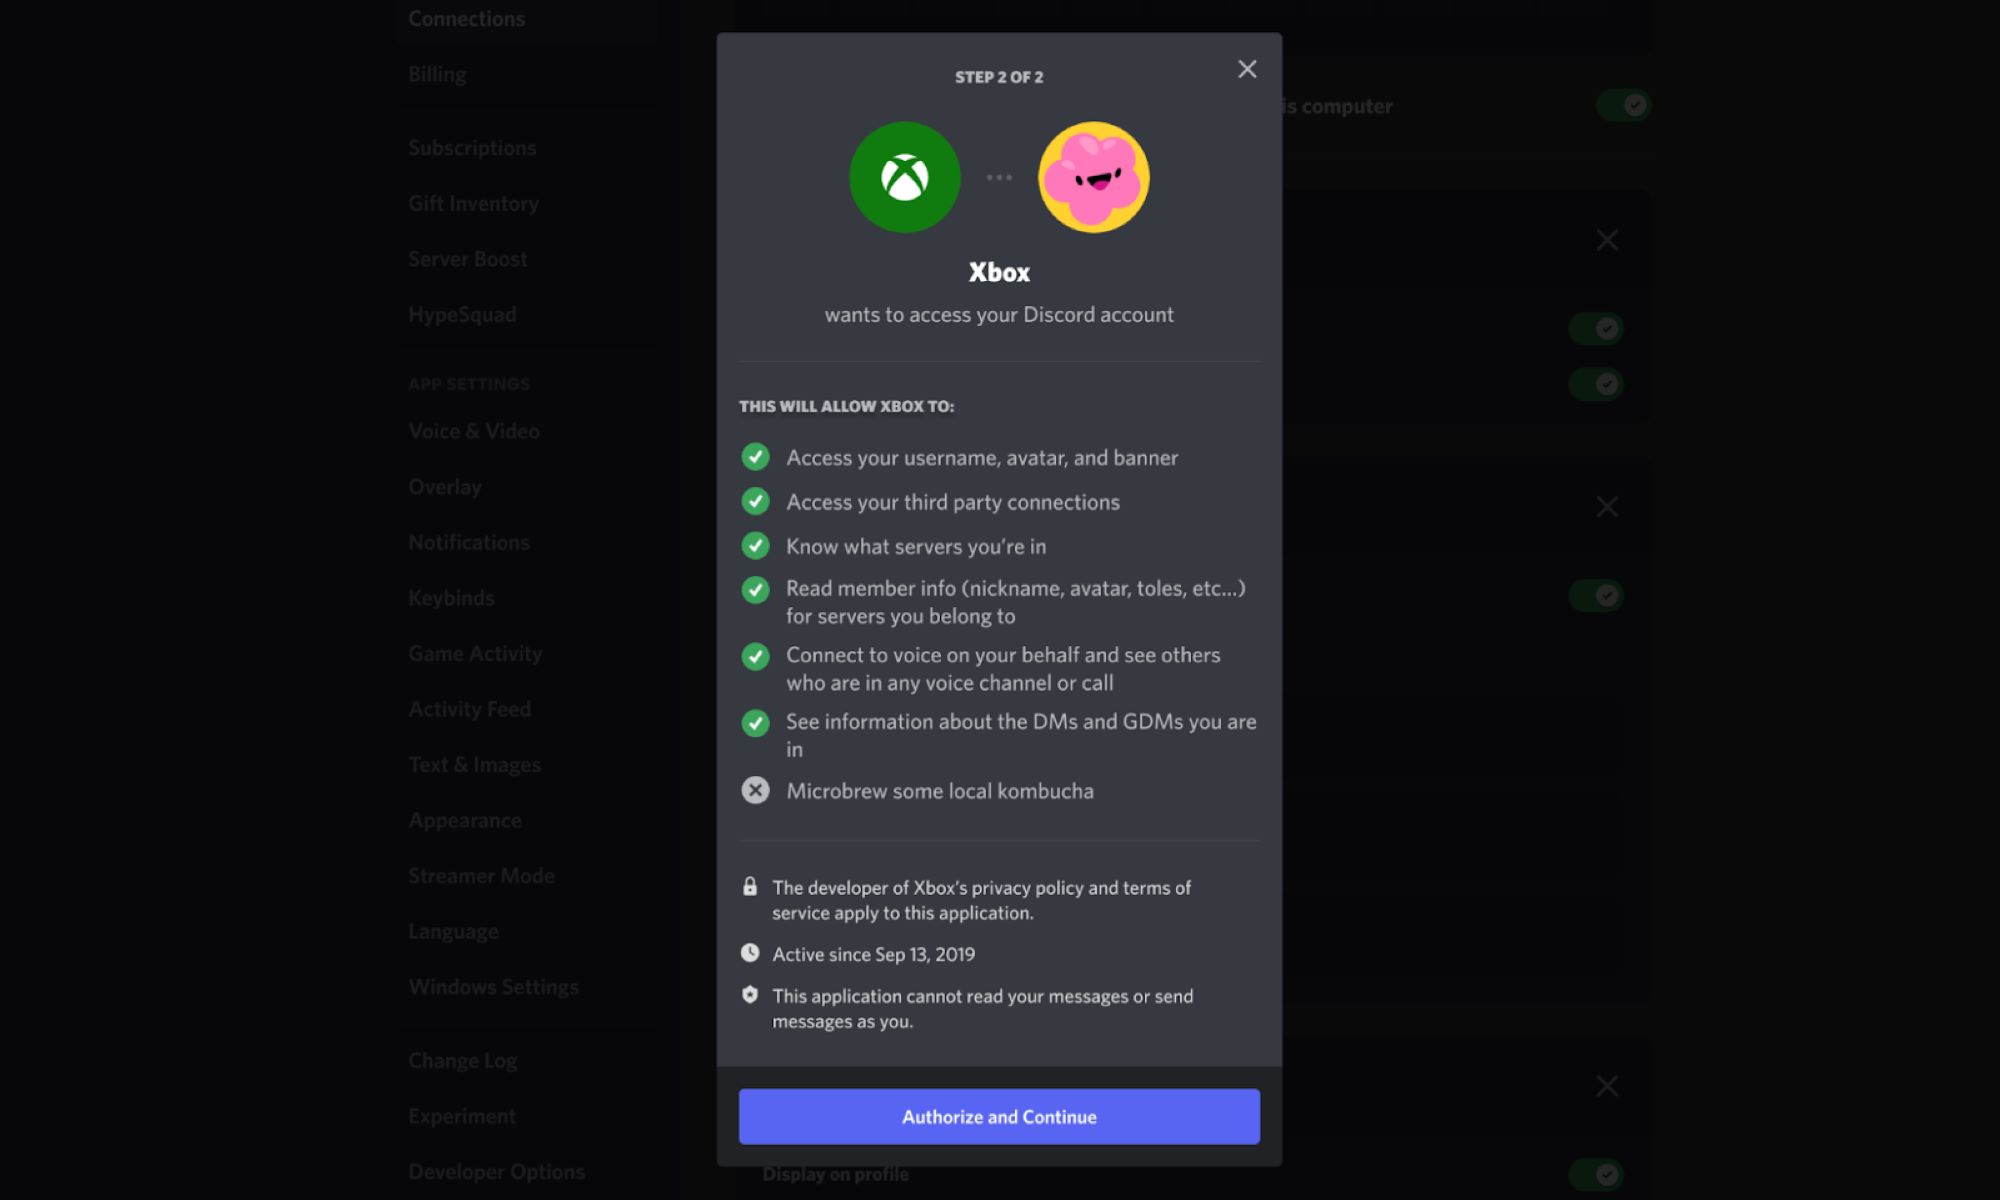
- Invite the Bot: Once you have found a bot you want to add, browse their respective websites or locate their documentation to find the invite link. Use the invite link to add the bot to your server. Be mindful of the permissions you grant the bot and ensure they align with your server’s needs.
- Configure Bot Permissions: Depending on the purpose of the bot, you may need to configure its permissions. Many bots offer customizable settings that can be adjusted to grant or restrict access to specific commands or features.
- Test and Familiarize Yourself: Before making the bot available to your community, take the time to test its functionalities and become familiar with its commands and features. This allows you to provide better support and guidance to your server members.
- Utilize Moderation Bots: Moderation bots can help automate tasks such as kicking or banning users, issuing warnings, or deleting inappropriate content. Configure and fine-tune these bots to fit your server’s specific moderation requirements.
- Music and Entertainment Bots: If your server has dedicated channels for music or entertainment, consider adding bots that can play music, provide trivia, or host games. These bots can add an interactive and fun element to your server.
- Integrate External Services: Explore integrations with external services such as YouTube, Twitch, Spotify, or game APIs. These integrations allow you to automatically post updates, livestream notifications, or play music from specific playlists.
- Create Custom Bots (Optional): If you have programming knowledge, you can create custom bots tailored to the unique needs of your server. Custom bots offer flexibility and allow you to build specific functionalities to enhance your server experience.
- Regularly Update and Maintain: Keep an eye on bot updates and ensure that you regularly update and maintain them. Stay informed about any changes, bug fixes, or new features released by the bot developers.
- Monitor and Manage Bot Usage: Keep track of bot usage and monitor how they are being utilized by your community. Address any misuse or abuse promptly and ensure that bots are enhancing the server experience rather than causing disruptions.
Adding bots and integrations can boost the functionality and engagement within your Discord server. Carefully select bots that align with your server’s needs, regularly update and maintain them, and monitor their usage to ensure they enhance the overall community experience.
Setting Up Server Rules and Guidelines
Establishing clear and well-defined rules and guidelines is essential for maintaining a safe, respectful, and enjoyable environment within your Discord server. Server rules help set expectations for behavior and ensure that all members have a positive experience. Here’s how you can effectively set up server rules and guidelines:
- Identify Core Values: Begin by identifying the core values and principles you want your server to uphold. These values will serve as the foundation for your rules and guidelines.
- Keep it Concise and Clear: Make sure your rules are concise and easy to understand. Use clear language and provide examples when necessary to avoid confusion.
- Address Key Areas: Address key areas such as respect, harassment, spamming, NSFW content, advertising, and other specific behaviors that may be prohibited in your community. Clearly state the consequences for violating these rules.
- Discord Community Guidelines: Familiarize yourself with Discord’s community guidelines and ensure that your server rules align with them. This helps maintain a consistent and safe environment across Discord.
- Promote Inclusivity: Emphasize the importance of inclusivity within your server rules. Encourage members to be respectful of diverse backgrounds and avoid any form of discrimination or hate speech.
- Display the Rules: Create a designated channel or section where you prominently display the server rules and guidelines. Pin the message or use a bot to ensure that new members can easily access and review the rules.
- Encourage Reporting: Establish a system for members to report rule violations. Encourage open communication and assure members that their reports will be taken seriously and addressed appropriately.
- Regularly Revisit and Update: As your community evolves, regularly revisit and update your server rules and guidelines. Solicit feedback from members and incorporate any necessary changes to ensure they remain effective and relevant.
- Lead by Example: As a server owner or administrator, lead by example and adhere to the rules yourself. By demonstrating respect and following the guidelines, you set the tone for the entire community.
- Explain Rationale: Provide a brief explanation or rationale behind each rule to help members understand the purpose behind them. This promotes transparency and ensures that rules are not seen as arbitrary restrictions.
By setting up clear and well-defined server rules and guidelines, you create a welcoming and inclusive environment for your community. Regularly communicate and reinforce these rules, address rule violations promptly, and encourage open dialogue to maintain a respectful and enjoyable space for all members.
Moderation and Security Measures
Moderation and security measures are crucial for maintaining a safe and enjoyable environment within your Discord server. By implementing effective moderation strategies and security measures, you can ensure that your community remains protected and free from harassment or malicious activities. Here’s how you can effectively implement moderation and security measures:
- Assign Moderators: Identify responsible and reliable members within your community who can serve as moderators. Assign them appropriate roles and permissions to moderate the server effectively.
- Establish Clear Moderation Guidelines: Create and communicate clear guidelines for moderators to follow when addressing rule violations or conflicts. Provide them with the necessary tools and resources to handle various situations effectively.
- Implement a Reporting System: Set up a reporting system for members to easily report rule violations or any suspicious activities. Designate a channel or use Discord bots with reporting features to streamline the process.
- Regularly Monitor Server Activity: Regularly monitor server activity to identify and address any inappropriate behavior, spam, or potential security threats. Stay vigilant and promptly take action when necessary.
- Enable Verification Measures: Implement verification measures to ensure that new members are legitimate and not bots or trolls. This can include methods such as email verification, captcha, or manual approval processes.
- Utilize Moderation Bots: Consider using moderation bots to automate routine tasks and enforce server rules. These bots can aid in detecting and removing spam, issuing warnings, or providing automated moderation responses.
- Monitor External Links: Be cautious about external links shared within the server. Encourage members to verify and report any suspicious links that could potentially lead to phishing or other security risks.
- Regularly Update and Patch Bots and Plugins: Keep all bots and plugins used within your server up to date. Regularly check for updates and security patches to ensure that vulnerabilities are addressed promptly.
- Establish a Code of Conduct: Develop a code of conduct that outlines expected behavior and consequences for violations. Clearly state the consequences, such as warnings, temporary bans, or permanent removal from the server.
- Provide Resources for Digital Well-being: Promote digital well-being within your server by providing resources and information on online safety, mental health support, and responsible internet use.
- Stay Educated on Discord Updates: Stay informed about Discord’s updates, security features, and recommended practices. Discord regularly releases new features and updates that can enhance server security and moderation capabilities.
By implementing effective moderation and security measures, you can create a safe and inclusive environment within your Discord server. Regularly review and assess these measures to ensure that they align with the evolving needs of your community and address any emerging security threats.
Tips for Growing and Managing Your Discord Server
Growing and managing a successful Discord server requires consistent effort and attention. Whether you’re starting a new community or looking to enhance an existing one, here are some valuable tips to help you grow and effectively manage your Discord server:
- Define Your Server’s Purpose: Clearly define the purpose and niche of your server. Having a focused theme or topic will attract like-minded individuals and help your community stand out.
- Promote Your Server: Actively promote your server on relevant forums, social media platforms, and other online communities. Engage with individuals who show interest and invite them to join your server.
- Encourage Member Engagement: Foster a sense of community by encouraging members to engage with one another. Create discussion prompts, organize events, or host contests to elicit participation.
- Provide Value to Members: Offer valuable content, resources, or unique features that keep members engaged and make them feel a part of something special. Continuously ask for feedback and adjust your server’s offerings accordingly.
- Create Quality Content: Regularly provide high-quality content, such as informative articles, guides, or entertaining media, to keep members interested and coming back for more.
- Develop a Welcoming Atmosphere: Ensure your server maintains a welcoming and inclusive atmosphere. Treat all members with respect and encourage them to do the same. Address conflicts promptly and fairly.
- Encourage Collaboration: Encourage members to collaborate on projects, share their talents, or provide mutual support. This fosters a sense of camaraderie and strengthens the bonds within the community.
- Gather Feedback: Regularly survey your members and seek their feedback on server improvements, events, or any changes you are considering. Taking their opinions into account shows that you value their input.
- Promote Community Involvement: Establish opportunities for members to take on leadership roles or contribute to the growth of the server. This fosters a sense of ownership and encourages members to actively contribute to the community’s success.
- Communicate Updates and Announcements: Keep members informed about server updates, events, or changes through regular announcements or a dedicated channel. This ensures transparency and helps members stay engaged.
- Continuously Adapt and Improve: Stay open to evolving your server as the needs and interests of your community change. Regularly assess the effectiveness of your server’s structure, features, and rules, and make adjustments as necessary.
- Collaborate with Other Communities: Partner with complementary communities or influencers to cross-promote each other. This helps expand your reach and attract new members who share similar interests.
- Appreciate and Recognize Active Members: Show your appreciation for members who actively participate in the community. Recognize their contributions, celebrate milestones, and reward them with special roles or perks.
- Stay Active and Engaged: Lead by example and be an active member of your own Discord server. Participate in conversations, offer support, and engage with your community regularly. This helps build trust and fosters a sense of community.
By implementing these tips, you can grow and manage a thriving Discord community. Remember, building a successful server takes time and dedication. Stay committed to providing value, fostering engagement, and continuously improving your server to create a vibrant and inclusive community for your members.