Introduction
Welcome to the world of virtual reality! With the advancement of technology, experiencing immersive virtual environments has become more accessible to everyone. While commercial virtual reality (VR) headsets can be quite expensive, you can actually create your very own homemade VR headset at a fraction of the cost. In this article, we will guide you through the process of making your own VR headset using simple materials.
Virtual reality is an incredible technology that allows you to be transported to virtual worlds, interact with objects, and experience a whole new level of entertainment. Whether you want to explore breathtaking landscapes, play immersive games, or watch 360-degree videos, a VR headset makes it all possible.
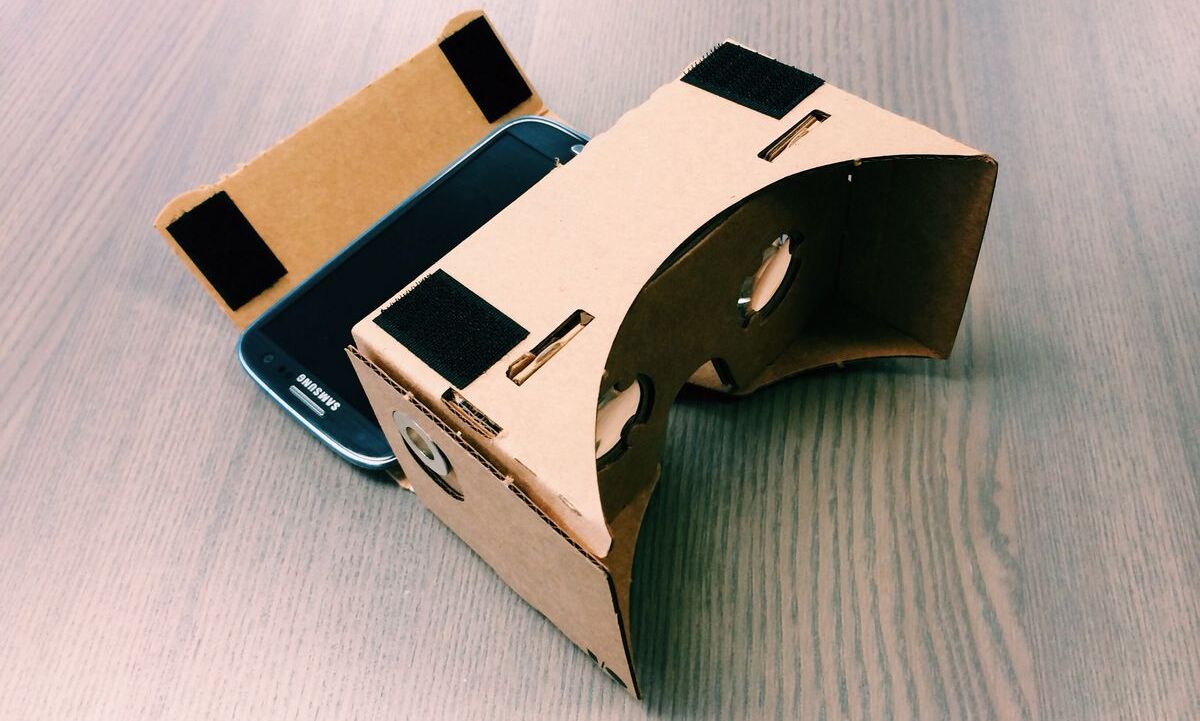
The materials required to make your homemade VR headset are easily accessible and affordable. You will need a smartphone with a high-resolution display, as well as a few other components that can be found at your local hardware store or online. Don’t worry, you don’t need to be a tech expert or have years of experience to make your own VR headset. It’s a fun and rewarding DIY project that anyone can take on.
In this step-by-step guide, we will walk you through the process of creating your very own VR headset from scratch. We will start by gathering the necessary materials, then move on to preparing the lenses, creating the frame, and finally assembling all the components. We will also provide tips on adjusting the head straps for maximum comfort and offer troubleshooting advice if you encounter any issues along the way.
By the end of this guide, you will have your own homemade VR headset that you can use to explore virtual worlds, play games, and immerse yourself in a whole new level of entertainment. So, let’s get started and embark on this exciting journey into the world of virtual reality!
Materials Needed
To create your homemade VR headset, you will need the following materials:
- Cardboard: Look for a sturdy piece of cardboard that is large enough to cut into the necessary components for your VR headset.
- Lenses: Acquire a pair of lenses with a focal length of around 45mm. These can usually be found at camera stores or online.
- Velcro straps: Get a few strips of Velcro to secure the headset on your head.
- Scissors: You’ll need a pair of scissors to cut the cardboard into the required shapes.
- Craft knife: A craft knife will come in handy for more precise cuts.
- Adhesive: Use glue or strong double-sided tape to assemble the parts of your VR headset.
- Elastic bands: Grab a couple of elastic bands to help adjust the headset and hold it firmly against your face.
- Smartphone: You’re going to need a smartphone with a high-resolution display to insert into the headset. Make sure it fits properly and is compatible with VR apps.
- Markers or decorative materials (optional): If you want to personalize your VR headset, you can use markers, stickers, or any other decorative materials to add your own unique touch.
Make sure you have all the materials ready before you begin the DIY process. You can easily find these items at your local hardware store or order them online.
Now that you have gathered all the necessary materials, let’s move on to the step-by-step process of creating your homemade VR headset.
Step-by-Step Guide
Now that you have all the materials ready, let’s dive into the step-by-step process of creating your homemade VR headset:
Step 1: Gathering the materials
Before you begin, make sure you have all the necessary materials mentioned in the previous section. Double-check to ensure you haven’t missed anything, as it will save you time during the construction process.
Step 2: Preparing the lenses
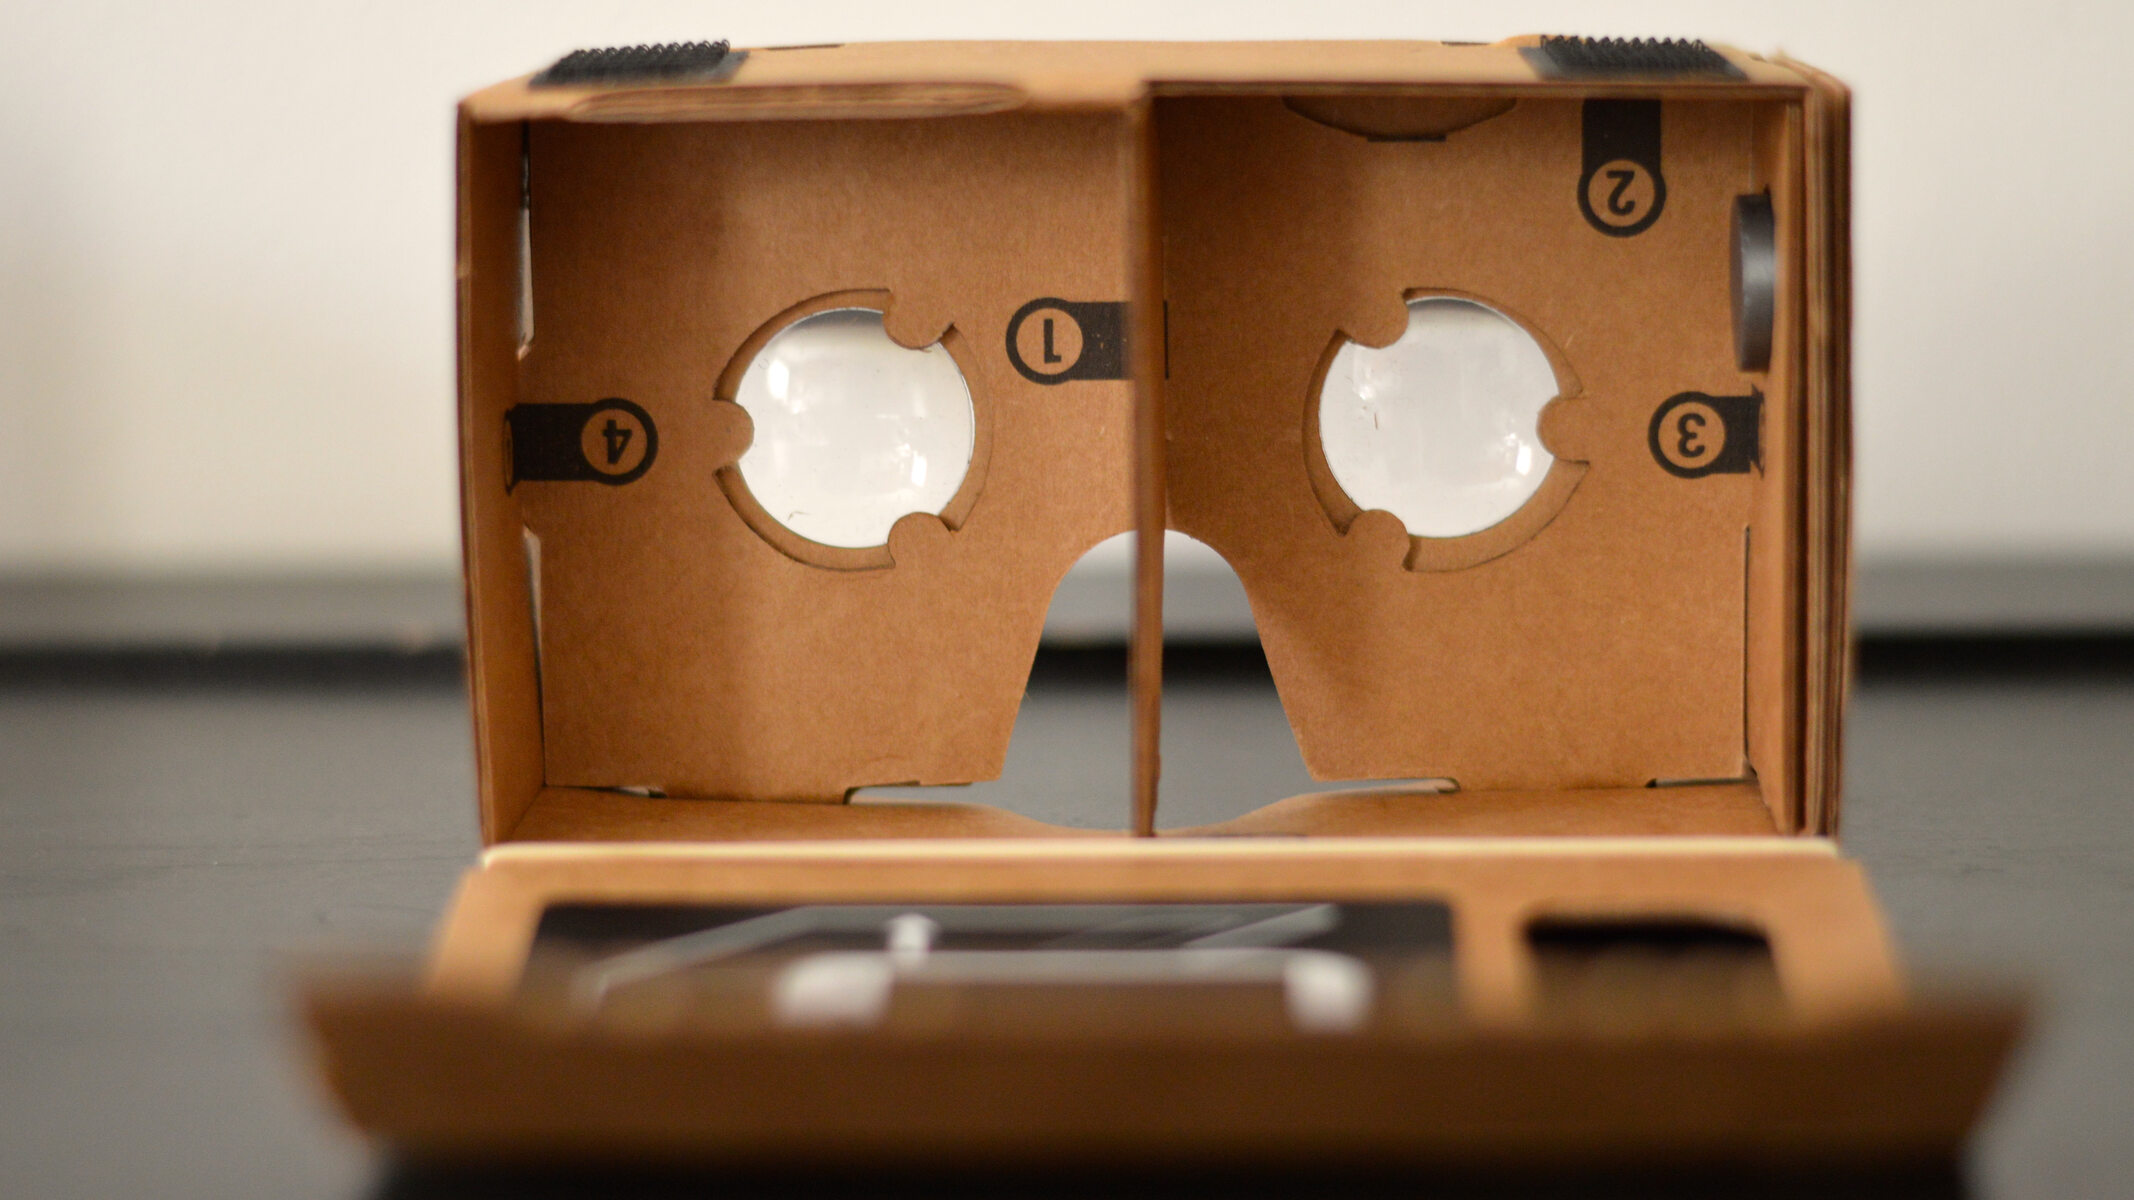
Take the lens pair and place them in the center of the cardboard. Trace around the lenses and cut out the holes carefully. Ensure that the lenses fit snugly into the holes without falling out.
Step 3: Creating the frame
Measure the dimensions of your smartphone and cut out a rectangular piece of cardboard that is slightly larger to accommodate the phone. Attach this piece on one side of the lens holes to create the frame. Make sure the frame securely holds the smartphone in place.
Step 4: Assembling the components
Using glue or strong double-sided tape, assemble the different sections of the VR headset. Attach the lens holder to the frame and secure it with adhesive. Be careful to align the lenses correctly with the holes for optimal viewing.
Step 5: Adjusting the head straps
Attach the Velcro straps to the sides of the VR headset so that it can be comfortably worn on your head. Ensure the straps are securely attached and adjustable to fit different head sizes.
Step 6: Testing and troubleshooting
Before you start using your homemade VR headset, check all the components and ensure everything is properly aligned and secured. Insert your smartphone into the frame, launch a VR app, and test the functionality of the headset. If you encounter any issues, such as blurry vision or the phone not fitting properly, troubleshoot by adjusting the lenses or making necessary modifications.
Enjoy your homemade VR headset and get ready to immerse yourself in the exciting world of virtual reality!
Gathering the materials
The first step in creating your homemade VR headset is to gather all the necessary materials. Here’s a breakdown of what you will need:
- Cardboard: Look for a sturdy piece of cardboard that is large enough to cut into the necessary components for your VR headset. You can repurpose an old cardboard box or purchase cardboard sheets from a craft store.
- Lenses: Acquire a pair of lenses with a focal length of around 45mm. These lenses are typically used in cameras and can be found at camera stores or online. The lenses are a crucial component as they allow you to view the virtual reality content with a wide field of view.
- Velcro straps: Get a few strips of Velcro to secure the headset on your head. These straps will ensure a comfortable and secure fit, allowing you to enjoy extended periods of VR experiences without any discomfort.
- Scissors: You’ll need a pair of scissors to cut the cardboard into the required shapes. Make sure they are sharp and have a comfortable grip to facilitate easy and precise cutting.
- Craft knife: A craft knife, such as an X-Acto knife, will come in handy for more precise cuts and intricate detailing. Use it to carve out intricate designs or create small slits for attaching components.
- Adhesive: Use glue or strong double-sided tape to assemble the parts of your VR headset. Choose an adhesive that securely holds the cardboard pieces together without leaving any residue that could obstruct your view.
- Elastic bands: Grab a couple of elastic bands to help adjust the headset and hold it firmly against your face. These bands will ensure a snug fit and prevent the headset from slipping during use.
- Smartphone: You’re going to need a smartphone with a high-resolution display to insert into the headset. Make sure it fits properly and is compatible with VR apps. A larger screen size and higher pixel density will enhance your virtual reality experience.
- Markers or decorative materials (optional): If you want to personalize your VR headset, you can use markers, stickers, or any other decorative materials to add your own unique touch. Let your creativity shine and make your homemade VR headset stand out!
Ensure that you have all these materials ready before you begin the DIY process. You can easily find most of these items at your local hardware store, camera store, or order them online. Having everything prepared in advance will make the construction process smoother and more enjoyable.
Preparing the lenses
Once you have gathered all the materials, the next step in creating your homemade VR headset is to prepare the lenses. Follow these steps to ensure the lenses are ready for the assembly:
- Measure and mark: Take your pair of lenses and place them in the center of the cardboard. Use a marker to trace around the lenses, creating a circular outline on the cardboard. Make sure the circles are slightly larger than the diameter of the lenses to provide enough space for them to fit.
- Cut out the holes: Using a pair of scissors or a craft knife, carefully cut along the marked outlines to create holes in the cardboard. Take your time to make precise cuts and ensure that the holes are clean and free from any jagged edges.
- Test the fit: Place the lenses into the holes you’ve just created. They should fit snugly and sit flush with the surface of the cardboard. If the lenses wobble or feel loose, you can secure them with small strips of adhesive or tape around the edges to hold them in place.
- Double-check the alignment: Before moving on to the next step, double-check that the lenses are properly aligned with the holes. They should be centered and parallel to each other. Adjust them if needed to ensure optimal viewing while wearing the VR headset.
Preparing the lenses is a crucial step as they play a vital role in providing an immersive VR experience. It’s important to take your time and ensure that they are securely fitted into the cardboard frame and properly aligned. This will help eliminate any blurriness or distortion in the virtual reality content you’ll be viewing.
With the lenses prepared, you’re now ready to move on to the next step of creating your homemade VR headset: creating the frame.
Creating the frame
Now that you have prepared the lenses, it’s time to move on to the next step: creating the frame for your homemade VR headset. Follow these steps to create a sturdy and functional frame:
- Measure and cut: Take your smartphone and measure its dimensions. Using a ruler or measuring tape, transfer these measurements onto the cardboard. Add a little extra space to ensure that the smartphone fits comfortably into the frame without being too tight.
- Mark and cut: Use a marker to draw the outline of the smartphone on the cardboard, based on the measurements you took in the previous step. Once you have marked the outline, carefully cut along the lines using scissors or a craft knife. Take your time and make precise cuts to ensure a clean and accurate frame.
- Attach to the lens holes: Position the frame you just created around the lens holes. It should align with the holes, leaving enough space for the lenses to fit without any obstructions. Use glue or strong double-sided tape to attach the frame securely to the cardboard. Make sure it is firmly in place and doesn’t wobble.
- Strengthen the frame: Depending on the thickness of the cardboard you’re using, you may want to add additional support to reinforce the frame. Cut small strips or squares of cardboard and attach them to the corners or edges of the frame using adhesive. This will provide extra stability and durability to your VR headset.
Creating a sturdy frame is essential as it will hold the lenses and smartphone securely in place while you use the VR headset. Ensure that the frame fits the dimensions of your smartphone accurately and is attached firmly to the cardboard. Taking the time to create a solid frame will result in a more comfortable and enjoyable VR experience.
With the frame now complete, you’re ready to move on to assembling the other components of your homemade VR headset. The next section will guide you through this process.
Assembling the components
With the frame of your homemade VR headset created, it’s time to move on to the exciting step of assembling all the components together. Follow these steps to ensure a smooth and successful assembly process:
- Align the lens holder: Take the lens holder and position it on the frame, ensuring that it aligns perfectly with the lens holes you created earlier. The lens holder should fit securely without covering the lenses or obstructing the view.
- Attach the lens holder: Once you are satisfied with the alignment, use adhesive or strong double-sided tape to attach the lens holder to the frame. Apply the adhesive securely around the edges of the lens holder, making sure it is firmly attached to the frame. This will keep the lenses in place and prevent any unwanted movement.
- Connect the straps: Now it’s time to attach the Velcro straps to the sides of the frame. Cut the Velcro into smaller strips, ensuring that they are long enough to wrap around your head comfortably. Attach one side of the Velcro to the frame and the other side to the opposite side of the frame to allow the straps to connect securely.
- Test the flexibility: Before finalizing the assembly, make sure that the straps can be adjusted to fit your head size. Additionally, check if the VR headset can sit comfortably on your head without feeling too tight or too loose. Adjust the length of the straps accordingly for a customized and comfortable fit.
- Secure the straps: Once you have adjusted the straps to your preference, securely attach them to the frame using adhesive or by sewing them onto the cardboard. Make sure that the straps are firmly in place to prevent any slippage or discomfort during use.
Assembling the components of your homemade VR headset requires attention to detail and precision. Take your time to ensure that everything aligns properly and securely attaches to the frame. The lens holder should keep the lenses in place, and the straps should be adjustable and comfortable to wear.
With the components assembled, you’re almost ready to dive into the immersive world of virtual reality. The next step will guide you through adjusting the head straps for maximum comfort and securing the headset in place.
Adjusting the head straps
Now that your homemade VR headset is assembled, it’s time to ensure that it fits comfortably on your head. Properly adjusting the head straps will not only enhance your comfort but also optimize your overall VR experience. Follow these steps to adjust the head straps to your liking:
- Customize the strap length: Put on the VR headset and adjust the straps until they fit snugly on your head. Avoid making them too tight or too loose. The straps should hold the headset securely in place without causing discomfort or putting excessive pressure on your face.
- Check the balance: Ensure that the VR headset is balanced evenly on your head. It should not tilt to one side or feel lopsided. Adjust the strap lengths and the position of the headset on your face until you achieve a balanced fit.
- Secure the straps: Once you have found the desired strap length and balanced fit, secure the straps in place. You can use a combination of adhesive, stitching, or additional Velcro patches to ensure that the straps stay in position.
- Test for comfort: Spend some time wearing the VR headset and evaluate the comfort level. If you notice any discomfort, adjust the straps as needed to relieve pressure points or improve the overall fit. Remember, a comfortable headset will allow you to fully immerse yourself in the virtual reality experience without distractions.
Properly adjusting the head straps is essential to avoid discomfort and ensure a secure fit. Take the time to find the right balance and strap length that works best for you. Comfortable straps will make your VR sessions more enjoyable and allow you to fully focus on the virtual world you’re exploring.
With the head straps adjusted to your liking, you’re ready to move on to the final step: testing and troubleshooting your homemade VR headset. The next section will guide you through this process to ensure everything is working smoothly.
Testing and troubleshooting
Now that you have completed the assembly and adjustment of your homemade VR headset, it’s time to test it out and address any potential issues. Follow these steps to ensure your VR headset is working properly:
- Insert your smartphone: Carefully insert your smartphone into the frame of the VR headset. Make sure it is centered and properly aligned with the lenses. Ensure that the screen is clean and free from any fingerprints or smudges that could affect your viewing experience.
- Launch a VR app: Open a VR app or a 360-degree video on your smartphone. Ensure that it is compatible with your device and supports the use of a VR headset. Place the VR headset on your head with the straps securely fastened.
- Adjust the lenses: While wearing the VR headset, adjust the position of the headset on your face to get a clear and focused view. If the image appears blurry, adjust the position of the lenses by gently moving them closer or farther away from your eyes. Experiment with different positions until you achieve optimal clarity.
- Check for any distortions: Look around the virtual environment and carefully observe if there are any distortions or aberrations in the images. Some minor distortions may occur due to the limitations of the lenses, but they should not significantly impact the overall experience. If you notice severe distortions, try repositioning the lenses or double-checking their alignment.
- Troubleshoot issues: If you encounter any issues during testing, such as poor focus, discomfort, or issues with the straps, troubleshoot by making necessary adjustments. Ensure that the lenses are clean, the smartphone is properly aligned, the straps are secure but not too tight, and the weight distribution is balanced.
By testing and troubleshooting your homemade VR headset, you can ensure that it delivers a seamless and immersive virtual reality experience. Don’t hesitate to make adjustments and fine-tune the headset until it meets your expectations for comfort and performance.
Now that you have successfully tested and troubleshooted your homemade VR headset, you’re all set to enjoy exciting and immersive virtual reality experiences from the comfort of your own home.
Conclusion
Congratulations on successfully creating your very own homemade VR headset! By following the step-by-step guide and using simple materials, you have unlocked the doors to immersive virtual reality experiences without breaking the bank. Let’s recap the key points:
You started by gathering the necessary materials, including cardboard, lenses, Velcro straps, scissors, adhesive, elastic bands, a smartphone, and optional decorative materials. These items were easily accessible and affordable, making it a cost-effective DIY project.
Next, you prepared the lenses by measuring, marking, and cutting holes in the cardboard to accommodate them. Ensuring a snug fit and proper alignment of the lenses is crucial for a clear and immersive VR experience.
Then, you created the frame by measuring and cutting cardboard to fit your smartphone. Attaching the frame securely to the lens holes and reinforcing it for added stability ensured a sturdy foundation for your homemade VR headset.
After assembling the components with adhesive and attaching the adjustable head straps with Velcro, you took the time to adjust the straps for a comfortable and secure fit. Finding the right balance and strap length is essential for an enjoyable VR experience.
Finally, you tested your homemade VR headset by inserting your smartphone, launching a VR app, and adjusting the lenses for optimal clarity. Any issues that arose were addressed through troubleshooting and making necessary adjustments.
Now, you’re ready to explore the exciting world of virtual reality from the comfort of your own DIY VR headset. Whether you want to dive into immersive games, travel to stunning virtual landscapes, or watch 360-degree videos, your homemade VR headset will take you there.
Remember, this is just the beginning. Feel free to personalize your VR headset further with decorative materials or explore additional DIY modifications to enhance its functionality. The sky’s the limit when it comes to creativity and customization!
Thank you for joining us on this DIY VR headset journey. We hope you have a fantastic time exploring the wonders of virtual reality!