Introduction
Welcome to the exciting world of virtual reality! In recent years, virtual reality (VR) technology has taken the tech industry by storm, providing immersive experiences that transport users to virtual realms. While there are several commercial VR headsets available on the market, building your own DIY virtual reality headset can be a rewarding and cost-effective option.
In this guide, we will walk you through the step-by-step process of creating your own virtual reality headset. From gathering the necessary materials to assembling the electronics, wiring, and testing the prototype, we will cover all the essentials to help you bring your VR dreams to life.
Building a virtual reality headset from scratch not only gives you a deeper understanding of the underlying technology but also allows for customization to suit your specific requirements. Whether you’re a gaming enthusiast, a content creator, or simply curious about this innovative technology, making your own VR headset will open up a world of possibilities.
Through this DIY project, you will learn about the various components that make up a VR headset, including the frame, electronics, display, and more. Assembling each part with careful precision will ensure a functional and comfortable VR experience for the end-user.
Before we dive into the nitty-gritty of building a VR headset, it’s important to note that this project requires basic knowledge of electronics, soldering, and some familiarity with tools such as a soldering iron and wire cutters. However, don’t be intimidated if you’re a beginner; we will provide you with detailed instructions and tips to help you along the way.
So let’s embark on this DIY VR headset journey and unlock the world of virtual reality right at your fingertips. Get ready to experience rich, immersive environments, explore new dimensions, and take your entertainment to a whole new level. Let’s get started!
Gathering Materials
Before you begin building your DIY virtual reality headset, it’s important to gather all the necessary materials. Having everything you need at hand will ensure a smooth and efficient construction process. Here is a list of materials you will need:
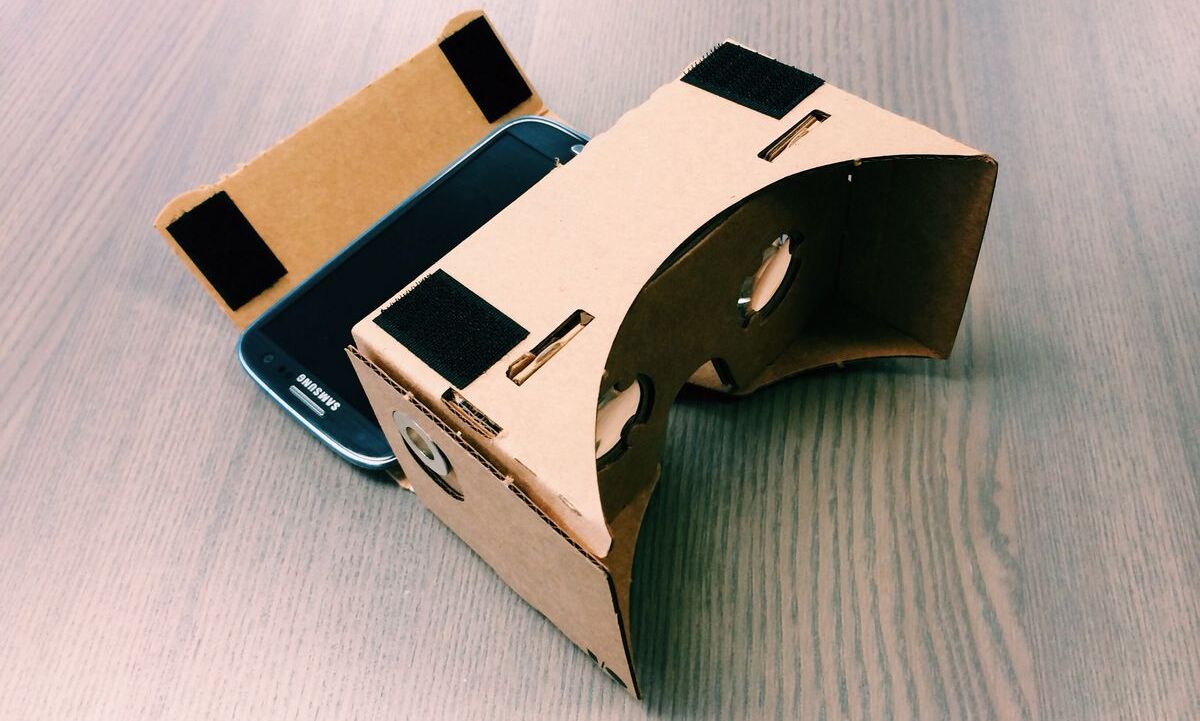
- Cardboard or plastic visor frame: You can use a pre-cut cardboard template or purchase a plastic visor frame online. This will serve as the foundation for your VR headset.
- Lenses: Acquire a pair of lenses designed specifically for virtual reality. These lenses will allow you to view the virtual environment with clarity and depth.
- Smartphone: You will need a smartphone with a high-resolution display and a gyroscope sensor. The gyroscope sensor is essential for tracking head movements in order to provide an immersive VR experience.
- Elastic or Velcro straps: These straps will help secure the VR headset to your head and ensure a comfortable fit.
- Velcro or adhesive strips: You will need Velcro or adhesive strips to attach the smartphone to the visor frame securely.
- Headphones: For a more immersive experience, consider using headphones to enhance the audio quality.
- Elastic bands or rubber bands: These bands will be used to keep the lenses in place within the visor frame.
- Additional tools: Depending on the design of your DIY VR headset, you may require a ruler, scissors, a marker, glue, or double-sided tape to aid in the assembly process.
It’s important to note that the materials mentioned above are just the basic components needed to create a functional VR headset. You can also customize your headset by adding features like a head strap, foam padding for comfort, or even incorporate sensors for more advanced tracking.
If you prefer a more advanced VR experience, you can explore options such as Arduino boards or Raspberry Pi for additional functionalities. However, for this basic DIY project, the materials listed above will suffice.
Now that you have a comprehensive list of materials, it’s time to gather everything in one place and prepare for the next exciting step, building the frame of your virtual reality headset.
Building the Frame
Now that you have all the materials ready, it’s time to start building the frame of your DIY virtual reality headset. The frame provides the structure and stability for your headset, ensuring a secure and comfortable fit for the user. Follow these steps to construct the frame:
- Take the cardboard or plastic visor frame and lay it on a flat surface. If using a cardboard template, carefully cut out the designated areas using a pair of scissors or a sharp knife.
- Next, measure the distance between the lenses and mark the center on the frame. This will ensure that the lenses are properly aligned for optimal viewing.
- Use adhesive strips or glue to attach the lenses to the designated areas on the frame. Make sure they are firmly secured in place.
- If you have opted for elastic or Velcro straps, attach them to the sides or back of the frame. Ensure they are positioned in a way that will comfortably secure the headset to your head.
- If desired, add foam padding to the areas that will come into contact with your face. This will provide additional comfort during prolonged use.
- Finally, double-check all the components to ensure they are securely attached and in the correct positions.
Remember to take your time during the construction process. Accuracy and attention to detail are crucial in creating a sturdy and well-fitting frame for your DIY VR headset.
Keep in mind that this is just a basic frame construction. You can explore more advanced materials and techniques if you want to take your VR headset to the next level. However, for beginners or those on a budget, the cardboard or plastic frame is a great starting point.
With the frame complete, you have successfully laid the foundation for your DIY virtual reality headset. The next step is to assemble the electronics and connect all the necessary components to bring your headset to life.
Assembling the Electronics
With the frame of your DIY VR headset complete, it’s time to focus on assembling the electronics. This step involves connecting various components that will enable your headset to function properly. Follow these instructions to assemble the electronics:
- Start by opening up the visor frame and creating a space to accommodate your smartphone. Make sure the space is large enough to hold the smartphone securely without obstructing the screen or buttons.
- If you are using Velcro or adhesive strips, attach one side to the back of your smartphone and the corresponding side to the visor frame. This will keep the smartphone in place during usage.
- If your smartphone has a removable back cover, take it off and attach adhesive or Velcro strips to the back of the phone. Place the phone back into position, ensuring it is tightly secured within the frame.
- Ensure that the camera on your smartphone is not blocked by any part of the visor frame. This will allow you to use VR apps that utilize the camera for augmented reality experiences.
- Attach any additional electronics or sensors you may have, such as an Arduino board or Raspberry Pi, in a position that does not obstruct the view or make the headset uncomfortable to wear.
- Check all the connections to ensure they are secure and properly aligned. Make sure there are no loose wires or components that may interfere with the functioning of your VR headset.
Remember to handle the electronics with care to prevent any damage or mishaps. Take your time during the assembly process and double-check all the connections to ensure they are correct and secure.
With the electronics assembled, you’re one step closer to enjoying your own DIY virtual reality headset. The next section will cover the wiring and connecting of the various components to ensure they work seamlessly together.
Wiring and Connecting
Now that you have successfully assembled the electronics for your DIY virtual reality headset, it’s time to tackle the crucial step of wiring and connecting. Proper wiring and connection of the components will ensure that your headset functions seamlessly. Follow these steps to wire and connect your VR headset:
- Start by identifying the various ports and connectors on the electronics components. Familiarize yourself with the specific wiring requirements of each component.
- Refer to the user manuals or online resources for guidance on how to correctly wire each component. Pay attention to the polarity and orientation of the wires and connectors.
- Use appropriate cables or connectors to establish the necessary connections between the components. This may include USB cables, audio cables, or other types of cables depending on the specific components being used.
- Ensure that all connections are secure and properly seated. Loose or faulty connections can result in malfunctioning or unreliable performance.
- If necessary, use electrical tape or cable ties to organize and secure the wires, minimizing the risk of tangling or accidental disconnections.
- Double-check all the connections to verify that everything is wired correctly. Make sure there are no loose wires or exposed connections that could pose a safety hazard.
It’s essential to exercise caution when handling wires and connectors to prevent any accidental damage or short circuits. Take your time during the wiring process and consult the appropriate resources or seek expert advice if needed.
Once you have successfully wired and connected all the components, you have laid the foundation for a fully functional VR headset. The next step is to test the prototype and ensure that all the components are working as expected.
Testing the Prototype
Now that you have wired and connected all the components of your DIY virtual reality headset, it’s time to proceed to the crucial step of testing the prototype. This step will ensure that all the components are functioning correctly and that you can enjoy a seamless VR experience. Follow these steps to test the prototype:
- Ensure that your smartphone is fully charged and has the necessary VR apps installed. These apps will allow you to test the functionality of your VR headset.
- Put on your VR headset and adjust the straps or bands for a comfortable and secure fit.
- Turn on your smartphone and open a VR app. Follow the specific instructions provided by the app to calibrate and set up the VR experience.
- Verify that the lenses are aligned correctly, providing a clear and sharp image. Adjust the position of the smartphone within the visor frame if necessary.
- Engage in different VR experiences provided by the app, such as virtual games or immersive videos, to ensure that head tracking and motion detection are working accurately.
- Test the audio output by playing audio through the headphones connected to your smartphone. Ensure that the sound is clear and balanced.
- Move around and test the stability of the headset as well as the comfort and fit during extended usage.
During the testing phase, pay attention to any issues or limitations you may encounter. This will help you identify any areas for improvement and fine-tune your DIY VR headset.
If you notice any problems, double-check the wiring and connections to make sure everything is properly connected and functioning. Troubleshoot any issues by referring to the user manuals or seeking assistance from online resources and forums.
By thoroughly testing your prototype and addressing any issues, you can ensure that your DIY VR headset provides a captivating and immersive experience for all your VR adventures.
Adding the Display
Now that you have successfully tested the functionality of your DIY virtual reality headset, it’s time to focus on adding the display. The display is a key component that allows you to view the virtual reality content with clarity and immersion. Follow these steps to add the display to your VR headset:
- Ensure that your smartphone is securely placed within the visor frame and aligned with the lenses for optimal viewing.
- If your smartphone has adjustable display settings, such as screen resolution or brightness, adjust them to enhance the visual quality of the VR experience.
- Consider using a lens cleaning cloth to wipe the lenses for a crystal-clear view.
- Investigate additional accessories or modifications that can enhance your display experience. This may include anti-reflective screen protectors, lens adapters for different focal lengths, or even custom lenses for improved viewing angles.
- Experiment with different VR apps and experiences to fully appreciate the capabilities of your display. Whether you’re exploring virtual game worlds, enjoying immersive 360-degree videos, or virtually touring distant locations, the quality of the display will greatly impact your overall experience.
- Ensure that the frame of your DIY VR headset provides enough ventilation to prevent overheating of your smartphone. Extended usage of VR apps can generate considerable heat, which may affect the performance and longevity of your device.
Adding the display is an important step in maximizing the immersive potential of your DIY virtual reality headset. Take the time to fine-tune the display settings and explore various VR apps to fully immerse yourself in the virtual world.
As technology continues to advance, alternative display technologies, such as OLED or higher resolution screens, may become more accessible for DIY VR projects. Keep an eye out for new developments and upgrades that can further enhance the display quality and overall experience of your homemade VR headset.
With the display now incorporated into your VR headset, you are one step closer to truly immersing yourself in the virtual reality world. The final section will cover the finishing touches you can add to customize and complete your DIY VR headset.
Finishing Touches
Now that you have successfully added the display to your DIY virtual reality headset, it’s time to focus on the finishing touches. These final details will not only add a personalized touch to your VR headset but also enhance the overall comfort and functionality. Here are some ideas for adding those finishing touches:
- Consider adding a head strap or additional padding to the visor frame for improved stability and comfort during extended usage. This will allow for a more secure fit and reduce the strain on your neck and head.
- Customize the exterior of your VR headset with paint, stickers, or decals to give it a unique and personalized look. Just make sure not to obstruct any essential components or sensors.
- Experiment with head tracking options and explore the possibility of adding sensors or modules that enable more precise and accurate tracking of head movements. This can greatly enhance the immersive experience and interactivity of your DIY VR headset.
- Consider integrating audio enhancements such as built-in speakers or wireless headphones for a more immersive audio experience. This will further elevate the overall immersion and make your VR adventures even more engaging.
- If you plan to share your VR headset with others, you may want to sanitize and clean the components regularly. This will ensure a hygienic and enjoyable experience for all users.
- Investigate additional accessories or modifications that can enhance the functionality of your VR headset. This may include additional input devices, handle controllers, or even haptic feedback devices for a more tactile experience.
Remember that the finishing touches are an opportunity to make your DIY virtual reality headset truly unique. Let your creativity shine and have fun personalizing your VR headset to suit your preferences and style.
While adding these finishing touches can enhance the overall experience, be mindful of not compromising the comfort and functionality of your VR headset. Regularly check for any signs of wear and tear and ensure that all modifications are securely attached.
By paying attention to the finishing touches, you can elevate your DIY virtual reality headset to a whole new level of customization and performance.
Conclusion
Congratulations on completing your DIY virtual reality headset! By following the steps outlined in this guide, you have successfully built a personalized and functional VR headset that opens up a world of immersive experiences.
Throughout this journey, you have learned the importance of gathering the necessary materials, building the frame, assembling the electronics, wiring and connecting the components, testing the prototype, adding the display, and adding the finishing touches to create a fully functional and customized VR headset.
Building your own VR headset not only allows for cost savings compared to commercial alternatives but also provides you with a deeper understanding of the technology behind virtual reality. It enables you to explore the different components, customize the headset to your preferences, and truly make it your own.
As technology continues to advance, there are endless possibilities for further improvements and enhancements to your DIY VR headset. You can continue to explore new features, add more sensors, upgrade the display technology, or even create your own VR content.
Remember to keep an eye on the latest trends and developments in the VR industry to stay up-to-date with the possibilities for enhancing your DIY VR headset. Online communities and forums are great resources for sharing ideas, troubleshooting issues, and finding inspiration for future projects.
Now that you have a fully functional DIY VR headset, it’s time to embark on exciting virtual adventures, explore new worlds, and enjoy immersive gaming, educational, and entertainment experiences. Let your imagination run wild as you delve into the limitless possibilities of virtual reality.
So put on your DIY VR headset, get ready to be transported to another dimension, and enjoy the incredible world of virtual reality that you have created.


