Introduction
Welcome to the world of seamless connectivity with your Netgear wireless router! Whether you’re setting up a new router or need to make changes to your existing settings, accessing your router’s login page is the first step. With the login credentials, you can manage and configure various aspects of your router, such as security settings, network name, and parental controls.
Logging into your Netgear router may seem daunting at first, but fear not! In this guide, we will walk you through the step-by-step process to help you gain access to your router’s web interface. So, grab your device and let’s get started!
Before we dive into the details, it’s essential to understand that every Netgear router comes with a default IP address, username, and password. These default credentials ensure that you can access your router’s settings right out of the box. However, it is strongly recommended to change these default login details to enhance the security of your network.
In the following sections, we will provide you with simple instructions to connect to your Netgear router, open a web browser, enter the default IP address, and finally, enter the default username and password to access the router’s login page. We will also guide you on configuring your router settings according to your preferences.
So, whether you need to set up a new Netgear router or make changes to your existing router, let’s embark on this journey together and make the most out of your wireless network!
Step 1: Connect to your Netgear router
The first step in logging into your Netgear wireless router is to establish a connection between your device (computer, laptop, or smartphone) and the router. Follow these simple steps to ensure a successful connection:
- Turn on your Netgear router by connecting it to a power source and wait for the router to initialize.
- Locate the Ethernet cable provided with your router and connect one end to your router’s LAN port.
- Connect the other end of the Ethernet cable to the LAN port on your device.
- If you prefer a wireless connection, ensure that your device’s Wi-Fi is turned on and search for available networks.
- Select your Netgear router’s network name (SSID) from the list and enter the password when prompted.
Once you are successfully connected to your Netgear router, you can proceed to the next step and access the router’s web interface to log in.
It’s worth mentioning that the process of connecting to your router may vary slightly depending on the model you own. However, the steps outlined above should generally apply to most Netgear routers.
Now that you have established a connection between your device and the router, let’s move on to the next step and open a web browser.
Step 2: Open a web browser
Once you are connected to your Netgear router, it’s time to open a web browser of your choice. Follow these steps to proceed:
- On your device, locate the web browser application. This may be Google Chrome, Mozilla Firefox, Safari, or Microsoft Edge, depending on your device and preferences.
- Click on the browser icon to open it. The browser will launch, and you will see the homepage or a blank page, depending on your browser settings.
- If you already have a web page open, you can open a new tab by clicking on the (+) sign or selecting “New Tab” from the browser’s menu or right-click options.
Once your web browser is open and ready, you can proceed to the next step and enter the default IP address of your Netgear router.
Note that the steps mentioned above are general guidelines for opening a web browser on most devices. The exact steps may vary slightly depending on your device and browser preferences.
Now that your web browser is up and running, we’re ready to move on to the next step and enter the default IP address of your Netgear router. This will allow us to access the login page and take control of the router’s settings.
Step 3: Enter the router’s default IP address
Every Netgear router has a default IP address that allows you to access its web-based interface. Follow these steps to enter the default IP address and access the router’s login page:
- In your web browser’s address bar, type the default IP address for your Netgear router. The most common default IP addresses used by Netgear routers are 192.168.1.1 or 192.168.0.1, but there may be variations depending on the specific model.
- Press the Enter key or click on the Go button in the browser. The browser will attempt to connect to the entered IP address.
- You will now be directed to the Netgear router’s login page, where you will be prompted to enter your login credentials.
If you’ve entered the correct default IP address, you should see the login page without any issues. However, if you encounter an error message or the page doesn’t load, it’s possible that your router’s default IP address has been changed. In such cases, you may need to consult the router’s manual or contact Netgear technical support for assistance.
It’s important to note that the default IP address mentioned above is for general reference and may differ for your specific Netgear router model. You can find the exact default IP address in the router’s documentation or on the Netgear website.
Now that you have successfully entered the router’s default IP address, it’s time to move on to the next step and enter the default username and password to log in to your Netgear router.
Step 4: Enter the default username and password
After accessing the Netgear router’s login page, you will be prompted to enter the default username and password to proceed. Follow these steps to enter the correct credentials:
- Refer to your Netgear router’s documentation or the label on the router itself to find the default username and password.
- In the login page, locate the fields to enter the username and password. These fields are typically labeled “Username” and “Password”.
- Type the default username and password in the respective fields. In most cases, the default username is “admin” and the default password is “password”. However, these values may vary depending on your Netgear router model.
- Double-check that you have entered the correct username and password.
- Click on the “Login” or “Submit” button to proceed.
If you have entered the correct default username and password, you will be granted access to the Netgear router’s web-based interface. However, if you encounter any issues logging in or receive an “Invalid username or password” error, it’s possible that your router’s default credentials have been changed. In such cases, you may need to reset your router to factory settings or contact Netgear support for further assistance.
It’s important to remember that using the default login credentials poses a security risk, as these are well-known values. It is highly recommended to change the default username and password after the initial login to ensure the security of your router and network.
Now that you have successfully entered the default username and password, you can proceed to the final step of configuring your Netgear router’s settings according to your preferences.
Step 5: Configure your router settings
Now that you have logged into your Netgear router’s web-based interface, you have access to a plethora of configuration options. Follow these steps to configure your router settings according to your requirements:
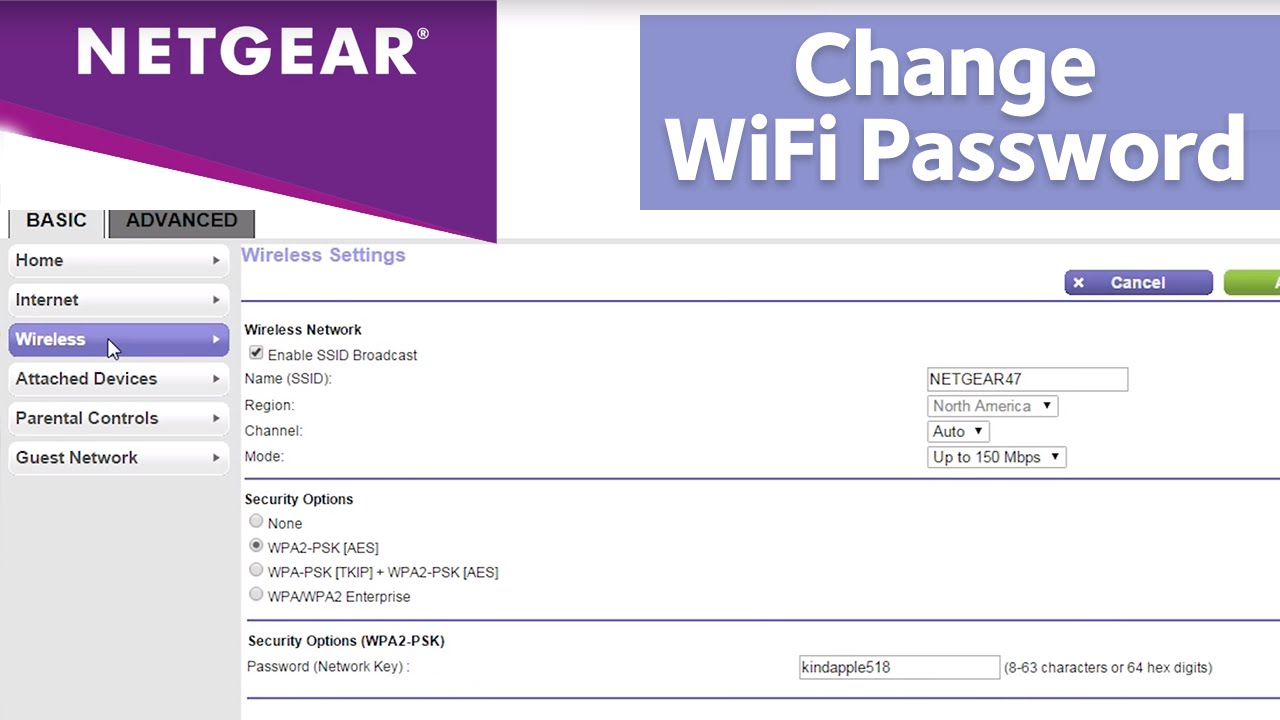
- Explore the various menu options and submenus available on the router’s web interface. Common menu items include “Wireless Settings”, “Security”, “Network Setup”, and “Advanced Settings”. Each menu item provides specific configuration options related to that category.
- Start by configuring your wireless network settings. You can change the network name, also known as SSID, and set a secure password to protect your network from unauthorized access. Avoid using common or easily guessable passwords for enhanced security.
- If desired, enable additional security features such as WPA2 encryption or MAC address filtering to further secure your wireless network.
- Explore the “Advanced Settings” menu to modify other advanced features such as port forwarding, DHCP settings, VLAN configuration, and Quality of Service (QoS) settings.
- Depending on your requirements, you may also want to explore options for parental controls, guest network setup, and firmware updates to ensure your router is up to date with the latest security patches.
- Make sure to save your changes after configuring each setting. Most routers have a “Save” or “Apply” button located at the bottom or top-right corner of the web interface.
- Once you are satisfied with your configuration settings, close the browser window or log out from the router’s web interface. This ensures that only authorized users can access and modify the router settings in the future.
Remember to regularly review and update your router settings as needed, especially when security vulnerabilities are identified or when you make changes to your home network setup.
By following these steps and configuring your Netgear router’s settings, you can maximize the performance, security, and customization of your wireless network to suit your specific needs.
Conclusion
Logging into your Netgear wireless router is an essential step in managing and configuring your network settings. By connecting to your router, opening a web browser, entering the default IP address, and logging in with the default username and password, you gain access to a wealth of options to customize and secure your network.
Once you’re logged in, you can configure various aspects of your router, such as wireless settings, security features, advanced options, and more. Take advantage of these settings to optimize your network’s performance, enhance security, and tailor it to your specific needs.
Remember to set a strong, unique password for your router to prevent unauthorized access and potential security breaches. Regularly reviewing and updating your router’s settings ensures that your network remains secure and up to date.
Now that you have a better understanding of how to log into your Netgear wireless router and configure its settings, you can take control of your network and enjoy the benefits of a seamless and secure wireless connection.
We hope this guide has been helpful to you. Should you have any further questions or encounter any difficulties, don’t hesitate to consult the Netgear support documentation or reach out to their technical support team for assistance.
Happy networking!