Introduction
When it comes to securing your Netgear wireless router, taking proactive measures is crucial to ensure the privacy and security of your network. With the increasing number of cyber threats and vulnerabilities, it is essential to implement the necessary steps to protect your router from potential intruders.
Netgear wireless routers are popular for their reliability and user-friendly interface. However, out of the box, these routers come with default settings that may leave your network vulnerable to attacks. By following the recommended security practices and making a few adjustments to your router’s configuration, you can strengthen the security of your network and keep your data safe.
This article will guide you through the steps to make your Netgear wireless router more secure. Whether you’re a tech-savvy individual or new to router security, these simple yet effective measures will help safeguard your network against unauthorized access and potential threats.
By implementing the following security measures, you can enhance the protection of your Netgear wireless router and ensure the safety of your data:
Change the Default Administrator Password
One of the first and most important steps in securing your Netgear wireless router is to change the default administrator password. When you first set up your router, it comes with a default username and password, which is commonly known and used by potential attackers. By changing the default password, you prevent unauthorized access to your router’s settings.
To change the administrator password, follow these steps:
- Open a web browser and enter your router’s IP address in the address bar. The default IP address for Netgear routers is usually 192.168.1.1.
- Enter the default username and password to log in to the router’s administration panel. If you have not changed these credentials before, consult the user manual or check the manufacturer’s website for the default login details.
- Once logged in, locate the “Administration” or “Settings” section in the router’s interface.
- Look for the option to change the administrator password and click on it. Enter a strong, unique password that combines uppercase and lowercase letters, numbers, and special characters.
- Save the new password and log out of the router’s administration panel.
Changing the default administrator password is crucial as it ensures that only authorized users can access and make changes to your router’s settings. By using a strong password, you significantly reduce the risk of a potential attacker gaining control over your network.
It is recommended to use a password manager to securely store and generate strong passwords for all your online accounts, including your router’s administrator password. Additionally, make a note of the new password in a secure location to prevent any difficulties in the future if you need to access the router’s settings.
Update the Firmware
Keeping your Netgear wireless router’s firmware up to date is essential for maintaining optimal performance and, more importantly, for addressing any security vulnerabilities that may exist in the older firmware versions. Firmware updates often include patches and fixes for known security issues, so it’s vital to regularly check for and apply these updates.
To update the firmware of your Netgear router, follow these steps:
- Visit the Netgear support website and navigate to the Downloads section.
- Enter your router’s model number in the search bar or select it from the list of available models.
- On the product page, locate and download the latest firmware version available for your router.
- Open a web browser and enter your router’s IP address in the address bar. Log in to the router’s administration panel using your username and password.
- In the router’s interface, locate the “Administration” or “Maintenance” section.
- Look for the option to update the firmware and click on it.
- Choose the firmware file you downloaded and follow the on-screen instructions to initiate the firmware update process.
- Wait for the update to complete. Do not turn off the router or interrupt the update process as it may cause damage to the device.
Regularly updating the firmware of your Netgear wireless router ensures that you have the latest security enhancements and bug fixes. It is recommended to check for firmware updates at least once every few months. Some newer models even have an automatic update feature, allowing the router to check for and install updates on its own.
By keeping your router’s firmware up to date, you significantly reduce the risk of potential vulnerabilities being exploited by hackers and other malicious individuals. It’s a simple yet effective way to enhance the security of your network and protect your personal information.
Disable Remote Management
Disabling remote management on your Netgear wireless router is a crucial step in securing your network. Remote management allows access to your router’s settings from outside your home network, which can pose a significant security risk if not properly configured.
To disable remote management on your Netgear router, follow these steps:
- Open a web browser and enter your router’s IP address in the address bar. Log in to the router’s administration panel using your username and password.
- In the router’s interface, navigate to the “Advanced” or “Remote Management” section.
- Look for the option to enable or disable remote management and make sure it is set to “Disabled”.
- Save the changes and exit the router’s administration panel.
By disabling remote management, you prevent unauthorized access to your router’s settings from external sources. This reduces the risk of potential malicious individuals gaining control over your network and compromising your data.
If you need to access your router’s settings remotely, it is recommended to set up a Virtual Private Network (VPN) to establish a secure connection. A VPN creates a private encrypted tunnel between your device and the router, ensuring that your communication remains secure and protected from eavesdropping and unauthorized access.
Disabling remote management is a simple yet effective security measure that can help safeguard your Netgear wireless router and protect your network from potential intruders. It is especially important for those who do not require remote access to their router’s settings on a regular basis.
Change the Default SSID and Password
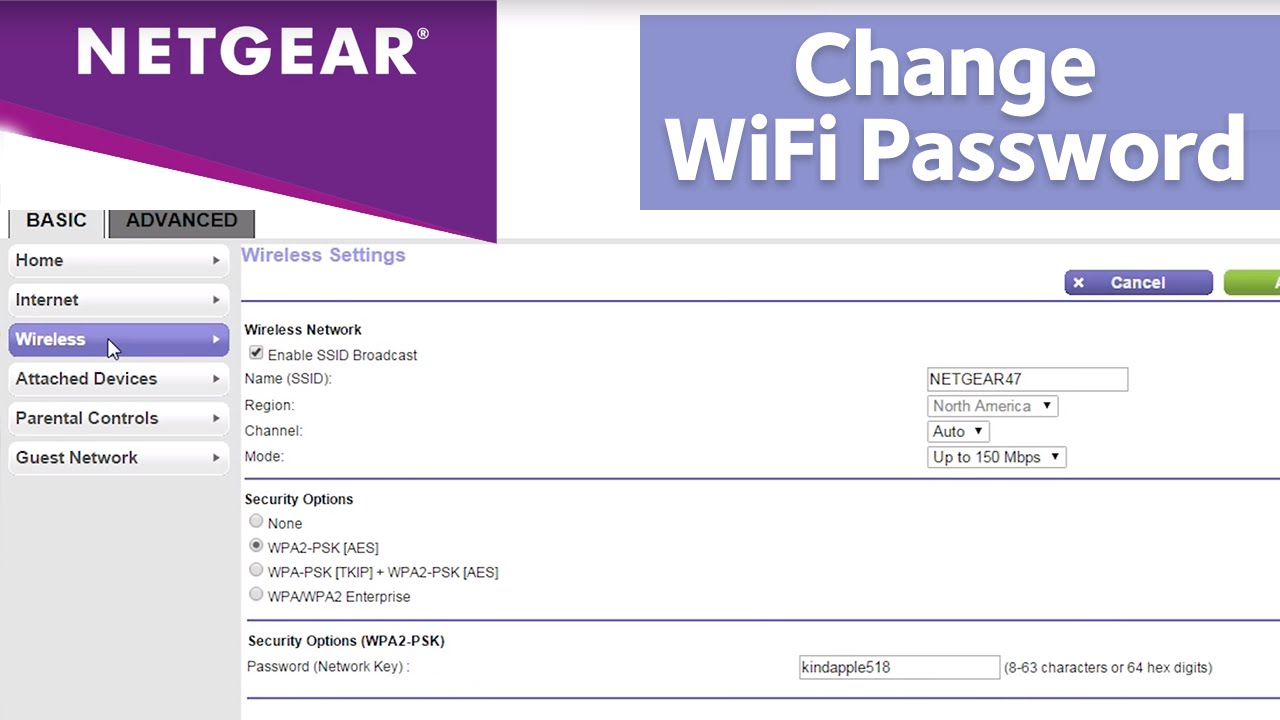
One of the essential steps in securing your Netgear wireless router is to change the default SSID (Service Set Identifier) and password. The SSID is the name of your wireless network that is visible to others, while the password is required to authenticate and connect to the network.
Changing the default SSID and password is important because attackers can easily identify and target networks using default values. By customizing these settings, you make it more difficult for unauthorized individuals to gain access to your network.
To change the default SSID and password on your Netgear router, follow these steps:
- Open a web browser and enter your router’s IP address in the address bar. Log in to the router’s administration panel using your username and password.
- In the router’s interface, navigate to the “Wireless” or “Wireless Settings” section.
- Locate the field for the SSID and enter a unique name for your wireless network. Avoid using personal information or easily identifiable details in the SSID.
- Find the field for the password or passphrase. Enter a strong, complex password that combines uppercase and lowercase letters, numbers, and special characters.
- Save the changes and exit the router’s administration panel.
Changing the default SSID and password ensures that your network is not easily identifiable and reduces the risk of unauthorized access. It is recommended to choose a strong, unique password that is not easily guessable. Avoid using common or easily guessable phrases or patterns.
Remember to update the SSID and password on all devices that connect to your wireless network. This includes smartphones, tablets, laptops, and any other devices that you use to access the internet.
By customizing the SSID and password, you add an extra layer of security to your Netgear wireless router, making it more challenging for attackers to breach your network.
Enable WPA2 Encryption
Enabling WPA2 (Wi-Fi Protected Access 2) encryption on your Netgear wireless router is a crucial step in securing your network. WPA2 is the latest and most secure encryption protocol available for Wi-Fi networks. By enabling WPA2 encryption, you ensure that your network traffic is encrypted and protected from unauthorized access.
To enable WPA2 encryption on your Netgear router, follow these steps:
- Open a web browser and enter your router’s IP address in the address bar. Log in to the router’s administration panel using your username and password.
- In the router’s interface, navigate to the “Wireless” or “Wireless Security” section.
- Look for the security mode or encryption type option and select “WPA2-PSK” or “WPA2 Personal”.
- Enter a strong, unique passphrase in the field provided. The passphrase should be at least 12 characters long and include a combination of uppercase and lowercase letters, numbers, and special characters.
- Save the changes and exit the router’s administration panel.
By enabling WPA2 encryption, you protect your wireless network from unauthorized access and eavesdropping. This encryption method ensures that only devices with the correct passphrase can connect to your network, maintaining the privacy and security of your data.
It is important to note that older devices that do not support WPA2 may not be able to connect to your network if you enable this encryption. However, most modern devices are compatible with WPA2, so it is recommended to use this encryption method for the highest level of security.
Regularly changing the passphrase for your WPA2-encrypted network is also recommended as an additional security measure. This helps prevent potential attackers from gaining access to your network even if they manage to capture the original passphrase.
Enabling WPA2 encryption is a fundamental step in securing your Netgear wireless router and protecting your network from unauthorized access. By implementing this encryption method, you can ensure the confidentiality and integrity of your data while enjoying a secure wireless network connection.
Enable Network Name (SSID) Broadcast
Enabling network name (SSID) broadcast on your Netgear wireless router can have both advantages and disadvantages when it comes to securing your network. The SSID broadcast feature allows your wireless network’s name to be visible to nearby devices, making it easier for them to identify and connect to your network.
To enable SSID broadcast on your Netgear router, follow these steps:
- Open a web browser and enter your router’s IP address in the address bar. Log in to the router’s administration panel using your username and password.
- In the router’s interface, navigate to the “Wireless” or “Wireless Settings” section.
- Look for the option to enable or disable SSID broadcast. Ensure that the option is set to “Enabled”.
- Save the changes and exit the router’s administration panel.
Enabling SSID broadcast allows devices in your vicinity to easily identify and connect to your network. This can be convenient for guests or devices that are not frequently used in your home or office.
However, there is a potential security risk associated with enabling SSID broadcast. When the SSID is broadcasted, it becomes easier for potential attackers to identify your network and attempt unauthorized access. By disabling SSID broadcast, you make it harder for unauthorized individuals to detect your network and decrease the likelihood of being targeted.
Disabling SSID broadcast does not completely hide your network from determined attackers, as they can still discover hidden networks through other means. However, it does provide an additional layer of obscurity that can deter casual attempts to connect to your network.
If you decide to enable SSID broadcast, it is important to implement other security measures, such as strong encryption and unique passwords, to protect your network from unauthorized access.
In summary, enabling SSID broadcast can make it more convenient for devices to connect to your network, but it can also increase the risk of unauthorized access. Consider the trade-off between convenience and security before deciding whether to enable or disable SSID broadcast on your Netgear wireless router.
Use a Strong Wireless Network Key
Using a strong wireless network key, also known as a Wi-Fi password or passphrase, is crucial for securing your Netgear wireless router and preventing unauthorized access to your network. A weak or easily guessable network key can leave your network vulnerable to attacks and compromises your privacy and data security.
To ensure the strength of your wireless network key, follow these guidelines:
- Choose a complex and unique passphrase that is difficult to guess. It should be at least 12 characters long and include a combination of uppercase and lowercase letters, numbers, and special characters.
- Avoid using common or easily guessable phrases, such as birth dates, phone numbers, or addresses. Random combinations of characters provide better security.
- Regularly change your network key. It is recommended to update it every few months to reduce the risk of unauthorized access.
- Avoid sharing your network key with unauthorized individuals. Only provide the network key to trusted individuals who need access to your network.
- Consider using a password manager to securely store and generate strong passwords. This ensures that you can easily access and manage your network key without compromising its security.
A strong network key acts as a barrier against unauthorized access attempts and ensures that only authorized devices can connect to your wireless network. It is an essential component of keeping your network secure from potential intruders.
Remember to update the network key on all devices that connect to your network to maintain consistent security. This includes smartphones, tablets, computers, gaming consoles, and IoT devices.
By using a strong wireless network key, you significantly enhance the security of your Netgear wireless router and protect your network and its data from unauthorized access. It is a simple yet effective security measure that should not be overlooked.
Disable WPS (Wi-Fi Protected Setup)
Disabling Wi-Fi Protected Setup (WPS) on your Netgear wireless router is an important step in securing your network. WPS is a feature designed to simplify the process of connecting devices to a Wi-Fi network by pressing a button or entering a PIN. However, it can also introduce potential security vulnerabilities that can be exploited by attackers.
To disable WPS on your Netgear router, follow these steps:
- Open a web browser and enter your router’s IP address in the address bar. Log in to the router’s administration panel using your username and password.
- In the router’s interface, navigate to the “Wireless” or “Wireless Settings” section.
- Look for the option to enable or disable WPS and ensure that it is set to “Disabled”.
- Save the changes and exit the router’s administration panel.
Disabling WPS on your Netgear wireless router prevents potential attackers from exploiting the vulnerabilities associated with this feature. WPS can be susceptible to brute-force attacks and can expose your network to unauthorized access.
Although WPS was designed to simplify the process of connecting devices to a Wi-Fi network, it is recommended to use more secure methods, such as entering the network key manually or using WPA2-PSK encryption with a strong passphrase.
Additionally, disabling WPS on your router may help improve the overall security of your network and protect against potential vulnerabilities that could be exploited by attackers.
If you have devices that rely on WPS for network connectivity, it is advisable to update them to use more secure methods or consider upgrading to newer devices that support more robust security protocols.
By disabling WPS on your Netgear wireless router, you reduce the risk of unauthorized access to your network and enhance the overall security of your Wi-Fi network.
Enable MAC Address Filtering
Enabling MAC (Media Access Control) address filtering on your Netgear wireless router is an effective security measure that allows you to control which devices can connect to your network. MAC address filtering adds an extra layer of protection by only allowing devices with specific MAC addresses to access your network.
To enable MAC address filtering on your Netgear router, follow these steps:
- Open a web browser and enter your router’s IP address in the address bar. Log in to the router’s administration panel using your username and password.
- In the router’s interface, navigate to the “Wireless” or “Wireless Settings” section.
- Look for the option to enable MAC address filtering and turn it on.
- Locate the MAC address filtering table or list and add the MAC addresses of the devices you want to allow access to your network. You can usually find the MAC address of a device in its network settings or on the device itself. Make sure to enter the MAC address correctly without any spaces or dashes.
- Save the changes and exit the router’s administration panel.
By enabling MAC address filtering, you can prevent unauthorized devices from connecting to your network, even if they have the correct network key or password. Only devices with MAC addresses listed in the router’s filtering table will be allowed access.
It is important to note that MAC address filtering may require additional configuration when adding or removing devices from your network. If you have guests or frequently change devices, you may need to update the MAC address filtering table accordingly.
While MAC address filtering adds another layer of security, it is not foolproof. Skilled attackers can spoof MAC addresses or capture valid MAC addresses from authorized devices. Therefore, it is recommended to combine MAC address filtering with other security measures, such as strong encryption and unique network keys, for enhanced network security.
By enabling MAC address filtering on your Netgear wireless router, you can enforce tighter control over which devices can access your network, providing an added level of security and peace of mind.
Disable UPnP (Universal Plug and Play)
Disabling Universal Plug and Play (UPnP) on your Netgear wireless router is an important step in securing your network. UPnP is a network protocol that allows devices on your network to automatically discover and communicate with each other without manual configuration. However, this convenience comes at the cost of potential security vulnerabilities that can be exploited by malicious actors.
To disable UPnP on your Netgear router, follow these steps:
- Open a web browser and enter your router’s IP address in the address bar. Log in to the router’s administration panel using your username and password.
- In the router’s interface, navigate to the “Advanced” or “UPnP” section.
- Look for the option to enable or disable UPnP and make sure it is set to “Disabled”.
- Save the changes and exit the router’s administration panel.
Disabling UPnP on your Netgear wireless router helps mitigate potential security risks. UPnP can leave your network vulnerable to unauthorized access and malicious attacks by allowing devices to automatically open ports and establish connections without your explicit permission.
While UPnP can be convenient for devices that require seamless network communication, such as gaming consoles or smart home devices, it is recommended to manually configure port forwarding or use other secure methods to enable proper connectivity for these devices.
Keep in mind that disabling UPnP may require manual configuration of ports for certain applications or services. However, this extra step ensures better control over your network’s security and reduces the risk of potential vulnerabilities being exploited by attackers.
By disabling UPnP on your Netgear router, you minimize the potential security risks associated with this feature, thus enhancing the overall security of your network.
Enable Guest Network
Enabling a guest network on your Netgear wireless router is a practical and secure way to provide internet access to your visitors while keeping your main network separate and protected. A guest network is a separate network that allows guests to connect to the internet without accessing your primary network or its connected devices.
To enable a guest network on your Netgear router, follow these steps:
- Open a web browser and enter your router’s IP address in the address bar. Log in to the router’s administration panel using your username and password.
- In the router’s interface, navigate to the “Guest Network” or “Guest Wi-Fi” section.
- Enable the guest network feature by toggling it on.
- Specify the network name (SSID) for the guest network. It is recommended to use a different name from your main network to differentiate them easily.
- Set a unique network passphrase for the guest network. Use a strong, secure password to ensure that guests have limited access and to protect your main network.
- Configure additional settings if available, such as network bandwidth limitations or time restrictions, depending on your router’s capabilities.
- Save the changes and exit the router’s administration panel.
Enabling a guest network prevents guests from accessing your main network and its connected devices, providing an added layer of security. It also helps in protecting sensitive files, printers, and other valuable resources from unauthorized access.
By setting up a guest network, guests can connect to the internet and use the network for their needs without compromising the security of your main network. This is especially useful if you frequently have visitors who require internet access.
Remember to periodically update the passphrase for your guest network to maintain security. Additionally, consider setting time limits on the guest network to automatically disconnect guests after a certain duration to further enhance security and manage network resources efficiently.
Enabling a guest network on your Netgear router ensures a secure and efficient way to provide internet access to your visitors, allowing them to enjoy connectivity without compromising the security of your main network.
Disable Unused Services
Disabling unused services on your Netgear wireless router is an important step in securing your network. By disabling unnecessary services, you reduce the potential attack surface and minimize the risk of vulnerabilities that may be exploited by malicious actors.
Here are some commonly found services on Netgear routers that you should consider disabling if they are not required:
- Remote Access: If you do not need remote access to your router’s administration panel, disable this feature. Remote access can leave your network more susceptible to unauthorized access if not properly configured and secured.
- FTP (File Transfer Protocol) Server: If you do not require FTP server functionality, disable this service. FTP servers can be targeted by attackers to gain unauthorized access or exploit vulnerabilities.
- DDNS (Dynamic DNS): If you do not use dynamic DNS services, disable this feature. Dynamic DNS allows remote users to access your network using a domain name, which can be a potential security risk if not needed.
- UPnP (Universal Plug and Play): Consider disabling UPnP if you do not rely on it for device connectivity. UPnP can introduce security vulnerabilities if not properly configured and monitored.
- IPv6 (Internet Protocol Version 6): If you are not currently using IPv6, disable this protocol. Disabling IPv6 eliminates the potential risks associated with it if it is not necessary for your network.
Disabling these unused services on your Netgear router can help limit potential attack vectors and enhance the overall security of your network. Keep in mind that disabling services that are necessary for your network functionality may disrupt certain features or devices, so it is essential to understand the impact before making any changes.
Regularly review the services enabled on your Netgear router and disable any that are unused or unnecessary. This will minimize the exposure of your network to potential security risks and help maintain a more robust and secure network environment.
By disabling unused services on your Netgear wireless router, you can reduce the risk of potential vulnerabilities and ensure a more secure and efficient network experience.
Enable Firewall Protection
Enabling firewall protection on your Netgear wireless router is a crucial step in securing your network and protecting it from unauthorized access and potential threats. A firewall acts as a barrier between your internal network and the wider internet, monitoring and filtering incoming and outgoing network traffic to block malicious or suspicious connections.
To enable firewall protection on your Netgear router, follow these steps:
- Open a web browser and enter your router’s IP address in the address bar. Log in to the router’s administration panel using your username and password.
- In the router’s interface, navigate to the “Advanced” or “Security” section.
- Look for the option to enable the firewall and turn it on.
- Depending on your router model, you may have additional firewall settings that you can configure. It is recommended to review these settings and adjust them according to your specific needs and security requirements.
- Save the changes and exit the router’s administration panel.
Enabling firewall protection on your Netgear router adds an extra layer of defense by inspecting network packets and blocking suspicious or potentially harmful traffic. It helps safeguard your network against unauthorized access attempts, malware, and other nefarious activities.
While the default firewall settings on most Netgear routers offer a good level of protection, it is important to periodically review and update your firewall settings as new threats and vulnerabilities emerge. Stay informed about firmware updates and security patches released by Netgear to ensure that your firewall is up to date and providing optimal protection.
It is worth noting that while a firewall provides an essential layer of network security, it is not a substitute for other security measures, such as strong encryption, unique passwords, and regular firmware updates. It is important to implement a holistic approach to network security to effectively protect your network and its connected devices.
By enabling firewall protection on your Netgear wireless router, you fortify your network’s security posture and create a safer environment for your online activities, giving you peace of mind and minimizing the risk of potential threats.
Frequently Update Security Settings
Regularly updating the security settings on your Netgear wireless router is essential to maintain the highest level of protection for your network. As new security vulnerabilities and threats are discovered, manufacturers release firmware updates that include patches and fixes to address these issues. Keeping your router’s security settings up to date helps ensure that your network remains secure and protected from potential attacks.
To frequently update the security settings on your Netgear router, follow these steps:
- Stay informed about firmware updates: Visit the Netgear support website regularly or sign up for notifications to receive updates about new firmware releases for your router model.
- Download the firmware updates: When a new firmware update is available, download the update file from the Netgear support website and save it to your computer.
- Back up your router’s configuration: Before performing a firmware update, it is recommended to back up your router’s configuration. This allows you to restore your settings if any issues arise during the update process.
- Perform the firmware update: Access your router’s administration panel, navigate to the firmware update section, and follow the on-screen instructions to install the latest firmware version for your router.
- Configure security settings: After the firmware update, review and adjust the security settings on your router. This includes enabling encryption, changing passwords, and enabling additional security features available on your router model.
By frequently updating the security settings on your Netgear wireless router, you ensure that you have the latest protections in place to defend against evolving threats and vulnerabilities. Regular firmware updates provide essential bug fixes and security patches that bolster the overall security of your network.
In addition to firmware updates, stay informed about best practices for network security, such as using strong passwords, regularly changing your network key, and employing other recommended security measures. Keeping yourself educated about potential risks and implementing the necessary security measures will help maintain a secure network environment.
Remember to periodically check for firmware updates and review your router’s security settings. Set a schedule to check for updates and make it a regular part of your network maintenance routine. By doing so, you ensure that your Netgear wireless router remains secure and your network is protected from emerging threats.
Conclusion
Securing your Netgear wireless router is crucial to protect your network, data, and privacy from potential threats and unauthorized access. By following the recommended steps outlined in this article, you can significantly enhance the security of your router and create a safer online environment.
Changing the default administrator password, updating the firmware, disabling remote management, and changing the default SSID and password are basic yet essential measures to fortify your network’s security. Enabling WPA2 encryption, enabling network name (SSID) broadcast, using a strong wireless network key, disabling WPS, and enabling MAC address filtering provide additional layers of protection against unauthorized access.
Disabling unused services, enabling firewall protection, and enabling a guest network further strengthen the security of your Netgear router. By frequently updating the security settings and firmware of your router, you ensure that your network is up to date with the latest protections and patches against potential vulnerabilities.
Remember to review your router’s security settings periodically, implement strong passwords and encryption, and stay informed about best practices for network security. Continuously educating yourself and taking proactive measures are key to maintaining a secure network environment.
Securing your Netgear wireless router may require some initial effort, but the peace of mind and protection it provides for your network and connected devices make it well worth the investment. By implementing these security measures, you can enjoy a safe and secure online experience while safeguarding your personal information and data.


