Introduction
Welcome to this comprehensive guide on how to change the password on your Netgear wireless router. Keeping your router password secure is essential to protect your network from unauthorized access and potential security breaches. Changing your password regularly adds an extra layer of security and ensures that only trusted individuals can access your network.
In this step-by-step tutorial, you will learn how to change the password on your Netgear wireless router. Whether you need to update your existing password or have recently purchased a new router and want to set up a secure password, this guide has got you covered.
Netgear routers provide an intuitive web interface that allows users to easily configure various settings, including the password. By accessing the router’s web interface, you can log in to the router’s settings and navigate to the password change section. Once you have changed the password, make sure to save and apply the changes for them to take effect.
It’s worth noting that changing the password will affect all devices currently connected to your network. After changing the password, you will need to reconnect your devices using the new password to regain internet access. By following the steps outlined in this guide, you will be able to change the password on your Netgear wireless router in no time.
So without further ado, let’s dive into the step-by-step process of changing your Netgear wireless router password and ensure the security of your network.
Step 1: Access the router’s web interface
The first step in changing the password on your Netgear wireless router is to access the router’s web interface. To do this, you’ll need a device with a web browser, such as a computer or a smartphone, that is connected to the same network as your router.
Open your preferred web browser and enter the default IP address of your Netgear router in the address bar. The default IP address is typically “192.168.1.1” or “192.168.0.1”, but it may vary depending on your specific router model. Press Enter or click Go to proceed.
If you are unsure about the default IP address, you can find it on the back or bottom of your Netgear router or refer to the documentation that came with it.
After entering the IP address, you will be directed to the router’s login page. Here, you will be prompted to enter the username and password to access the router’s settings.
By default, the username is often set to “admin”, and the password is either “password” or “1234”. However, if you have previously changed the login credentials and cannot remember them, you may need to perform a factory reset on your router to restore the default settings.
Once you have entered the correct login credentials, click on the login or submit button to proceed to the router’s web interface.
Please note that if you are accessing the router’s web interface for the first time or using a different device, you may be prompted to change the default password before proceeding. It is recommended to set a strong and unique password to secure your router’s settings.
Now that you have successfully accessed the router’s web interface, you are ready to move on to the next step of changing the password.
Step 2: Log in to the router’s settings
After accessing the router’s web interface in the previous step, the next step is to log in to the router’s settings. This will allow you to make changes to various configuration options, including the password.
On the web interface, you will be presented with a user-friendly dashboard that provides access to the router’s settings. Look for a navigation menu or tabs that contain different sections and options.
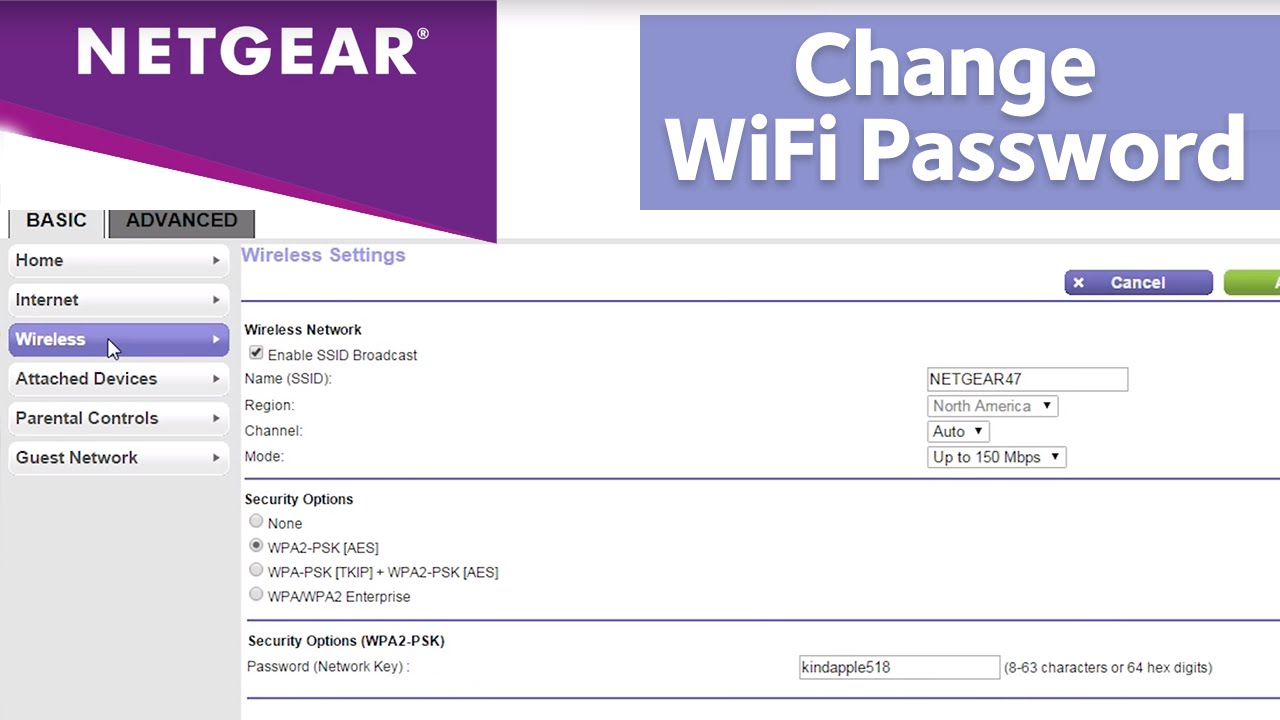
Navigate to the section or tab that is related to the password settings. This section may be labeled “Security,” “Wireless Settings,” or similar. The exact location of this section may vary depending on your Netgear router model and firmware version.
In some cases, you may need to enter additional information such as the current password or security key to access the password settings section. Follow the prompts and enter the required details to proceed.
If you encounter any difficulties navigating through the router’s settings or finding the password section, consult the router’s documentation or visit Netgear’s official support website for additional guidance and troubleshooting.
Once you have successfully accessed the password settings section, you are one step closer to changing the password on your Netgear wireless router. In the next step, we will explore how to navigate to the specific option to change the password.
Step 3: Navigate to the password change section
Now that you have logged in to the router’s settings, it’s time to navigate to the password change section. This section will allow you to modify the current password and set a new one.
Look for an option or subcategory within the settings menu specifically related to passwords. The name of this option may vary depending on your Netgear router model, but it is commonly labeled as “Password,” “Security,” or “Wireless Password.”
Click on the corresponding option to access the password change section. This will open a new page or window that displays the current password and provides options for modifying it.
In some cases, there may be separate fields to enter the old password and the new password, while in others, you may find a single field where you can directly input the new password. The layout and design of this section may also differ based on your router’s firmware version.
If you want a strong and secure password, consider using a combination of uppercase and lowercase letters, numbers, and special characters. Avoid using common passwords or easily guessable information such as names, birthdates, or phone numbers.
Before proceeding to change the password, you may also have the option to modify other password-related settings, such as the password encryption method or the password visibility. Adjust these settings according to your preferences, but take caution when modifying advanced settings that you are not familiar with.
Once you have entered the desired new password and made any additional changes, it’s time to apply the modifications and save the new password. The following step will guide you through the process of changing the password on your Netgear wireless router.
Step 4: Change the password
Now that you have navigated to the password change section, it’s time to actually change the password on your Netgear wireless router. Follow these steps to update your router’s password:
- Enter the desired new password in the appropriate field. Make sure to choose a strong and secure password that includes a combination of uppercase and lowercase letters, numbers, and special characters.
- If there is a field for confirming the new password, re-enter the new password to ensure accuracy and prevent any typing errors.
- Double-check all the settings and options in the password change section to ensure that they are set correctly according to your preferences.
- If there are any additional options related to password settings, such as encryption method or password visibility, make any desired changes to these settings as well.
- Once you are satisfied with the new password and any accompanying settings, proceed to save the changes.
Look for a “Save” or “Apply” button on the screen, typically located at the bottom or top of the password change section. Click on this button to save the changes and update your router’s password.
The router may take a few moments to apply the new settings. During this process, ensure that you do not turn off or unplug the router. Doing so may cause the changes to be incomplete or result in disruptions to your network connectivity.
After the changes have been successfully applied, your Netgear wireless router will now have a new password in place. It is highly recommended to make a note of this new password and store it in a safe and secure place, as it will be required to access the router’s settings in the future.
With the password successfully changed, you can now proceed to the next step to save and apply the changes to your Netgear wireless router.
Step 5: Save and apply the changes
Once you have changed the password on your Netgear wireless router, it is important to save and apply the changes for them to take effect. Follow these steps to ensure that the new password is properly implemented:
- Look for a “Save” or “Apply” button on the screen. This button is usually located at the bottom or top of the settings page.
- Click on the “Save” or “Apply” button to save and apply the changes you made to the password.
- Wait for the router to process the changes. This may take a few moments, and during this time, it is important not to turn off or unplug the router.
- Once the changes have been successfully saved and applied, you will usually see a confirmation message or a notification indicating that the changes have taken effect.
- It is recommended to restart your router after making any significant changes to ensure that the new settings are fully applied. You can do this by turning off the router, waiting for a few seconds, and then turning it back on.
By saving and applying the changes, your Netgear wireless router will now have the new password in place. This means that you and other authorized users will need to use the updated password when connecting to the Wi-Fi network.
Now that you have successfully saved and applied the changes, the next step involves reconnecting your devices using the new password to regain internet access. This step is crucial to ensure that all devices on your network are using the updated password for a secure connection.
Step 6: Reconnect devices using the new password
After changing the password on your Netgear wireless router, it is essential to reconnect all your devices to the network using the new password. This step ensures that all devices can continue to access the internet securely. Follow these steps to reconnect your devices:
- On each device connected to your network, locate the Wi-Fi settings or network settings.
- Search for the name of your Wi-Fi network (also known as the SSID) in the list of available networks.
- Select your Wi-Fi network and click or tap on the “Connect” button.
- Enter the new password that you set for your Netgear wireless router.
- Click or tap on the “Connect” button to establish a connection.
- Repeat this process for each device that was previously connected to your network.
- Ensure that each device is successfully connected to the network and can access the internet.
It is important to note that some devices may prompt you to forget the old Wi-Fi network before connecting with the new password. If this is the case, select the option to forget the network and proceed with the steps outlined above.
By reestablishing the connection between your devices and the network using the new password, you can ensure that all devices have the correct credentials for accessing the internet. This also helps maintain a secure network and prevents any unauthorized access.
Congratulations! You have successfully changed the password on your Netgear wireless router and reconnected your devices using the new password. Your network is now secure with a strong password, safeguarding your data and ensuring that only authorized individuals have access.
Conclusion
Changing the password on your Netgear wireless router is a crucial step in maintaining a secure network. By following the step-by-step instructions in this guide, you have successfully learned how to change the password on your Netgear router and reconnected your devices using the new password.
Remember that changing your router’s password adds an extra layer of security and prevents unauthorized access to your network. It is highly recommended to change your password regularly and choose a strong and unique password to ensure the safety of your network.
Throughout this guide, you have accessed the router’s web interface, logged in to the router’s settings, navigated to the password change section, changed the password, and saved and applied the changes to your Netgear router. Furthermore, you have reconnected your devices to the network using the new password, ensuring that all devices have the correct credentials for secure internet access.
Keep in mind that securing your wireless network goes beyond just changing the password. Additional security measures, such as enabling network encryption, disabling remote access, and keeping the firmware up to date, can further enhance the protection of your network.
By following best practices for router security and regularly reviewing and updating your network settings, you can minimize the risk of security breaches and maintain a safe and secure Wi-Fi network.
We hope this guide has been helpful and has provided you with the knowledge and confidence to change the password on your Netgear wireless router. Remember to keep your password secure, update it regularly, and take proactive steps to protect your network and devices from potential threats.