Introduction
Resetting your wireless router is an essential step to troubleshoot various network-related issues and ensure optimal performance. Whether you’re experiencing slow internet speeds, connection drops, or forgotten passwords, performing a reset can often resolve these problems. In this guide, we will walk you through the step-by-step process of resetting a Netgear wireless router.
Netgear is a well-known and trusted brand when it comes to networking devices, and their routers are widely used in both homes and businesses. However, even the best routers can encounter issues over time, such as configuration errors or firmware glitches. By performing a reset, you can restore the router to its factory default settings, thereby eliminating any potential conflicts or misconfigurations.
Before we begin, it’s important to note that resetting your router will erase all of your customized settings, including network names, passwords, and port forwarding configurations. Therefore, it’s crucial to have this information handy or be prepared to reconfigure the router once the reset is complete.
In the following steps, we will guide you through the process of resetting a Netgear wireless router and reconfiguring it to get you back online quickly and efficiently.
Step 1: Prepare for the Reset
Before you begin the reset process, it’s essential to make the necessary preparations to ensure a smooth and successful reset of your Netgear wireless router. Here are a few key steps to follow:
- 1. Disconnect from the Internet: To avoid any potential interruptions or conflicts during the reset, it’s advisable to disconnect your router from the internet. Simply turn off your modem or unplug the Ethernet cable connecting it to the router.
- 2. Locate important information: As mentioned earlier, performing a router reset will erase all customized settings. Therefore, it’s crucial to gather essential information such as the router’s default username and password, network name (SSID), and any specific configurations you may have set up.
- 3. Prepare a physical reset tool: Netgear routers often come with a small reset button located either on the back or bottom of the device. You’ll need a thin object like a paperclip or pin to press and hold the reset button during the reset process.
- 4. Backup your current settings (optional): If you want to save your existing router settings before performing the reset, some Netgear routers allow you to create a backup file of your configuration. Check the router’s manual or Netgear’s website for instructions on how to perform this backup.
By following these preparatory steps, you’ll ensure a hassle-free router reset process. Once you’ve completed these preparations, you’re ready to move on to the next step in resetting your Netgear wireless router.
Step 2: Locate the Reset Button
In order to reset your Netgear wireless router, you will need to locate the reset button on the device. The location of the reset button may vary depending on the specific model of your router, so it’s important to consult the router’s manual or the manufacturer’s website for accurate information. Here are some general guidelines to help you find the reset button:
- 1. Check the back or bottom of the router: The reset button is typically a small recessed button that may require a pin or paperclip to press. It is commonly found on the back or bottom of the router. Look for a small hole labeled “Reset” or with an icon indicating a reset function.
- 2. Follow the manufacturer’s instructions: Each Netgear router model may have a slightly different reset button location. For specific instructions, refer to the router’s manual or visit Netgear’s website and search for your router’s model number. They will provide detailed information on where to find the reset button.
- 3. Be cautious when pressing the button: Once you’ve located the reset button, it’s important to exercise caution when pressing it. Use a thin object like a paperclip or pin to gently press and hold the button for a few seconds. Avoid using excessive force as it may cause damage to the router.
- 4. Verify the reset is initiated: After pressing the reset button, you should see the router’s lights blink or change, indicating that the reset process has been initiated. Keep in mind that the lights may vary depending on your specific Netgear router model.
Finding and accessing the reset button is a crucial step in resetting your Netgear wireless router. Once you have successfully located the button and initiated the reset process, you’re ready to move on to the next step of the reset procedure.
Step 3: Reset the Router
Once you have located the reset button on your Netgear wireless router, you are ready to proceed with resetting the device. Follow these step-by-step instructions to reset your router:
- 1. Power off the router: Ensure that the router is powered on and functioning normally. Locate the power button or disconnect the power supply to turn off the router. This step is important to prevent any data corruption during the reset process.
- 2. Press and hold the reset button: Using a pin or paperclip, press and hold the reset button located on the back or bottom of the router. You will need to hold it down for about 10-15 seconds. The router’s lights may blink during this time.
- 3. Release the reset button: After holding the reset button for the specified duration, release it. This action will trigger the router to initiate the reset process.
- 4. Power on the router: Once you have released the reset button, power on the router again by either pressing the power button or reconnecting the power supply. Allow the router to boot up, which may take a few moments.
By following these steps, you will have successfully reset your Netgear wireless router. Resetting the router will restore it to its original factory settings, removing any customized configurations or changes you have made. Now that the router has been reset, you can continue with the next step to configure your network settings and get your router up and running again.
Step 4: Wait for the Router to Reboot
After resetting your Netgear wireless router, it is essential to allow the device to fully reboot before proceeding with further configuration. This step ensures that the router’s settings are properly restored and that it is ready to be set up with your desired network settings. Follow these guidelines to ensure a smooth reboot process:
- 1. Observe the router’s lights: As the router reboots, pay attention to the lights on the device. They may initially blink or flash, indicating that the router is going through its startup process. Allow sufficient time for the lights to stabilize.
- 2. Patience is key: The reboot process may vary in duration depending on the specific model and your network setup. It typically takes a few minutes for the router to complete the reboot. Avoid interrupting this process by powering off or disconnecting the router.
- 3. Monitor the power light: Keep an eye on the power light of the router. Once the reboot process is complete, the power light should remain steady or display its usual behavior, indicating that the router is ready for configuration.
- 4. Verify internet connectivity: To ensure that the router has successfully rebooted and established a connection, check your internet connectivity. Attempt to access a website or perform a basic internet-related task on a device that is connected to the router. If you have restored the default settings, you may need to enter the default SSID and password provided by Netgear to establish a connection.
Allowing the router to fully reboot is crucial in ensuring its stability and readiness for further configuration. Once you have confirmed that the router has successfully rebooted and you have established a working internet connection, you can proceed to the next step to reconfigure your router settings as needed.
Step 5: Reconfigure the Router Settings
Now that your Netgear wireless router has been reset and rebooted, it’s time to reconfigure the device’s settings to get your network up and running again. Follow these instructions to set up your router with the desired configurations:
- 1. Access the router’s web interface: Open a web browser on a device connected to the router and enter the router’s default IP address in the address bar. The default IP address is typically “192.168.1.1” or “192.168.0.1”. Hit “Enter” to access the router’s web interface.
- 2. Login to the router: You will be prompted to enter a username and password to access the router’s settings. Use the default credentials provided by Netgear or the ones you previously configured if you have them. If you don’t remember the login details, consult the router’s manual or visit the Netgear support website for assistance.
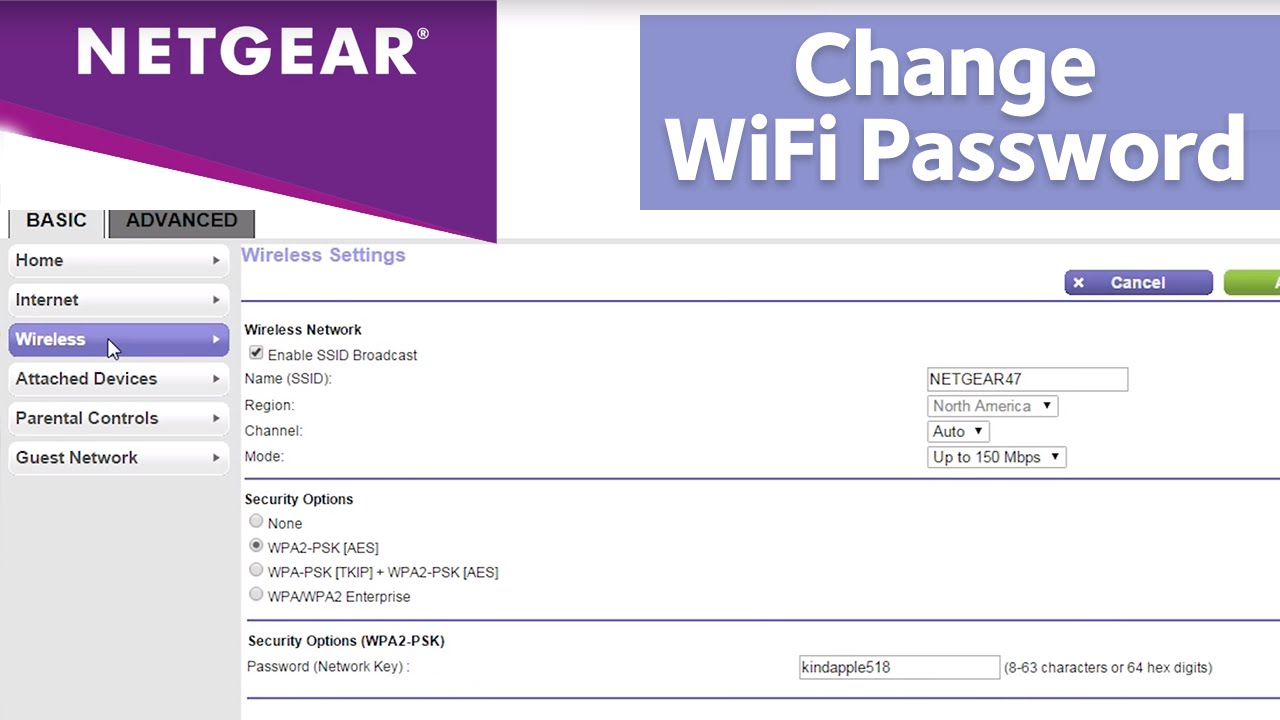
- 3. Customize your settings: Once logged into the router’s web interface, you can begin customizing the settings to suit your preferences. This includes setting up a new SSID (network name), establishing a secure password, configuring advanced network settings, and enabling any desired features or functions.
- 4. Save and apply the changes: After making the necessary adjustments to your router’s settings, be sure to save the changes by clicking on the “Save” or “Apply” button within the web interface. This will ensure that your updated settings take effect.
- 5. Test your network: To verify that your network is properly configured and functioning as intended, connect devices to the router and test internet connectivity. Open a web browser and navigate to different websites to ensure smooth browsing. If required, adjust the settings further to address any remaining issues.
By following these steps, you can reconfigure your Netgear wireless router with your desired network settings and ensure that your network is up and running as desired. Remember to save your new settings and periodically check for firmware updates from Netgear to keep your router secure and optimized.
Conclusion
Resetting a Netgear wireless router can be a valuable troubleshooting step when encountering network issues or when you need to restore the device to its default settings. In this guide, we have covered the step-by-step process to reset and reconfigure your Netgear router successfully.
We began by emphasizing the importance of preparing for the reset and gathering essential information about your router’s settings. We then guided you through locating the reset button on your router and explained how to initiate the reset process. After that, we discussed the need to wait for the router to reboot fully and recommended monitoring the router lights to ensure a successful reboot.
Lastly, we covered the reconfiguration process, including accessing the router’s web interface, logging in, and customizing the settings according to your preferences. We encouraged you to save the changes and test your network connectivity to ensure that everything is working as expected.
Resetting a Netgear wireless router can resolve many common network-related issues and provide a fresh start for your network configuration. However, it’s important to remember that performing a reset will erase any customized settings, so make sure to back up important information beforehand.
By following the steps outlined in this guide, you can confidently reset and reconfigure your Netgear wireless router, ensuring the optimal functionality and performance of your network. If you encounter any difficulties during the process, consult the router’s manual or reach out to Netgear’s customer support for further assistance.
Now that you have the knowledge to reset your Netgear wireless router, you can take control of your network and troubleshoot any issues that may arise, empowering you to enjoy seamless and reliable connectivity.