Introduction
Welcome to the world of PHP and MySQL! If you’re looking to build dynamic websites or web applications that involve storing data, then you’ve come to the right place. In this tutorial, we’ll be exploring the process of inserting data into a MySQL database using PHP.
MySQL is one of the most popular open-source relational database management systems, and PHP is a powerful server-side scripting language. Combining these two technologies allows you to create dynamic and interactive websites that can store, retrieve, and manipulate data efficiently.
Inserting data into a MySQL database is a fundamental operation in web development. It allows users to submit information through forms or applications and store that data for later use. Whether you’re creating a simple contact form or a complex e-commerce website, understanding how to insert data into a MySQL database using PHP is an essential skill.
In this tutorial, we will guide you through the step-by-step process of connecting to a MySQL database, creating a form to collect user input, validating the form data, and finally inserting the data into the database using PHP.
Throughout this tutorial, we will assume that you have a basic understanding of HTML, PHP, and MySQL. If you’re new to any of these technologies, don’t worry! We will explain the concepts in a beginner-friendly manner, providing code examples and explanations along the way.
So let’s dive in and discover the power of PHP and MySQL in storing data and building dynamic web applications!
Prerequisites
Before we begin, there are a few prerequisites you should have in order to follow along with this tutorial:
1. Basic knowledge of HTML: You should understand HTML tags, form elements, and how to create a basic HTML page.
2. Familiarity with PHP: Having a basic understanding of PHP syntax and how to write PHP code is necessary to grasp the concepts in this tutorial.
3. MySQL Database: You need access to a MySQL database server or a local development environment like XAMPP or WAMP that includes MySQL. If you haven’t set up a MySQL database yet, follow the instructions provided by your hosting provider or refer to the MySQL documentation for installation guidelines.
4. PHP installed: Ensure that you have a PHP environment installed on your server or local machine. You can download the latest version of PHP from the official PHP website and follow the installation instructions.
5. A text editor: You’ll need a text editor to write PHP code. You can use any text editor of your choice, such as Sublime Text, Visual Studio Code, or Notepad++.
6. Web browser: To test your PHP and MySQL code, you’ll need a web browser like Google Chrome, Mozilla Firefox, or Safari.
With these prerequisites in place, you’ll be ready to learn how to insert data into a MySQL database using PHP. Make sure to have a development environment set up and a basic understanding of HTML and PHP before proceeding to the next steps.
Now that we have the necessary foundations in place, let’s move on to connecting to a MySQL database using PHP.
Connecting to MySQL Database
Before we can insert data into a MySQL database, we need to establish a connection between our PHP script and the database. This connection allows us to send SQL queries to the database and retrieve or modify data as needed.
To connect to a MySQL database using PHP, we use the mysqli extension, which provides improved security and functionality compared to the older mysql extension.
Here are the steps to connect to a MySQL database in PHP:
Step 1: Set the Connection Parameters
First, we need to define the necessary parameters for our database connection. These parameters include the hostname, username, password, and database name. Here’s an example:
Make sure to replace your_username, your_password, and your_database with the appropriate values for your MySQL server.
Step 2: Create a Connection
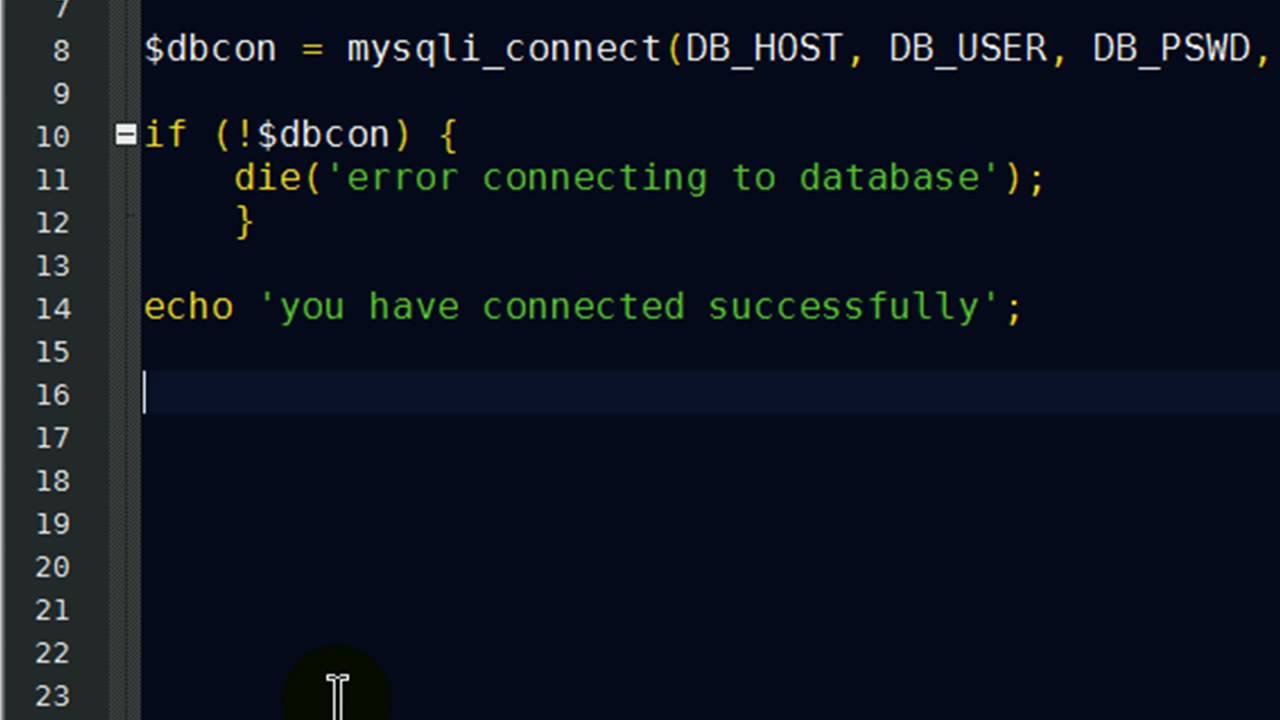
Next, we use the mysqli_connect() function to establish a connection to the MySQL database. Here’s an example:
In the above code, we attempt to connect to the database using the specified parameters. If the connection fails, the mysqli_connect_error() function will display an error message. You can customize the error message based on your preferences.
Note: It’s important to ensure that the credentials you provide are correct and have the necessary permissions to access the database.
Step 3: Close the Connection
Once we have finished working with the database, it’s good practice to close the connection using the mysqli_close() function. Here’s an example:
This step is not mandatory as the connection will close automatically at the end of the script. However, it’s a good practice to explicitly close the connection to release resources and free up memory.
Now that we know how to connect to a MySQL database using PHP, we can move on to creating a form to collect data from users.
Creating a Form for Data Input
Before we can insert data into a MySQL database, we need to collect the data from users. We can achieve this by creating an HTML form that prompts users to enter the required information.
Here are the steps to create a form for data input:
Step 1: HTML Form Structure
Start by creating an HTML form structure using the <form> tags. Inside the form, you can add form elements such as text fields, checkboxes, radio buttons, and dropdown menus to collect specific data.
Here’s an example of a basic form structure:
In the above code, we use the method="POST" attribute to specify that the form data will be sent via the HTTP POST method. The action="insert_data.php" attribute defines the URL where the form data will be submitted.
Step 2: Form Field Validation
It’s essential to validate user input to ensure that the data entered is in the desired format. For example, you can use HTML5 form validation attributes like required, pattern, or implement custom validation using JavaScript.
In the example above, we have used the required attribute to make the name and email fields mandatory. This means that the user must enter a value in these fields before submitting the form.
Step 3: Submitting the Form
When the user clicks the “Submit” button, the form data will be sent to the URL specified in the action attribute. In this case, it will be sent to the “insert_data.php” file.
Make sure to create the “insert_data.php” file to handle the form submission and insert the data into the MySQL database. We will cover this in the next section.
Now that we have a form in place, we can move on to the next step, which involves validating the form data before inserting it into the database using PHP.
Validating the Form Data
Before inserting the user-submitted data into a MySQL database, it’s crucial to validate the form data to ensure its accuracy and integrity. Validating the form data helps prevent errors, malicious inputs, and database inconsistencies.
Here are the steps to validate the form data:
Step 1: Handling Form Submission
In the file specified in the form’s action attribute, typically named “insert_data.php”, we need to handle the form submission. This is done by checking if the form has been submitted using the $_POST superglobal variable.
Here’s an example of how to handle form submission:
Step 2: Data Validation
Once the form is submitted, we need to validate each form field according to specific criteria. Common validation checks include checking for empty fields, validating email addresses, and ensuring the correct data format.
For example, we can use PHP’s built-in functions like empty(), filter_var(), or regular expressions to validate form data.
Here’s an example of validating the name and email fields:
In the above code, we check if the name and email fields are empty using empty(). If they are empty, we add an error message to the $errors array. We also use filter_var() with the FILTER_VALIDATE_EMAIL filter to ensure the email address is valid.
Step 3: Displaying Validation Errors
If any validation errors occur, we need to display them to the user. This helps them identify and correct any mistakes in the form.
We can iterate through the $errors array and display the error messages using a loop:
“;
foreach ($errors as $error) {
echo “
“;
}
echo “
“;
}
?>
In the above code, we check if the $errors array is not empty. If there are errors, we loop through the array and display each error message as a list item using HTML markup.
By following these steps, we can ensure that the form data is valid before proceeding to insert it into the MySQL database. In the next section, we will learn how to insert the validated data into the database using PHP.
Inserting Data into MySQL using PHP
Now that we have validated the form data, we can proceed to insert it into the MySQL database using PHP. Inserting data requires constructing an SQL query and executing it to store the data in the appropriate database table.
Here are the steps to insert data into MySQL using PHP:
Step 1: SQL Query Construction
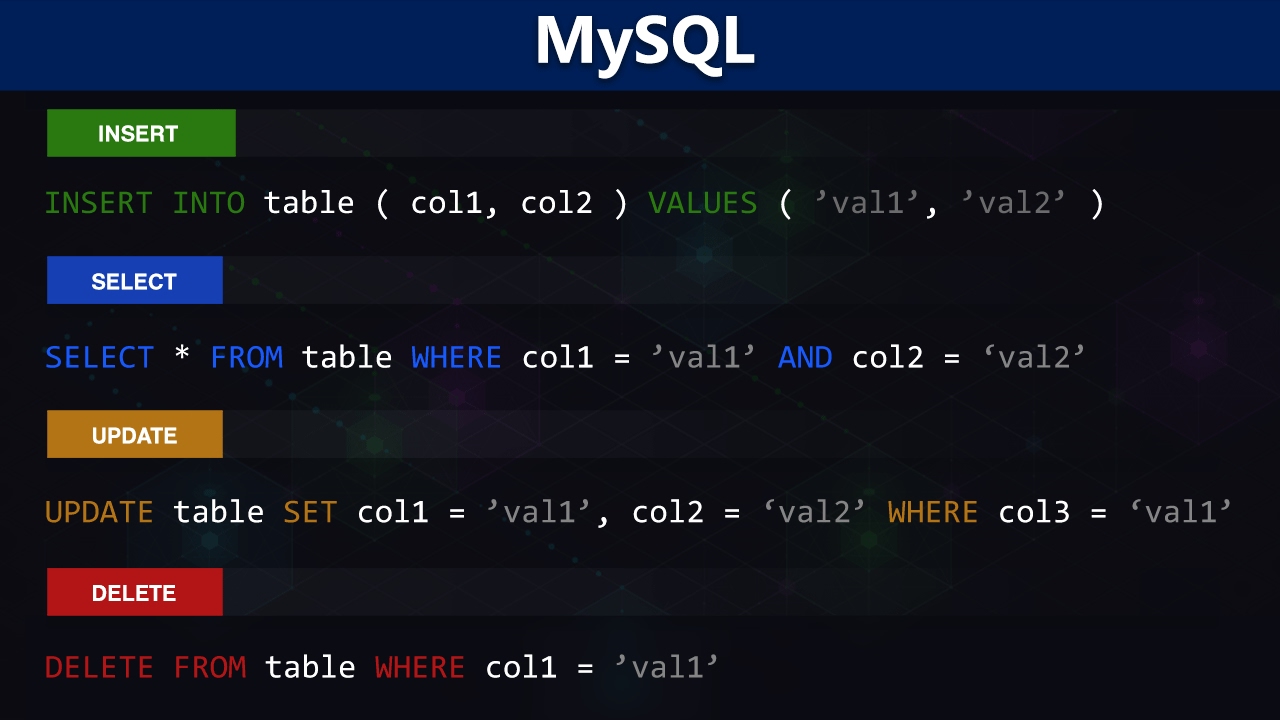
To insert data into a MySQL database, we use the INSERT INTO statement. This statement allows us to specify the table name and the columns into which the data will be inserted.
Here’s an example of an SQL query to insert data into a table:
In the above code, we define the variable $query and construct the SQL query to insert the data into the “users” table. We use the $_POST superglobal variable to retrieve the values from the form fields and insert them into the respective columns.
Note: It’s important to sanitize user input to prevent SQL injection attacks. In a production environment, you should use prepared statements or parameterized queries to secure your application.
Step 2: Executing the SQL Query
Once we have constructed the SQL query, we need to execute it using the appropriate PHP function. In this case, we will use the mysqli_query() function to execute the query.
Here’s an example of executing the SQL query:
In the above code, we use the mysqli_query() function to execute the query, passing in the database connection variable $conn and the query itself. If the query is successful, we display a success message. Otherwise, we display an error message along with the error details using mysqli_error().
And that’s it! The data from the form fields will be inserted into the MySQL database table.
In the next section, we will cover how to handle insertion errors and display appropriate messages to the user.
Handling Insertion Errors
During the process of inserting data into a MySQL database, errors may occur for various reasons, such as duplicate entries, exceeding field length limits, or database connection issues. It’s important to handle these errors gracefully and provide appropriate feedback to the user.
Here are the steps to handle insertion errors:
Step 1: Check for Errors
After executing the SQL query to insert data, we need to check if any errors have occurred. We can use the mysqli_error() function to check if an error message is returned by the database.
Here’s an example of how to check for errors:
php
if ($result) {
echo “Data inserted successfully.”;
} else {
echo “Error: ” . mysqli_error($conn);
}
In the above code, we assume that the execution of the SQL query is stored in the variable $result. If the execution is successful (i.e., no errors), we display a success message. Otherwise, we display the error message returned by the database.
Step 2: Provide User-Friendly Messages
Instead of simply displaying the error message returned by the database, it’s best practice to provide more user-friendly messages that explain the issue. This helps users understand what went wrong and how to resolve the problem.
For example, you can use conditional statements to handle specific errors and display custom error messages:
php
if ($result) {
echo “Data inserted successfully.”;
} else {
if (strpos(mysqli_error($conn), “Duplicate entry”) !== false) {
echo “This record already exists.”;
} elseif (strpos(mysqli_error($conn), “Data too long”) !== false) {
echo “Please check your input length.”;
} else {
echo “An error occurred. Please try again later.”;
}
}
In the above code, we check for specific error messages using the strpos() function. If the error message contains the specified keyword, we display a user-friendly error message corresponding to that specific error. If none of the conditions are met, a generic error message is displayed.
By providing user-friendly messages, you enhance the user experience and make it easier for them to understand and resolve any issues.
In the next section, we will summarize what we have learned and conclude our tutorial on inserting data into a MySQL database using PHP.
Conclusion
In this tutorial, we have learned how to insert data into a MySQL database using PHP. We covered the essential steps, from connecting to the database to validating form data, constructing SQL queries, and handling insertion errors.
By following this tutorial, you have gained the knowledge and skills to:
- Establish a connection to a MySQL database using PHP
- Create an HTML form to collect user input
- Validate form data to ensure its accuracy and integrity
- Construct SQL queries to insert data into a MySQL database
- Handle insertion errors gracefully and provide user-friendly messages
Remember to always sanitize user input and handle errors diligently to ensure the security and reliability of your applications.
With these foundations, you can now apply these concepts to build dynamic web applications that store and retrieve data from a MySQL database. From simple contact forms to complex e-commerce systems, the ability to insert data into a database is a fundamental skill for any web developer.
Continue practicing and exploring more advanced concepts, such as updating and deleting data, using prepared statements for secure database operations, and optimizing your database queries for better performance.
Thank you for following along with this tutorial, and best of luck with your PHP and MySQL endeavors!