Introduction
PHP My Admin is an incredibly useful tool for managing and administering MySQL databases. It is a web-based application written in PHP that provides a user-friendly interface for performing a wide range of tasks related to database management. Whether you are a seasoned web developer or a novice, PHP My Admin offers an intuitive and efficient way to interact with your databases.
With PHP My Admin, you can easily create, modify, and delete databases, tables, and fields, as well as execute SQL queries and manage user privileges. It simplifies the process of handling complex database operations, making it accessible for users with varying degrees of technical expertise.
One of the key advantages of PHP My Admin is its platform independence. As a web-based application, it can be accessed through any modern web browser, allowing you to manage your databases from anywhere with an internet connection. This flexibility makes it a valuable tool for website administrators and developers who need to work with databases remotely.
In this article, we will explore the features and functionalities of PHP My Admin, discuss how to install it, and provide tips on securing the application. We will also walk through the process of using PHP My Admin for common database management tasks and offer troubleshooting advice for potential issues you may encounter.
By the end of this article, you will have a solid understanding of PHP My Admin and be equipped with the knowledge to leverage its capabilities to efficiently manage your MySQL databases. So, let’s dive in and get started with this powerful tool!
What is PHP My Admin?
PHP My Admin is a free and open-source tool that allows you to conveniently manage and administer MySQL databases through a web-based interface. It was created to simplify the tasks involved in working with databases, making it accessible to users of all skill levels.
With PHP My Admin, you can perform a variety of database operations, including creating and dropping databases, creating and modifying tables and fields, inserting, updating, and deleting data, and executing SQL queries. It provides a visual and user-friendly interface that simplifies these operations, reducing the need for complex command-line interactions.
One of the standout features of PHP My Admin is its ability to interact with multiple MySQL servers simultaneously. This means you can manage databases across different servers from a single interface, making it a convenient choice for those working with large-scale applications or multiple projects.
Another advantage of PHP My Admin is its cross-platform compatibility. As a web-based tool, it can be accessed from any device with a web browser and an internet connection. This means you can manage your databases from your desktop, laptop, or even your mobile device, making it highly flexible and convenient for on-the-go database administration.
Furthermore, PHP My Admin provides extensive support for various MySQL features, including the ability to import and export databases, create complex queries using the Query Builder, manage user privileges and access control, and view detailed information about server status and performance.
The user interface of PHP My Admin is designed to be easy to navigate and intuitive, with a menu-based structure and icons that represent different functions. This makes it simple for even beginners to quickly grasp the basics and start managing their databases effectively.
Overall, PHP My Admin is a powerful tool that simplifies the management and administration of MySQL databases. Its user-friendly interface, cross-platform compatibility, and extensive feature set make it a popular choice among web developers, database administrators, and anyone involved in managing MySQL databases.
Features of PHP My Admin
PHP My Admin offers a wide range of features and functionalities that make it a valuable tool for managing and administering MySQL databases. Let’s explore some of its key features:
1. Intuitive Interface: PHP My Admin provides a user-friendly interface with a menu-driven structure and icons that represent different functions. This ensures that users can easily navigate the application and quickly access the desired features.
2. Database Creation and Management: With PHP My Admin, you can create and manage multiple databases effortlessly. You can easily create, delete, and rename databases, as well as modify their properties and configuration settings.
3. Table and Field Management: PHP My Admin allows you to create and modify tables within your databases. You can add, delete, and modify table columns, set primary keys, define relationships between tables, and manage table indexes and constraints.
4. Data Manipulation: You can easily insert, update, and delete data from your database tables using PHP My Admin. The interface provides intuitive forms for entering data and performing database operations, making it simple for users to work with their data.
5. SQL Query Execution: PHP My Admin enables you to execute SQL queries directly within the application. This feature is particularly useful for advanced users who want to run complex queries or perform specific database operations that are not supported by the graphical interface.
6. Import and Export: PHP My Admin allows you to import and export data and entire databases in various formats, including SQL, CSV, and XML. This feature is helpful when migrating databases, backing up data, or exchanging data with other systems.
7. User Management: PHP My Admin provides robust user management capabilities, allowing you to create, modify, and delete user accounts with specific privileges and access control. You can define user permissions at the database, table, or even column level, ensuring secure and granular data access.
8. Server Monitoring: PHP My Admin offers a comprehensive interface for monitoring the status and performance of your MySQL server. You can view information on server variables, running processes, server logs, and analyze server performance charts to optimize your database operations.
Overall, the extensive features and functionalities of PHP My Admin make it an indispensable tool for anyone working with MySQL databases. It streamlines the management process, empowers users with efficient data manipulation capabilities, and ensures the security and performance of your database operations.
How to Install PHP My Admin
Installing PHP My Admin is a straightforward process, and it can be done by following these simple steps:
1. Check Requirements: Before installing PHP My Admin, make sure your web server meets the minimum requirements. You will need a web server (such as Apache or Nginx) with PHP support, and a MySQL server installed and running.
2. Download PHP My Admin: Visit the official PHP My Admin website (https://www.phpmyadmin.net/) and download the latest stable release. You can choose from different compression formats, such as tar.gz or zip, depending on your preference and server environment.
3. Extract the Files: Once the download is complete, extract the files from the compressed archive to a directory on your web server. Ensure that the directory is accessible by the web server.
4. Configuration File: Rename the “config.sample.inc.php” file to “config.inc.php” and open it in a text editor. Edit the file and provide the necessary configuration details for your MySQL server, such as the hostname, username, and password. Save the changes.
5. Security Configuration (Optional): For enhanced security, you can configure a blowfish secret key within the “config.inc.php” file. This key is used to encrypt sensitive data in cookies. Generate a blowfish secret by visiting the PHP My Admin website (https://www.phpmyadmin.net/home_page/security/secret_key/) and follow the instructions provided. Insert the generated key in the config file.
6. Access PHP My Admin: Open a web browser and enter the URL of your PHP My Admin installation, like “http://localhost/phpmyadmin”. You will be directed to the PHP My Admin login page. Enter the username and password configured in the “config.inc.php” file.
7. Start Managing Databases: Once logged in, you will have access to the PHP My Admin interface. From here, you can start managing your MySQL databases, create new ones, modify tables, import and export data, and perform various other database operations.
It is important to note that proper security measures should be taken when installing PHP My Admin. Ensure that your server is protected with strong passwords, firewall rules, and regular software updates. It is also recommended to restrict access to the PHP My Admin interface to authorized users only.
By following these steps, you can easily install PHP My Admin and start leveraging its powerful features for efficient and convenient database management.
How to Secure PHP My Admin
Securing your PHP My Admin installation is crucial to protect your databases and ensure the integrity of your data. Here are some essential steps to enhance the security of PHP My Admin:
1. Change Default Username: PHP My Admin typically uses the “root” username by default. It’s important to change this default username to something unique to prevent potential unauthorized access. Create a new user specifically for PHP My Admin and grant it the necessary privileges.
2. Strong Passwords: Choose a strong and complex password for the PHP My Admin user account. Include a combination of uppercase and lowercase letters, numbers, and special characters. Avoid using easily guessable passwords or reusing passwords from other accounts.
3. Remove or Restrict Access: Remove any unnecessary or unused files, directories, or scripts related to PHP My Admin. Restrict access to the PHP My Admin interface by allowing only specific IP addresses or IP ranges to access it. This can be done through your web server configuration or a firewall.
4. Enable SSL/HTTPS: Secure the communication between the client and the PHP My Admin server by enabling SSL encryption (HTTPS). This helps protect sensitive information, such as login credentials, from being intercepted by malicious users. Install an SSL certificate and configure your web server to use HTTPS.
5. Enable Two-Factor Authentication (2FA): Implement an additional layer of security by enabling two-factor authentication for PHP My Admin. This requires users to provide a second form of authentication, such as a time-based one-time password (TOTP) generated by a mobile app, in addition to their username and password.
6. Regular Updates: Keep your PHP My Admin installation up to date with the latest version. Updates often include security patches that address vulnerabilities identified in previous versions. Regularly check for updates and apply them promptly to ensure you have the most secure version of PHP My Admin.
7. Disable Directories Browsing: Prevent the browsing of directories within your PHP My Admin installation to minimize the risk of exposing sensitive files or configurations. Disable directory listings in your web server configuration to prevent unauthorized access.
8. Logging and Monitoring: Enable logging in PHP My Admin to record any unusual or suspicious activities. Regularly review the logs to detect any suspicious login attempts, SQL injection attempts, or other potential security breaches. Set up monitoring and alerting systems to notify you of any suspicious activity.
By following these security measures, you can significantly enhance the protection of your PHP My Admin installation and ensure the safety and confidentiality of your databases and data. Remember that maintaining the security of PHP My Admin requires ongoing vigilance and regular updates to address emerging security threats.
Using PHP My Admin for Database Management
PHP My Admin offers a user-friendly interface that simplifies the process of managing and administering MySQL databases. Let’s explore how you can effectively use PHP My Admin for various database management tasks:
1. Creating Databases and Tables: PHP My Admin allows you to create new databases and tables effortlessly. Through the intuitive interface, you can specify the database schema, define table columns, and set primary keys and constraints.
2. Inserting and Modifying Data: PHP My Admin simplifies the process of inserting and modifying data in your tables. You can easily add new rows of data, update existing data, and delete records as needed. The graphical interface provides form-based data entry and editing, making it accessible to users of all skill levels.
3. Executing SQL Queries: For advanced users, PHP My Admin allows you to execute SQL queries directly. The “SQL” tab in the interface provides a text editor where you can write and execute custom SQL statements. This feature is particularly useful for complex queries or when you need to perform operations not supported by the graphical interface.
4. Importing and Exporting Data: PHP My Admin offers the ability to import and export data and entire databases in various formats. You can import data from CSV, SQL, or XML files into your tables. Similarly, you can export data in these formats, making it easier to migrate databases or exchange data with other systems.
5. Query Building: PHP My Admin includes a Query Builder tool that enables you to create complex SQL queries using a graphical interface. This feature allows you to visually build queries by selecting tables, columns, and conditions, which is especially useful for users who are not proficient in writing SQL queries.
6. User Management and Access Control: PHP My Admin provides robust user management capabilities. You can create new user accounts, modify existing ones, and assign specific privileges and permissions at the database, table, or column level. This ensures secure and granular access to your data.
7. Server Monitoring and Maintenance: PHP My Admin offers tools for monitoring the status and performance of your MySQL server. You can view information about server variables, running processes, server logs, and analyze performance charts. This helps optimize your database operations and ensures the smooth functioning of your server.
8. Database Maintenance Tasks: PHP My Admin simplifies common database maintenance tasks, such as optimizing tables, repairing corrupted tables, and performing backups. These tasks can be easily initiated through the interface, allowing you to efficiently manage the health and performance of your databases.
PHP My Admin’s comprehensive set of features and intuitive interface make it an invaluable tool for managing MySQL databases. By leveraging its capabilities, you can perform a wide range of tasks efficiently and effectively, empowering you to focus on developing and maintaining robust database-driven applications.
Understanding the Interface of PHP My Admin
The interface of PHP My Admin is designed to be user-friendly and intuitive, allowing users to easily navigate and perform various tasks related to database management. Let’s take a closer look at the different components of the PHP My Admin interface:
1. Navigation Panel: The left-hand side of the interface contains the navigation panel, which displays the database structure. It shows the list of databases and the tables within each database. You can expand or collapse the treeview to navigate through the database structure.
2. Menu Bar and Toolbar: The menu bar at the top of the interface provides access to various functions and features of PHP My Admin. It includes options for managing databases, tables, executing SQL queries, importing and exporting data, and more. The toolbar below the menu bar offers quick access to commonly used functions.
3. Main Workspace: The main workspace of PHP My Admin is the central area where the different database management tasks are performed. It displays the content related to the selected database or table, including the data, structure, and configuration options. The workspace is divided into tabs that allow you to switch between different views.
4. Structure View: When you choose a specific table in the navigation panel, the structure view displays the details of that table. It provides an overview of the table structure, including the column names, data types, and constraints. You can also modify the structure of the table from this view.
5. Data View: The data view presents the actual data stored in the selected table. It displays the rows and columns, allowing you to easily view and edit the data. You can insert new rows, update existing data, and delete rows directly from this view.
6. SQL View: The SQL view allows you to write and execute custom SQL queries directly within PHP My Admin. It provides a text editor where you can enter SQL statements. This view is particularly useful for advanced users who want to perform complex database operations or execute specific queries.
7. Configuration and Settings: PHP My Admin provides settings and configuration options that can be accessed from the menu bar. This allows you to customize the behavior and appearance of the application according to your preferences. You can configure various aspects such as language, display options, import/export settings, and more.
Overall, the interface of PHP My Admin is designed to streamline the process of managing databases. By familiarizing yourself with the navigation panel, menu bar, and different views of the main workspace, you can navigate through your databases, perform database operations, and customize the behavior of PHP My Admin to suit your needs.
Common Tasks in PHP My Admin
PHP My Admin provides a user-friendly interface that streamlines common tasks involved in managing MySQL databases. Let’s explore some of the most frequently performed tasks in PHP My Admin:
1. Creating Databases: With PHP My Admin, you can easily create new databases. Simply navigate to the “Database” section, enter a name for the database, and select the desired collation. Click “Create” to create the database.
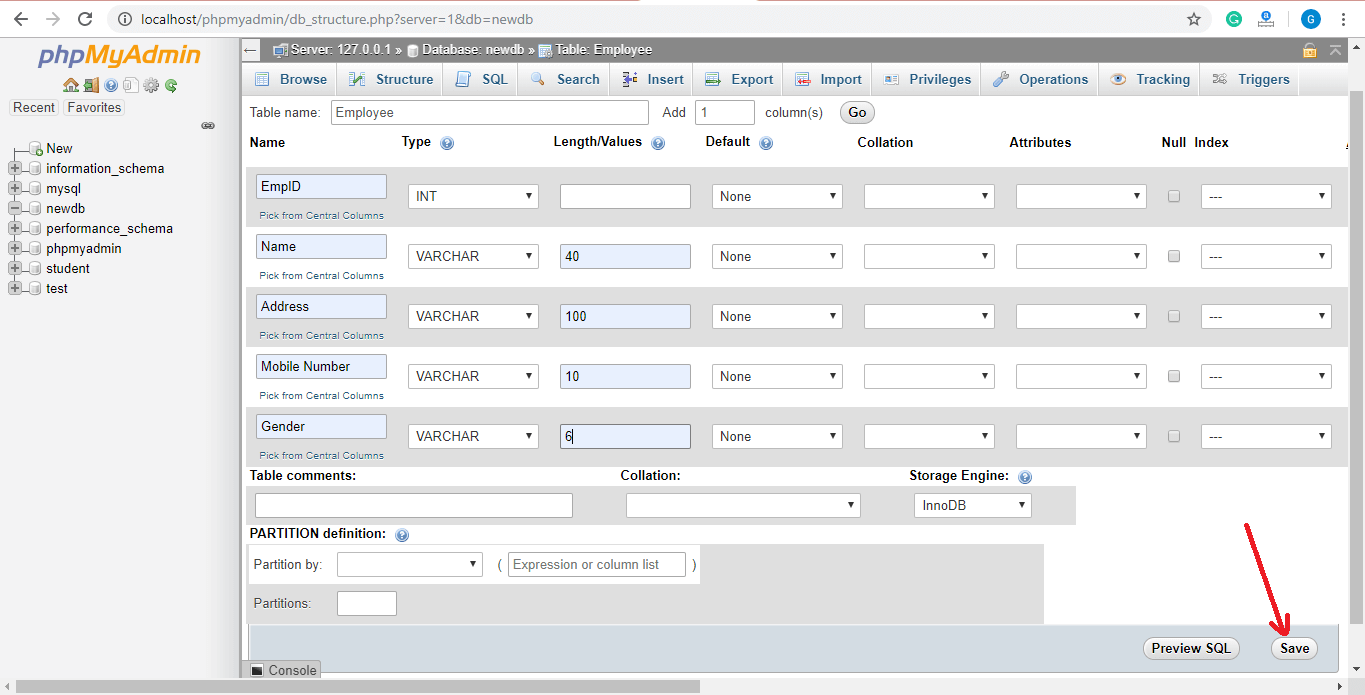
2. Creating Tables: PHP My Admin allows you to create tables within your databases. Navigate to the desired database, click on the “Structure” tab, and select “Create Table.” Enter the table name and specify the columns, data types, and constraints. Click “Save” to create the table.
3. Inserting Data: To insert data into a table, select the desired table and go to the “Insert” tab. Fill in the values for each column in the form provided and click “Go” to insert the data into the table.
4. Modifying Data: PHP My Admin allows you to modify existing data in your tables. Go to the “Browse” tab, select the table containing the data you want to modify, and click the “Edit” button for the respective row. Update the values and click “Go” to save the changes.
5. Executing SQL Queries: PHP My Admin enables you to execute custom SQL queries right from the interface. Simply switch to the “SQL” tab and enter your SQL query in the text editor. Click “Go” to execute the query and view the results.
6. Importing and Exporting Data: PHP My Admin offers the ability to import and export data in various formats. To import data, go to the “Import” tab, select the file from your local system, and choose the appropriate import settings. To export data, go to the “Export” tab, select the desired format, tables, and settings, and click “Go.”
7. Managing User Privileges: PHP My Admin allows you to manage user privileges and access control. Go to the “Users” section and click on the desired user. Here, you can grant or revoke privileges specific to databases, tables, or even columns. Click “Go” to save the changes.
8. Optimizing and Repairing Tables: PHP My Admin provides options to optimize and repair your database tables. Navigate to the “Operations” tab for the desired table and select the respective operation. Optimization helps improve table performance, while repair fixes potential table corruption issues.
These are just a few of the common tasks you can perform in PHP My Admin. Its user-friendly interface makes it easy to navigate and execute various database management operations, allowing you to efficiently manage your MySQL databases and streamline your workflow.
Troubleshooting Common Issues in PHP My Admin
While PHP My Admin is a powerful tool for managing MySQL databases, there may be situations where you encounter certain issues or errors. Let’s explore some common problems you may face when using PHP My Admin and how to troubleshoot them:
1. Login Issues: If you are unable to log in to PHP My Admin, double-check the username and password you are using. Make sure they are correct and properly configured in the “config.inc.php” file. If you have forgotten your password, you can reset it using the appropriate MySQL commands or through your hosting control panel.
2. Connection Problems: If PHP My Admin is unable to connect to the MySQL server, ensure that the server is running and accessible. Verify the server settings in the “config.inc.php” file, such as the hostname, port, and login credentials. Check that your firewall settings allow connections to the MySQL server.
3. Permissions Denied: If you encounter “access denied” or permission-related errors, verify that you have the necessary privileges to perform the desired actions. Check the user privileges configured in PHP My Admin and ensure they have sufficient permissions to access databases, execute queries, and modify tables.
4. Compatibility Issues: PHP My Admin versions may have compatibility issues with certain web servers or PHP versions. Ensure that you are using a PHP My Admin version that is compatible with your environment. You may need to upgrade or downgrade PHP My Admin or update your PHP installation to resolve compatibility problems.
5. Database Connection Errors: If you are unable to establish a connection to a specific database, confirm that the database exists and that the database name is correctly configured in PHP My Admin. Check the database user credentials and make sure they have the necessary permissions to access the database.
6. Slow Performance: If PHP My Admin is exhibiting slow performance, ensure that your server has sufficient resources, such as memory and CPU. Optimize your MySQL server configuration settings to improve performance. Consider using caching mechanisms and query optimization techniques to enhance PHP My Admin’s responsiveness.
7. Missing Features: In some cases, certain features or functions may not be available in your PHP My Admin installation. Ensure that you are using the latest version of PHP My Admin and that all its dependencies are properly installed. Check the configuration settings in the “config.inc.php” file to ensure that the desired features are enabled.
8. Error Messages: Pay attention to error messages displayed by PHP My Admin. They often provide valuable information about the issue at hand. Search for the error message online or refer to the PHP My Admin documentation to find possible causes and solutions.
When troubleshooting issues in PHP My Admin, it can be helpful to consult online forums, user communities, or official documentation for guidance. Always make sure to backup your databases before making any configuration changes or attempting fixes to avoid data loss.
By effectively troubleshooting and resolving common issues in PHP My Admin, you can ensure a smooth and efficient experience while managing your MySQL databases.
Conclusion
PHP My Admin is a powerful and user-friendly tool for managing and administering MySQL databases. With its intuitive interface, you can easily create databases, tables, and fields, insert and modify data, execute SQL queries, and perform various other database management tasks.
Throughout this article, we covered the key aspects of PHP My Admin, including its features, installation process, security considerations, and common tasks. We explored how to navigate the interface, troubleshoot common issues, and leverage its capabilities to efficiently manage databases.
By using PHP My Admin, you can simplify the process of database management and ensure the smooth functioning of your MySQL databases. It provides a comprehensive set of features, such as data import and export, user management, and server monitoring, that empower you to effectively maintain and optimize your databases.
However, it is important to consider security when using PHP My Admin. Implement best practices such as using strong passwords, restricting access, enabling SSL encryption, and regularly updating the software to ensure the protection of your databases and data.
With its cross-platform compatibility and user-friendly interface, PHP My Admin has become a popular choice among web developers, database administrators, and individuals involved in managing MySQL databases. It offers a convenient and accessible way to interact with databases, streamlining tasks and empowering users to focus on their core objectives.
In conclusion, PHP My Admin is a valuable tool that simplifies the management and administration of MySQL databases. By following the guidelines and best practices outlined in this article, you can leverage PHP My Admin’s capabilities to effectively manage your databases and ensure the security and integrity of your data. Embrace the power of PHP My Admin and unlock the potential of your MySQL databases.