Introduction
Welcome to the world of content management systems (CMS)! In today’s digital age, having a dynamic and customizable website is crucial for businesses and individuals alike. A CMS allows you to create, edit, and manage your website’s content without the need for technical expertise. While there are numerous CMS platforms available, building your own CMS can provide you with the flexibility and control you desire.
In this article, we will guide you through the process of creating your own CMS using PHP. PHP is a powerful server-side scripting language widely used for web development. By leveraging PHP, you can develop a custom CMS tailored to your specific requirements.
Before diving into the nitty-gritty details, it’s important to have a basic understanding of HTML, CSS, and PHP. Familiarity with these languages will make the development process smoother and help you make the most of this tutorial.
In the following sections, we will cover everything you need to know to successfully build your own CMS. From setting up your development environment to creating the necessary database structure and implementing essential functionalities such as user registration, login, and content management, we’ve got you covered.
By the end of this guide, you’ll have a fully functional CMS that allows you to create, edit, and publish content on your website effortlessly. So, let’s get started and unlock the power of creating your very own CMS using PHP!
Prerequisites
Before you embark on the journey of creating your own CMS in PHP, there are a few essential prerequisites that you need to have in place. Ensuring you have these tools and knowledge will help you navigate through the development process smoothly and effectively.
Here are the prerequisites:
- Web Server: You need a local web server environment installed on your computer. Popular options include XAMPP, WAMP, or MAMP, which provide you with a package containing Apache, MySQL, and PHP, making it easy to set up.
- Text Editor or Integrated Development Environment (IDE): Choose a text editor or an IDE that you’re comfortable with. Some popular choices are Visual Studio Code, Sublime Text, or PhpStorm. These tools will make it easier to write and manage your PHP code.
- Basic Knowledge of HTML and CSS: HTML and CSS are the building blocks of web pages. Having a solid understanding of these languages allows you to structure and style your website’s content. If you’re new to HTML and CSS, consider going through beginner tutorials or online courses to familiarize yourself with the fundamentals.
- Understanding of PHP: As we’ll be creating our CMS using PHP, you should have a good understanding of PHP concepts such as variables, control structures, functions, and object-oriented programming (OOP) if you prefer an OOP approach.
- Knowledge of MySQL: MySQL is a popular database management system commonly used with PHP. It’s essential to have a basic understanding of database concepts, such as creating tables, managing data, and executing SQL queries, to interact with the CMS’s database.
Keep in mind that while prior experience in these areas is helpful, this tutorial will provide step-by-step guidance to help you build your CMS from scratch. As long as you’re motivated and willing to learn, you’ll be able to create your own CMS in no time!
Step 1: Setting Up Environment
To begin creating your own CMS in PHP, the first step is setting up your development environment. This involves installing a local web server on your computer, which will serve as the platform for hosting and running your PHP code.
Follow these steps to set up your environment:
- Choose a Local Web Server: Select a local web server software such as XAMPP, WAMP, or MAMP, depending on your operating system. These software packages provide a bundled solution that includes Apache, MySQL, and PHP, making it easy to install and configure.
- Download and Install: Go to the official website of your chosen local server software and download the installation package compatible with your operating system. Follow the installation instructions provided by the software to complete the setup.
- Start the Web Server: Once the installation is complete, start the local web server from the control panel provided by the software. This will start the Apache server, MySQL database, and PHP engine.
- Test the Server: To ensure the web server is functioning correctly, open a web browser and enter “localhost” or “127.0.0.1” as the URL. If you see the default web server page, it means the server is up and running successfully.
- Set Up Document Root: Now, you need to set up the document root directory where your PHP files will be stored. By default, this directory is “htdocs” for XAMPP and “www” for WAMP and MAMP. You can find the location of the document root in the server configuration file or control panel.
- Create a Test PHP File: To verify that PHP is working correctly, create a new file in the document root directory with a .php extension. For example, create a file named “test.php” and add the following code:
<?php
    echo "Hello, World!";
    ?>
Save the file and access it through a web browser by entering “localhost/test.php” in the URL bar. If you see the text “Hello, World!” on the page, it indicates that PHP is working properly.
Setting up your development environment is a crucial first step in creating your own CMS. Once you have a functional local web server, you’re ready to move on to the next steps in building your CMS.
Step 2: Creating Database
In order to store and manage the content of your CMS, you need to create a database that will hold all the necessary information. Creating a database allows you to organize your data efficiently and query it as needed.
Follow these steps to create your database:
- Access phpMyAdmin: phpMyAdmin is a web-based database management tool that is often bundled with local web server software like XAMPP, WAMP, or MAMP. Open your preferred web browser and enter “localhost/phpmyadmin” in the URL bar to access the phpMyAdmin interface.
- Login: Login to phpMyAdmin using the username and password associated with your local server. If you’re using default settings, the username is likely “root” and the password is empty.
- Create a New Database: Once logged in, locate the “Databases” tab at the top of the page. Click on it to open the database creation form. Enter a name for your database in the designated field. Choose a meaningful name that relates to your CMS.
- Set Character Set: Select the appropriate character set and collation for your database. The default settings usually work fine, but it’s recommended to use UTF-8 as the character set to support international characters.
- Create Database: After specifying the database name and character set, click the “Create” button to create the database. phpMyAdmin will display a success message indicating that the database has been created.
With the database creation completed, you now have a dedicated space to store and manage your CMS’s data. This includes user information, content, and any other relevant data for your website.
Remember to note down the database name as you’ll need it later when establishing the connection between your PHP code and the database.
Now that you have created the essential foundation for your CMS, it’s time to move on to the next step: creating the file structure to organize your PHP files effectively.
Step 3: Creating File Structure
Creating a well-organized file structure is crucial for managing your CMS’s code and resources effectively. A structured file system will make it easier to locate files, navigate through your codebase, and ensure a maintainable and scalable CMS.
Follow these steps to create a logical file structure for your CMS:
- Create a Root Directory: Start by creating a directory that will serve as the root of your CMS. Choose a location within your local web server’s document root directory. For example, if you’re using XAMPP, the root directory could be “htdocs/your-cms”.
- Subdirectories: Within the root directory, create subdirectories to organize different components of your CMS. Some common subdirectories include “src” for PHP source code, “css” for stylesheets, “js” for JavaScript files, and “images” for image assets.
- Index File: In the root directory, create an index file (e.g., index.php) that will serve as the entry point for your CMS. This file will handle the requests and direct the user to the appropriate pages based on the requested URLs.
- Include Files: Create an “includes” directory within the root directory to store PHP files that contain reusable code. These files can include configurations, database connections, utility functions, and other commonly used code snippets.
- Page Templates: Create a directory to store your CMS’s page templates or layouts. These templates will define the structure and styling of different sections of your website. Consider creating separate directories for header, footer, sidebar, and content templates to keep things organized.
- Admin Panel: If your CMS includes an admin panel, create a specific directory to house all the files related to it. This includes files for user management, content creation, and other administrative tasks.
- User Authentication: If your CMS requires user authentication, create a directory to handle user registration, login, and account management functionality. This directory can also include password reset or recovery modules, if needed.
- Content Management: Create a directory to handle content management functionality, such as creating, editing, and deleting website content. This directory can further contain subdirectories specific to different types of content, such as articles, blog posts, or media uploads.
Organizing your CMS files into a logical structure will make it easier to maintain and extend your codebase. It will also help other developers understand your CMS’s structure and collaborate more effectively, if needed.
With the file structure in place, you can now proceed to the next step: setting up the configuration file to manage important settings for your CMS.
Step 4: Setting Up Configuration File
Setting up a configuration file is essential for managing important settings and variables for your CMS. This file will centralize all the configurations, making it easier to modify and maintain settings without directly modifying the core code.
Follow these steps to set up your configuration file:
- Create a Configuration File: In the “includes” directory, create a file named “config.php” or any preferred name with a .php extension. This file will hold all the necessary configurations for your CMS.
- Define Database Credentials: In the configuration file, define the credentials required to establish a connection with your database. This includes variables for the database host, username, password, and database name. For example:
define('DB_HOST', 'localhost');
define('DB_USER', 'your-username');
define('DB_PASS', 'your-password');
define('DB_NAME', 'your-database-name');
Replace “your-username,” “your-password,” and “your-database-name” with the actual credentials specific to your database.
- Other Configurations: Depending on your CMS’s requirements, define additional configurations in the configuration file. This may include settings for website title, email notifications, maximum upload file size, and any other relevant settings.
- Include Configuration File: In any PHP file that requires access to the configurations, include the configuration file using the PHP “require_once” or “include_once” statement. This ensures that the necessary configurations are available throughout your CMS.
By centralizing your CMS’s configurations in a dedicated file, you have more control over the settings and can easily modify them without the need to search through multiple files. This also enhances the security of sensitive information, such as database credentials, by keeping them separate from the core code.
Now that you have set up the configuration file, you can move on to the next step: creating a database connection to interact with your database using PHP.
Step 5: Creating Database Connection
In order to interact with your database and retrieve or store data, you need to establish a connection between your PHP code and the database. This connection allows you to perform various database operations such as querying, inserting, updating, and deleting data.
Follow these steps to create a database connection:
- Open Database Connection File: In the “includes” directory, create a file named “db_connection.php” or any preferred name with a .php extension. This file will handle the database connection and provide functions to interact with the database.
- Include Configuration File: In the database connection file, include the configuration file we created in the previous step using the PHP “require_once” or “include_once” statement. This ensures that the database credentials are accessible in the connection file.
- Create Database Connection: Inside the database connection file, use PHP’s mysqli extension or PDO (PHP Data Objects) to establish a connection with the database. Here’s an example using mysqli:
$connection = mysqli_connect(DB_HOST, DB_USER, DB_PASS, DB_NAME);
if(!$connection) {
    die("Database connection failed: " . mysqli_connect_error());
}
Replace the constants DB_HOST, DB_USER, DB_PASS, and DB_NAME with the actual values from your configuration file.
- Handle Connection Error: After establishing the database connection, it’s important to handle any connection errors gracefully. In the example above, the die() function is used to display an error message if the connection fails.
- Close Database Connection: It’s good practice to close the database connection when you’re done using it. This helps free up resources and prevents potential security vulnerabilities. Use the following code to close the connection:
mysqli_close($connection);Place this code at the end of your PHP file or when you’re finished executing database queries.
With the database connection created, you can now start performing database operations to store and retrieve data for your CMS. This connection will be used throughout your CMS to interact with the database.
In the next step, we will focus on creating an admin panel to manage the CMS and its functionalities.
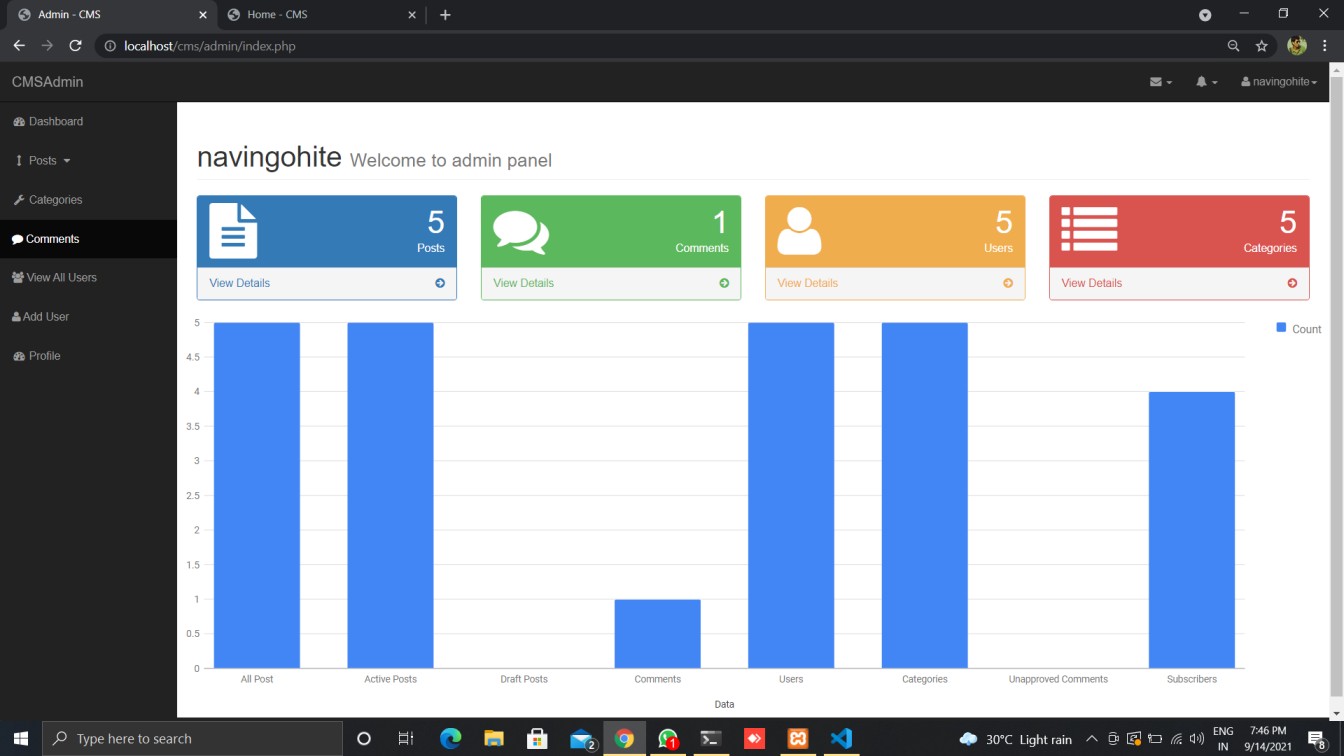
Step 6: Creating Admin Panel
The admin panel is the backbone of your CMS, allowing you to manage and control various aspects of your website. It provides an easy-to-use interface for administrators to create, edit, and delete content, manage users, and perform other administrative tasks.
Follow these steps to create the admin panel for your CMS:
- Create a New Directory: In the root directory of your CMS, create a new directory named “admin” or any preferred name to house all the files related to the admin panel.
- Design Admin Panel Interface: Design the interface of the admin panel, including navigation menus, forms, and other elements, using HTML and CSS. Consider using a responsive design to ensure the admin panel is accessible and functional across different devices.
- Create Admin Dashboard: Within the admin directory, create a PHP file named “dashboard.php” or any preferred name. This file will serve as the main landing page for the admin panel. Include the necessary HTML and PHP code to display the dashboard interface.
- Implement User Authentication: Create the functionality for user authentication, including registration, login, and logout. Store user information in the database, encrypt passwords, and validate login credentials. Implement sessions or tokens to track logged-in users and restrict access to admin pages.
- Create Admin Navigation: Design and implement the navigation menu for the admin panel, allowing administrators to navigate between different sections and features of the CMS. Make sure to include links to manage content, users, settings, and any other relevant sections.
- Implement Content Management: Create the necessary functionality to manage content within the admin panel. This includes creating, editing, and deleting content such as articles, blog posts, or pages. Develop forms to input and update content, and implement the logic to save changes to the database.
- Manage Users: Implement features to manage users within the admin panel. This includes the ability to view, create, edit, and delete user accounts. Implement forms for user registration, user profiles, and user role assignment.
- Enhance Security: Implement security measures like input validation, password encryption, and ensuring proper access controls. Protect against common web vulnerabilities such as SQL injection and cross-site scripting (XSS) attacks.
- Test and Refine: Thoroughly test the functionality of the admin panel, checking for any bugs or errors. Seek user feedback, both from administrators and end-users, to make improvements and refine the user experience.
The admin panel is a critical component of your CMS, enabling you to manage and update your website efficiently. By implementing the necessary features and maintaining a user-friendly interface, you can streamline content creation and user management within your CMS.
Next, we will move on to creating user registration and login functionality for your CMS.
Step 7: Creating User Registration and Login
User registration and login functionality are crucial aspects of any CMS, as they allow individuals to create accounts and access restricted areas of the website. In this step, we will focus on creating a user registration and login system for your CMS.
Follow these steps to implement user registration and login:
- Create User Registration Form: Design and develop a user registration form using HTML and CSS. Include fields for username, email address, password, and any other relevant information. Validate user inputs to ensure data integrity and security.
- Handle User Registration: Process the user registration form submission using PHP. Validate user inputs, such as checking for unique usernames and valid email addresses. Hash the password using a secure hashing algorithm, and store the user information in the database.
- Create User Login Form: Design and develop a user login form where users can enter their credentials to access the restricted areas of the website. Include fields for username or email address and password.
- Handle User Login: Process the user login form submission using PHP. Validate the user’s credentials against the information stored in the database. Set session variables or tokens to track the user’s login status and grant access to restricted areas.
- Implement Password Reset: Provide a password reset functionality using email validation. Allow users to request a password reset link, which will be sent to their registered email address. Generate a unique token to validate the reset request, and provide a form to set a new password.
- Secure User Authentication: Implement security measures to protect user accounts. This includes encrypting passwords using a strong hashing algorithm, enforcing password complexity guidelines, implementing secure session handling, and protecting against brute-force attacks.
- Provide User Feedback: Display meaningful feedback to users during the registration and login processes. Inform them about invalid credentials, successful registrations, or any errors that may occur.
By implementing user registration and login functionality, you allow users to create accounts, access personalized content, and interact with your CMS. User authentication not only enhances the security of your CMS but also opens up opportunities for user-specific features and personalization.
With user registration and login in place, we can move on to the next step: creating content management functionality for your CMS.
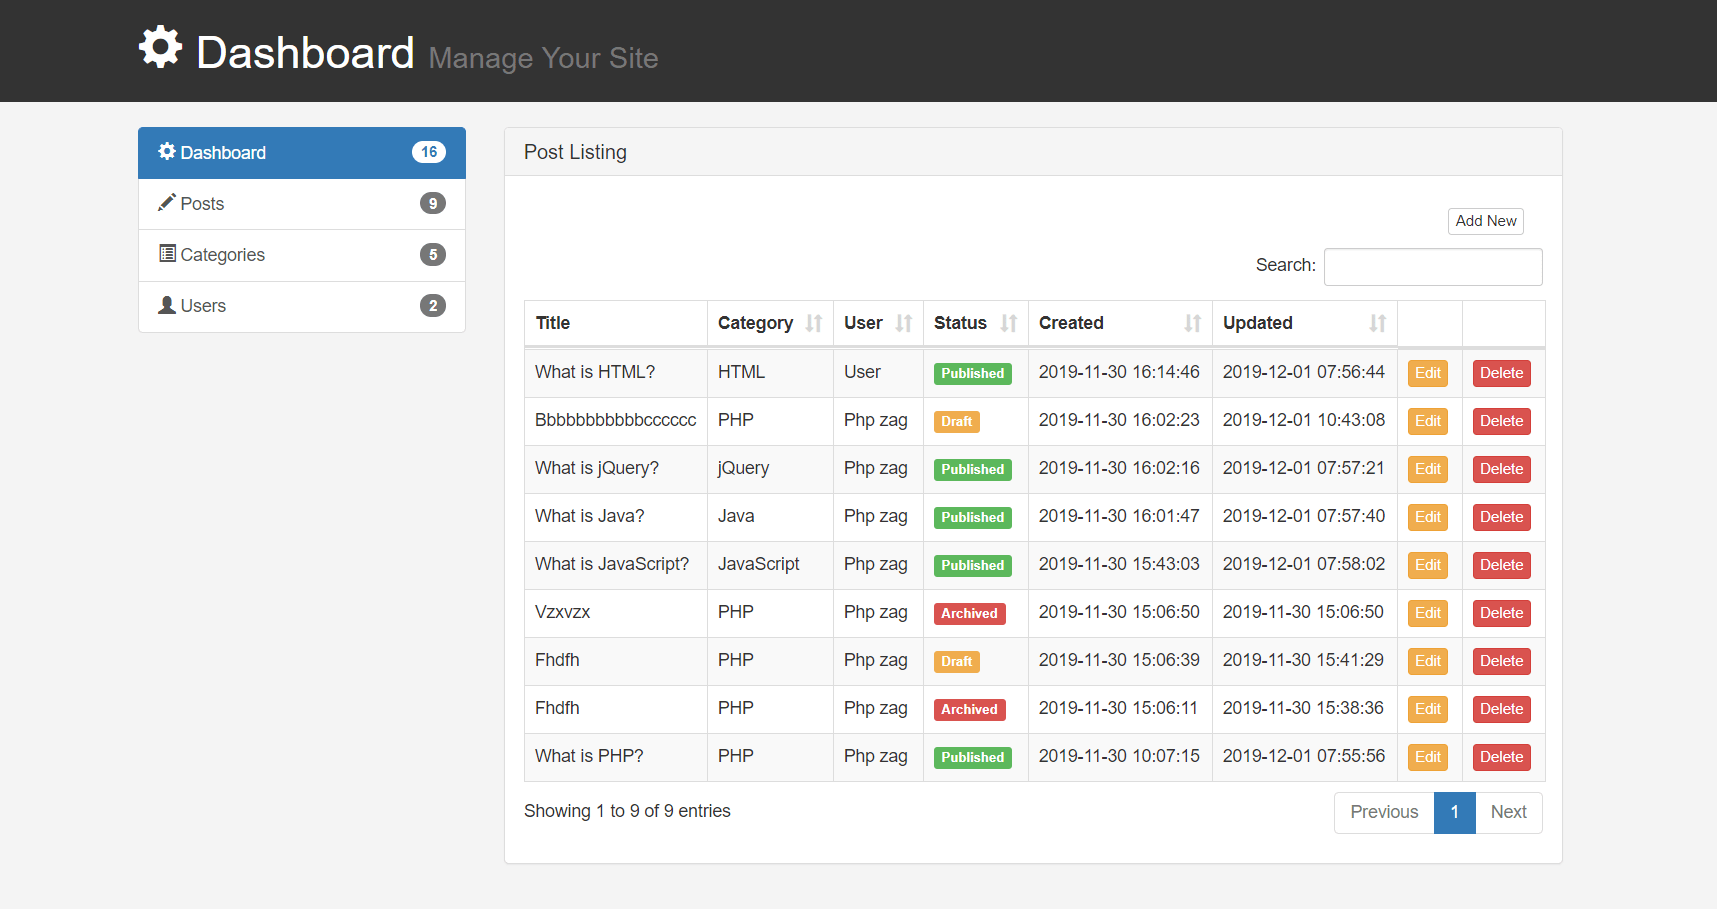
Step 8: Creating Content Management
Content management is a fundamental aspect of any CMS, allowing you to create, edit, and organize the content on your website. In this step, we will focus on creating content management functionality for your CMS.
Follow these steps to implement content management:
- Create Content Management Interface: Design and develop an interface within the admin panel where administrators can manage the content. This could include options to create new content, edit existing content, and organize content into categories or sections.
- Implement Content Creation: Develop functionality that allows administrators to create new content for your website. This may involve form fields for title, body text, images, categories, and any other relevant information. Store the content data in the database for retrieval later.
- Enable Content Editing: Implement functionality that allows administrators to edit existing content. Load the content data from the database and populate the form fields with the current information. Update the database with the modified data when the administrator saves the changes.
- Manage Content Categories: Create functionality to manage content categories or sections within your CMS. Allow administrators to create, edit, and delete categories as needed. Assign content to categories to organize and structure the website’s content.
- Implement Content Pagination: If your CMS deals with a large amount of content, consider implementing pagination to divide the content into manageable pages. This improves the user experience by reducing page load times and provides easier navigation through the content.
- Configure Content Permissions: Set up user permissions to control who can access, create, and edit content. Define user roles such as administrators, editors, and contributors, and assign appropriate permissions. Limit access to certain sections or content based on user roles.
- Implement Content Search: Develop a search functionality that allows users to search for specific content on the website. Implement search filters, keyword-based searches, or advanced search options to improve the accuracy and relevancy of search results.
- Provide Content Analytics: Track and analyze content performance using analytics tools. This can include tracking page views, engagement metrics, and user behavior patterns. Use these insights to make data-driven decisions and optimize your content strategy.
By creating content management functionality, you gain full control over your website’s content. This allows you to keep your website up-to-date, organized, and engaging for your visitors. Through effective content management, you can maintain a dynamic and thriving online presence.
Now that you have implemented content management, let’s move on to the final step: creating frontend templates to display your website content.
Step 9: Creating Frontend Templates
Creating frontend templates is the final step in building your CMS. Frontend templates determine how your website’s content is displayed to visitors. In this step, we will focus on designing and implementing the frontend templates for your CMS.
Follow these steps to create frontend templates:
- Design Template Layout: Plan the layout and structure of your website’s frontend templates. Consider the overall design, including header, navigation menu, content area, sidebar, and footer. Sketch out a wireframe or create a visual mockup to guide the development process.
- Translate Design into HTML/CSS: Using HTML and CSS, translate your design into a functional frontend template. Create separate HTML files for the header, footer, sidebar, and content area. Apply CSS styling to achieve the desired visual appearance.
- Integrate with CMS: Integrate your frontend templates with the CMS backend. Retrieve content data from the database and dynamically populate the templates with the relevant information. Use PHP or a templating engine to easily insert dynamic content into the appropriate sections of the templates.
- Implement Responsive Design: Ensure that your frontend templates are responsive and adaptable to different screen sizes and devices. Use responsive CSS techniques, such as media queries and flexible layouts, to optimize the user experience across desktops, tablets, and mobile devices.
- Optimize Performance: Optimize your frontend templates for performance by minimizing file sizes, optimizing image assets, and implementing caching mechanisms. Compress CSS and JavaScript files, leverage browser caching, and make use of Content Delivery Networks (CDNs) to deliver your website’s content efficiently.
- Implement SEO Best Practices: Apply SEO best practices to your frontend templates to improve visibility in search engine results. Ensure proper use of heading tags, meta tags, alt attributes for images, and structured data. Optimize page load speed and use clean URLs for better SEO performance.
- Test and Iterate: Thoroughly test your frontend templates across different browsers, devices, and screen sizes. Validate the HTML markup for compliance with web standards. Collect feedback from users and make necessary improvements to enhance the usability and visual appeal.
- Manage Template Customization: Consider providing options for template customization, such as color schemes or font choices, to allow users to personalize their website’s appearance. Implement a user-friendly interface within the admin panel to manage and modify template settings.
Creating well-designed and functional frontend templates is crucial for delivering an engaging and user-friendly website experience. With the frontend templates in place, you have completed the building blocks of your CMS and are ready to launch your website.
Congratulations on completing all the steps in creating your own CMS! Now, your CMS is equipped with essential functionalities, allowing you to efficiently manage and publish content for your website.
Remember to continuously update and improve your CMS as you gather user feedback, identify new requirements, and embrace emerging technologies.
Conclusion
Congratulations on successfully building your own CMS using PHP! In this guide, we have covered the step-by-step process of setting up the environment, creating a database, establishing a file structure, setting up a configuration file, creating a database connection, building an admin panel, implementing user registration and login, creating content management functionality, and designing frontend templates.
By following these steps, you now have a fully functional CMS that empowers you to create, edit, and manage your website’s content effectively. With user authentication in place, you can control access to your CMS and ensure the security of sensitive information. The admin panel provides a user-friendly interface for managing users, content, and other administrative tasks.
The content management functionality allows you to easily create, edit, and organize your website’s content, while the frontend templates ensure a visually appealing and responsive user experience. By optimizing the performance and implementing SEO best practices, you can enhance the visibility and accessibility of your website in search engine results.
Remember, building a CMS is an ongoing process. You can continue to add new features, improve existing functionalities, and incorporate user feedback to make your CMS even more robust and user-friendly. Stay up-to-date with emerging technologies, security best practices, and industry trends to further enhance your CMS.
Now that you have a powerful CMS at your disposal, take advantage of its capabilities to regularly update and manage your website’s content. Create engaging content, interact with your audience, and continuously improve the user experience to drive the success of your online presence.
Good luck with your CMS journey, and may it bring you success and satisfaction in managing and growing your website!