Introduction
Welcome to our beginner’s guide on how to create an admin panel in PHP. Building an admin panel is an essential part of web development, as it allows you to manage and control various aspects of your website or application with ease. Whether you’re developing a blog, an e-commerce site, or a content management system, having a secure and functional admin panel is crucial for efficient backend operations.
In this tutorial, we will walk you through the step-by-step process of creating an admin panel from scratch using PHP. We’ll cover all the necessary components, such as setting up the database, creating a user registration and login system, building the admin table, and implementing authentication for secure access to the admin panel.
No prior knowledge of PHP is required, but it would be helpful to have a basic understanding of HTML, CSS, and databases. By the end of this tutorial, you’ll have a solid foundation in developing a robust admin panel that can be customized according to your specific needs.
Before we dive into the technical details, it’s important to emphasize the importance of security when building an admin panel. As an admin, you’ll have access to sensitive information and control over the system, so it’s crucial to follow best practices for securing user credentials and preventing any unauthorized access. We’ll be incorporating secure authentication mechanisms throughout this tutorial to ensure the safety of data and user accounts.
Now, let’s get started by setting up the database and creating a user registration and login system to lay the foundation for our admin panel.
Setting Up Database
The first step in creating an admin panel is to set up the database that will store all the necessary information. We’ll be using MySQL, a popular relational database management system, for this tutorial. Follow the steps below to get started:
- Install MySQL: If you haven’t already, download and install MySQL server on your local machine. You can find the official installer on the MySQL website, along with installation instructions for your specific operating system.
- Create a new database: Once MySQL is installed, open the MySQL command line interface or a graphical tool like phpMyAdmin. Create a new database by running the following command:
sql
CREATE DATABASE admin_panel;
This will create a new database named “admin_panel” that we’ll be using throughout this tutorial. Feel free to change the name if you prefer.
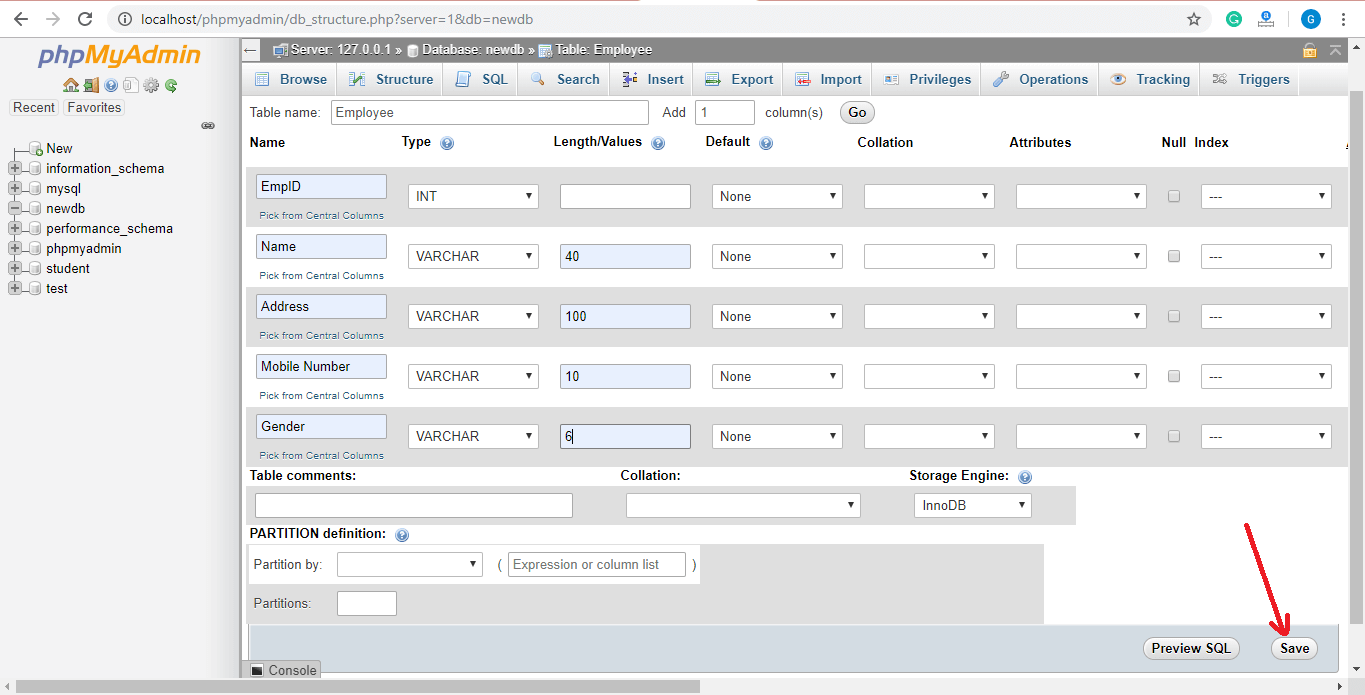
- Create the users table: Now, let’s create a table to store the user information, including username and password. Run the following query to create the “users” table:
sql
CREATE TABLE users (
id INT AUTO_INCREMENT PRIMARY KEY,
username VARCHAR(50) NOT NULL,
password VARCHAR(255) NOT NULL
);
This will create a table named “users” with three columns: “id”, “username”, and “password”. The “id” column is set as the primary key and will auto-increment with each new user record. The “username” column will store the user’s username, and the “password” column will store the hashed password.
- Insert test data: For testing purposes, let’s insert some test data into the “users” table. Run the following query to insert a user with a username and password:
sql
INSERT INTO users (username, password) VALUES (‘admin’, ‘adminpassword’);
This will insert a user with the username “admin” and a password “adminpassword” into the “users” table. Remember to hash the password in a real-world scenario to enhance security.
That’s it! You have successfully set up the database for our admin panel. In the next section, we’ll focus on creating a user registration and login system to allow users to log in to the admin panel.
Creating User Registration and Login System
Now that our database is set up, we can proceed to create a user registration and login system. This system will allow users to create an account, log in, and access the admin panel. Follow the steps below to implement the user registration and login functionality:
- Create a registration form: Start by creating an HTML form that prompts the user to enter their desired username and password. Include input fields for the username and password, along with a submit button. You can use HTML and CSS to style the form and make it visually appealing.
- Validate the form inputs: Before processing the form data, it’s important to validate the user inputs to ensure they meet the required criteria. Use PHP to check if the username input is not empty and if the password meets any specific requirements, such as a minimum character length or character restrictions.
- Hash the password: To enhance security, it’s crucial to hash the user’s password before storing it in the database. PHP provides built-in functions, such as password_hash(), to securely hash passwords using the bcrypt algorithm. Use this function to hash the user’s password before inserting it into the “users” table.
- Create a login form: Similar to the registration form, create an HTML form for the login functionality. Prompt the user to enter their username and password, and include a submit button to process the form data.
- Verify login credentials: Use PHP to verify the user’s login credentials by querying the database. Retrieve the hashed password associated with the provided username, and use the password_verify() function to compare the hashed password with the user’s input. If the credentials match, initiate a session to keep the user logged in.
- Redirect to the admin panel: Once the user has successfully logged in, redirect them to the admin panel page. This page will serve as the central hub for managing the website or application’s content, settings, and other administrative tasks.
By implementing these steps, you’ll be able to create a fully functional user registration and login system. Users will be able to create accounts, log in securely, and access the admin panel to manage the backend of your website or application.
In the next section, we’ll focus on creating the admin table in the database to store information related to the admin users.
Creating the Admin Table in the Database
In order to handle admin-specific functionality in our admin panel, we need to create a separate table in the database to store information about the admin users. This table will hold details such as the admin’s username, password, and any other relevant information. Follow the steps below to create the admin table:
- Open your database management tool, such as phpMyAdmin or MySQL command line, and select the database we previously created.
- Create the admin table: Run the following SQL query to create the “admin” table:
sql
CREATE TABLE admin (
id INT AUTO_INCREMENT PRIMARY KEY,
username VARCHAR(50) NOT NULL,
password VARCHAR(255) NOT NULL,
email VARCHAR(100) NOT NULL,
created_at TIMESTAMP DEFAULT CURRENT_TIMESTAMP
);
This query will create a table named “admin” with the necessary columns. We’ve included an “id” column as the primary key, an “username” column to store the admin’s username, a “password” column to store the hashed password, an “email” column to store the admin’s email address, and a “created_at” column to track the creation timestamp of each admin user.
- Insert admin user: To have at least one admin user in the table, run the following SQL query:
sql
INSERT INTO admin (username, password, email) VALUES (‘admin’, ‘adminpassword’, ‘admin@example.com’);
Of course, make sure to replace the example values for username, password, and email with actual values of your admin user.
With the admin table in place, we can now proceed to build the admin panel itself. In the next section, we’ll cover the steps involved in creating the admin panel UI and necessary functionalities.
Building the Admin Panel
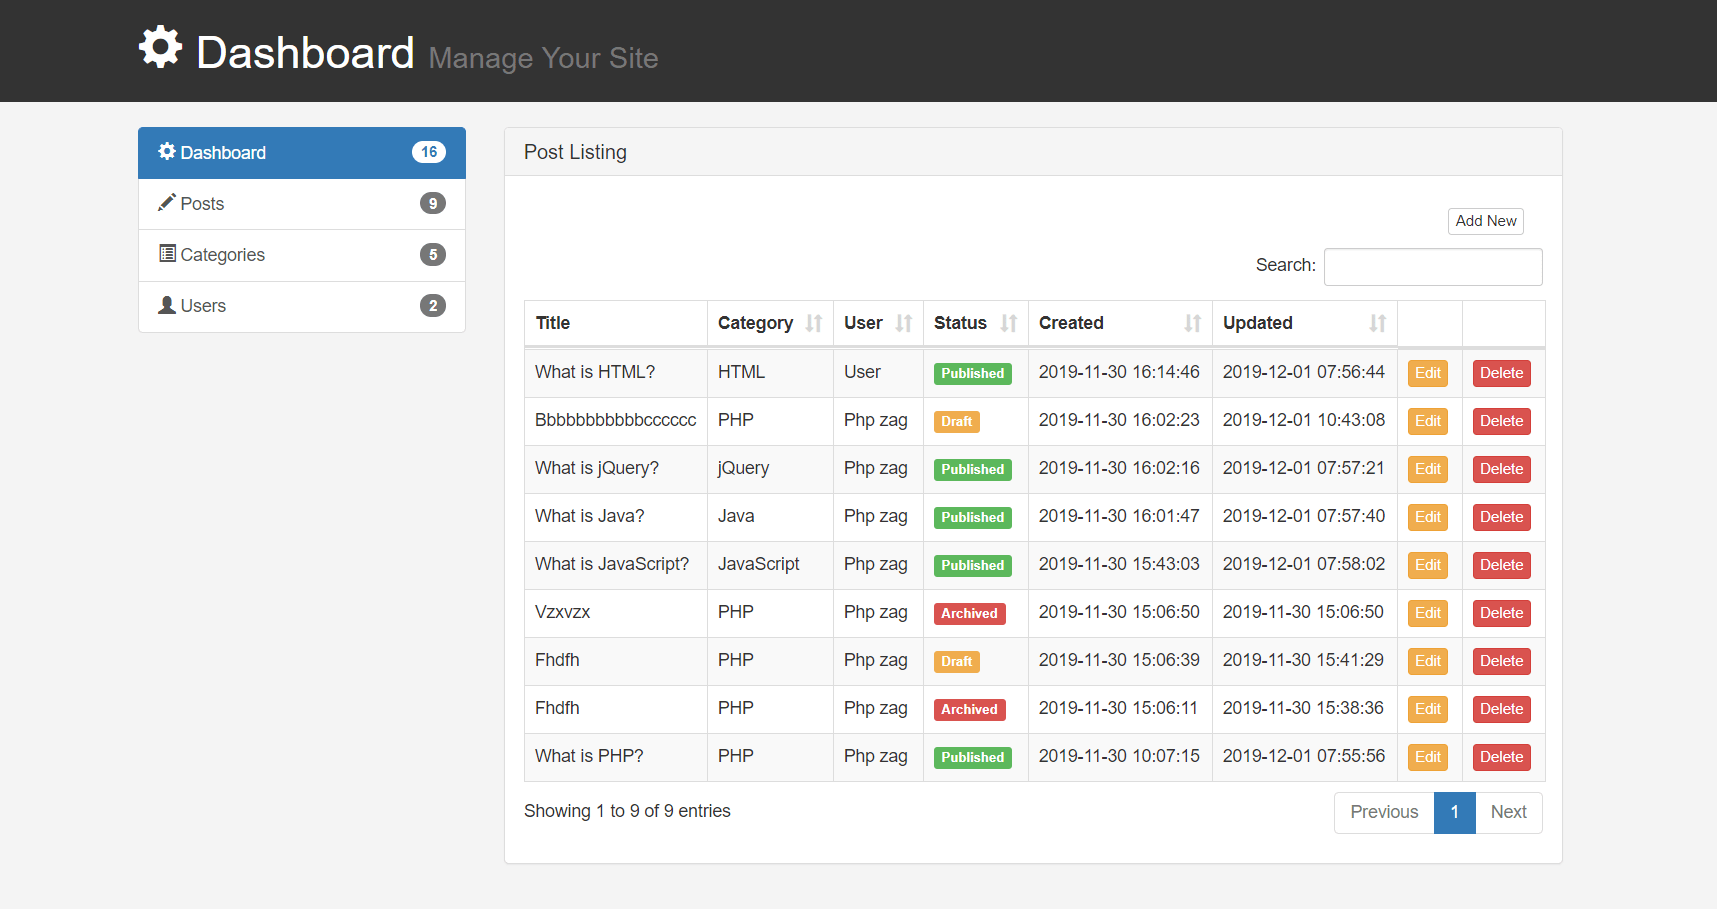
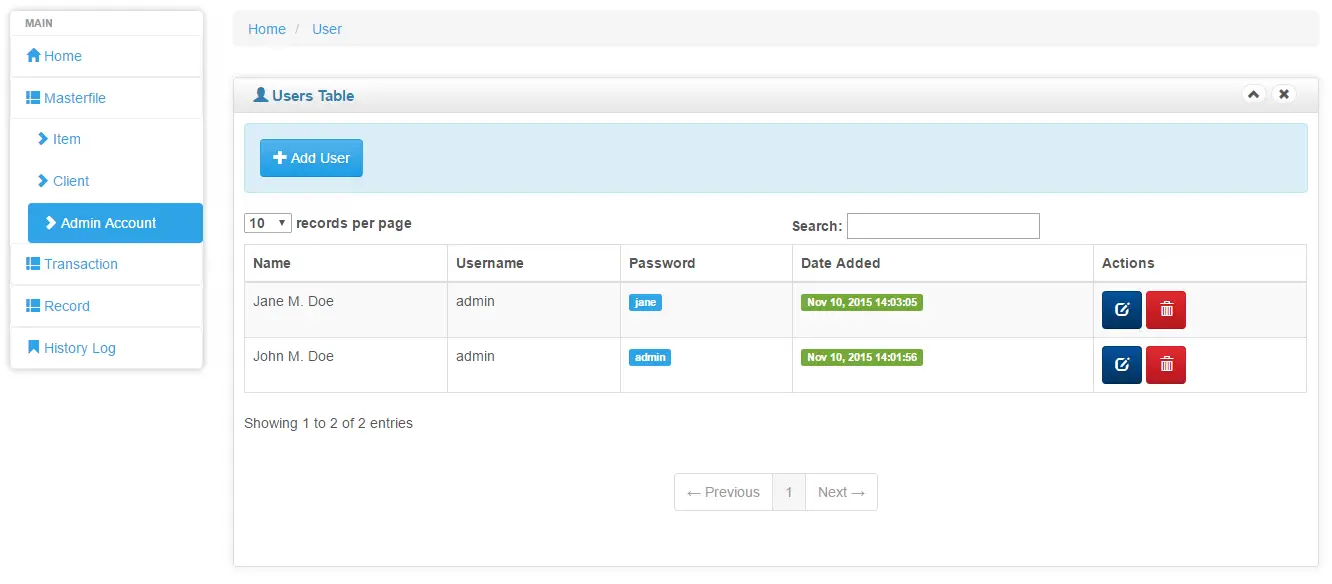
Building the admin panel requires creating a user interface that allows the admin to manage various aspects of the website or application. This includes functionalities such as adding, editing, and deleting content, managing user accounts, monitoring site analytics, and more. Follow the steps below to build the admin panel:
- Create the admin panel UI: Design and develop the admin panel user interface using HTML, CSS, and JavaScript. Consider the specific needs and requirements of your project, and create a layout that is intuitive, user-friendly, and visually appealing. Use HTML to structure the page, CSS to style the elements, and JavaScript to add interactivity if needed.
- Retrieve and display data: Use PHP to retrieve data from the database and display it within the admin panel. This can include fetching content from the website, displaying user information, or any other data relevant to the admin’s responsibilities.
- Implement CRUD operations: Add functionality to perform the CRUD (Create, Read, Update, Delete) operations within the admin panel. This will allow the admin to add new content, edit existing content, delete content, and view details of each item. Create forms and input fields for the admin to input data and use PHP to handle the data processing and database operations.
- Manage user accounts: Include features that allow the admin to manage user accounts, such as creating new accounts, updating account details, and disabling or deleting accounts if needed. Implement necessary forms and validations to ensure data integrity and security.
- Enhance security measures: Apply relevant security measures to protect the admin panel from unauthorized access or malicious attacks. This can include implementing user authentication, using prepared statements or parameterized queries to prevent SQL injections, and implementing measures to prevent cross-site scripting (XSS) attacks.
- Test and optimize the admin panel: Thoroughly test the admin panel for any bugs or issues, and optimize its performance to ensure smooth operation. Test it across different devices and browsers to ensure compatibility and responsiveness.
By following these steps, you’ll be able to create a functional and efficient admin panel that meets the requirements of your website or application. In the next section, we’ll focus on adding authentication to the admin panel to ensure secure access.
Adding Authentication to the Admin Panel
Authentication is a crucial aspect of securing the admin panel, as it ensures that only authorized users can access and manage the website or application. It provides a layer of protection against unauthorized access and keeps sensitive data and functionalities secure. Follow the steps below to add authentication to the admin panel:
- Create a login page: Design and create a login page where the admin can enter their credentials to access the admin panel. This page should include input fields for the username and password, along with a submit button to process the login request.
- Validate login credentials: Use PHP to validate the admin’s login credentials against the data stored in the admin table in the database. Retrieve the hashed password associated with the provided username and use the password_verify() function to compare it with the entered password. If the credentials match, store the authenticated user’s ID in a session variable to maintain their logged-in state.
- Add session management: Implement session management to track the admin’s authentication status throughout their session. Create a session variable to store the admin’s authentication status, and check this variable on each admin panel page to ensure that the user is authenticated before accessing any sensitive functionality.
- Implement access control: Restrict access to certain admin panel pages or functionalities based on the user’s authentication status. For example, only authenticated admins should be able to add or delete content, manage user accounts, or modify system settings. Implement PHP logic to check the authentication status and redirect unauthorized users to the login page or display an appropriate message.
- Add logout functionality: Create a logout mechanism that allows the admin to securely end their session and log out of the admin panel. Upon logout, destroy the session and redirect the user to the login page.
- Enhance password security: Incorporate additional security measures such as password strength requirements and password expiration policies to ensure that admin accounts are adequately protected. You can enforce minimum password length, password complexity rules, and periodic password changes to enhance the overall security of the admin panel.
By adding authentication to the admin panel, you’ll ensure that only authorized users can access and manage the website or application’s backend functionalities. This helps safeguard sensitive data, prevent unauthorized changes, and protect the overall integrity of the system. In the next section, we’ll discuss how to test the admin panel to ensure its functionality and performance.
Testing the Admin Panel
Testing the admin panel is an essential step to ensure its functionality, usability, and performance. Thorough testing helps identify and address any bugs, issues, or usability concerns before the panel is deployed to production. Follow these steps to perform comprehensive testing of the admin panel:
- Functionality testing: Test each feature and functionality of the admin panel to ensure they work as intended. Try adding, editing, and deleting content, managing user accounts, and performing other administrative tasks to ensure everything functions correctly.
- User interface testing: Test the user interface across different devices, resolutions, and browsers. Ensure that the layout is responsive, elements are displayed correctly, and the user experience is consistent and smooth across various platforms.
- Security testing: Perform security testing to identify potential vulnerabilities and ensure that the admin panel is adequately protected against common security threats, such as SQL injections, cross-site scripting (XSS), session hijacking, and brute-force attacks.
- Error handling testing: Test the admin panel’s error handling mechanisms. Validate how the panel handles invalid inputs, improper requests, or unexpected errors. Make sure that error messages are displayed clearly and securely handled to prevent any data leaks or security breaches.
- Performance testing: Evaluate the performance of the admin panel by simulating high loads and stress conditions. Check for any performance bottlenecks, long response times, or memory leaks that may affect the panel’s performance. Optimize the code, database queries, and server configurations to ensure optimal performance.
- Usability testing: Involve real users or testers to perform usability testing on the admin panel. Gather feedback on the intuitiveness, ease of navigation, and overall user experience. Make necessary improvements based on the feedback to enhance the admin panel’s usability.
- Accessibility testing: Ensure that the admin panel adheres to accessibility standards. Test the panel using assistive technologies and verify that it is accessible to users with disabilities. Implement any necessary adjustments to improve accessibility compliance.
By thoroughly testing the admin panel, you can identify and resolve any issues or inefficiencies, ensuring that it functions flawlessly and meets the needs of both administrators and end-users. Testing also contributes to the panel’s stability, security, and overall user satisfaction.
With the testing phase completed, you can proceed with confidence to deploy the admin panel and utilize its powerful features to effectively manage your website or application’s backend operations.
Conclusion
Creating an admin panel in PHP is an essential step in developing a website or application that requires backend management. Building a secure and functional admin panel allows you to effectively manage content, user accounts, system settings, and more. By following the steps outlined in this tutorial, you’ll be able to create a robust admin panel from scratch.
We started by setting up the database and creating the necessary tables to store user information and admin details. We then implemented a user registration and login system to allow secure access to the admin panel. Additionally, we covered creating the admin table in the database to handle admin-specific functionality.
Next, we focused on building the admin panel itself, including creating the user interface, implementing CRUD operations, and managing user accounts. We also discussed the importance of enhancing security measures, such as authentication, session management, and access control.
Testing the admin panel is vital to ensure its functionality, usability, and performance. We covered various types of testing, including functionality testing, user interface testing, security testing, performance testing, usability testing, and accessibility testing.
By completing these steps and thoroughly testing your admin panel, you can achieve a secure, efficient, and user-friendly backend management system that meets the specific needs of your website or application.
Remember to continuously update and maintain your admin panel to address any security vulnerabilities, improve performance, and accommodate evolving business requirements. Regularly review and enhance your security measures to protect against emerging threats, and stay updated with the latest web development practices.
We hope this tutorial has provided you with valuable insights and guidance on creating an admin panel in PHP. Harness the power of your admin panel to efficiently manage your website or application and drive its success.