Introduction
WordPress is a popular content management system (CMS) that allows users to create and manage websites with ease. While WordPress comes with a wide range of functionalities and features, it may not offer all the customization options you desire. One way to enhance your WordPress website is by incorporating PHP code into your pages.
PHP is a versatile programming language that can add dynamic elements to your website. By adding PHP code, you can interact with databases, create custom forms, perform calculations, and more. However, integrating PHP code into a WordPress page requires a few additional steps.
In this tutorial, we will guide you through the process of adding PHP code to a WordPress page. Whether you need to display real-time data, create a custom function, or customize the appearance of your site, this guide will help you achieve your goals.
Before we dive into the steps, it’s important to have a basic understanding of HTML, CSS, and PHP. You should also have a WordPress website set up and functioning properly.
Now, let’s get started with the necessary prerequisites to follow along with this tutorial.
Prerequisites
Before you begin adding PHP code to your WordPress page, make sure you have the following prerequisites in place:
- A functioning WordPress website: Ensure that your WordPress website is set up and running smoothly. If you haven’t already created a website, you can install WordPress on your domain or use a local development server.
- Basic understanding of HTML: Having a basic understanding of HTML is beneficial as it allows you to structure your page properly and include any necessary HTML elements alongside the PHP code.
- Basic understanding of CSS: While not mandatory, a basic understanding of CSS will help you style your PHP elements and ensure they blend seamlessly with the rest of your WordPress page’s design.
- Basic understanding of PHP: Having a foundation in PHP is essential to write, modify, and troubleshoot the PHP code that you’ll be adding to your WordPress page. Familiarize yourself with PHP syntax, variables, functions, and control structures.
- Access to your WordPress dashboard: You’ll need to be able to access the admin area of your WordPress website to create a new page, install plugins, and add PHP code.
If you meet these prerequisites, you’re ready to proceed to the next steps. If you need to brush up on your HTML, CSS, or PHP skills, there are numerous online resources and tutorials available to help you get started.
Step 1: Create a new WordPress page
The first step in adding PHP code to your WordPress page is to create a new page where you want the code to be displayed. Follow these simple instructions:
- Login to your WordPress admin dashboard.
- On the left-hand side, navigate to “Pages” and click on “Add New.”
- You will be redirected to the Gutenberg editor or the classic editor, depending on the version of WordPress you’re using.
- Give your new page a title that describes its purpose. This title will be displayed as the page’s headline.
- In the content area, you can add any additional text, images, or other elements that you want to accompany your PHP code. This allows you to provide context or instructions for your visitors.
- Once you’re satisfied with your page’s content, click on the “Publish” or “Update” button to save your changes.
By following these steps, you’ve successfully created a new WordPress page where you can add your PHP code. Now, let’s proceed to the next step and install a PHP code plugin.
Step 2: Install and activate a PHP code plugin
To enable the execution of PHP code in your WordPress page, you’ll need to install and activate a PHP code plugin. Follow these steps to do so:
- Login to your WordPress admin dashboard.
- On the left-hand side, navigate to “Plugins” and click on “Add New.”
- In the search bar, type the name of the PHP code plugin you want to use. Some popular options include “Insert PHP Code Snippet,” “PHP Everywhere,” and “Code Snippets.”
- Once you’ve found the desired plugin, click on the “Install Now” button next to it.
- After the plugin is installed, click on the “Activate” button to activate it.
Once the PHP code plugin is activated, you’ll have access to its features, which will allow you to easily add and manage PHP code within your WordPress pages. Now, let’s move on to the next step and start writing your PHP code.
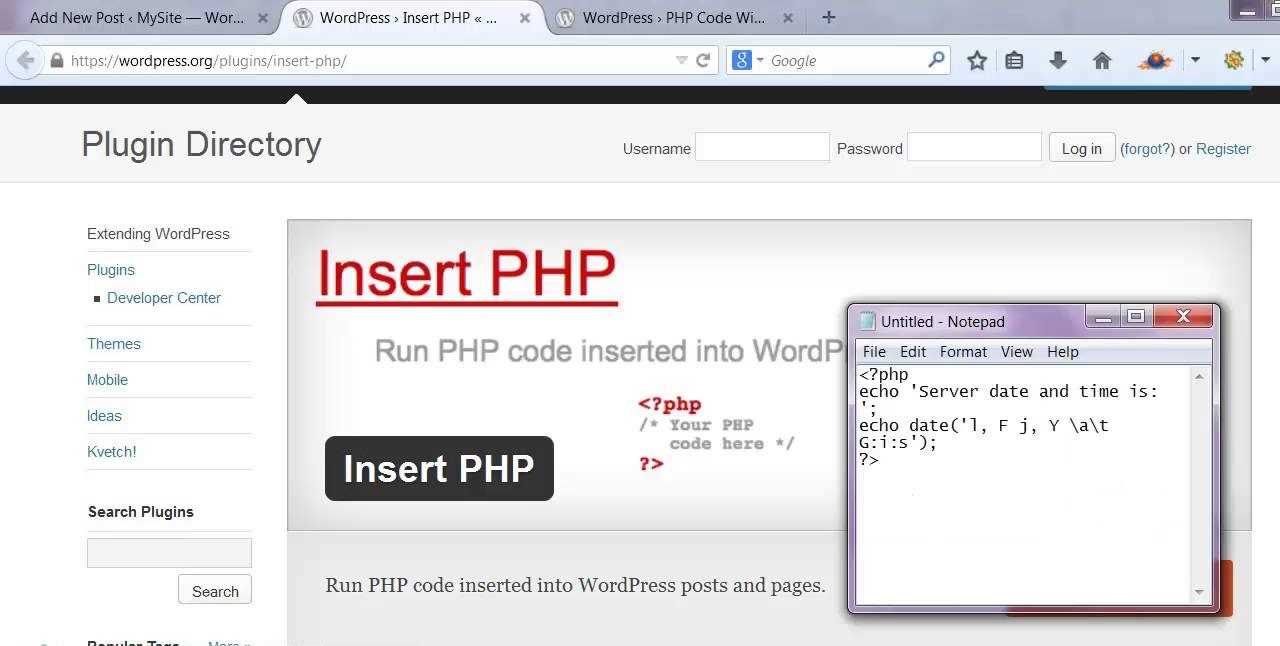
Step 3: Write your PHP code
Now that you have installed and activated a PHP code plugin, it’s time to write the PHP code that you want to add to your WordPress page. Follow these steps to write your PHP code:
- Go to your WordPress admin dashboard.
- Navigate to the “Pages” section and find the page where you want to insert the PHP code.
- Edit the page by clicking on the “Edit” option.
- In the content editor, place your cursor where you want the PHP code to appear.
- Now, locate the PHP code plugin’s icon in the toolbar (it may vary depending on the plugin you’re using) and click on it.
- A pop-up or a code block will appear, allowing you to enter your PHP code.
- Write or paste your PHP code into the provided area.
- Once you have entered your PHP code, review it to ensure its accuracy and correctness.
Remember to properly format your PHP code for readability and maintainability. This includes using indentation, comments, and following standard PHP coding practices. You can also test your PHP code outside of WordPress before inserting it into your page to ensure that it functions as intended.
With your PHP code written and ready, you are now ready to insert it into your WordPress page. Let’s move on to the next step and learn how to add the PHP code to your page.
Step 4: Insert the PHP code into your WordPress page
Now that you have written your PHP code, it’s time to insert it into your WordPress page. Follow these steps to add the PHP code to your page:
- Access your WordPress admin dashboard and navigate to the page where you want to insert the PHP code.
- Click on the “Edit” option to open the page in the editor.
- Locate the position in the content editor where you want the PHP code to appear.
- Now, go back to the PHP code plugin section in the toolbar.
- Click on the plugin’s icon to open the pop-up or code block where you can enter your PHP code.
- In this section, you will find a button or an option labeled “Insert Code” or “Insert PHP” to add your code to the page.
- Click on the “Insert Code” or relevant button to insert your PHP code.
- After inserting the code, you will see a shortcode or a similar indicator representing your PHP code in the content editor.
- Preview the page to ensure that the PHP code is showing correctly and functioning as expected.
By following these steps, you have successfully inserted your PHP code into your WordPress page. Make sure to save your changes, and proceed to the final step to publish and test your page with the PHP code.
Step 5: Publish and test your WordPress page with PHP code
After inserting the PHP code into your WordPress page, it’s important to publish and test the page to ensure that the PHP code is functioning as expected. Follow these steps to publish and test your WordPress page:
- Click on the “Update” or “Publish” button to save and publish your WordPress page with the PHP code.
- Once the page is published, navigate to your website’s front end to view the page.
- Locate the page where you inserted the PHP code and open it.
- Check if the PHP code is displayed and functioning correctly on the page.
- If your PHP code is interacting with a database or performing any calculations, ensure that the expected results are being produced.
- If the PHP code is not displaying or functioning as desired, double-check the code for any errors, typos, or missing elements.
- You can also check the plugin’s settings to ensure that it is configured correctly.
- If troubleshooting is required, you can seek assistance from the plugin’s support documentation or online forums.
Testing your WordPress page with the PHP code is crucial to confirm that everything is working as intended. It allows you to identify any issues and make necessary changes to enhance functionality and user experience.
Now that you have published and tested your WordPress page with the PHP code, you are ready to integrate dynamic elements and customized functionalities into your website.
Conclusion
Adding PHP code to your WordPress pages can greatly enhance the functionality and customization options of your website. By following the steps outlined in this tutorial, you have learned how to create a new WordPress page, install and activate a PHP code plugin, write PHP code, insert it into your page, and publish and test the page.
Remember to ensure that you have the necessary prerequisites in place, such as a functioning WordPress website and a basic understanding of HTML, CSS, and PHP. Installing a reliable PHP code plugin is crucial to easily manage and execute your PHP code within WordPress.
Writing your PHP code requires careful consideration and adherence to proper coding practices. Adding the PHP code to your WordPress page is a straightforward process using the PHP code plugin. Once inserted, be sure to publish and test your page to confirm that the PHP code is displaying and functioning correctly.
By incorporating PHP code into your WordPress pages, you can create dynamic elements, interact with databases, perform calculations, and much more. This gives you the flexibility to customize your website and deliver a unique user experience to your visitors.
Now that you have learned how to put PHP in a WordPress page, you can explore the vast possibilities that PHP offers and take your website to new heights.