Introduction
Welcome to our guide on how to implement reCAPTCHA in PHP! In today’s digital landscape, ensuring the security of online forms has become a top priority. No one wants to deal with spam submissions or malicious attacks targeting their website’s forms. This is where reCAPTCHA comes in.
reCAPTCHA is a widely used and highly effective tool that helps prevent spam and abuse on websites. It is a free service provided by Google that utilizes advanced technology to distinguish between humans and bots. By implementing reCAPTCHA, you can protect your website from unwanted spam submissions while providing a seamless user experience for genuine visitors.
In this guide, we will explain what reCAPTCHA is, why it is beneficial to use, and how to implement it in PHP code. Whether you are a beginner or an experienced developer, this step-by-step tutorial will walk you through the process of integrating reCAPTCHA into your PHP forms.
By the end of this guide, you will have a clear understanding of how reCAPTCHA works and the necessary steps to implement it on your website. So, let’s get started and take the first step towards securing your online forms!
What is reCAPTCHA?
reCAPTCHA is a security feature developed by Google that helps protect websites from spam and abuse. It is designed to differentiate between human users and bots attempting to submit forms or engage in malicious activities. By implementing reCAPTCHA, website owners can prevent unwanted spam submissions, while ensuring a smoother user experience for legitimate visitors.
The technology behind reCAPTCHA is based on the idea that humans can easily solve certain problems or puzzles, while bots struggle to do so. reCAPTCHA presents users with challenges called CAPTCHAs (Completely Automated Public Turing test to tell Computers and Humans Apart), such as identifying specific objects in an image or solving simple math problems.
When a user interacts with a form on a website that has reCAPTCHA enabled, the reCAPTCHA system analyzes their behavior to determine whether they are human or a bot. If the system suspects a user is a bot, it presents them with a more challenging CAPTCHA to solve.
One of the significant advantages of reCAPTCHA is that it does not disrupt the user experience. In most cases, users only need to check a box or solve a simple puzzle to prove their humanity. This means that genuine visitors can interact with the website seamlessly, while automated bots are effectively blocked from submitting forms or engaging in spam activities.
In addition to the traditional version of reCAPTCHA, Google also offers reCAPTCHA v3, which does not require user interaction at all. Instead, it assigns a score to each user based on their behavior within the website, allowing site owners to determine the level of potential risk or suspicious activity.
Overall, reCAPTCHA is a highly effective and widely used tool for protecting websites and forms from spam, bots, and malicious activities. Now that we understand what reCAPTCHA is, let’s explore the benefits of implementing it on your website.
Why Use reCAPTCHA?
Implementing reCAPTCHA on your website offers numerous benefits and advantages. Let’s explore why you should consider using reCAPTCHA to protect your forms and enhance the security of your website.
1. Prevents Spam Submissions: One of the primary motivations for using reCAPTCHA is to prevent spam submissions. By implementing reCAPTCHA, you can significantly reduce the number of automated bot-generated submissions that flood your forms. This ensures that the data you receive through your forms is genuine and valid.
2. Protects User Privacy: reCAPTCHA helps protect the privacy of your website visitors by ensuring that their personal information doesn’t end up in the hands of spammers or malicious individuals. It adds an extra layer of security to your forms, giving users peace of mind when providing their details.
3. Enhances User Experience: Traditional CAPTCHAs can often be frustrating for users, requiring them to decipher distorted text or solve complex puzzles. However, reCAPTCHA offers a much smoother and user-friendly experience. In most cases, users simply need to check a box or solve a simple challenge, which is far more convenient and less intrusive.
4. Improves Website Security: By implementing reCAPTCHA, you strengthen the security of your website, making it more resistant to automated bots and malicious attacks. This can help protect sensitive data, prevent unauthorized access, and maintain the integrity of your website.
5. Easy Implementation: Integrating reCAPTCHA into your website may sound complex, but it is relatively easy, especially with the availability of useful documentation and code examples. Google provides clear instructions and libraries for various programming languages, including PHP, making the implementation process smooth and hassle-free.
6. Free of Charge: Using reCAPTCHA to protect your forms and website security is completely free. This makes it an accessible option for websites of all sizes and budgets. You can reap the benefits of enhanced security without any additional financial burden.
Overall, reCAPTCHA offers an effective and user-friendly solution for preventing spam submissions, protecting user privacy, and improving the security of your website. With its easy implementation and free availability, there’s no reason not to utilize this powerful tool.
Now that we understand the benefits of using reCAPTCHA, let’s move on to the next section and learn how to obtain reCAPTCHA API keys.
Getting reCAPTCHA API keys
Before you can start implementing reCAPTCHA on your website, you need to obtain the necessary API keys from the reCAPTCHA website. These API keys are essential for integrating reCAPTCHA into your forms and enabling the validation process.
Here are the steps to get your reCAPTCHA API keys:
1. Sign up for reCAPTCHA: Visit the reCAPTCHA website (https://www.google.com/recaptcha) and click on the “Admin Console” button located in the top right corner of the screen. You will be prompted to sign in with your Google account or create a new one if you don’t have an account yet.
2. Register your website: After signing in, you’ll be directed to the reCAPTCHA admin console. On this page, you need to register your website by providing a label (for your reference) and the domain name. You can also select the reCAPTCHA type (v2 or v3) based on your preference and requirements.
3. Accept the Terms of Service: After registering your website, you’ll need to review and accept the reCAPTCHA Terms of Service. It’s important to read and understand the terms to ensure compliance with reCAPTCHA’s usage guidelines.
4. Obtain your API keys: Once you’ve accepted the Terms of Service, you will be directed to a page displaying your reCAPTCHA API keys. These keys consist of a “Site key” and a “Secret key.” The Site key needs to be included in the HTML markup of your website, while the Secret key should be securely stored and used on the server-side for validating reCAPTCHA responses.
It’s important to note that reCAPTCHA supports multiple versions and types, each requiring its own API keys. Make sure you select the appropriate keys for the reCAPTCHA version and type you intend to use.
5. Test your API keys: Before implementing reCAPTCHA on your live website, it’s a good practice to test your API keys on a development or testing environment. This allows you to ensure that the keys are working correctly and that the reCAPTCHA validation process is functioning as expected.
Once you have obtained your reCAPTCHA API keys, you’re ready to proceed with the integration process. In the next section, we will cover how to install and implement reCAPTCHA on your website.
Installing reCAPTCHA on the website
After obtaining your reCAPTCHA API keys, the next step is to install and implement reCAPTCHA on your website. Here’s a step-by-step guide on how to do it:
1. Include the reCAPTCHA API: In the <head> section of your HTML document, add the following script tag to include the reCAPTCHA API:
html
2. Add the reCAPTCHA markup to your form: Locate the form where you want to add reCAPTCHA and insert the reCAPTCHA widget just before the submit button. Use the data-sitekey attribute to specify your reCAPTCHA site key, obtained from the reCAPTCHA admin console. Below is an example of how to add reCAPTCHA to a form:
html
3. Handle form submission on the server-side: When the form is submitted, you need to validate the reCAPTCHA response on the server-side to ensure it came from a genuine user. In your server-side script, you can retrieve the reCAPTCHA response using the name specified in the reCAPTCHA markup. Here’s an example of how to verify the reCAPTCHA response using PHP:
php
// Your other form validation and processing code goes here
// Get the reCAPTCHA response from the form data
$recaptchaResponse = $_POST[‘g-recaptcha-response’];
// Verify the reCAPTCHA response
$recaptchaUrl = ‘https://www.google.com/recaptcha/api/siteverify’;
$recaptchaSecretKey = ‘YOUR_SECRET_KEY’;
$recaptchaVerifyUrl = $recaptchaUrl . ‘?secret=’ . $recaptchaSecretKey . ‘&response=’ . $recaptchaResponse;
$recaptchaResponseData = file_get_contents($recaptchaVerifyUrl);
$recaptchaResult = json_decode($recaptchaResponseData);
// Check if the reCAPTCHA was successful
if ($recaptchaResult->success) {
// Proceed with form submission and processing
} else {
// Display an error message or take appropriate action if reCAPTCHA validation fails
}
Remember to replace YOUR_SITE_KEY and YOUR_SECRET_KEY with your actual reCAPTCHA API keys obtained from the reCAPTCHA admin console.
By following these steps, you can successfully install and integrate reCAPTCHA into your website’s forms. This will help protect your forms from spam and abuse, improving the security and reliability of your website.
In the next section, we will cover the process of registering your website and obtaining a site key from the reCAPTCHA admin console.
Registering the website and getting a site key
Before you can implement reCAPTCHA on your website, you need to register your website and obtain a site key from the reCAPTCHA admin console. Here’s how you can do it:
1. Sign up or sign in to reCAPTCHA: Visit the reCAPTCHA website (https://www.google.com/recaptcha) and click on the “Admin Console” button on the top right corner of the screen. If you don’t have a Google account, you’ll need to sign up. If you have one, sign in with your credentials.
2. Register your website: After signing in, you’ll be directed to the reCAPTCHA admin console page. Click on the “+ Register a new site” button to start the registration process for your website.
3. Enter site details: In the registration form, you’ll need to provide the necessary details for your website. This includes a label (for your reference) and the domain name where you plan to implement reCAPTCHA. You can also select the reCAPTCHA type from the options available (e.g., reCAPTCHA v2 or v3) based on your needs.
4. Accept the reCAPTCHA Terms of Service: Before completing the registration, make sure to read and accept the reCAPTCHA Terms of Service. It’s crucial to understand and comply with the usage guidelines provided.
5. Obtain your site key: After registering your website, you’ll be redirected to a page where you can find your reCAPTCHA site key. The site key is a unique identifier for your website and is used in the reCAPTCHA HTML markup. Make sure to copy and securely store this key as you will need it during the implementation process.
6. Configure additional settings (optional): On the reCAPTCHA admin console, you have the option to configure additional settings for your reCAPTCHA implementation. This includes adjusting the appearance and behavior of the reCAPTCHA widget, setting up advanced options, and managing additional domains or owners.
By following these steps, you can register your website and obtain a site key from the reCAPTCHA admin console. This key is essential for integrating reCAPTCHA into your website and adding an extra layer of security to your forms.
In the next section, we will explain how to add the reCAPTCHA HTML markup to your forms, allowing you to display the reCAPTCHA widget and protect your website from spam and abuse.
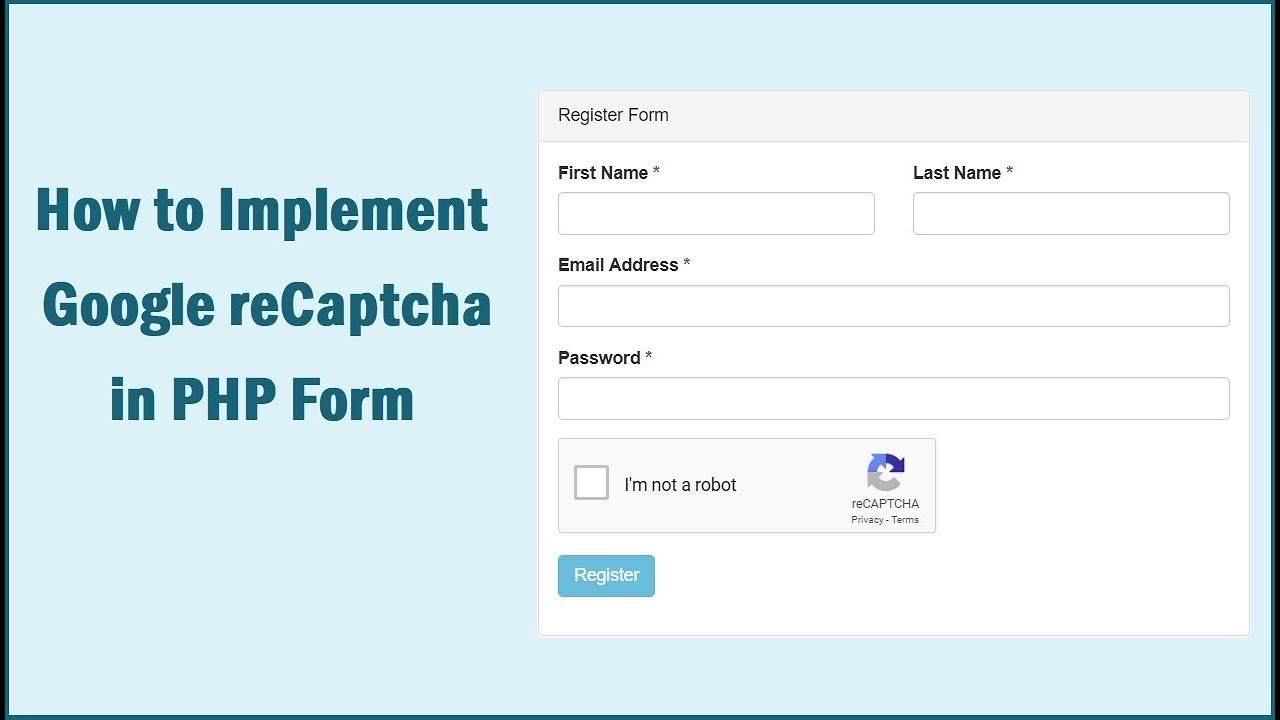
Adding reCAPTCHA HTML markup to forms
To implement reCAPTCHA on your website and protect your forms from spam and abuse, you need to add reCAPTCHA HTML markup to the forms where you want to enable reCAPTCHA validation. Here’s how you can do it:
1. Locate the form: Identify the form on your website where you want to integrate reCAPTCHA. This could be a contact form, registration form, comment form, or any other form that requires protection from automated bot submissions.
2. Add the reCAPTCHA widget: Insert the reCAPTCHA widget just before the submit button in your form. Use the following HTML markup:
html
Replace “YOUR_SITE_KEY” with the actual reCAPTCHA site key you obtained when registering your website in the reCAPTCHA admin console.
3. Customize the reCAPTCHA appearance (optional): You can further customize the reCAPTCHA appearance by modifying the CSS styles. Add a CSS class to the reCAPTCHA div element and define the styles in your CSS file accordingly. This allows you to match the reCAPTCHA widget with the design of your website.
4. Ensure correct placement: Make sure that the reCAPTCHA widget is placed correctly within the form structure. It should be located before the form’s submit button to ensure that reCAPTCHA validation occurs before form submission.
Here’s an example of a complete form with reCAPTCHA integration:
html
Remember to replace “YOUR_SITE_KEY” with your actual reCAPTCHA site key obtained from the reCAPTCHA admin console.
By adding the reCAPTCHA HTML markup to your forms, you activate the reCAPTCHA widget, which displays the necessary challenge for users to complete. This helps ensure that only genuine human users can submit the form, protecting your website from spam and abuse.
In the next section, we will cover how to validate the reCAPTCHA response on the server-side and process the form submission accordingly.
Validating reCAPTCHA response on the server side
To ensure the security and reliability of your website’s forms, it is essential to validate the reCAPTCHA response on the server side. This step confirms that the user’s response to the reCAPTCHA challenge is valid and authentic. Here’s how you can validate the reCAPTCHA response on the server side using PHP:
1. Retrieve the reCAPTCHA response: When the form is submitted, you need to retrieve the reCAPTCHA response from the form data on the server side. You can access the response using the name attribute specified in the reCAPTCHA HTML markup. Here’s an example to retrieve the reCAPTCHA response in PHP:
php
$recaptchaResponse = $_POST[‘g-recaptcha-response’];
2. Verify the reCAPTCHA response: Use the reCAPTCHA API to verify the response received from the form submission. Construct the verification URL by appending the reCAPTCHA secret key and the user’s response. Then, send a request to this URL and process the response. Here’s an example of how to verify the reCAPTCHA response using PHP:
php
$recaptchaUrl = ‘https://www.google.com/recaptcha/api/siteverify’;
$recaptchaSecretKey = ‘YOUR_SECRET_KEY’;
$recaptchaVerifyUrl = $recaptchaUrl . ‘?secret=’ . $recaptchaSecretKey . ‘&response=’ . $recaptchaResponse;
$recaptchaResponseData = file_get_contents($recaptchaVerifyUrl);
$recaptchaResult = json_decode($recaptchaResponseData);
if ($recaptchaResult->success) {
// The reCAPTCHA response is valid, proceed with form submission and processing
} else {
// The reCAPTCHA response is invalid or suspicious, handle the error appropriately
}
Make sure to replace “YOUR_SECRET_KEY” with your actual reCAPTCHA secret key obtained from the reCAPTCHA admin console.
3. Process the form submission: Based on the result of the reCAPTCHA verification, you can proceed with further form processing if the response is valid. This includes saving the form data to a database, sending email notifications, or any other actions related to your form’s functionality. If the reCAPTCHA response is invalid, you can display an error message to the user or take appropriate action.
By validating the reCAPTCHA response on the server side, you ensure that only genuine human users can successfully submit the form, while blocking automated bots and securing your form data from spam and abuse.
In the next section, we will discuss how to handle reCAPTCHA errors and troubleshoot common issues that may arise during the implementation process.
Handling reCAPTCHA errors
While implementing reCAPTCHA on your website, it’s essential to handle any errors that may occur during the validation process. These errors can help you detect and address issues with reCAPTCHA, ensuring a smooth user experience. Here are some common reCAPTCHA errors and how to handle them:
1. Invalid reCAPTCHA response: If the reCAPTCHA response is deemed invalid or fails the verification process, it’s crucial to notify the user about the error. You can display an error message, informing them to try again or providing further instructions on completing the reCAPTCHA challenge successfully.
2. Suspicious reCAPTCHA response: In some cases, the reCAPTCHA response may be flagged as suspicious by the reCAPTCHA system. This usually happens when unusual or potentially malicious behavior is detected. When this occurs, you can display an error message stating that the response was flagged as suspicious and prompt the user to reconsider their actions.
3. Network or API errors: Occasionally, network or API errors may occur during the reCAPTCHA verification process. It’s important to handle these errors gracefully by displaying a generic error message to the user. You can also log the specific error details for debugging purposes.
4. Unavailability of reCAPTCHA service: Although rare, there may be instances when the reCAPTCHA service is temporarily unavailable due to maintenance or technical issues. In such cases, you can display a message to the user indicating that reCAPTCHA is currently unavailable and advise them to try again later.
5. Logging and monitoring: It’s recommended to log any reCAPTCHA errors or suspicious activity for analysis and troubleshooting. By implementing robust error logging and monitoring mechanisms, you can identify recurring issues, track patterns of abuse, and take appropriate measures to strengthen your form’s security.
Remember to handle reCAPTCHA errors in a user-friendly and informative manner. Clear error messages help users understand the issue and take the necessary actions to successfully complete the reCAPTCHA challenge.
In the next section, we will discuss how to test and troubleshoot your reCAPTCHA implementation to ensure its effectiveness and resolve any issues that may arise.
Testing and troubleshooting reCAPTCHA implementation
After implementing reCAPTCHA on your website, it’s crucial to thoroughly test and troubleshoot the implementation to ensure its effectiveness and identify any potential issues. Here are some steps you can follow to test and troubleshoot your reCAPTCHA implementation:
1. Test form submission: Submit your forms multiple times, both with valid responses to the reCAPTCHA challenge and with invalid or incorrect responses. This helps ensure that the reCAPTCHA validation process is functioning correctly and that the appropriate error messages are displayed when necessary.
2. Check server-side validation: Verify that the server-side validation is correctly processing the reCAPTCHA response and performing the necessary actions based on the validation status. Test scenarios with valid, invalid, and suspicious responses to ensure your server-side logic handles each case correctly.
3. Test on different devices and browsers: Validate that reCAPTCHA is displayed and functions as expected on various devices, such as desktops, laptops, tablets, and mobile devices. Also, test on different browsers (e.g., Chrome, Firefox, Safari) to ensure cross-browser compatibility.
4. Perform stress testing: Simulate a high volume of form submissions in a short period to assess the performance and stability of your reCAPTCHA implementation. Monitor server resources, response times, and error rates to identify any limitations or scalability issues.
5. Monitor reCAPTCHA analytics: Utilize the reCAPTCHA admin console to monitor the analytics and statistics related to your reCAPTCHA implementation. This can provide insights into the number of successful reCAPTCHA validations, the occurrence of suspicious activities, and potential errors encountered by users.
6. Keep an eye on reCAPTCHA updates: Stay updated with reCAPTCHA announcements, documentation, and any new features or changes. Google may release updates or provide recommendations for improving the security and performance of your reCAPTCHA implementation.
7. Troubleshoot common issues: If you encounter any issues during testing, refer to the reCAPTCHA developer documentation, forums, or support resources for troubleshooting guidance. Common issues may include configuration errors, incorrect API key usage, or connectivity problems.
By diligently testing and troubleshooting your reCAPTCHA implementation, you can ensure its effectiveness in protecting your forms from spam and abuse. Regular monitoring and maintenance will help maintain a secure and reliable user experience on your website.
In the next section, we will conclude our guide on implementing reCAPTCHA in PHP and provide a summary of the key points covered.
Conclusion
In conclusion, reCAPTCHA is a powerful tool for protecting your website’s forms from spam and abuse. By implementing reCAPTCHA, you can ensure that only genuine human users can submit forms, enhancing the security and reliability of your website.
In this guide, we explored what reCAPTCHA is and why it is beneficial to use. We learned how to obtain reCAPTCHA API keys by registering our website on the reCAPTCHA admin console. We then delved into the process of installing reCAPTCHA on the website by adding the reCAPTCHA HTML markup to forms.
We also discussed the importance of validating the reCAPTCHA response on the server side and provided a step-by-step example of how to do it using PHP. Additionally, we explored the handling of reCAPTCHA errors, ensuring that users receive clear and informative messages in case of validation issues.
To ensure a smooth implementation, we highlighted the significance of testing and troubleshooting the reCAPTCHA implementation. By thoroughly testing the forms, checking server-side validation, and monitoring the performance, you can identify and resolve any issues that may arise.
By following the steps outlined in this guide, you can successfully implement reCAPTCHA on your website and enjoy the benefits of enhanced security and user experience.
Remember to stay up-to-date with reCAPTCHA announcements and best practices to ensure the continued effectiveness of your implementation. With reCAPTCHA, you can protect your website from spam, maintain user privacy, and enhance the overall security and reliability of your forms.