Introduction
Facebook, one of the most popular social media platforms, offers various features and functionalities that developers can leverage to build exciting applications. Creating a Facebook application in PHP allows you to integrate your app with Facebook’s vast user network and benefit from its extensive user base.
Whether you are developing a game, a productivity tool, or a social media integration, having a Facebook application can provide numerous advantages, including increased visibility, user engagement, and potential monetization opportunities. This guide will walk you through the process of creating a Facebook application in PHP, enabling you to tap into this powerful platform.
Before we delve into the technical details, it is important to note a few prerequisites. First, you should have a solid understanding of PHP programming language, as well as HTML, CSS, and JavaScript. Additionally, you will need a local development environment, such as XAMP or WAMP, installed on your machine for testing and development. Lastly, you will need a Facebook developer account to create and manage your application.
Once you have the necessary prerequisites in place, you can proceed to set up your Facebook developer account and create a new Facebook app. We will guide you through each step of the process, including configuring app settings, obtaining app credentials, and implementing various Facebook app functionalities.
By the end of this guide, you will be equipped with the knowledge and skills necessary to create your own Facebook application in PHP. So, let’s get started and embark on this exciting journey of building a highly engaging and successful Facebook app!
Prerequisites
Before diving into creating a Facebook application in PHP, there are a few prerequisites that you should have in place to ensure a smooth development process. Below are the key requirements:
- Knowledge of PHP: A solid understanding of PHP programming language is essential as you will be working with PHP to build the Facebook application.
- HTML, CSS, and JavaScript: Familiarity with HTML, CSS, and JavaScript will be beneficial as these languages are often used in conjunction with PHP to create dynamic and interactive web applications.
- Local Development Environment: You will need a local development environment installed on your machine. Popular options include XAMP for Windows and MAMP for Mac, which include Apache, MySQL, and PHP pre-installed, providing a suitable environment for PHP development.
- Facebook Developer Account: To create and manage your Facebook application, you will need a Facebook Developer account. If you don’t have one yet, you can easily create it by visiting the Facebook Developer website and following the registration process.
- Basic Facebook Platform Understanding: While not mandatory, having a basic understanding of how the Facebook platform works, including the concepts of access tokens, permissions, and the Graph API, will be advantageous in creating a more robust and feature-rich Facebook application.
Ensuring you have these prerequisites met will help you navigate the process of creating a Facebook application in PHP with more confidence and ease. With these foundations in place, you will be ready to embark on the exciting journey of building your very own Facebook application!
Set Up Facebook Developer Account
Before you can create a Facebook application in PHP, you need to set up a Facebook Developer account. Having a Facebook Developer account allows you to access the necessary tools and resources to build and manage your applications.
To create a Facebook Developer account, follow these steps:
- Visit the Facebook Developer website at developers.facebook.com.
- Click on the “Get Started” button located in the top-right corner of the page.
- Log in to your existing Facebook account or create a new one if you don’t have an account already.
- Once logged in, you will be redirected to the Facebook Developer Dashboard.
- Click on the “Create App” button to start creating your new Facebook application.
By following these steps, you will successfully set up your Facebook Developer account and be ready to create your first Facebook application in PHP. Having a Facebook Developer account provides you with access to a plethora of features and resources that are integral to developing and managing Facebook applications.
Now that you have your Facebook Developer account set up, the next step is to create a new Facebook app. This process involves configuring various settings and obtaining the necessary credentials for your application, which we will cover in the next section.
Create a New Facebook App
In order to create a Facebook application in PHP, you need to create a new Facebook app. This involves setting up the app, configuring its settings, and obtaining the required credentials. Follow the steps below to create a new Facebook app:
- Visit the Facebook Developer Dashboard and log in to your Facebook Developer account.
- Click on the “Create App” button to initiate the app creation process.
- Provide a name for your app and choose the app category that best matches its purpose.
- Click on the “Create App ID” button to proceed.
- You will be redirected to the app dashboard, where you can configure various settings.
- Navigate to the “Settings” tab on the left-hand side.
- In the “Basic” section, fill in the required information such as the display name, namespace, and contact email.
- Upload an app icon and cover photo to make your app visually appealing.
- Scroll down to configure additional settings, such as adding a platform for your app (e.g., website, iOS, Android) and providing relevant details.
- Save your changes by clicking on the “Save Changes” button.
Once you have created your Facebook app and configured the necessary settings, you are one step closer to building your PHP application. The app creation process allows you to define the basic details and customize various aspects of your application, making it unique and tailored to your needs.
Next, we will discuss how to configure the settings for your Facebook app, including essential functionalities such as user authentication and retrieving user information.
Configure Facebook App Settings
After creating a new Facebook app, it’s important to configure the settings to customize its behavior and enable specific functionalities. By adjusting the app settings, you can determine how your app interacts with Facebook and its users. Follow these steps to configure your Facebook app settings:
- Access the Facebook Developer Dashboard and navigate to your app’s dashboard.
- Click on the “Settings” tab located on the left-hand side.
- Review the options available in the different sections of the settings page and adjust them according to your app’s requirements.
- Basic: Here, you can update the app’s display name, description, and other basic information. You can also configure the app visibility and choose an appropriate app category.
- Advanced: In this section, you can enable features like App Domains and Single Sign-On, which allow users to log in to your app using their Facebook credentials. You can also manage your app’s migration, data protection, and webhooks.
- Security: This section allows you to implement more advanced security measures for your app, such as enabling App Secret Proof, which adds an extra layer of protection to your API calls.
- Products: Here, you can configure various Facebook products that your app may utilize, such as Facebook Login, Share Dialog, and App Events.
- Webhooks: If you want to set up real-time notifications for specific events in your app, you can configure webhooks in this section.
- Roles: The Roles section allows you to manage the roles and permissions for individuals associated with your app, such as administrators, developers, and testers.
- Save any changes you make by clicking on the “Save Changes” button.
By configuring the app settings, you can tailor your Facebook app to suit your specific requirements. The available options in the settings page cover a wide range of functionalities, enabling you to enhance the user experience, strengthen security, and integrate with various Facebook products.
Next, we will explore how to obtain the necessary credentials for your Facebook app, which are essential for authenticating and interacting with the Facebook API in your PHP application.
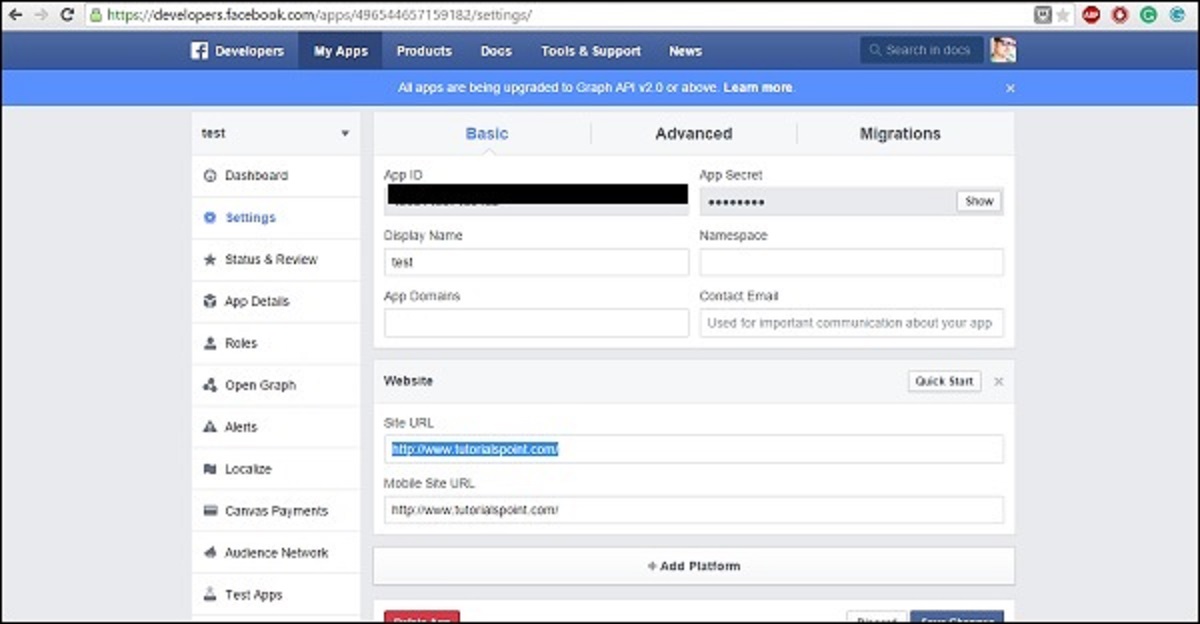
Obtain App Credentials
When creating a Facebook application in PHP, you need to obtain the necessary credentials from your app dashboard. These credentials are vital for authenticating and interacting with the Facebook API in your PHP application. Here’s how you can obtain your app credentials:
- Access the Facebook Developer Dashboard and navigate to your app’s dashboard.
- Click on the “Settings” tab on the left-hand side.
- In the “Basic” section, you will find essential app information, including your App ID and App Secret. These are unique identifiers for your app.
Your App ID is a public identifier that you may need to use in your application when making API requests, authenticating users, or integrating various Facebook features. The App Secret, on the other hand, is a private key used for securing communication between your app and Facebook.
It’s important to keep your App Secret secure and confidential. Avoid sharing it publicly or hardcoding it in your application’s source code. Instead, you can store it in a secure environment, such as an environment variable or a configuration file outside the webroot.
In addition to the App ID and App Secret, you may also need to obtain other credentials depending on the functionalities you plan to implement. For example, if you want to enable Facebook Login in your app, you will need to specify the Valid OAuth Redirect URIs and obtain the Client OAuth Settings credentials.
By obtaining the necessary app credentials, you can authenticate with the Facebook API and access the various features and functionalities provided by the platform. These credentials are essential for integrating your PHP application with Facebook and enabling seamless interactions with users and their data.
With your app credentials in hand, you are now ready to set up a local development environment and start building your Facebook application in PHP. In the following sections, we will cover the steps to create a local environment, install the required dependencies, and implement various Facebook app functionalities.
Set Up a Local Environment
Before you start developing your Facebook application in PHP, it’s essential to set up a local development environment on your machine. A local environment allows you to create and test your application locally before deploying it to a live server. Follow these steps to set up a local environment:
- Choose a local development environment software such as XAMP (for Windows), MAMP (for Mac), or LAMP (for Linux) based on your operating system.
- Download and install the chosen local development environment software by following its installation instructions.
- Launch the local development environment software and start the Apache Server and MySQL Database services.
- Verify that the local development environment is working properly by visiting
http://localhostin your web browser. You should see a welcome page indicating that the server is running. - Create a new directory for your Facebook application within the root directory of your local development environment. This directory will serve as the web root for your application.
- Configure the web server to point to the newly created directory as the Document Root.
- Create an
index.phpfile within the web root directory to serve as the entry point for your application. - Verify that your local environment is properly set up by accessing
http://localhost/your-app(replace “your-app” with the name of your app directory) in your web browser. You should see a blank page or a message indicating that the PHP file is not found.
With your local environment set up, you can now begin developing and testing your Facebook application within a controlled and isolated environment. This allows you to experiment and iterate on your application’s features before deploying it to a live server.
In the next sections, we will cover the steps to install the necessary dependencies and libraries, such as the Facebook PHP SDK, and implement various Facebook app functionalities using PHP.
Install Composer
Composer is a dependency management tool for PHP that allows you to easily install and manage libraries and packages required by your application. To work with the Facebook PHP SDK and other dependencies in your Facebook application, it is recommended to have Composer installed. Follow these steps to install Composer:
- Visit the official Composer website at getcomposer.org.
- On the homepage, you will see two installation methods: Command-line installation and Windows installer.
- If you are using a Unix-based system (Mac or Linux), the command-line installation option is recommended. Open your terminal and execute the installation command provided on the website.
- If you are using Windows, you can download the Windows installer, which provides an easy-to-use graphical interface for installing Composer.
- Follow the installation instructions specific to your operating system.
- After installation, open your terminal or command prompt and run the
composercommand to verify that it is installed correctly. You should see the Composer version and available commands.
With Composer installed, you can now use it to manage your application’s dependencies. Composer simplifies the process of installing, updating, and removing libraries, ensuring that your Facebook application has the necessary packages to function correctly.
In the next section, we will discuss how to create a new PHP project for your Facebook application and define its dependencies in a composer.json file.
Create a New PHP Project
When developing a Facebook application in PHP, it is best practice to organize your code within a project structure. This helps maintain a clean and modular codebase. Follow these steps to create a new PHP project for your Facebook application:
- Create a new directory on your local machine where you want to store your PHP project.
- Navigate to the newly created directory using your terminal or command prompt.
- Run the following command to initiate a new PHP project:
composer initThis will start the project initialization process and guide you through a series of prompts to set up your project’s details, such as name, description, author, and so on. Press “Enter” to accept the default values or provide your own.
Once you have provided the necessary information, Composer will generate a composer.json file in your project directory. This file lists the dependencies and configuration for your project.
Next, you can add the required dependencies to the composer.json file. For example, if you want to use the Facebook PHP SDK, you can specify it as a dependency by running the following command:
composer require facebook/graph-sdkThis will fetch the Facebook PHP SDK and include it in your project’s vendor directory, along with any other dependencies the SDK may have.
With your PHP project and dependencies set up, you can now start writing your code and implementing the various features and functionalities of your Facebook application.
In the next section, we will explore how to install and configure the Facebook PHP SDK in your project to interact with the Facebook API.
Install Facebook PHP SDK
The Facebook PHP SDK is a powerful library that allows you to integrate your PHP application with the Facebook platform. It provides a convenient interface to interact with the Facebook API and access various features, such as user authentication, retrieving user information, posting to a user’s timeline, and more. To install the Facebook PHP SDK, follow these steps:
- Open your terminal or command prompt and navigate to the root directory of your PHP project.
- Ensure that Composer is installed, as we will use it to manage dependencies.
- Run the following command to require the Facebook PHP SDK in your project:
composer require facebook/graph-sdkThis command downloads the Facebook PHP SDK and its dependencies, and adds them to your project’s vendor directory.
After the installation is complete, you can start using the Facebook PHP SDK in your PHP code. To begin, you will need to include the Composer autoloader in your PHP scripts. Add the following line of code at the top of your PHP files:
require_once 'vendor/autoload.php';This will load the necessary classes and functions from the Facebook PHP SDK, allowing you to use its functionality in your application.
Now that you have the Facebook PHP SDK installed and ready to use, you can start implementing the various Facebook app functionalities, such as user authentication, retrieving user information, and interacting with the Facebook Graph API. Refer to the Facebook PHP SDK documentation for detailed information on how to use each feature.
In the next section, we will discuss how to obtain the Facebook Login Button code and implement user authentication in your Facebook application.
Obtain a Facebook Login Button Code
Implementing user authentication is a crucial step in creating a Facebook application. To enable users to log in to your app using their Facebook accounts, you will need to include a Facebook Login button. Facebook provides a simple way to obtain the code for the login button. Follow these steps to obtain the Facebook Login button code:
- Go to the Facebook Developer website and access your app’s dashboard.
- Navigate to the “Quickstarts” section, typically found in the left-hand menu.
- Select “Web” as the platform to generate the Facebook Login button code for web applications.
- Choose the option to set up Facebook Login.
- Enter the URL of your app’s login callback page. This is the page where Facebook will redirect users after they log in successfully. Make sure this URL is accessible and handles the authentication callback.
- Customize the appearance of the login button by selecting a size, button type, and other options.
- Get the generated code for the Facebook Login button.
- Copy the provided HTML code snippet and paste it into your application’s HTML file where you want the login button to appear.
- Save the changes to your HTML file.
The generated code will include the necessary JavaScript and HTML markup to create and style the Facebook Login button. When users click on this button, they will be prompted to authenticate with their Facebook credentials through a popup window or redirect (depending on the user’s settings).
Once your Facebook Login button code is added to your application, you will need to handle the authentication callback to complete the login process and retrieve the necessary user information from Facebook. We will cover this topic in the next section.
Implement User Authentication
User authentication is a fundamental aspect of Facebook applications, allowing users to securely log in to your app using their Facebook credentials. To implement user authentication in your Facebook application, follow these steps:
- Ensure that you have the Facebook PHP SDK installed and the Facebook Login button code added to your application.
- Create a PHP script or page that will serve as the callback URL for the authentication process. This URL should match the one defined in the Facebook Developer dashboard when obtaining the Facebook Login button code.
- In the callback script, use the Facebook PHP SDK to initialize the Facebook object with your app credentials.
- Check if the user is already authenticated by calling the
getAccessToken()method. If an access token is returned, it means the user is logged in. - If the user is not logged in, redirect them to the Facebook Login page by calling the
getLoginUrl()method and providing the necessary parameters, such as requested permissions and the callback URL. - Upon successful login, Facebook will redirect the user back to your callback URL with an authorization code or an access token.
- In the callback script, exchange the authorization code or access token for a long-lived access token by calling the
getAccessTokenFromCode()orgetAccessTokenFromRedirect()method. - Store the access token securely for future use, e.g., in a session variable or in the database, to maintain the user’s authenticated state.
- Retrieve and process the user’s information, such as name, email, profile picture, etc., by making API calls to the Facebook Graph API using the obtained access token.
Implementing user authentication allows your Facebook application to provide personalized experiences, access user data, and interact with the Facebook platform on behalf of the user. By following the steps above and integrating user authentication, you can enhance the functionality and engagement of your Facebook application.
In the next section, we will discuss how to create a Facebook App Login callback URL to handle the user authentication callback and retrieve user information from Facebook.
Create Facebook App Login Callback URL
To handle the user authentication callback from Facebook, you need to create a callback URL in your Facebook application. This URL is the destination where Facebook redirects users after they successfully log in using their Facebook credentials. Follow these steps to create a Facebook App Login callback URL:
- Determine the URL of the page in your application that will handle the user authentication callback.
- In your Facebook Developer Dashboard, go to your app’s Settings and open the “Products” tab.
- Click on “Facebook Login” and then “Settings”.
- In the “Valid OAuth Redirect URIs” section, add the URL of your callback page. This URL should point to the actual location where the callback handling code resides.
- Save the changes to update the callback URL.
By configuring the Valid OAuth Redirect URIs, you ensure that Facebook only redirects users to the specified URLs after successful authentication. This helps prevent unauthorized redirects and enhances the security of your application.
With the Facebook App Login callback URL set up, you can now implement the code to handle the user authentication callback and retrieve user information from Facebook. In the next section, we will discuss how to handle the user authentication callback and parse the user data returned by Facebook.
Handle User Authentication Callback
After a user successfully logs in using their Facebook credentials, Facebook redirects them back to your Facebook App Login callback URL. In this section, we will discuss how to handle the user authentication callback and retrieve user information from Facebook.
- Create the PHP script or page that corresponds to your Facebook App Login callback URL. This script will receive the authorization code or access token sent by Facebook.
- Verify that the callback request contains the necessary parameters, such as the
codeoraccess_token. - Initialize the Facebook PHP SDK by setting up the app credentials and creating a new instance of the Facebook object.
- Exchange the authorization code or access token received from the callback request for a long-lived access token using the
getAccessTokenFromCode()orgetAccessTokenFromRedirect()method, respectively. - Store the obtained access token securely, such as in a session variable or database, to maintain the user’s authenticated state across different pages and requests.
- Use the access token to make API calls to the Facebook Graph API and retrieve user information. For example, you can call the
/meendpoint to obtain the user’s name, email, profile picture, and other relevant data. - Process and utilize the retrieved user information as needed in your application, e.g., display the user’s name, profile picture, or create a personalized user experience.
- Handle any potential errors or exceptions that may occur during the authentication process, such as invalid access tokens or network issues.
Handling the user authentication callback allows you to complete the login process, obtain the necessary user information from Facebook, and integrate it into your application. Remember to implement appropriate error handling and security measures to ensure a smooth and secure authentication experience for your users.
With the user authentication callback handled and user information retrieved, you can now implement additional functionalities in your Facebook application, utilize the data to personalize user experiences, and interact with the Facebook platform on behalf of the authenticated user.
Retrieve User Information from Facebook
Once a user has authenticated your Facebook application, you can retrieve their information from Facebook using the Facebook PHP SDK and the access token obtained during the authentication process. Here are the steps to retrieve user information from Facebook:
- Ensure that you have the user’s access token securely stored after a successful login.
- Create an instance of the Facebook object using the SDK and provide your app credentials.
- Set the user’s access token in the Facebook object to make authenticated API requests.
- Use the Facebook object to call the desired endpoints of the Facebook Graph API, such as
/meto access the user’s profile information. - Parse and process the response to obtain the user’s data, such as their name, email, profile picture, and other relevant details.
- Utilize the retrieved user information in your application as needed, such as displaying it on user profiles, personalizing user experiences, or performing actions on behalf of the user.
The Facebook Graph API offers a wide range of endpoints to access different types of user information. The /me endpoint, for example, allows you to retrieve the currently authenticated user’s data. You can also retrieve information about friends, events, groups, and more using the respective endpoints.
Remember to handle errors and exceptions that may occur while making API requests or processing the responses from Facebook’s servers. This helps ensure a smooth and reliable user experience within your application.
By retrieving user information from Facebook, you can personalize your application’s interactions, provide a seamless user experience, and leverage the social graph of Facebook’s user network for more engaging and dynamic functionalities.
In the next section, we will explore how to create additional functionalities in your Facebook application that leverage the capabilities of the Facebook PHP SDK.
Create Other Facebook App Functionality
In addition to user authentication and retrieving user information, the Facebook PHP SDK offers various other functionalities that you can integrate into your Facebook application. Here are some examples of other Facebook app functionalities you can create:
- Post to User’s Timeline: Utilize the Facebook PHP SDK to post content, such as status updates, photos, or links, to the user’s Facebook timeline. This allows users to share information from your app directly to their Facebook network.
- Retrieve User’s Friends: Use the Facebook SDK to access the user’s friend list and retrieve their friends’ information, such as names, profile pictures, or any other available data. This can be used, for example, to suggest connections or create social interactions within your app.
- Implement Social Sharing: Enable users to share content from your app to their Facebook feed or send app-specific invitations to their Facebook friends. This enhances the reach and visibility of your app and encourages user engagement.
- Access Insights and Analytics: Leverage the Facebook Graph API to gather valuable insights and analytics about user interactions and performance metrics of your app. This data can help inform your app’s development and marketing strategies.
- Implement Facebook Messenger Integration: Integrate Facebook Messenger into your app to enable users to communicate and share content directly through private messages. This can enhance engagement and facilitate communication between users.
- Implement App Events: Track and log specific events within your app, such as user actions or milestones, using the Facebook SDK’s app events functionality. This allows you to analyze user behavior and optimize your app’s performance.
These are just a few examples of the various functionalities you can create with the Facebook PHP SDK. The possibilities are extensive, and you can tailor your app’s features to suit your specific needs and goals.
Remember to refer to the official documentation and guides provided by Facebook for detailed information on how to implement each functionality and make the most of the Facebook API.
With the ability to create additional Facebook app functionalities, you can enhance user engagement, expand the reach of your app, and provide a more personalized and dynamic user experience.
In the next section, we will wrap up this guide and summarize the key points discussed in the article.
Conclusion
Creating a Facebook application in PHP opens up a world of possibilities for engaging with a massive user base and leveraging the power of the Facebook platform. Throughout this guide, we covered the essential steps to successfully create and develop a Facebook application.
We started by discussing the prerequisites, emphasizing the importance of having a solid understanding of PHP, HTML, CSS, and JavaScript. We then proceeded to walk you through the process of setting up a Facebook Developer account and creating a new Facebook app.
You learned how to configure your app settings, obtain the necessary app credentials, and set up a local development environment using tools like XAMP, MAMP, or LAMP. We also covered the installation of Composer and the Facebook PHP SDK, which are crucial components of your Facebook application development process.
With the foundation set, we focused on implementing user authentication using the Facebook Login button. We discussed how to handle the user authentication callback and retrieve user information from Facebook using the Facebook PHP SDK.
Lastly, we explored the possibilities of creating additional functionality within your Facebook application, such as posting to the user’s timeline, accessing user’s friends, implementing social sharing, and utilizing insights and analytics.
By following the steps outlined in this guide, you are equipped with the knowledge and skills to create a robust and engaging Facebook application in PHP. Remember to refer to the documentation and resources provided by Facebook for more detailed information on each aspect of the development process.
Now it’s time to unleash your creativity and build a stellar Facebook application that stands out in the crowded social media landscape. Happy coding!