Introduction
Welcome to our guide on how to import journal entries into QuickBooks Online. As a business owner or accountant, you may find it essential to transfer your journal entries from external accounting systems or spreadsheets into QuickBooks Online. This can be a daunting task, but with the right knowledge and tools, it can be a seamless process.
Importing journal entries into QuickBooks Online offers numerous benefits, including saving time and reducing manual data entry errors. By automating the process, you can ensure accurate financial records and focus on other critical aspects of your business.
In this tutorial, we will walk you through a step-by-step process to successfully import journal entries into QuickBooks Online. From preparing your journal entries to reviewing and posting them, we will cover every aspect of the import process. Whether you are a small business owner or an accountant, this guide will equip you with the knowledge necessary to streamline your journal entry import process.
We understand that each business has unique financial requirements, and QuickBooks Online offers flexibility to accommodate various file formats. Whether you have your journal entries in Excel, CSV, or IIF files, we will guide you through the conversion and import process.
Before we dive into the technical steps, it is crucial to note that accuracy is paramount when importing journal entries. Make sure you carefully review your journal entries for any errors or discrepancies before importing. We also recommend backing up your QuickBooks Online data before proceeding with the import process as a precautionary measure.
Are you ready to master the art of importing journal entries into QuickBooks Online? Let’s get started!
Step 1: Prepare your journal entries
Before you can import your journal entries into QuickBooks Online, it’s crucial to ensure that they are properly prepared. This step involves organizing and formatting your data in a way that QuickBooks can understand and process.
First, gather all the necessary information for your journal entries, including the account numbers, dates, transaction descriptions, and amounts. It’s important to double-check this information to avoid any errors during the import process.
If you have your journal entries in an external accounting system or spreadsheet, ensure that the data is arranged in a logical and consistent manner. You can use column headers to identify the different fields, such as “Account Number,” “Date,” “Description,” and “Amount.”
Next, review the chart of accounts in QuickBooks Online. Make sure that the account numbers in your journal entries correspond to the account numbers in QuickBooks. If necessary, make any adjustments to align them correctly.
In addition, it’s important to consider the date format used in your journal entries. QuickBooks Online typically follows the MM/DD/YYYY format, so ensure that your entries adhere to this format. If your entries use a different date format, you might need to convert them before importing.
Furthermore, check for any special characters or invalid characters in your journal entry data. QuickBooks Online has specific requirements for characters that can be used in fields, so it’s important to remove any symbols or characters that may cause errors during the import process.
Finally, take the time to review and reconcile your journal entries before proceeding with the import. This helps ensure accuracy and avoid discrepancies in your financial records. Double-checking your calculations and verifying the accuracy of each entry is critical to maintaining the integrity of your financial data.
By preparing your journal entries meticulously and making sure they are properly organized and formatted, you will set the stage for a smooth import process. With this important step completed, you’re now ready to move on to the next stage: converting your journal entries into the correct file format.
Step 2: Convert your journal entries into the correct file format
Once you have prepared your journal entries, the next step is to convert them into the correct file format that is compatible with QuickBooks Online. Depending on the source of your journal entries, you may need to convert them into formats such as CSV, Excel, or IIF (Intuit Interchange Format).
If your journal entries are currently in a spreadsheet or accounting software that supports CSV export, you can save them as a CSV file. To do this, open your spreadsheet or software, go to the “File” menu, select “Save As,” and choose the CSV file format. Make sure to review the exported file to ensure it is properly formatted and all the data is accurately preserved.
If your journal entries are in Excel format, you can also save them as a CSV file by selecting the “Save As” option in Excel and choosing CSV. This step may involve some additional adjustments, such as ensuring that the field separators and row headers are properly configured.
In some cases, you may need to convert your journal entries into the IIF file format, which is specific to QuickBooks. This format allows for more advanced customization, but it requires a deeper understanding of QuickBooks and its import process. To convert your journal entries into IIF format, you may need to use a third-party converter or consult QuickBooks support for guidance.
It’s essential to check the format requirements for importing journal entries into QuickBooks Online. QuickBooks provides guidelines and templates that can help ensure your files are correctly formatted. These resources can be found in the QuickBooks Online Help Center or by reaching out to QuickBooks customer support.
During the conversion process, be sure to review your files for any potential errors or inaccuracies. Pay attention to the data presentation, headers, and column alignment to ensure that your journal entries are converted accurately and can be easily imported into QuickBooks Online.
Once your journal entries are converted into the correct file format, it’s time to move on to the next step: logging in to QuickBooks Online and accessing the import feature.
Step 3: Log in to QuickBooks Online
Now that you have your journal entries prepared and converted into the appropriate file format, it’s time to log in to QuickBooks Online to begin the import process.
First, open your preferred web browser and navigate to the QuickBooks Online login page. Enter your login credentials – your username and password – to access your QuickBooks Online account. If you don’t have an account yet, you will need to sign up for one.
Once you are logged in, you will be redirected to the QuickBooks Online dashboard, which provides an overview of your company’s financial activities and reports.
Before proceeding with the import, take a moment to familiarize yourself with the QuickBooks Online interface, especially the navigational menu. This will help you locate the necessary features and options as you progress through the import process.
If you are new to QuickBooks Online or not familiar with its features, you may find it beneficial to explore the available tutorials and resources provided by QuickBooks. These resources can help you gain a better understanding of the platform and maximize its capabilities.
Take the time to ensure that your QuickBooks Online account is set up correctly and that your chart of accounts matches the account numbers used in your journal entries. This will help streamline the import process and ensure accurate data mapping in the subsequent steps.
Once you are logged in and familiar with the QuickBooks Online interface, you are ready to proceed to the next step: accessing the import feature in QuickBooks Online. This feature will allow you to upload and import your converted journal entries into your QuickBooks Online account.
With QuickBooks Online open and your account ready, let’s move on to the next step, where we will guide you through accessing the import feature in QuickBooks Online.
Step 4: Access the Import Feature in QuickBooks Online
After logging in to QuickBooks Online, the next step is to access the import feature, which will allow you to upload and import your converted journal entries.
To access the import feature, navigate to the home screen or dashboard of QuickBooks Online. Look for the “+ New” button, usually located in the top right corner of the screen. Click on it, and a dropdown menu will appear.
In the dropdown menu, you will see various options for creating new transactions or importing data. Look for the option labeled “Upload file” or “Import data” and click on it. This will open the import data screen.
In the import data screen, you will be prompted to select the file containing your converted journal entries. Click on the “Browse” or “Choose File” button, which will open a file explorer window on your computer. Locate the converted file on your computer and select it for upload.
After selecting the file, QuickBooks Online will begin the import process. Depending on the size of your file and the number of entries it contains, the import process may take a few moments. You may see a progress bar indicating the status of the import.
During the import, QuickBooks Online will perform a validation process to ensure the accuracy and integrity of the data being imported. If any errors or discrepancies are detected, QuickBooks will display them and provide suggestions for resolution.
Once the import process is complete, QuickBooks Online will inform you of the status of the import. It will indicate whether the import was successful or if any issues were encountered during the process. In case of any errors, QuickBooks will provide detailed information on the specific problems encountered.
If the import is successful, you can proceed to the next step to map the fields in your journal entries to the corresponding fields in QuickBooks Online. This step is crucial to ensure that the data is correctly matched and imported into the appropriate accounts.
Now that you have accessed the import feature and uploaded your converted file, let’s move on to the next step: mapping your journal entry fields in QuickBooks Online.
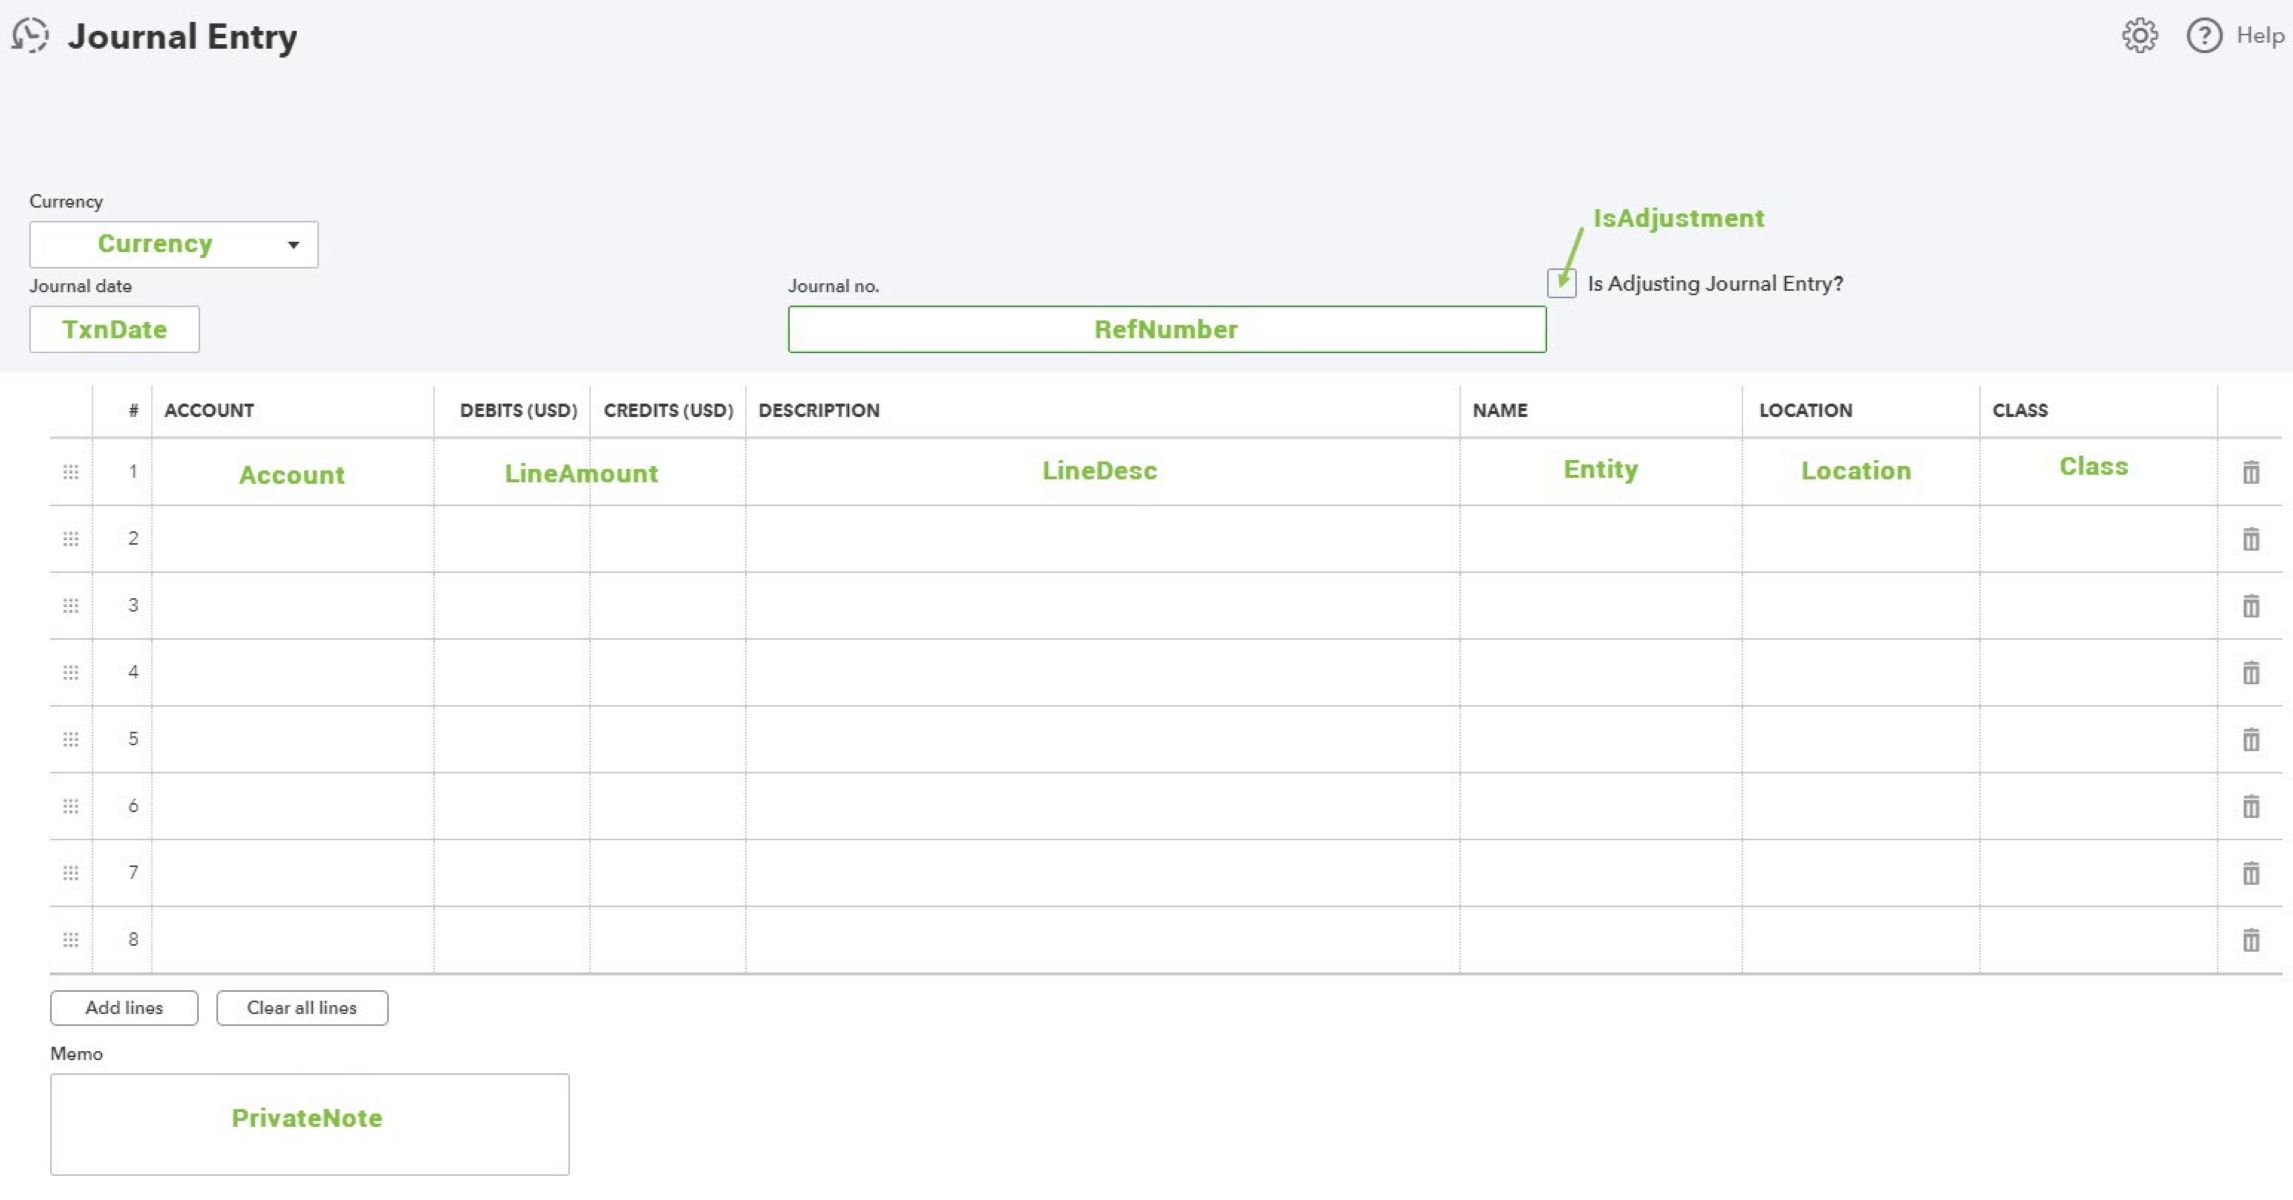
Step 5: Map your journal entry fields
After successfully uploading your converted journal entry file, the next step is to map the fields in your journal entries to the corresponding fields in QuickBooks Online. This mapping process ensures that the data is accurately transferred and imported into the correct accounts.
QuickBooks Online provides a mapping interface where you can specify how each field in your journal entries should be mapped to the corresponding QuickBooks fields. To begin mapping, review the field options available in QuickBooks Online and their corresponding fields in your journal entries.
Start by selecting the type of transaction you are importing, such as “Journal Entry.” QuickBooks Online will display a list of available fields that can be mapped. Depending on your setup, you may see fields like “Account,” “Date,” “Description,” “Debit,” and “Credit.”
One by one, for each field in your journal entries, select the corresponding field in QuickBooks Online. For example, if the “Account” field in your journal entries corresponds to the “Account” field in QuickBooks Online, select the “Account” field from the available options.
If the field names in your journal entries are similar but not an exact match to the field names in QuickBooks Online, you may need to choose a custom mapping option. This will allow you to manually map the fields based on their content or specify a specific field in QuickBooks Online for the mapping.
While mapping the fields, make sure to review the selected options to ensure they are accurate and aligned with your journal entry data. Double-check that all the fields in your journal entries are mapped and that none are left unassigned.
Additionally, consider any special cases or customizations that may apply to your journal entries. QuickBooks Online allows for various customization options, such as assigning classes, locations, or customer/vendor references to specific transactions. Take advantage of these features if they are applicable to your business needs.
Once you have mapped all the fields in your journal entries, review the mapping settings to ensure their accuracy. Take the time to validate the mapping and confirm that each field is correctly assigned to its corresponding QuickBooks field.
When you are satisfied with the field mapping, save your mapping settings. QuickBooks Online will store these settings for future imports, making subsequent imports more efficient and streamlined.
Now that your journal entry fields are successfully mapped, you can move on to the next step: validating and reviewing your imported journal entries.
Step 6: Validate and review your imported journal entries
After mapping the fields in your journal entries, it’s crucial to validate and review the imported data in QuickBooks Online. This step ensures the accuracy and integrity of your financial records before further processing.
Start by reviewing a sample of the imported journal entries. Check if the data in QuickBooks Online matches the information in your original journal entry file. Verify that the account numbers, dates, descriptions, and amounts are correctly imported.
If you notice any discrepancies or errors, retrace your steps and review the field mapping settings. Ensure that the fields in your journal entries are mapped correctly to the corresponding fields in QuickBooks Online.
Continue by validating the overall balance of your journal entries. Ensure that the debits and credits are balanced, as this is fundamental to maintaining accurate financial records. QuickBooks Online provides a helpful balance check feature to identify any imbalances in your journal entries.
If you have a large number of journal entries, you may want to consider spot-checking a representative sample. This can help identify any systematic errors or issues that require attention.
In addition to validating the data, consider reviewing the imported journal entries for any other potential errors or inconsistencies. Pay attention to duplicate entries, incorrect account assignments, or any additional information that may require adjustment.
If you encounter any errors or discrepancies during the validation and review process, take the necessary steps to correct them. Depending on the nature of the issue, you may need to modify the original journal entry file and repeat the import process, or manually edit the imported entries in QuickBooks Online.
It’s important to note that QuickBooks Online provides various tools and reports to help you analyze and reconcile your financial data. Utilize these resources to further ensure the accuracy and integrity of your imported journal entries.
By thoroughly validating and reviewing your imported journal entries, you can address any errors or discrepancies early on, minimizing potential issues in your financial records. This sets the stage for the final step: posting your imported journal entries in QuickBooks Online.
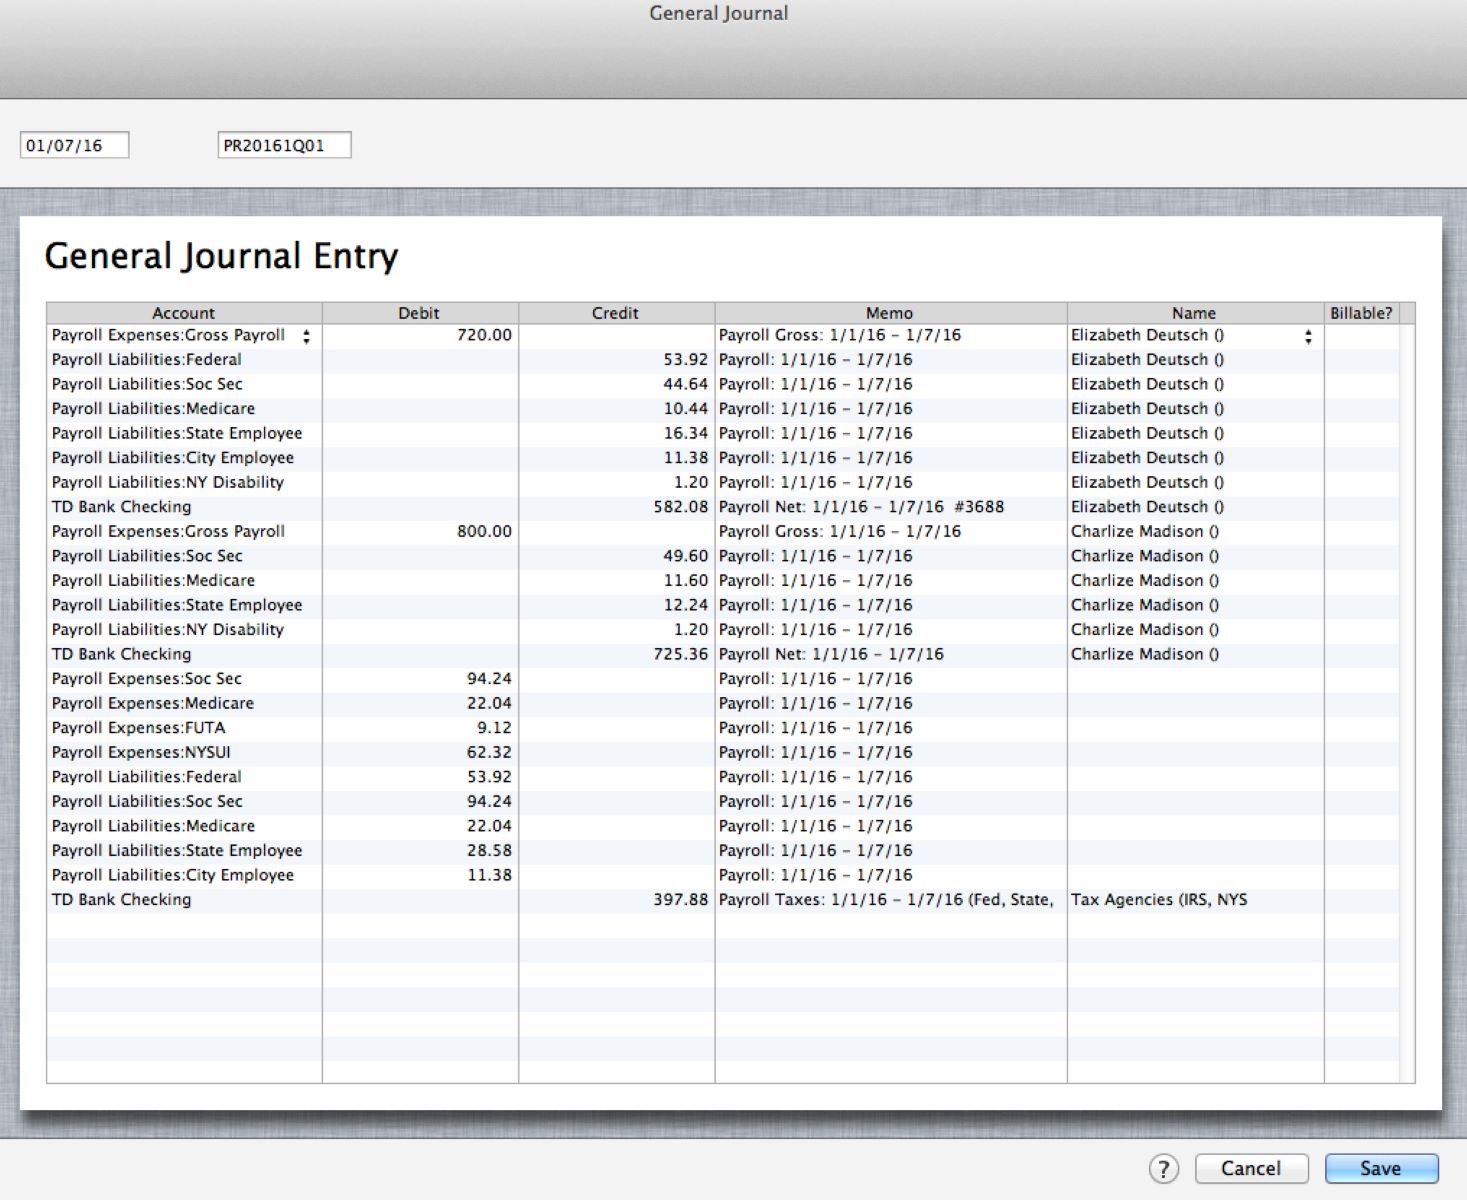
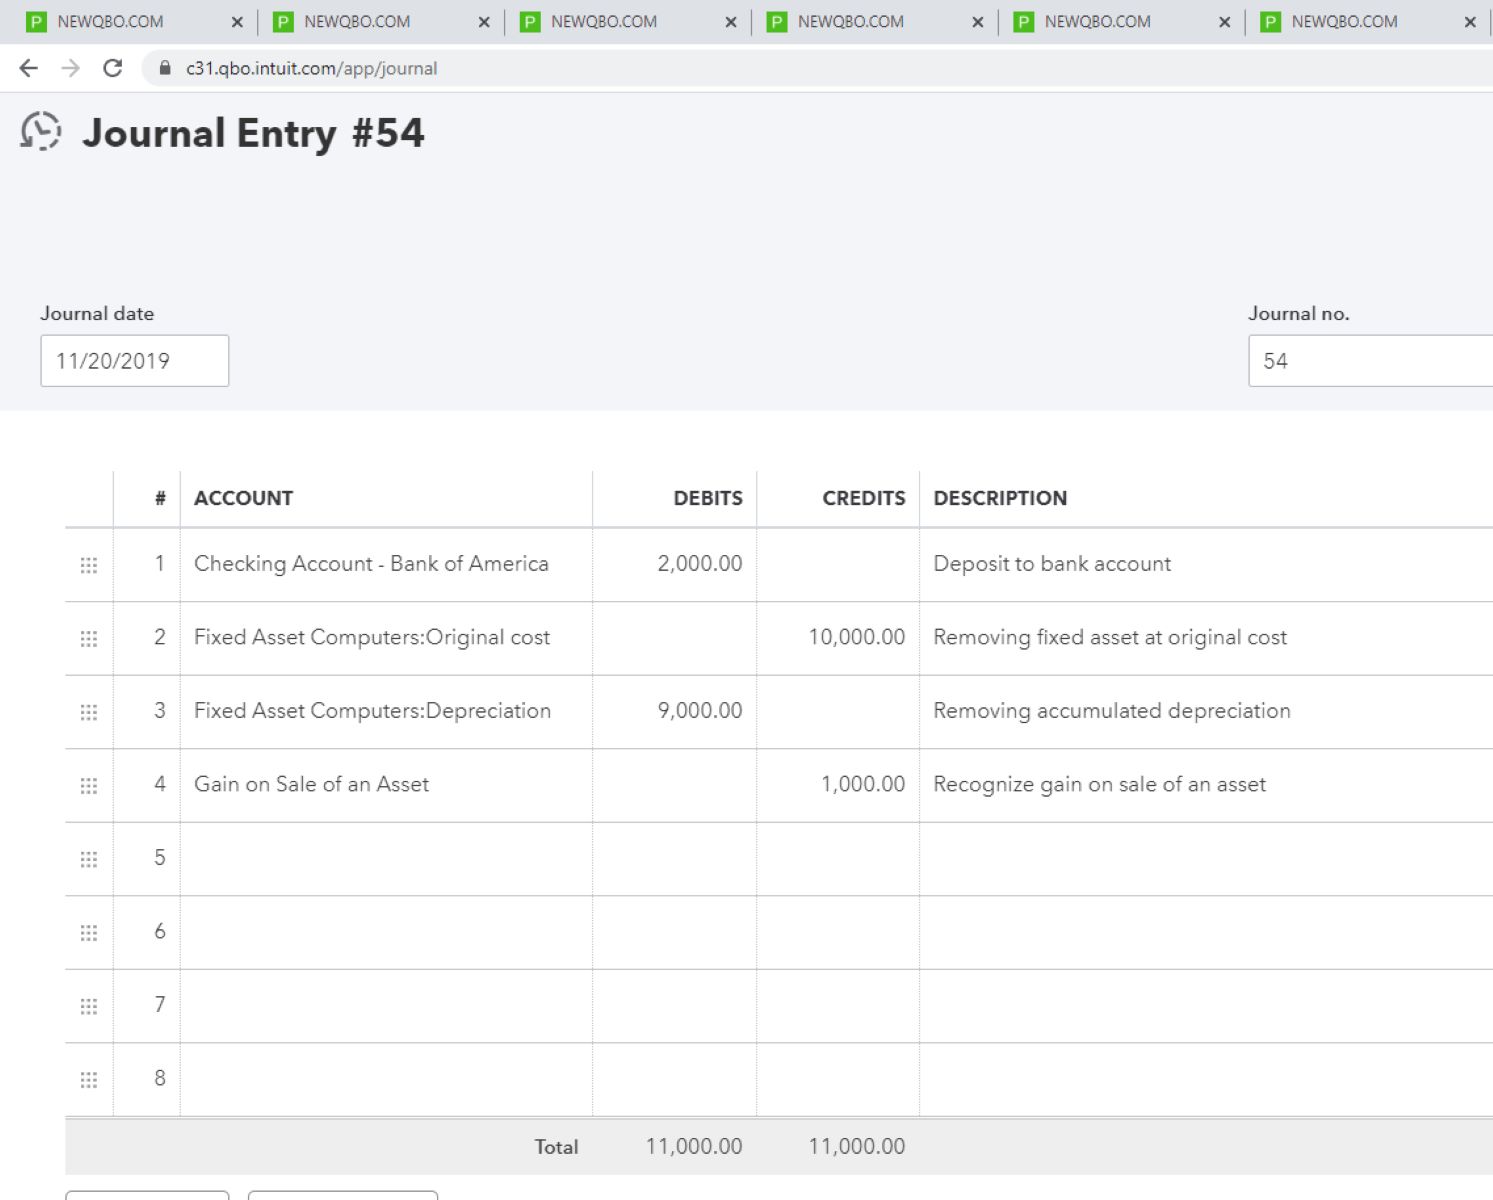
Step 7: Post your imported journal entries
After validating and reviewing your imported journal entries, the final step is to post them in QuickBooks Online. Posting your journal entries ensures that they are officially recorded in your financial records, affecting the appropriate accounts and providing an accurate representation of your company’s transactions.
When you are confident that your imported journal entries are accurate and complete, navigate to the appropriate section in QuickBooks Online to post them. Typically, this involves going to the “Accounting” or “Transactions” section and selecting the option to create a new journal entry.
In the journal entry creation screen, you will see the fields relevant to your journal entries, such as account numbers, dates, descriptions, and debit/credit amounts. Take a moment to review these fields and ensure they reflect the correct information from your imported journal entries.
If necessary, make any final adjustments or additional notes to the journal entries before posting them. Check that the account assignments are accurate, the dates align with the original entries, and any additional details are properly recorded.
Once you are satisfied with the journal entry details, click on the “Save” or “Post” button to officially record the entries in QuickBooks Online. The entries will be processed, affecting the appropriate accounts and updating your financial reports accordingly.
After posting your journal entries, take a moment to review the updated financial reports and statements in QuickBooks Online. Verify that the imported entries have had the desired impact on your accounts and that the financial information accurately reflects your business activities.
It’s also recommended to run additional checks and reconciliations to ensure the accuracy of your financial records. Review balance sheets, income statements, and any other relevant reports to confirm that the posted journal entries have been properly accounted for.
By successfully posting your imported journal entries, you have completed the import process in QuickBooks Online. Your financial records are now updated, accurately reflecting your business transactions and providing valuable insights into your company’s financial health.
Remember, whenever you import journal entries into QuickBooks Online, it’s important to maintain a backup of your original data files. This serves as a precautionary measure in case any issues arise or if you need to revert to previous data.
Congratulations! You have successfully completed the process of importing and posting journal entries in QuickBooks Online. With your financial records organized and accurately represented, you are now well-equipped to manage your business finances effectively.
Conclusion
Importing journal entries into QuickBooks Online can be a powerful tool for streamlining your financial record-keeping and minimizing manual data entry errors. By following the steps outlined in this guide, you now have the knowledge and skills to successfully import your journal entries into QuickBooks Online.
Remember, thorough preparation and organization of your journal entries is crucial. Take the time to ensure that your data is properly formatted and aligned with QuickBooks Online’s requirements. Verify the accuracy of your journal entries and reconcile them before proceeding with the import process.
Converting your journal entries into the correct file format is the next step. Whether it’s CSV, Excel, or IIF files, follow the conversion process carefully to preserve the integrity of your data.
Once you have logged in to your QuickBooks Online account, accessing the import feature allows you to upload and import your converted journal entry file. Map the fields in your journal entries to their corresponding fields in QuickBooks Online for seamless data transfer.
Take the time to validate and review your imported journal entries to ensure accuracy and detect any errors. Spot-check a sample of the entries and ensure that the balances are correct.
Lastly, post your imported journal entries to officially record them in QuickBooks Online, and review the financial reports to confirm that the entries have been accurately accounted for.
By following these steps, you can save time, reduce errors, and maintain accurate financial records in QuickBooks Online. Embrace the power of automation and take advantage of the tools and features provided by QuickBooks Online to streamline your financial management processes.
Keep in mind that QuickBooks Online offers ongoing support and resources to help you navigate any challenges you may encounter during the import process. Their help center, tutorials, and customer support are invaluable assets as you continue to use QuickBooks Online for your business needs.
Congratulations on completing the journey of importing journal entries into QuickBooks Online. With efficient import processes in place, you can focus more on analyzing your financial data, making informed decisions, and growing your business.