Introduction
QuickBooks is a popular accounting software used by businesses to manage financial transactions, track expenses, and generate detailed reports. One of the many features of QuickBooks is the ability to export data to different file formats, including Excel. Exporting QuickBooks data to Excel can be extremely useful for data analysis, creating custom reports, and sharing data with colleagues or clients.
Exporting data from QuickBooks to Excel offers several advantages. Firstly, Excel provides more flexibility in data manipulation and analysis compared to QuickBooks’ built-in reporting capabilities. By exporting data to Excel, users can apply complex formulas, create pivot tables, and generate custom charts to gain deeper insights into their financial data.
Secondly, exporting data to Excel allows users to create visually appealing reports and presentations. Excel offers a wide range of formatting options, allowing the data to be presented in a more professional and visually appealing manner. This is particularly useful for businesses that need to share financial data with stakeholders, potential investors, or board members.
Furthermore, exporting data to Excel provides the opportunity to integrate QuickBooks data with other data sources. By importing data from other software or databases into Excel, users can perform data analysis across multiple sources, enabling them to gain a comprehensive view of their financial performance.
In this article, we will guide you through the step-by-step process of exporting QuickBooks data to Excel. Whether you are a business owner, an accountant, or a bookkeeper, this guide will help you leverage the power of Excel to analyze and present your financial data efficiently. So let’s dive in and explore the process of exporting QuickBooks to Excel.
Exporting QuickBooks Data
Exporting data from QuickBooks involves a few simple steps. By following these steps, you’ll be able to export your financial data and reports into Excel format quickly and easily. Let’s get started!
The first step in exporting QuickBooks data is to open the QuickBooks application on your computer. Make sure you have the necessary permissions to access and export data from QuickBooks.
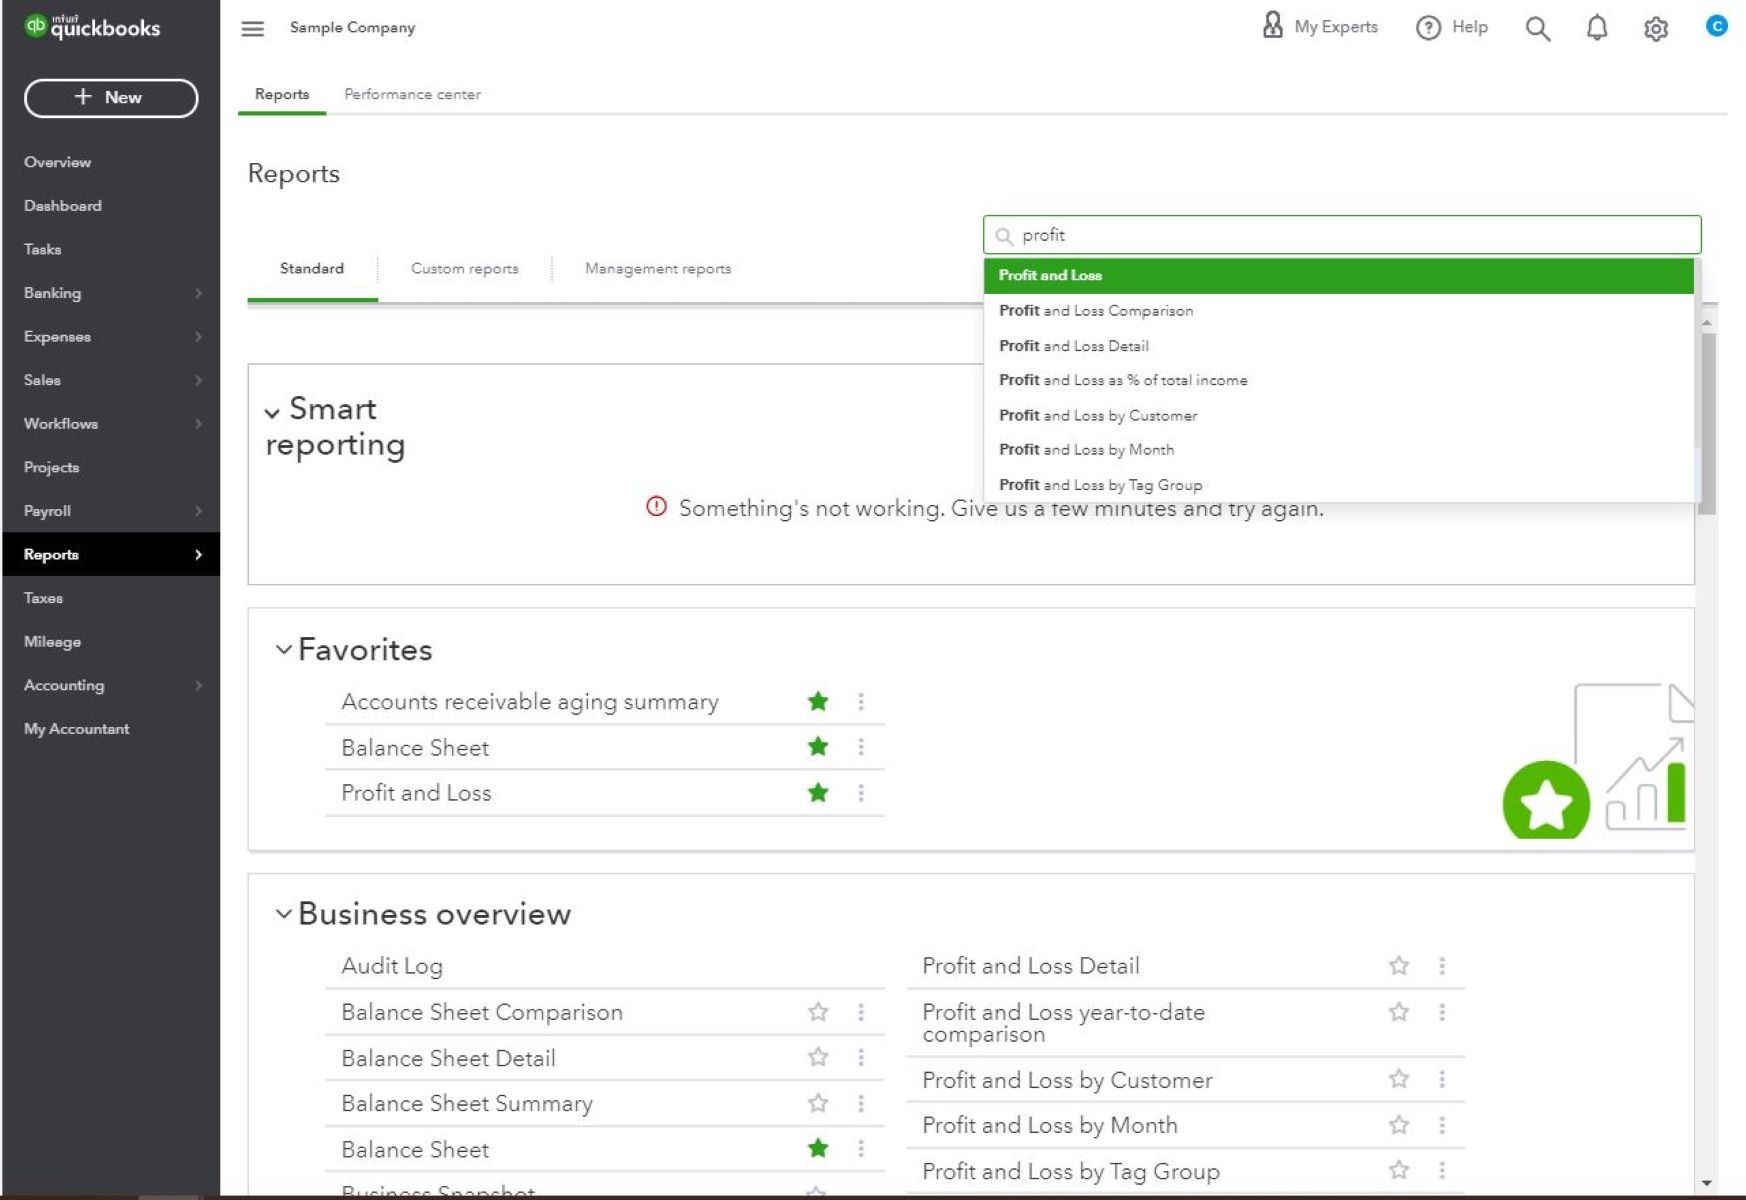
Once you have opened the QuickBooks application, navigate to the Reports tab. This tab contains all the pre-built reports that are available in QuickBooks, such as Profit and Loss, Balance Sheet, Sales Report, and more.
Choose the report that you want to export to Excel. QuickBooks offers a wide range of reports to track different aspects of your business finances. Select the report that includes the data you want to export.
If needed, you can customize the report before exporting. QuickBooks allows you to modify the report criteria, including the date range, accounts, and other filters, to refine the data you want to export. Customizing the report can help you extract specific information that is relevant to your analysis.
Once you have selected or customized the report, look for the Export button. The location of the Export button may vary depending on the version of QuickBooks you are using, but it is typically located in the top-right corner of the report screen.
Click on the Export button, and a menu will appear with various export options. Choose the Excel Spreadsheet option from the menu. This will export the report’s data into an Excel file format.
After selecting the Excel Spreadsheet option, specify the destination folder where the exported file will be saved. Choose a location that is convenient and easily accessible for future reference.
Finally, click on the Save button to initiate the export process. QuickBooks will generate an Excel file containing the exported data from the selected report and save it to the specified location.
That’s it! You have successfully exported QuickBooks data to Excel. You can now open the Excel file and start analyzing and manipulating the data using Excel’s powerful features.
Exporting QuickBooks data to Excel offers numerous benefits, including enhanced data analysis capabilities, customizable reports, and the ability to integrate data from multiple sources. By mastering the process of exporting QuickBooks data, you can unlock the full potential of Excel and make informed financial decisions for your business.
Step 1: Open QuickBooks
The first step in exporting data from QuickBooks to Excel is to open the QuickBooks application on your computer. To do this, follow the steps below:
- Locate the QuickBooks icon on your desktop or in your Start menu. Double-click on the icon to launch the application. If you do not have QuickBooks installed on your computer, you will need to download and install it from the official Intuit website.
- After launching QuickBooks, you will be prompted to enter your login credentials. Enter your username and password in the respective fields and click on the “Sign In” button. If you are using the desktop version of QuickBooks, you may need to select the company file you want to work with.
- Once you have entered your login credentials and selected the company file, QuickBooks will open to the main dashboard. Here, you will see an overview of your finances, including account balances, recent transactions, and reports.
- Ensure that you have the necessary permissions to access and export data from QuickBooks. If you do not have the necessary privileges, you may need to contact your company’s QuickBooks administrator or IT support to grant you the required access.
Opening QuickBooks is the initial step in the data export process. By launching the application and gaining access to your company’s financial data, you can proceed to the next steps of exporting the desired data to Excel.
QuickBooks provides a user-friendly interface and intuitive navigation, making it easy to access and manage your financial information. Whether you are using the desktop version or the online version of QuickBooks, the process of opening the program remains consistent.
Now that you have successfully opened QuickBooks, it’s time to move on to the subsequent steps of exporting QuickBooks data to Excel. In the next step, we will guide you through navigating to the Reports tab, where you can select the specific report to export.
Step 2: Navigate to the Reports Tab
After opening QuickBooks, the next step in exporting data to Excel is to navigate to the Reports tab. The Reports tab contains a wide range of pre-built reports that are available in QuickBooks. These reports provide valuable insights into various aspects of your business finances, such as income and expenses, sales, balance sheets, and more.
To navigate to the Reports tab, follow these steps:
- Locate the navigation menu on the left-hand side of the QuickBooks interface. The navigation menu consists of different sections, such as Home, Customers, Vendors, Employees, and Reports.
- Click on the “Reports” section in the navigation menu. This will expand the section and display various report categories, such as Sales, Customers, Vendors, Expenses, and more.
- Depending on the type of report you want to export to Excel, select the appropriate category from the expanded Reports section. For example, if you want to export a Profit and Loss report, you may need to navigate to the “Company & Financial” or “Profit and Loss” category.
- Once you have selected the desired report category, a list of available reports will appear. Browse through the list and click on the specific report that contains the data you want to export. QuickBooks offers a wide array of reports that cater to different financial aspects of your business, so choose the one that suits your needs.
Navigating to the Reports tab allows you to access a vast collection of reports that present your financial data in a structured manner. These reports provide a comprehensive view of your business’s financial performance and aid in making informed decisions.
QuickBooks makes it easy to find and select the desired report with its intuitive and user-friendly interface. By following the steps outlined above, you can locate the Reports tab and choose the specific report you want to export to Excel.
Now that you have successfully navigated to the Reports tab, it’s time to proceed to the next step, where you can customize the report before exporting it to Excel. Customizing the report allows you to refine the data and tailor it to your specific requirements.
Step 3: Choose the Report to Export
After navigating to the Reports tab in QuickBooks, the next step in exporting data to Excel is to choose the specific report that you want to export. QuickBooks offers a wide variety of pre-built reports that cover different aspects of your business finances, such as sales, expenses, profit and loss, balance sheets, and more.
To choose the report to export, follow these steps:
- From the list of available reports under the selected report category, browse through the options to identify the report that best suits your needs. Consider the specific financial data or insights you require and select the report that corresponds to those requirements.
- If you want to view more information about a specific report before exporting it, you can hover your cursor over the report name. QuickBooks will display a brief description of the report and its purpose, aiding you in making the right selection.
- Once you have identified the report you want to export, click on the report name. This will open the report in the QuickBooks interface, displaying the data and insights in a structured format.
Choosing the appropriate report is crucial as it determines the specific data that will be exported to Excel. QuickBooks offers a diverse range of reports, each providing unique perspectives on your business’s financial health and performance.
Ensure that you select the report that contains the relevant financial data you wish to export. For example, if you want to analyze your company’s sales data, choose a sales report. If you need to evaluate your expenses, select an expenses report.
QuickBooks makes it easy to identify and select the desired report with its intuitive interface and report categorization. By following the steps outlined above, you can efficiently choose the report that meets your data export requirements.
Now that you have chosen the report to export, the next step is to customize the report if necessary. Customizing the report allows you to refine the data based on specific criteria or filters to ensure that the exported data meets your exact needs.
Step 4: Customize the Report (Optional)
Customizing the report is an optional but valuable step in the process of exporting QuickBooks data to Excel. By customizing the report, you can refine the data based on specific criteria and filters, ensuring that the exported data is tailored to your specific needs and analysis requirements.
To customize the report, follow these steps:
- Once you have opened the report you want to export in QuickBooks, look for the customization options. Depending on the version of QuickBooks you are using, the customization options may be found in different locations, such as a gear icon, a customize button, or a drop-down menu.
- Click on the customization option to access the report customization settings. Here, you can modify various aspects of the report, such as the date range, accounts, customer, vendor, or item filters, and other parameters.
- Adjust the report criteria according to your needs. For example, if you only want to export data for a specific period, modify the date range accordingly. If you want to focus on specific accounts or categories, apply the necessary filters to refine the data.
- Explore the different customization options available for the report, such as sorting options, column selection, display format, and subtotal configurations. By leveraging these options, you can fine-tune the report to present the data in the most meaningful and insightful way.
Customizing the report allows you to extract specific data and insights that are relevant to your analysis. It helps you focus on the key aspects of your business finances and provides a more refined and targeted view of your financial performance.
QuickBooks offers a range of customization options, enabling you to tailor the report to your exact requirements. Take advantage of these options to have control over the exported data and extract the most relevant information for your analysis.
Once you have customized the report, you can proceed to export it to Excel in the next step. However, if you are satisfied with the default report settings and do not require any customizations, you can skip this step and move directly to the export process.
Now that you understand the process of customizing the report, let’s move on to the next step, where you will learn how to export the report to Excel format.
Step 5: Click on the Export Button
After customizing the report (if necessary) in QuickBooks, the next step in exporting data to Excel is to click on the Export button. This button triggers the export process, converting the report’s data into a format compatible with Excel.
To click on the Export button, follow these steps:
- Locate the Export button on the QuickBooks interface. The location of the Export button may vary depending on the version of QuickBooks you are using, but it is typically located in the top right-hand corner of the report screen.
- Once you have found the Export button, click on it to initiate the export process.
Clicking on the Export button is a crucial step as it signals QuickBooks to prepare the report data for export. The software converts the report’s data into a format that can be read by Excel, ensuring a seamless transfer of information.
QuickBooks offers various export options, allowing you to export the report data to different file formats. However, since we are focusing on exporting to Excel, it is important to ensure that you select the appropriate export option specific to Excel.
Once you have clicked on the Export button, a menu with different export options will appear. Look for the option that mentions Excel or Spreadsheet, and select it. This ensures that the report data is exported to Excel format rather than other file formats.
By clicking on the Export button, you are directing QuickBooks to prepare the report for exporting to Excel. The software streamlines the process, making it quick and simple to transfer the data into a format that is compatible with Excel.
Now that you have successfully clicked on the Export button and selected the Excel export option, it’s time to proceed to the next step, where you will choose the destination folder to save the exported file.
Step 6: Select Excel Spreadsheet
After clicking on the Export button in QuickBooks, the next step in exporting data is to select the Excel Spreadsheet option. This option ensures that the report data is exported to an Excel file format, allowing for easy manipulation and analysis using Microsoft Excel.
To select the Excel Spreadsheet option, follow these steps:
- Once you have clicked on the Export button, a menu with different export options will appear on your screen. Look for the option that mentions Excel or Spreadsheet and select it. The exact wording may vary depending on the version of QuickBooks you are using, but it should indicate the export option for Excel.
- Clicking on the Excel Spreadsheet option will instruct QuickBooks to convert the report data into an Excel-compatible format. This ensures that the exported file can be opened and viewed using Microsoft Excel.
Choosing the Excel Spreadsheet option is essential if you intend to analyze, manipulate, or further process the data in Excel. Excel offers a wide range of powerful features, such as formulas, pivot tables, charts, and conditional formatting, enabling you to gain deeper insights and visualize the data effectively.
By selecting the Excel Spreadsheet option, you ensure that the report data is exported in a structured format that is compatible with Excel. This seamless transfer allows for a smooth transition from QuickBooks to Excel, facilitating further data analysis and exploration.
QuickBooks simplifies the process of exporting data, including the availability of the Excel Spreadsheet option. This user-friendly interface ensures that you can easily export the report data to Excel format without any technical difficulties.
Now that you have successfully selected the Excel Spreadsheet option, it’s time to move on to the next step, where you will choose the destination folder to save the exported file.
Step 7: Choose the Destination Folder
Once you have selected the Excel Spreadsheet option to export your data from QuickBooks, the next step is to choose the destination folder where you want to save the exported file. When choosing the destination folder, consider a location that is easily accessible and organized for future reference and analysis.
To choose the destination folder, follow these steps:
- After selecting the Excel Spreadsheet option in the previous step, QuickBooks will prompt you to choose the location where you want to save the exported file. The dialog box that appears allows you to navigate through your computer’s directory structure to select the desired folder.
- Click on the “Browse” or “Choose Folder” button in the dialog box to open the file explorer window.
- Navigate to the desired destination folder using the file explorer window. You can click on folders to expand them and view their contents.
- Once you have located the desired destination folder, click on it to select it as the location for saving the exported file.
- After selecting the destination folder, you may have the option to rename the exported file before saving. Enter a descriptive and meaningful name for the file if desired, or you can leave it as the default file name set by QuickBooks.
Choosing the right destination folder is important for efficient file management and future access. Consider creating a dedicated folder for storing QuickBooks exports or using an existing folder that aligns with your file organization system.
By choosing the destination folder, you ensure that the exported file is saved in the desired location, making it easier for you to locate and access the file when needed.
QuickBooks simplifies the process of selecting the destination folder, allowing you to choose the appropriate location with just a few clicks. The intuitive interface ensures that you can easily navigate through your computer’s directory structure and find the desired folder.
Now that you have successfully chosen the destination folder, it’s time to proceed to the next step, where you will save the exported file in the selected location.
Step 8: Save the File
After choosing the destination folder for your exported file in QuickBooks, the final step is to save the file. Saving the file ensures that the exported data is stored in the selected location, ready for further analysis or sharing with others.
To save the file, follow these steps:
- Once you have chosen the destination folder, review the file name in the save dialog box. By default, QuickBooks will assign a file name based on the report name or a generic name like “Exported-Report.” If desired, you can edit the file name to make it more descriptive and meaningful.
- Click on the “Save” or “Save As” button in the save dialog box. QuickBooks will initiate the saving process, converting the exported data into an Excel file and storing it in the selected destination folder.
Saving the file after exporting the data is essential to ensure that the exported data is securely stored and easily accessible in the future. By saving the file, you retain a copy of the exported data that can be opened, analyzed, and shared using Microsoft Excel.
When choosing a file name, consider using a naming convention that is consistent with your file management system. This can include including relevant details such as the report name, date, or any other information that helps you identify the purpose or context of the exported data.
QuickBooks streamlines the saving process, allowing you to save the exported file with just a few clicks. The software automatically converts the exported data into an Excel file format, ensuring compatibility and easy access in Microsoft Excel.
Now that you have successfully saved the file, you can open it in Excel and proceed with analyzing, manipulating, or presenting the data as needed. By exporting data from QuickBooks to Excel, you can unleash the full power of Excel’s features to gain valuable insights into your financial data.
Conclusion
Exporting QuickBooks data to Excel provides businesses with a powerful tool for data analysis, customization, and presentation. By following the step-by-step process outlined in this guide, you can efficiently export your financial data and reports from QuickBooks to Excel, enabling deeper insights and informed decision-making.
We began by introducing the benefits of exporting data from QuickBooks to Excel, including enhanced data manipulation, customizable reports, and the ability to integrate data from multiple sources. These advantages make Excel a valuable companion to QuickBooks, expanding the capabilities of financial analysis and reporting.
We then outlined each step of the export process, starting with opening QuickBooks and navigating to the Reports tab. Choosing the appropriate report and customizing it to your specific needs were emphasized as crucial steps in refining the data for export.
We proceeded to selecting the export option for Excel and choosing the destination folder, ensuring seamless transfer and organization of the exported file. Finally, we concluded with saving the file, providing a secure backup and easy accessibility of the exported data.
By successfully exporting QuickBooks data to Excel, you unlock a multitude of possibilities for in-depth analysis, data manipulation, and visualization. Excel’s formula functions, pivot tables, charts, and formatting options enable you to gain critical insights and present your findings professionally.
With accurate and comprehensive financial data at your fingertips, you can make data-driven decisions, identify trends, track performance, and communicate financial information effectively with stakeholders, investors, or clients.
By leveraging the integration between QuickBooks and Excel, businesses can unleash the full potential of their financial data, paving the way for efficient financial management and growth.
So, go ahead and harness the power of exporting QuickBooks data to Excel to elevate your financial analysis and reporting capabilities, and drive your business forward with data-backed decisions.