Introduction
Welcome to this step-by-step guide on how to run a 1099 report in QuickBooks Desktop. If you are a business owner or accountant who needs to track payments and generate 1099 forms for your vendors, QuickBooks Desktop offers a simple and efficient solution. Running a 1099 report will help you gather the necessary information to accurately complete your tax forms and meet IRS requirements.
The 1099 form is used to report income received by non-employees, such as independent contractors, freelancers, or self-employed individuals. QuickBooks Desktop provides a straightforward process to compile the vendor payment data and generate a comprehensive report that simplifies your tax preparation process.
In this guide, we will walk you through the steps to access the 1099 report in QuickBooks Desktop, set up the report period, filter the report by vendors, customize the report, and finally, view and export it for your records. By following these steps, you can ensure that you have an accurate overview of your vendor payments and facilitate the reporting process.
Whether you are a seasoned QuickBooks user or a beginner, this guide will provide you with the necessary instructions to navigate the software efficiently and save valuable time during tax season. Let’s dive in and learn how to run a 1099 report in QuickBooks Desktop.
Step 1: Accessing the Reports menu
The first step in running a 1099 report in QuickBooks Desktop is accessing the Reports menu. This menu contains all the pre-built report options that QuickBooks offers, including the 1099 report.
To access the Reports menu, follow these simple steps:
- Launch QuickBooks Desktop and open the company file you want to work on.
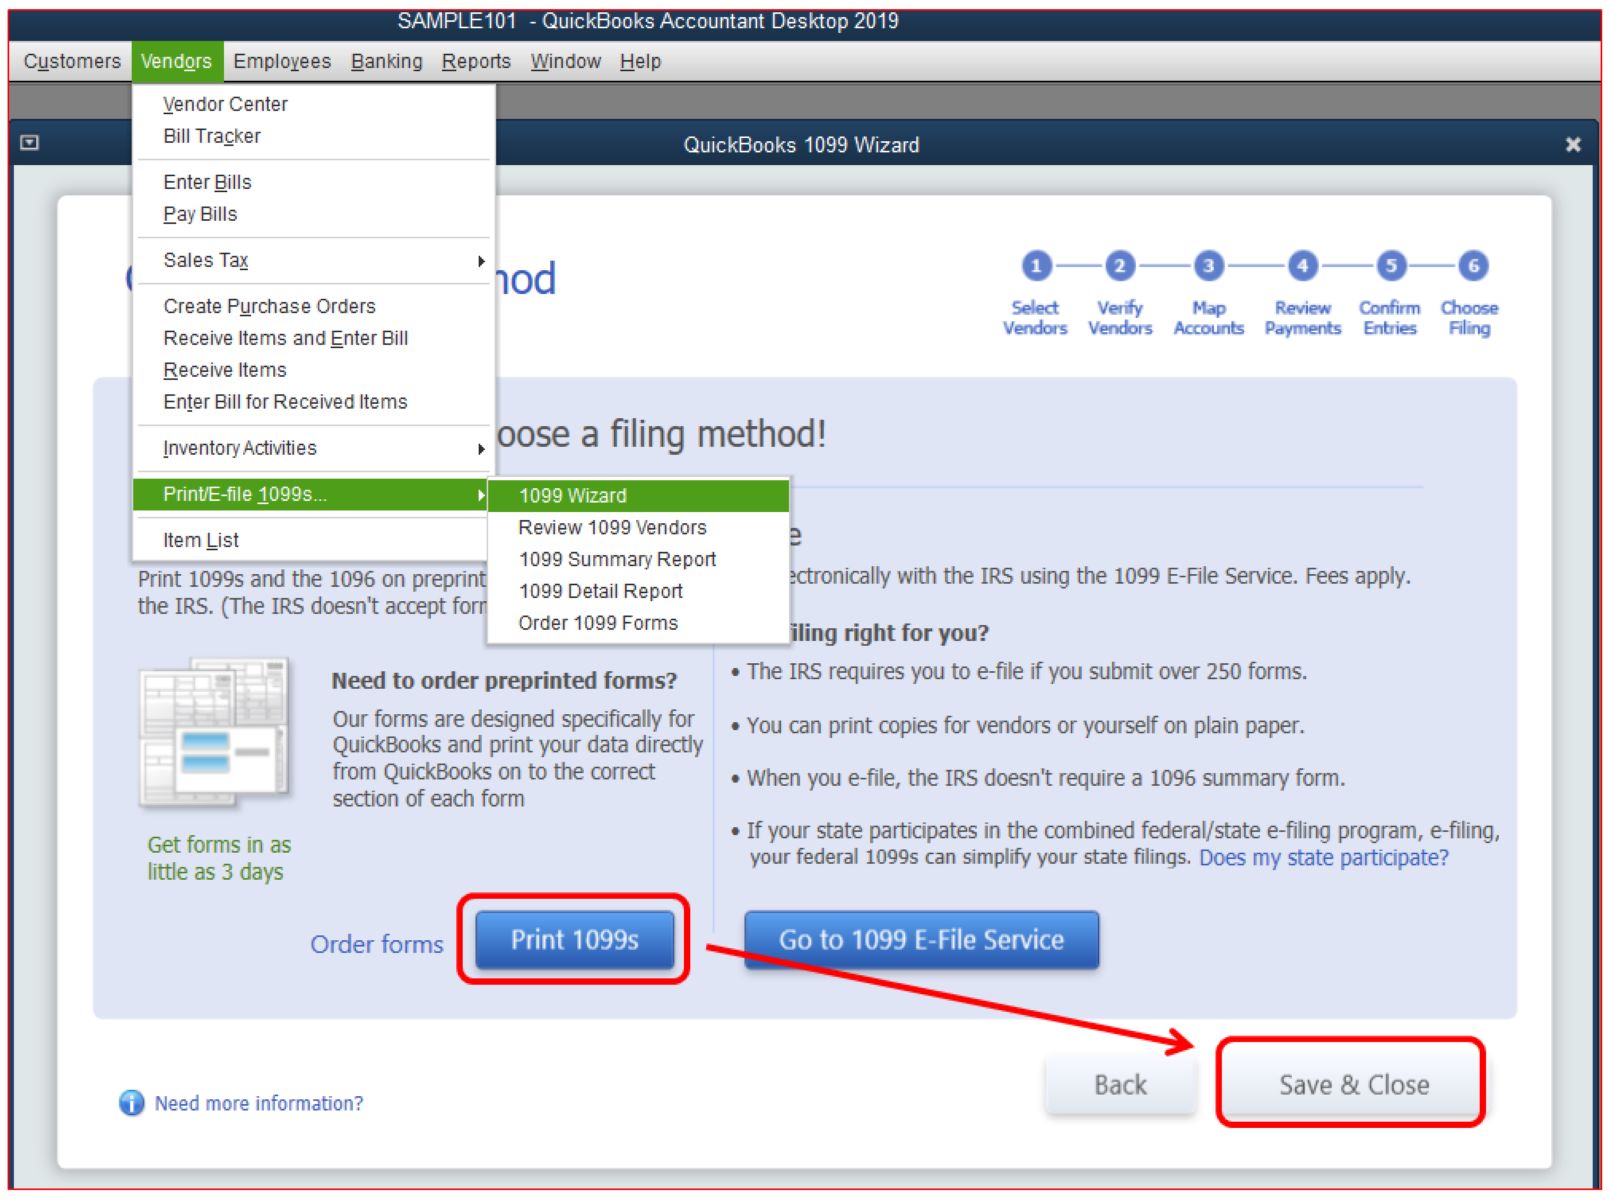
- From the top navigation bar, click on the “Reports” tab. This will open a dropdown menu with various report categories.
- Scroll down or navigate to the “Vendors & Payables” section in the Reports menu.
- Click on the “1099” option. This will launch the 1099 report and bring up the report generation window.
As you can see, accessing the Reports menu is a straightforward process. QuickBooks Desktop organizes reports into categories, making it easier for you to find the specific report you need. By selecting the “1099” option from the Vendors & Payables section, you will be on your way to generating a detailed and accurate report of your vendor payments.
Now that you know how to access the Reports menu in QuickBooks Desktop, let’s move on to the next step – selecting the 1099 report – to continue the process of running your 1099 report.
Step 2: Selecting the 1099 report
Once you have accessed the Reports menu in QuickBooks Desktop, the next step is to select the 1099 report from the available options. The 1099 report is specifically designed to compile and summarize vendor payment information for tax reporting purposes.
Here’s how you can select the 1099 report:
- After opening the Reports menu, scroll down or navigate to the “Vendors & Payables” section.
- Click on the “1099” option.
When you click on the “1099” option, QuickBooks Desktop will generate a report specifically tailored for 1099 reporting. This report will provide you with a comprehensive overview of your payments to vendors during the designated time period.
It is important to note that QuickBooks Desktop offers different variations of the 1099 report, depending on your specific reporting needs. These variations include:
- 1099 Summary: This report provides a summary of your vendor payments, grouped by vendor, and displays the total amounts for different payment types (such as cash, checks, or credit cards).
- 1099 Detail: This report provides a detailed breakdown of each vendor payment, including the vendor name, payment amount, and payment type.
Now that you have selected the 1099 report from the Reports menu, you are ready to move on to the next step in the process – setting up the report period. This will help you specify the time frame for which you want to generate the 1099 report.
Step 3: Setting up the report period
After selecting the 1099 report in QuickBooks Desktop, the next step is to set up the report period. This allows you to specify the time frame for which you want to generate the 1099 report, ensuring that it includes all the necessary vendor payment information.
Here’s how you can set up the report period:
- In the 1099 report window, locate the “Report Period” section. This section is typically located at the top of the window.
- Select the desired reporting year from the available options. QuickBooks Desktop provides the option to generate the 1099 report for the current year or previous years.
- Specify the start and end dates for the report period. This will define the range of dates within which vendor payments will be included in the report. You can enter the dates manually or use the calendar icon to select them.
By setting up the report period, you ensure that the 1099 report accurately reflects the payments made to vendors during the specified time frame. This allows you to report the correct amounts on your tax forms and fulfill your tax obligations.
It’s important to note that the report period can be adjusted as needed. QuickBooks Desktop allows you to generate the 1099 report for different time periods, such as monthly, quarterly, or annually, depending on your reporting requirements.
Once you have set up the report period, you can proceed to the next step – filtering the report by vendors. This will allow you to focus on specific vendors and streamline the information included in the 1099 report.
Step 4: Filtering the report by vendors
As you progress in running the 1099 report in QuickBooks Desktop, the next step is to apply filters to narrow down the report to specific vendors. Filtering the report by vendors allows you to focus on the relevant payment information and ensures that you include only the necessary data in your 1099 report.
Here’s how you can filter the report by vendors:
- In the 1099 report window, locate the “Filter” or “Customize” button. This button is typically located near the top or bottom of the report window.
- Click on the button to open the filter settings.
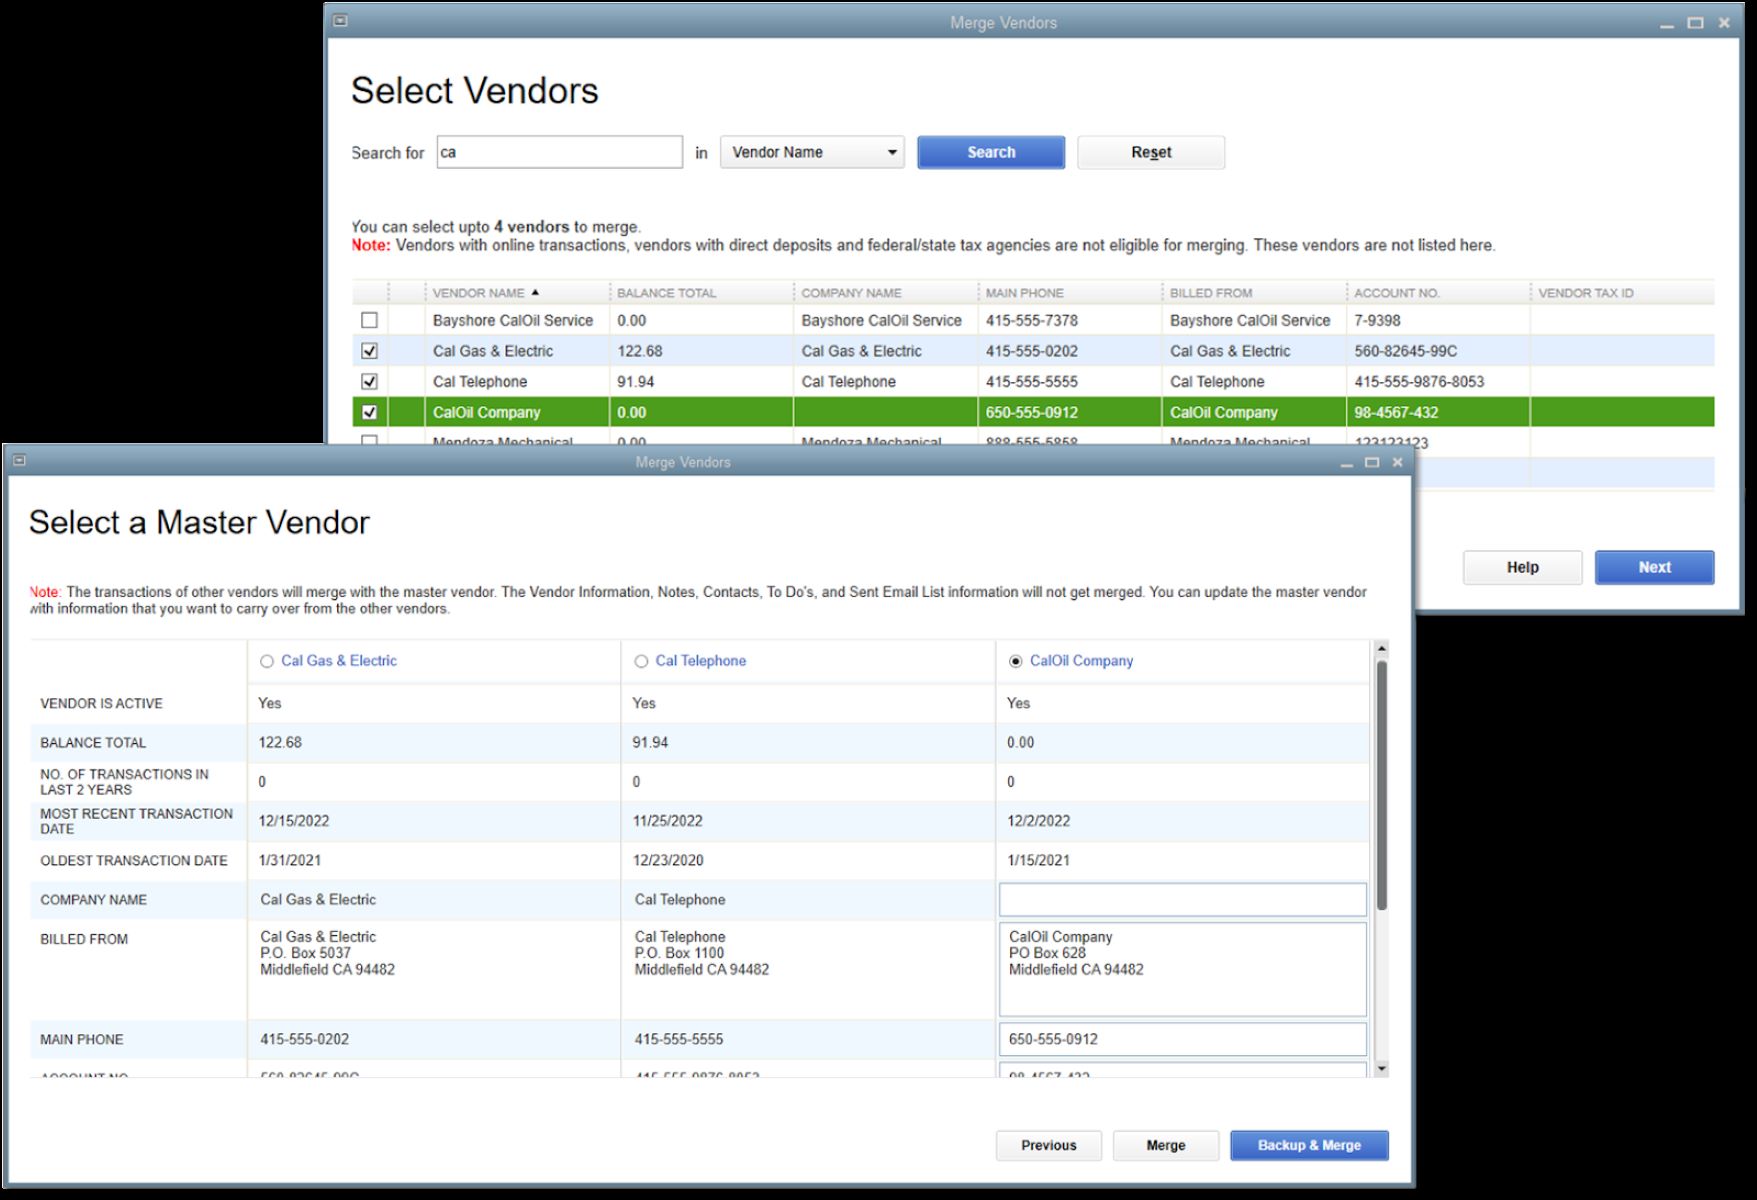
- Within the filter settings, look for the option to filter by vendors or payees. QuickBooks Desktop provides a range of filter options to refine the report, such as vendor name, vendor type, or payment account.
- Select the desired filter criteria to include or exclude specific vendors from the report. You can select multiple vendors by holding down the Ctrl or Command key while making your selections.
- Apply the filter settings and generate the report.
By filtering the report by vendors, you can focus on the payment information relevant to specific vendors, making it easier to review and analyze the data. This is especially useful if you have numerous vendors and want to generate separate 1099 reports for different groups or categories.
Furthermore, QuickBooks Desktop allows you to save these filter settings for future use. This makes it convenient if you need to run the 1099 report regularly or want to access the filtered information at a later time without having to reapply the filter criteria.
With the report filtered by vendors, you are now ready to move on to the next step – customizing the report. Customizing the report allows you to tailor it to your specific needs and preferences, enhancing its usefulness and readability.
Step 5: Customizing the report
Once you have filtered the 1099 report by vendors in QuickBooks Desktop, the next step is to customize the report according to your specific requirements. Customizing the report allows you to tailor its appearance and content to suit your needs, making it easier to review and present the information in a way that is most useful to you.
Here’s how you can customize the report:
- In the 1099 report window, locate the “Customize Report” or “Customize” button. This button is typically located near the top or bottom of the report window.
- Click on the button to open the customization options.
- Within the customization options, you can modify various aspects of the report such as columns, headers and footers, fonts, and filters.
- Choose the specific customizations you want to apply to the report. For example, you can select which columns to display, rearrange their order, or change their width.
- Preview the changes as you make them to ensure they meet your requirements.
- Once satisfied with the customizations, click on the “OK” or “Generate Report” button to generate the customized 1099 report.
Customizing the report allows you to tailor it to your specific needs and preferences. You can choose to include only the relevant columns, rearrange them for better readability, or modify the formatting to match your desired style. This customization ensures that the report presents the vendor payment information in a way that is clear and meaningful to you.
Furthermore, QuickBooks Desktop provides options to save your customized report settings for future use. This allows you to quickly generate the customized report whenever needed, without having to go through the customization process again.
With the 1099 report customized to your liking, you are now ready for the final step – viewing and exporting the report. This will allow you to review the report and save it for your records or share it with others as needed.
Step 6: Viewing and exporting the report
After customizing the 1099 report in QuickBooks Desktop, the final step is to view and export the report. This step allows you to review the report’s contents, make any necessary adjustments, and save it for your records or share it with others.
Here’s how you can view and export the report:
- Once the 1099 report is generated with your desired customizations, review it to ensure that all the necessary information is included and presented correctly.
- If you need to make any changes or modifications to the report, go back to the customization options and make the necessary adjustments.
- Once you are satisfied with the report, you have two main options for exporting it: saving it as a PDF file or printing a hard copy.
- To save the report as a PDF, click on the “Save as PDF” or “Export to PDF” option. Choose a location on your computer to save the PDF file and give it a meaningful name.
- If you prefer a hard copy, click on the “Print” option. Adjust the print settings as needed, such as selecting the printer and the number of copies, and then click on the “Print” button.
By viewing and exporting the report, you have a tangible record of your vendor payment information in the desired format. This makes it easier for you to keep organized records, share the report with others, or submit it as required for tax reporting purposes.
It is advisable to keep digital copies of the exported reports for future reference and easy retrieval. This ensures that you have a backup of the report in case of any unexpected loss or damage to the original copy.
With the report viewed and exported, you have successfully run the 1099 report in QuickBooks Desktop. By following these steps, you can accurately track and report your vendor payments, ensuring compliance with tax regulations and making your tax preparation process smoother.
Conclusion
Running a 1099 report in QuickBooks Desktop is a straightforward process that allows you to efficiently track and report vendor payments. By following the step-by-step guide outlined in this article, you can generate a comprehensive and accurate 1099 report to fulfill your tax obligations and maintain organized records.
We began by accessing the Reports menu in QuickBooks Desktop, where we selected the 1099 report specifically designed for reporting vendor payments. Then, we set up the report period, ensuring that it encompassed the desired time frame for payment tracking. Next, we filtered the report by vendors, narrowing down the information to include only relevant payment data. Afterwards, we customized the report, tailoring it to our specific preferences and requirements.
Finally, we viewed and exported the report in either PDF or printed format, providing a tangible record of the vendor payment information. This enables easy record-keeping, sharing with others, and tax reporting.
By following these steps, you have successfully navigated QuickBooks Desktop to generate a comprehensive 1099 report. This process ensures that you comply with IRS regulations and have the necessary information at your fingertips to accurately complete your tax forms.
Remember to consult with a tax professional or accountant for guidance specific to your business’s financial needs and obligations. Regularly running and reviewing 1099 reports will help you stay organized and maintain accurate records of your vendor payments, contributing to your financial efficiency and success.
So, go ahead and take advantage of QuickBooks Desktop’s powerful features to generate your 1099 report effortlessly and keep your business running smoothly.