Benefits of Merging Vendors
Merging vendors in QuickBooks can have several advantages for your business. By consolidating duplicate or similar vendor information, you can streamline your accounting processes, improve data accuracy, and effectively manage your vendor relationships. Here are some benefits of merging vendors in QuickBooks:
- Elimination of Duplicate Vendors: Over time, it’s common to accumulate duplicate vendors in your QuickBooks database. Merging vendors allows you to identify and combine these duplicates, eliminating the confusion caused by redundant vendor entries and ensuring that all vendor-related transactions are correctly attributed to a single record.
- Enhanced Data Accuracy: Having multiple vendors with slightly different variations in names, addresses, or contact information can lead to data inconsistencies and errors. By merging vendors, you can consolidate all relevant vendor details into one record, ensuring accuracy and consistency across your financial reports and transactions.
- Easier Vendor Management: Merging vendors simplifies vendor management by providing a single point of reference for all interactions and transactions. This makes it easier to communicate with vendors, track payments, and analyze vendor performance, ultimately saving time and improving operational efficiency.
- Clearer Financial Insights: Merging vendors can help you obtain a clearer picture of your financials by consolidating vendor-related expenses, invoices, and payments. With all vendor transactions concentrated in one vendor record, it becomes simpler to generate accurate reports, analyze spending patterns, and make informed business decisions.
- Reduction in Errors and Duplicate Payments: Duplicate vendors can often lead to duplicate payments or erroneous entries in your accounting system. By merging vendors, you can minimize the risk of double-booking expenses or making duplicate payments, resulting in cost savings and improved financial accuracy.
- Improved Vendor Relationships: Merging vendors allows you to better manage and maintain positive relationships with your vendors. By consolidating their information, you can easily access historical communications, track past transactions, and provide better customer service. This fosters stronger vendor partnerships and can lead to potential discounts, improved supplier terms, and other mutually beneficial arrangements.
These benefits highlight the value of merging vendors in QuickBooks. By streamlining your vendor data and optimizing your accounting processes, you can save time, reduce errors, and gain valuable insights into your business’s financial health.
Preparing Your QuickBooks Data for Vendor Merging
Before you merge vendors in QuickBooks, it’s important to properly prepare your data to ensure a smooth and accurate merging process. Taking the time to organize and clean up your vendor information will help prevent potential issues and complications. Here are some steps to prepare your QuickBooks data for vendor merging:
- Review Vendor List: Start by reviewing your vendor list in QuickBooks and identifying any duplicate or similar vendor records. Pay close attention to differences in names, addresses, or contact information that may indicate duplicate entries. Consider creating a list or spreadsheet to track the vendors you plan to merge.
- Record Vendor Details: Take note of the vendor details you want to retain, such as the primary vendor name, primary contact information, and any important notes or special instructions. This will ensure that the merged vendor contains all the necessary information and retains vital historical data.
- Update Vendor Records: Before merging vendors, it’s important to update the vendor records to reflect accurate information. Verify and correct any inaccuracies, such as misspelled names, outdated addresses, or incorrect contact details. This will help maintain data integrity and prevent the repetition of errors in the merged vendor record.
- Backup Your QuickBooks Data: Creating a backup of your QuickBooks data is crucial before any major changes, including vendor merging. This ensures that you can roll back to a previous state if any issues or errors arise during the merging process. Use the backup feature in QuickBooks to create a copy of your company file.
- Notify Staff and Stakeholders: Inform your employees and other stakeholders about the upcoming vendor merging process. Clearly communicate the reasons behind the merging and provide any necessary instructions or guidelines to ensure a smooth transition. This helps everyone involved understand the changes and avoid confusion.
By following these steps to prepare your QuickBooks data for vendor merging, you can minimize potential issues and ensure a seamless merging process. Proper organization and documentation will help maintain data accuracy, preserve historical information, and make the vendor merging process more efficient.
Step-by-Step Guide to Merging Vendors in QuickBooks
Merging vendors in QuickBooks is a straightforward process that can be accomplished in a few simple steps. Here’s a step-by-step guide to merging vendors in QuickBooks:
- Open the Vendor Center: Launch QuickBooks and click on the “Vendors” tab to access the Vendor Center, where you can view and manage your vendor records.
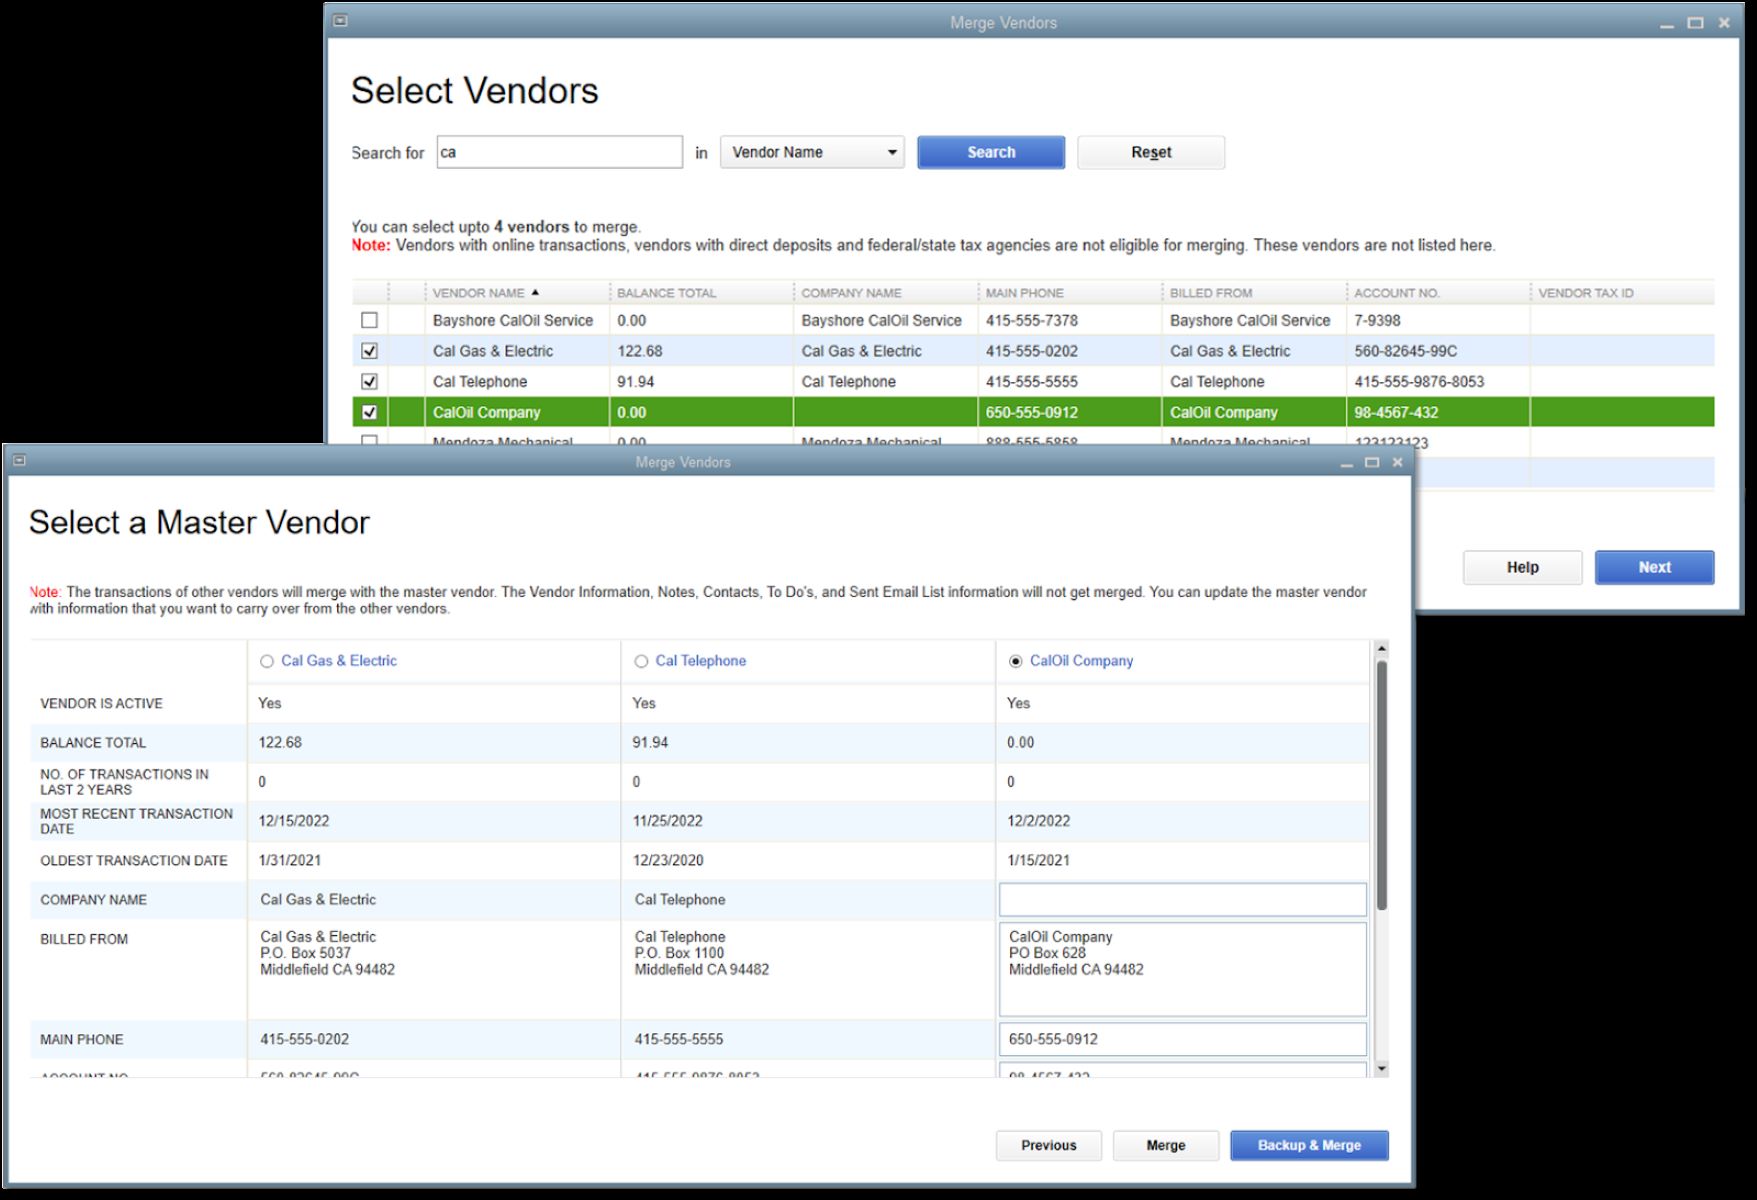
- Select Vendors to Merge: Identify the vendors you want to merge by clicking on their respective entries in the Vendor Center. To select multiple vendors, hold down the “Ctrl” key (Windows) or “Command” key (Mac) while clicking on each vendor name.
- Initiate the Merge: With the vendors selected, right-click on one of the vendor names and choose “Merge Vendors” from the context menu. This will open a window that allows you to review and confirm the merging process.
- Choose the Primary Vendor: In the merge window, QuickBooks will prompt you to select a primary vendor. This primary vendor will serve as the main record for all merged vendor information. Select the vendor with the most accurate and complete data to ensure that vital details are retained.
- Review Merged Vendor Information: After choosing the primary vendor, QuickBooks will display a summary of the merged vendor information. Review this information to ensure that all relevant details have been correctly merged. Pay close attention to addresses, contact information, payment terms, and any special notes or instructions.
- Confirm the Merge: Once you have reviewed the merged vendor information, click “Merge” to initiate the merging process. QuickBooks will consolidate the selected vendors into a single record based on the primary vendor you chose.
- Handling Merged Vendor Transactions: After the merge is complete, QuickBooks will prompt you to handle existing transactions for the merged vendors. Choose whether you want to assign the transactions to the primary vendor or keep them under the original vendor names. Consider the impact on your financial reports and choose the option that best suits your business needs.
- Verifying the Merged Vendor: After completing the merge, go back to the Vendor Center and locate the primary vendor that now contains the merged records. Verify that all information is accurate and up to date. Make any necessary edits or additions to ensure data integrity.
By following this step-by-step guide, you can efficiently merge vendors in QuickBooks and consolidate your vendor data into a single, comprehensive record. This will help you maintain data accuracy, reduce clutter, and simplify your vendor management processes.
Reviewing Merged Vendor Information
After merging vendors in QuickBooks, it is essential to review the merged vendor information to ensure accuracy and completeness. This step is crucial in maintaining data integrity and avoiding any potential issues in your accounting records. Here are some key aspects to consider when reviewing merged vendor information in QuickBooks:
- Vendor Details: Check that all the relevant vendor details, such as name, address, contact information, and tax ID, have been accurately merged into the primary vendor record. Compare the merged information with the original vendor records to identify any discrepancies or missing data.
- Payment Terms and Methods: Verify that the payment terms and methods assigned to the merged vendor are correct. This includes payment due dates, credit limits, discounts, and any special payment arrangements. Make any necessary adjustments to ensure accurate payment processing.
- Outstanding Balances and Transactions: Review the outstanding balances and open transactions associated with the merged vendors. Ensure that all unpaid invoices, bills, or purchase orders have been correctly transferred to the primary vendor. Any discrepancies should be addressed to avoid errors in your financial statements.
- Product or Service Records: If your vendors are associated with specific products or services, ensure that the merged vendor is correctly linked to the appropriate inventory items or services. This will ensure accurate tracking of purchase history, inventory levels, and cost of goods sold.
- Communication History: Review the communication history associated with the merged vendors. Check for any important emails, notes, or attachments that may have been linked to the original vendor records. It is essential to retain this information for historical purposes and to maintain continuity in your vendor interactions.
- Custom Fields and Notes: If you have customized vendor fields or added any important notes to the original vendor records, verify that this information has been correctly merged into the primary vendor. Make any necessary updates to retain important data or add new fields if required.
By thoroughly reviewing the merged vendor information, you can identify and address any discrepancies or missing data, ensuring that your vendor records are accurate and up to date. This step is crucial for maintaining the integrity of your accounting system and facilitating efficient vendor management.
Handling Transactions for Merged Vendors
When you merge vendors in QuickBooks, it’s essential to properly handle the transactions associated with the merged vendors. This ensures that your financial records remain accurate and that all transactions are properly attributed to the primary vendor. Here are some steps to follow when handling transactions for merged vendors:
- Assess Existing Transactions: Start by reviewing the existing transactions associated with the merged vendors. This includes unpaid invoices, bills, purchase orders, and any other open or pending transactions. Take note of the total amount and quantity of these transactions for future reference.
- Decide on Transaction Handling: Determine how you want to handle these existing transactions. You have two options: assign them to the primary vendor or retain them under the original vendor names. Consider the impact on your financial reports and choose the option that makes the most sense for your business.
- Assign Transactions to Primary Vendor: If you decide to consolidate the transactions under the primary vendor, you can easily reassign them within QuickBooks. Edit each transaction and change the vendor name to the primary vendor. This ensures that all associated transactions are accurately reflected in your financial reports.
- Retain Transactions Under Original Vendor Names: Conversely, if you choose to retain the transactions under the original vendor names, you can leave them as is without any modifications. However, keep in mind that this approach may result in duplicated records and potentially misrepresenting your financial data.
- Consider Vendor Reports: After handling the transactions, assess your vendor reports to ensure accuracy. Run vendor-specific reports such as the Vendor Balance Summary, Vendor Transaction Detail, or Vendor Contact List to verify that the transaction handling process has been executed correctly.
- Update Payment Methods and Terms: If the merged vendors had different payment methods or terms, make sure to update the primary vendor’s payment settings to reflect the desired options. This ensures consistency in payment processing and accurate financial record-keeping.
By effectively handling the transactions for merged vendors, you maintain accurate financial records and avoid any confusion or double-counting in your accounting system. The approach you choose will depend on your business needs and reporting preferences, so it’s important to carefully consider the impact on your financial statements.
Troubleshooting Common Issues in Vendor Merging
While merging vendors in QuickBooks is a relatively straightforward process, you may encounter some common issues along the way. Understanding these issues and how to troubleshoot them can help you overcome any hurdles and ensure a successful vendor merging process. Here are some common issues that may arise during vendor merging and how to troubleshoot them:
- Duplicate Transactions: One issue that may occur is the duplication of transactions after merging vendors. This can happen if you don’t properly handle or reassign existing transactions. To troubleshoot this, carefully review your transaction history and modify transactions that mistakenly remained under the original vendor names.
- Incorrect Merged Information: In some cases, incorrect information may be merged into the primary vendor record. This may include inaccurate contact details, wrong addresses, or missing data. To fix this, review the merged vendor information and manually edit any errors or missing information to ensure accuracy.
- Lost Communication History: It’s possible that the communication history associated with the original vendors may not merge properly, resulting in lost emails, notes, or attachments. If this occurs, try exporting the communication history of the original vendors and manually importing it into the primary vendor record for reference.
- Discrepancies in Account Balances: Merging vendors can sometimes cause discrepancies in account balances, particularly if there are differences in outstanding invoices or bills. Verify that all transactions have been accurately transferred and adjust any discrepancies manually to ensure that your accounts remain balanced.
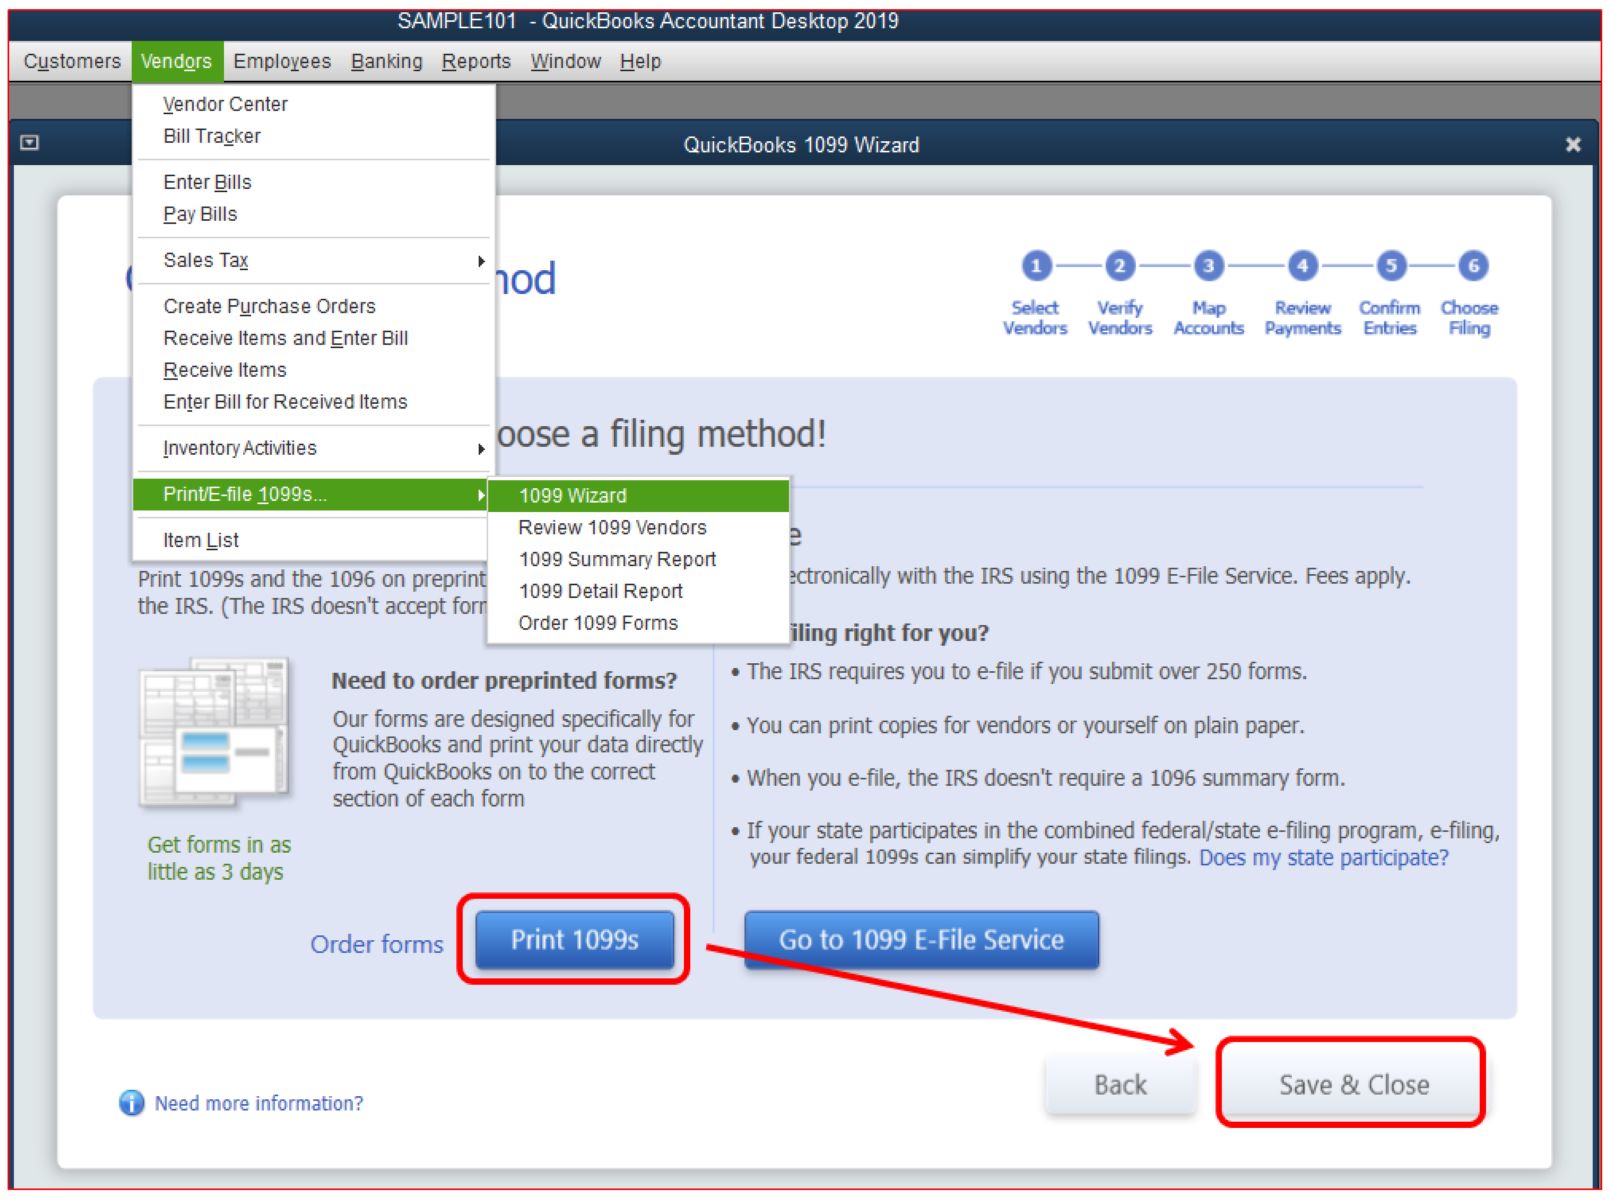
- Issues with 1099 Reporting: If merged vendors were eligible for 1099 reporting, it’s important to review and update their tax settings after merging. Ensure that the merged vendor is correctly marked as a 1099 vendor and that the appropriate tax identification information is included to avoid reporting inaccuracies.
- Merging the Wrong Vendors: Mistakenly merging the wrong vendors can happen if you don’t double-check your selection before initiating the merge. To troubleshoot this issue, carefully review the vendor records and, if needed, undo the merge by going to the Audit Log and restoring the original vendors.
By being aware of these common issues and knowing how to troubleshoot them, you can navigate through the vendor merging process more effectively. Paying attention to details and double-checking your work will help you maintain the integrity of your vendor data and ensure a successful merging process.
Best Practices for Merging Vendors in QuickBooks
When merging vendors in QuickBooks, it’s important to follow best practices to ensure a smooth and accurate merging process. These practices will help you maintain data integrity, streamline your vendor management, and avoid any potential issues. Here are some best practices to consider when merging vendors in QuickBooks:
- Perform Data Cleanup: Before merging vendors, conduct a thorough review and cleanup of your vendor data. This includes identifying and removing duplicate or outdated vendor records and ensuring that all vendor information is accurate and up to date.
- Create a Backup: Prior to merging vendors, create a complete backup of your QuickBooks company file. This provides a restore point in case any issues or errors occur during the merging process, allowing you to revert back to the previous state.
- Document Vendor Details: Take detailed notes of the vendor details you want to retain during the merging process. This includes primary vendor names, contact information, payment terms, and any special arrangements. This documentation will help ensure that no vital information is lost during the merge.
- Select a Primary Vendor Carefully: When choosing a primary vendor, consider factors such as accurate data, complete records, and the vendor with the most ongoing transactions. Selecting the most appropriate primary vendor will help maintain data accuracy and prevent confusion in your accounting system.
- Communicate the Merging Process: Inform your staff and stakeholders about the vendor merging process and its implications. Clearly communicate the reasons for merging and provide any necessary instructions or guidelines to ensure everyone understands the changes and avoids potential confusion.
- Review Merged Information: After merging vendors, thoroughly review the merged vendor information to ensure accuracy. Check for any discrepancies in contact details, payment terms, outstanding balances, or transaction history. Make any necessary edits to maintain data integrity.
- Update Payment Settings: If the merged vendors had different payment terms or methods, update the primary vendor’s payment settings accordingly. This ensures consistency in payment processing and accurate financial record-keeping.
- Regularly Review Reports: Regularly run vendor-specific reports to review your merged vendor data and ensure accuracy. This includes reports such as Vendor Balance Summary, Vendor Transaction Detail, or Vendor Contact List. Regular reviews help you identify any anomalies and maintain accurate financial records.
By following these best practices, you can effectively merge vendors in QuickBooks and optimize your vendor management processes. These practices promote data integrity, streamline operations, and ensure that your vendor records are accurate and up to date.
Conclusion
Merging vendors in QuickBooks is an essential task for maintaining accurate and efficient vendor management. By consolidating duplicate or similar vendor records, you can streamline your accounting processes, improve data accuracy, and effectively track vendor relationships. Throughout this guide, we’ve discussed the benefits of merging vendors, provided a step-by-step guide to the merging process, and highlighted best practices to ensure a successful merge.
When merging vendors in QuickBooks, it’s crucial to follow best practices such as performing data cleanup, creating backups, and carefully selecting a primary vendor. Additionally, regularly reviewing merged vendor information, handling transactions properly, and troubleshooting common issues will help maintain data integrity and avoid potential complications.
By implementing these practices and paying careful attention to the merging process, you’ll be able to streamline your vendor management and maintain accurate financial records. This allows for clearer financial insights, improved vendor relationships, and reduced errors in your accounting system.
Remember, vendor merging is not a one-time task. Regularly review and manage your vendor list to prevent the accumulation of duplicate or unnecessary vendor records. By keeping your vendor data clean and up to date, you’ll be able to optimize your accounting processes and focus on growing your business.