Introduction
Welcome to this step-by-step guide on how to apply a vendor credit in QuickBooks. Vendor credits are an essential tool for managing your accounts payable and maintaining accurate financial records. By applying credits to your vendor bills, you can ensure that your accounts accurately reflect your outstanding liabilities and avoid overpaying vendors. In this guide, we’ll walk you through the process of applying a vendor credit to an existing bill in QuickBooks.
Whether you received a credit from a vendor due to returns, discounts, or other situations, properly applying that credit is crucial for maintaining the integrity of your financial data. QuickBooks offers a simple and efficient way to record and track these credits, ensuring that your accounts remain up-to-date and your cash flow is accurately managed.
Throughout this guide, we’ll provide detailed instructions on how to access the vendor credit feature in QuickBooks, create a new vendor credit, fill in the necessary details, and apply the credit to both existing and future bills. By the end, you’ll have a clear understanding of how to seamlessly manage your vendor credits, improving the accuracy and efficiency of your accounts payable processes.
Without further ado, let’s dive into the step-by-step process of applying a vendor credit in QuickBooks.
Step 1: Access Vendor Credit feature
The first step in applying a vendor credit in QuickBooks is to access the vendor credit feature within the software. QuickBooks provides a user-friendly interface that allows you to easily navigate to the vendor credit section. Follow these simple steps:
- Launch QuickBooks and log in to your company file.
- From the homepage, navigate to the top menu and click on the “Vendors” tab.
- In the drop-down menu, select “Enter Bills” to open the vendor bills section.
- On the “Enter Bills” page, locate and click on the “Vendor Credit” button, usually located next to the “Bill” button.
Once you’ve completed these steps, you will have successfully accessed the vendor credit feature in QuickBooks.
It’s important to note that the availability and appearance of the vendor credit feature may vary slightly depending on the version of QuickBooks you are using. However, the general steps outlined above should be applicable to most versions of QuickBooks.
Now that you have accessed the vendor credit feature, you’re ready to move on to the next step: creating a new vendor credit.
Step 2: Create a new Vendor Credit
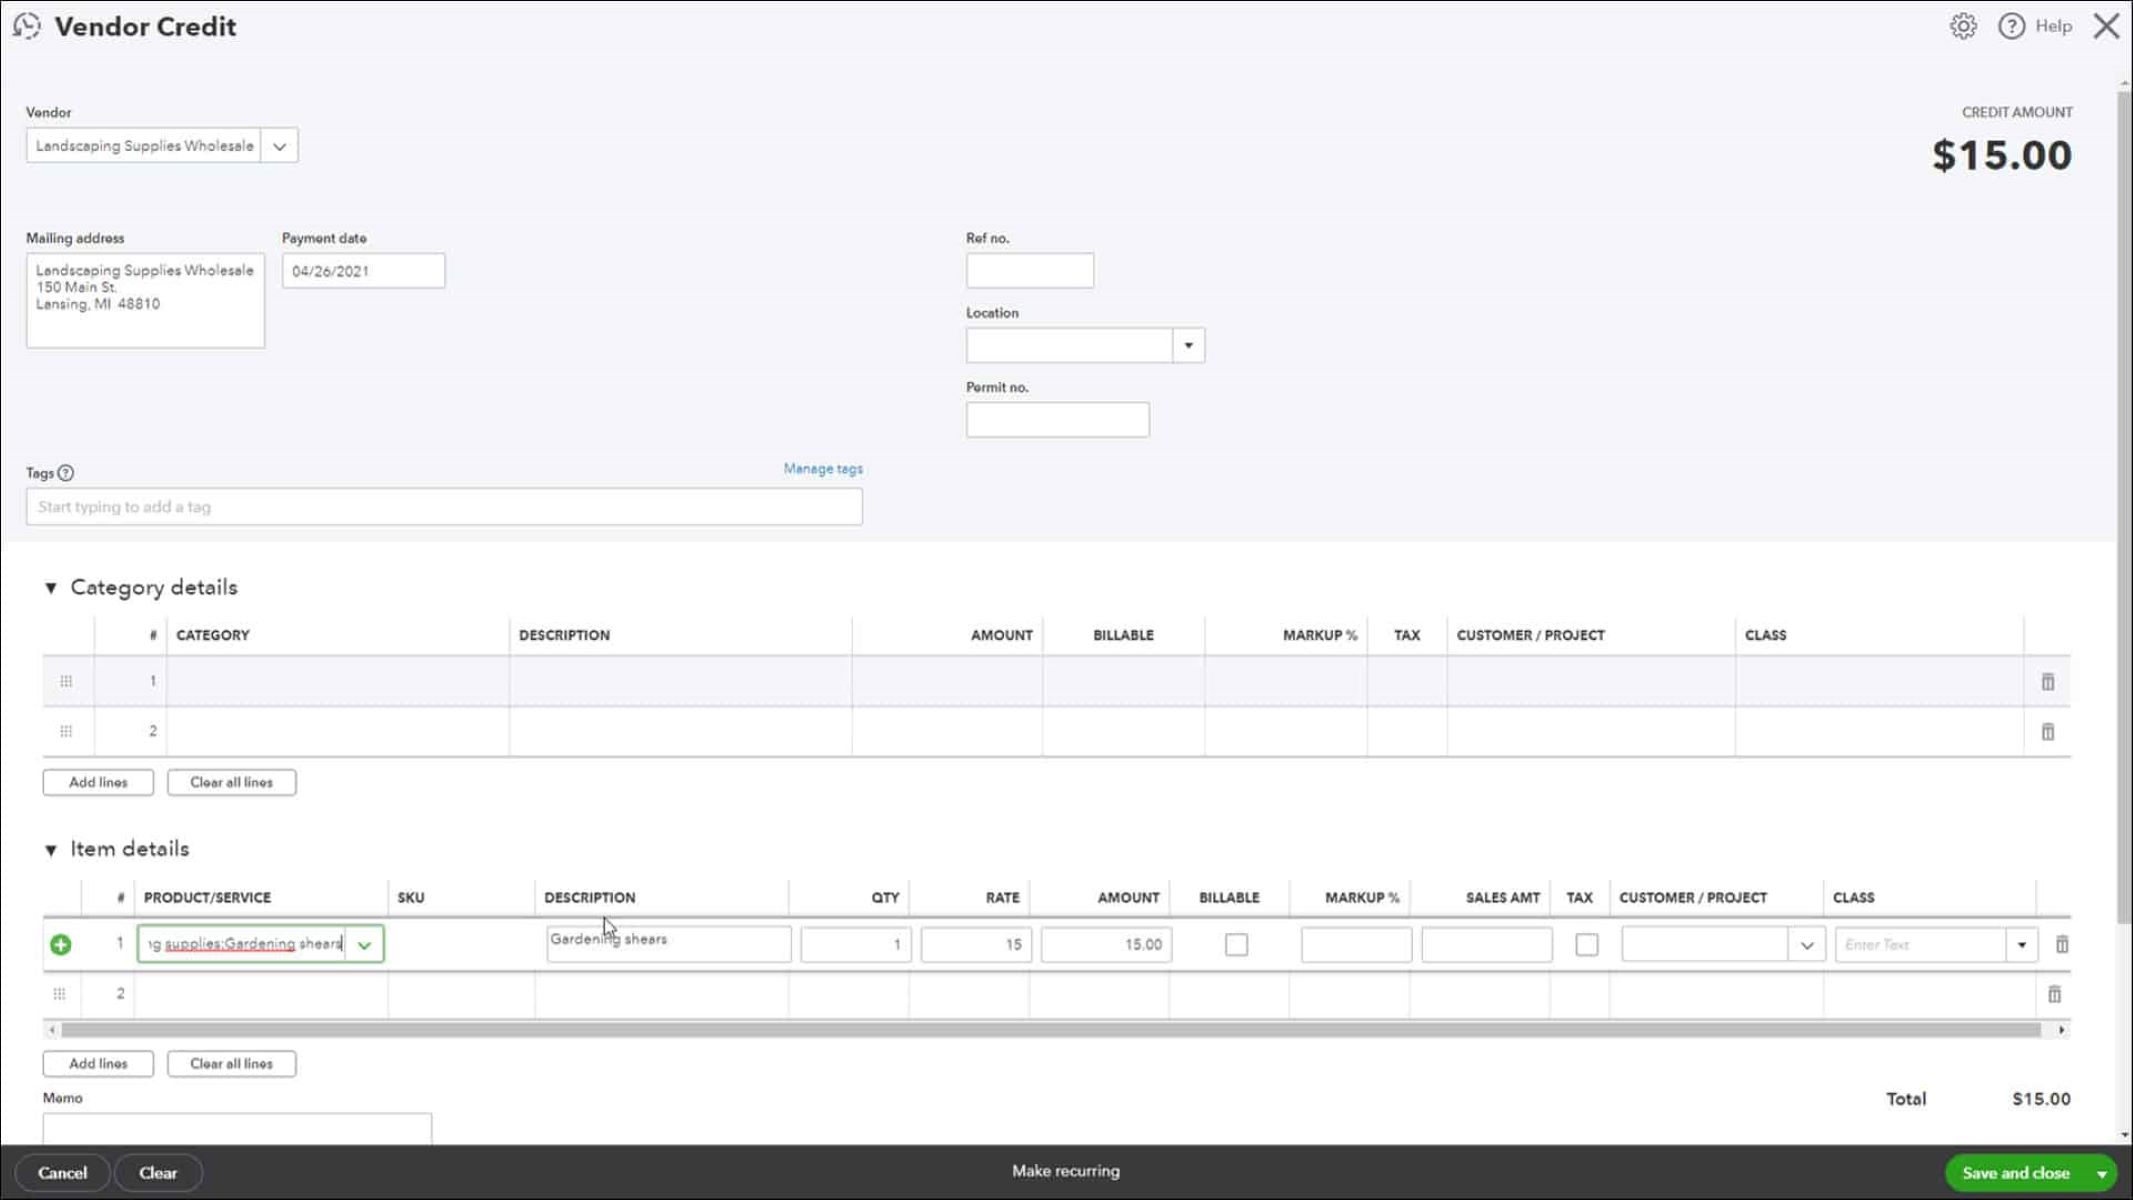
Now that you have accessed the vendor credit feature in QuickBooks, the next step is to create a new vendor credit. This involves entering the details of the credit, such as the vendor’s information, the credit amount, and any necessary notes. Follow these steps:
- On the vendor credit page, you will find various fields that need to be filled out.
- Begin by selecting the appropriate vendor from the drop-down menu. This ensures that the credit is linked to the correct vendor.
- Next, enter the date of the vendor credit. This will typically be the date on which the credit was issued.
- In the “Refund/Credit” field, enter the credit amount. This is the amount that the vendor has provided as a credit.
- If you have any additional notes or comments related to the vendor credit, you can enter them in the “Memo” field.
By completing these steps, you have successfully created a new vendor credit in QuickBooks. It is important to review the entered information to ensure accuracy before proceeding to the next step.
The ability to add attachments, such as scanned receipts or supporting documents, can vary depending on the version of QuickBooks you are using. If this feature is available, you may want to attach any relevant documents to the vendor credit for future reference.
Now that the vendor credit has been created, it’s time to move on to the next step: filling in the details of the vendor credit.
Step 3: Fill in the details of the Vendor Credit
After creating a new vendor credit in QuickBooks, the next step is to fill in the necessary details of the credit. This involves specifying the accounts to be credited, assigning expense categories, and linking the credit to the corresponding vendor bill. Follow these steps:
- On the vendor credit page, locate the “Items” or “Expenses” section.
- In this section, you can choose to either select items from your inventory or enter custom expenses.
- If you have items in your inventory that correspond to the credit, select them by checking the appropriate boxes. These items will be added to the credit and will reflect the amount credited.
- If you need to enter custom expenses, click on the “Add New Expense” button and provide the necessary details, such as the expense account and amount.
- If you have multiple expenses to add, you can click on the “Add More Details” button to enter additional expenses.
- To link the vendor credit to the corresponding bill, locate the “Apply Credits” section on the vendor credit page.
- Select the bill to which you want to apply the credit by checking the appropriate box(es).
- The credit amount applied will automatically be populated based on the amount of the selected bill(s).
Ensure that the amounts and accounts entered are correct and match the vendor credit documentation. Double-checking the information at this stage will help avoid errors and ensure accurate bookkeeping.
Once you have filled in the necessary details of the vendor credit, you are ready to proceed to the next step: applying the vendor credit to an existing bill.
Step 4: Apply the Vendor Credit to an existing bill
Now that you have filled in the details of the vendor credit in QuickBooks, the next step is to apply the credit to an existing bill. This process ensures that the credit is deducted from the outstanding balance on the bill. Follow these steps:
- On the vendor credit page, locate the “Apply Credits” section.
- In this section, you will see a list of open bills that can be offset by the vendor credit.
- Select the bill to which you want to apply the credit by checking the appropriate box(es).
- The credit amount that you previously entered will automatically be populated based on the amount of the selected bill(s).
- If the credit amount exceeds the bill amount, QuickBooks will automatically apply the remaining credit to the next open bill(s) for that vendor.
- If you have multiple bills to apply the credit to, you can check the boxes to allocate the credit accordingly.
- Review the applied credit amounts to ensure accuracy. You can adjust the applied amounts by editing the values in the “Amount to Apply” column.
By applying the vendor credit to the existing bill(s), you effectively reduce the outstanding balance, reflecting the credit that the vendor has provided.
It’s important to note that there may be instances where the vendor credit exceeds the total amount of outstanding bills. In such cases, QuickBooks will leave the excess credit as an available credit for future use.
Now that you have successfully applied the vendor credit to an existing bill, you’re ready to move on to the next step: applying the vendor credit to a future bill, if applicable.
Step 5: Apply the Vendor Credit to a future bill
After applying the vendor credit to an existing bill in QuickBooks, you may find that there is still a remaining credit balance. If this is the case, you can apply the remaining credit to a future bill from the same vendor. Here’s how to apply the vendor credit to a future bill:
- On the vendor credit page, in the “Apply Credits” section, locate the future bill(s) that you want to offset with the remaining credit.
- Check the box(es) next to the future bill(s) to apply the remaining credit.
- Review the remaining credit balance to ensure accuracy. QuickBooks will calculate and display the remaining credit amount after applying it to the selected future bill(s).
- If necessary, you can adjust the applied amounts by editing the values in the “Amount to Apply” column.
By applying the vendor credit to a future bill, you ensure that the remaining credit is utilized and reduces the outstanding balance on that bill. This helps in maintaining accurate records of vendor liabilities and ensures proper cash flow management.
It’s important to note that QuickBooks will automatically allocate the remaining credit to future bills based on the order in which they become due. If you want to override this automatic allocation and apply the credit to specific bills, you can manually select the bills in the order you prefer.
Now that you have successfully applied the vendor credit to a future bill, you’re ready to move on to the next step: reviewing and saving the applied vendor credit.
Step 6: Review and save the applied Vendor Credit
After applying the vendor credit to both existing and future bills in QuickBooks, it is crucial to review and save the applied credit to ensure the accuracy of your financial records. Follow these steps to complete the process:
- On the vendor credit page, review the applied credits and ensure that the amounts and bills are correct. Double-checking this information will help maintain accurate accounts payable records.
- If you need to make any adjustments, you can edit the applied amount by modifying the values in the “Amount to Apply” column for the respective bills.
- Once you are satisfied with the applied credits and their allocation, save the vendor credit by clicking on the “Save” or “Save and Close” button, usually located at the bottom or top-right corner of the screen.
By reviewing and saving the applied vendor credit, you finalize the process and ensure that the credit is appropriately recorded and reflected in your QuickBooks accounts. This step is important for financial reporting and maintaining accurate vendor balances.
After saving the vendor credit, it is advisable to generate a vendor credit report in QuickBooks, which provides a summary of all the vendor credits applied. This report can be useful for reconciliation purposes and helps keep track of your vendor credits.
Now that you have successfully reviewed and saved the applied vendor credit, you have completed the process of applying a vendor credit in QuickBooks. Congratulations!
Utilizing the vendor credit feature in QuickBooks allows you to effectively manage your accounts payable and maintain accurate financial records. It streamlines the process of applying vendor credits, ensuring that you are up-to-date with your outstanding liabilities and avoiding overpayments.
Remember to follow these steps whenever you receive a vendor credit and need to apply it in QuickBooks, ensuring that your financial records remain accurate and organized.
Conclusion
Applying a vendor credit in QuickBooks is a fundamental process that allows you to manage your accounts payable effectively and maintain accurate financial records. By following the step-by-step guide outlined in this article, you can seamlessly apply vendor credits to both existing and future bills, ensuring that your accounts reflect the credits accurately.
Throughout this guide, we discussed how to access the vendor credit feature in QuickBooks, create a new vendor credit, fill in the necessary details, and apply the credit to existing and future bills. By completing each step carefully, you can ensure the accuracy of your vendor credit application process.
Remember to review and save the applied vendor credit before finalizing the process. This step helps to confirm the accuracy of the applied credits and maintains precise accounts payable records.
Utilizing the vendor credit feature in QuickBooks not only ensures accurate bookkeeping but also helps you avoid overpaying vendors and improves the overall management of your cash flow.
By applying these vendor credit techniques in QuickBooks, you not only save time but also streamline your financial processes. Properly managing your vendor credits contributes to the overall financial health and success of your business.
We hope that this guide has provided valuable insights into how to apply a vendor credit in QuickBooks. By following these steps, you can effectively manage your vendor credits and maintain accurate financial records in your QuickBooks software.
Remember to consult the QuickBooks help center or reach out to a professional if you encounter any difficulties with your specific situation or software version.
Thank you for taking the time to read this guide, and we wish you success in your vendor credit management endeavors in QuickBooks!