Introduction
Setting up QuickBooks for your business is an essential step towards streamlining your financial management. With its user-friendly interface and robust features, QuickBooks helps businesses of all sizes efficiently manage their finances, track expenses, generate financial reports, and streamline their bookkeeping processes.
In this guide, we will walk you through the step-by-step process of setting up QuickBooks. Whether you are a small business owner looking to migrate from manual bookkeeping or an established company transitioning from other accounting software, this guide is designed to provide you with a comprehensive understanding of how to set up QuickBooks effectively.
Throughout the following chapters, we will cover everything you need to know to get started with QuickBooks. We will guide you through the installation process, help you set up your company file, and teach you how to create and customize your chart of accounts. We will also show you how to add customers, vendors, and employees to your QuickBooks database, and connect your bank accounts and credit cards for seamless financial transactions.
Additionally, we will cover the setup of sales tax and demonstrate how to run reports and analyze your financial data within the QuickBooks platform. Our goal is to empower you with the knowledge and skills necessary to confidently use QuickBooks to manage your business finances efficiently.
By the end of this guide, you will have a solid foundation in QuickBooks setup and be well-equipped to handle your day-to-day financial tasks with ease. Let’s dive in and explore the world of QuickBooks as we embark on this journey together!
Chapter 1: Getting Started with QuickBooks
Before you can start using QuickBooks to manage your business finances, it’s essential to familiarize yourself with the basics. In this chapter, we will explore the key features of QuickBooks and guide you through the initial setup process.
To begin, you’ll need to decide whether you want to use QuickBooks desktop or QuickBooks online. QuickBooks desktop is a software application that you install on your computer, while QuickBooks online is a cloud-based platform accessible via the internet. Consider your business needs and preferences to choose the best option for you.
Once you have decided on the version of QuickBooks that suits your requirements, you can proceed with the installation process. If you are using QuickBooks desktop, insert the installation disc or download the software from the Intuit website. Follow the on-screen instructions to complete the installation. For QuickBooks online, visit the Intuit website and sign up for an account.
After installing or signing up for QuickBooks, you will be prompted to create a new company file. This file will store all your financial data and company information. Provide the necessary details, such as your business name, industry, and contact information. QuickBooks will generate a sample chart of accounts based on the industry you select, which you can customize later.
Once the company file is created, you will be prompted to set up your company preferences. These preferences include your fiscal year-end, accounting method, and reporting options. Pay close attention to these settings, as they will influence how your financial reports are generated and presented.
After setting up your company preferences, you can customize QuickBooks to suit your business needs. This includes selecting the modules and features you want to use, such as accounts receivable, accounts payable, and inventory management. You can also choose to set up multi-user access if you have a team that will be working on QuickBooks simultaneously.
In this chapter, we have covered the initial steps to get started with QuickBooks. By the end of this guide, you will have a solid foundation in QuickBooks setup and be well-equipped to handle your day-to-day financial tasks with ease.
Chapter 2: Installing QuickBooks
Installing QuickBooks is a crucial step in getting started with this powerful financial management software. In this chapter, we will guide you through the process of installing QuickBooks and getting it up and running on your computer.
Before you begin, make sure your computer meets the minimum system requirements for running QuickBooks. This includes having a compatible operating system, sufficient RAM and storage space, and a reliable internet connection if you are using QuickBooks online.
If you are using QuickBooks desktop, you have two options for installation: from a CD or by downloading the software from the Intuit website. If you have a CD, insert it into your computer’s disc drive, and the installation process will start automatically. Follow the on-screen instructions to install QuickBooks.
If you prefer to download QuickBooks, visit the Intuit website and sign in to your account. Select the version of QuickBooks you want to install and download the installation file. Once the download is complete, double-click on the file to start the installation process. Follow the prompts to install QuickBooks on your computer.
For QuickBooks online, the installation process is much simpler. All you need is a compatible web browser and an internet connection. Simply visit the QuickBooks website and sign up for an account. Once you’ve created an account, you can access QuickBooks online through your web browser and start using it immediately.
During the installation process, you may be prompted to enter your product key or sign in using your Intuit account. Make sure to have your product key ready if necessary or sign in with your Intuit account credentials.
After the installation is complete, you can launch QuickBooks and begin setting up your company file. Follow the on-screen instructions to provide the necessary information, such as your business name, industry, and contact details. QuickBooks will guide you through the initial setup process, allowing you to customize the software to fit your business needs.
By the end of this chapter, you should have successfully installed QuickBooks on your computer or signed up for QuickBooks online. You are now ready to move on to the next step and set up your company file.
Chapter 3: Setting Up a Company File
Setting up a company file is a vital part of using QuickBooks to manage your business finances. In this chapter, we will walk you through the process of setting up a company file and customizing it to reflect your business’s unique details and requirements.
When you first launch QuickBooks, you will be prompted to create a new company file. This file serves as a digital repository for all your financial information and allows you to keep track of your income, expenses, and other financial transactions.
To set up a company file, you will need to provide basic information about your business, such as your business name, industry, and contact details. QuickBooks will use this information to generate a chart of accounts, which categorizes your income, expenses, assets, and liabilities.
Once you have entered your business information, QuickBooks will guide you through setting up the chart of accounts. This is an essential step as it determines how your financial transactions will be recorded and classified. The chart of accounts usually includes general categories such as assets, liabilities, equity, income, and expenses. It is important to review and customize the chart of accounts according to your business’s specific needs.
In addition to setting up the chart of accounts, you will also have the option to add additional lists, such as customer and vendor lists. These lists help you keep track of your customers, vendors, and other entities you interact with in your business operations. You can add and manage these lists within QuickBooks for easy reference and tracking.
QuickBooks allows you to customize your company file by adding your business logo, setting up defaults and preferences, and tailoring the software to suit your workflow. Take some time to explore the various customization options available to make QuickBooks feel personalized and aligned with your business’s branding and operations.
By the end of this chapter, you should have successfully set up a company file in QuickBooks and customized it to reflect your business details and preferences. In the next chapter, we will guide you through the process of setting up the chart of accounts to accurately track your financial transactions.
Chapter 4: Setting Up Chart of Accounts
The chart of accounts is a fundamental component of QuickBooks that helps you organize and categorize your financial transactions. In this chapter, we will take you through the process of setting up the chart of accounts in QuickBooks to accurately track your income, expenses, assets, and liabilities.
When you initially set up your company file, QuickBooks generates a default chart of accounts based on the industry you specified. However, it’s important to review and customize this chart of accounts to align with your specific business needs and reporting requirements.
To begin setting up the chart of accounts, go to the “Lists” menu in QuickBooks and select “Chart of Accounts.” Here, you will see a list of accounts organized into categories like assets, liabilities, equity, income, and expenses. Take the time to review these accounts and make any necessary changes.
You can add new accounts to the chart by clicking on the “Account” button and choosing the appropriate account type. For example, if you need to track expenses for office supplies, you can create a new account under the “Expenses” category. It’s crucial to assign each account a unique name and account number for easy identification and reference.
In addition to adding accounts, you can also modify existing accounts by selecting them from the list and clicking on the “Edit” button. This allows you to change the account name, number, and other account details. You can also deactivate accounts that are no longer in use.
When setting up your chart of accounts, consider the specific needs of your business and how you want to track your financial transactions. For example, if you have multiple departments or locations, you may want to create separate accounts to track income and expenses for each one. This level of customization ensures that your financial reports provide accurate insights into different aspects of your business.
Once you have reviewed and customized the chart of accounts to your satisfaction, save your changes. You can always revisit the chart of accounts in the future to make further modifications or additions as your business evolves.
By diligently setting up and maintaining your chart of accounts in QuickBooks, you will have a solid foundation for accurate financial reporting, budgeting, and decision-making. In the next chapters, we will explore further steps to set up customers, vendors, and employees in QuickBooks.
Chapter 5: Adding Customers and Vendors
One of the key features of QuickBooks is its ability to manage your relationships with customers and vendors. In this chapter, we will guide you through the process of adding customers and vendors to your QuickBooks system, allowing you to track important details, transactions, and interactions with these entities.
To add a customer or vendor in QuickBooks, navigate to the “Customers” or “Vendors” tab, respectively, and select the option to add a new customer or vendor. In the following dialogue box, you can input essential information such as their name, contact details, billing and shipping addresses, and payment terms.
For customers, you may also want to include additional information like their preferred payment methods, credit terms, and any notes or comments relevant to their account. This information can help you provide personalized service and ensure timely payments.
When adding vendors, it’s essential to include details like their tax ID, payment terms, and any account numbers they may have assigned to your business. This information enables you to accurately track costs, manage your accounts payable, and maintain good relationships with your vendors.
It’s worth noting that QuickBooks allows you to associate transactions, such as invoices and payments, with specific customers or vendors. This feature helps you keep a comprehensive record of all interactions and transactions related to these entities, making it easier to analyze and manage your financial data.
In addition to basic contact information, QuickBooks offers customization options to capture more specific details about your customers and vendors. For example, you can create custom fields to store unique information like customer preferences, vendor specialties, or any other data relevant to your business.
It’s crucial to keep your customer and vendor lists up to date by regularly reviewing and updating their information. As your business evolves, you may establish new relationships, modify existing ones, or no longer work with certain customers or vendors. Managing your customer and vendor lists ensures the accuracy and integrity of your financial records.
By adding customers and vendors to QuickBooks, you can streamline your interactions, track transactions, and maintain a comprehensive record of your business relationships. In the next chapter, we will explore how to set up products and services in QuickBooks to manage inventory and sales.
Chapter 6: Setting Up Products and Services
Setting up your products and services in QuickBooks is crucial for effectively tracking inventory, managing sales, and generating accurate financial reports. In this chapter, we will guide you through the process of setting up products and services in QuickBooks, enabling you to efficiently manage your offerings and streamline your sales processes.
To get started, navigate to the “Products and Services” tab in QuickBooks. Here, you can add new products or services by selecting the option to create a new item. QuickBooks offers different item types to choose from, including inventory parts, non-inventory parts, service, and other charge items, depending on the nature of your business offerings.
When adding a new item, provide essential details such as the item name, description, and sales price. This information ensures that your products or services are accurately represented in invoices, sales receipts, and other transaction documents.
If you are managing inventory, you have the option to enable quantity tracking for your items. This allows QuickBooks to automatically update inventory levels as sales are made or new stock is received. It’s important to assign the appropriate income and expense accounts to each item to ensure accurate tracking of cost of goods sold and sales revenue.
QuickBooks also provides options for customizing your products and services. You can assign specific tax information, add custom fields, and even track preferred vendors for each item. These customization features allow you to tailor your product and service offerings to your unique business requirements.
In addition to individual items, you can create item groups or assemblies in QuickBooks. Item groups allow you to bundle multiple items together, such as a product kit or a service package, to streamline the sales process. Assemblies are more advanced and are used when you need to track the components that make up a finished product or service.
As your product and service offerings evolve, it’s important to regularly review and update your items in QuickBooks. This includes discontinuing items that are no longer sold, updating prices, or adding new items to accommodate changes in your business offerings.
By effectively setting up products and services in QuickBooks, you can accurately track inventory, streamline sales processes, and generate insightful reports. In the next chapter, we will explore how to set up employees and payroll in QuickBooks, allowing you to manage your workforce efficiently.
Chapter 7: Setting Up Employees and Payroll
Managing employee payroll is a critical aspect of running a business. In this chapter, we will guide you through the process of setting up employees and payroll in QuickBooks, empowering you to efficiently manage your workforce’s compensation and ensure compliance with payroll regulations.
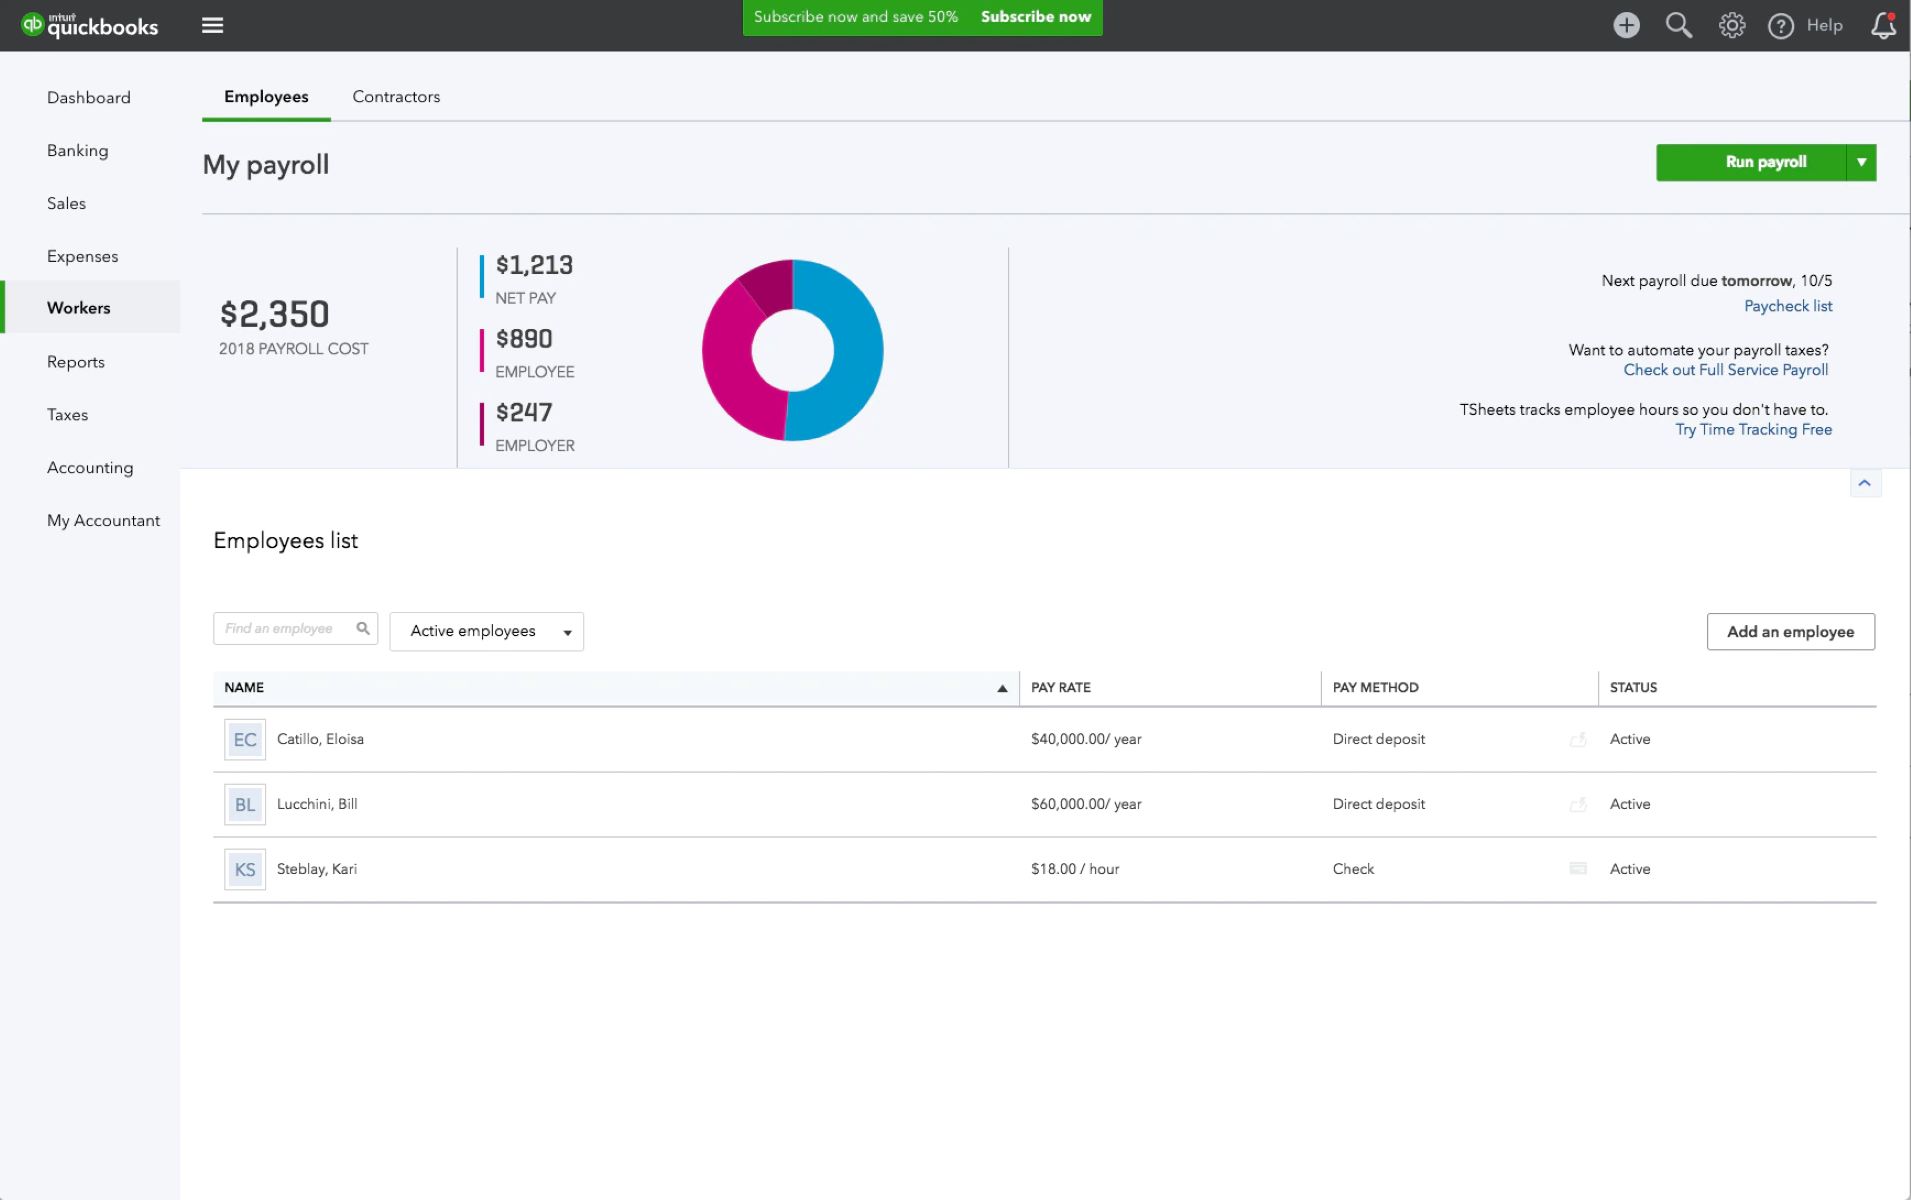
To begin, navigate to the “Employees” tab in QuickBooks and select the option to add a new employee. Enter the employee’s personal information, including their name, contact details, and employment status. You can also specify their pay frequency, such as weekly, bi-weekly, or monthly.
After adding an employee, proceed to enter their salary or hourly wage, along with any additional compensation elements like bonuses, commissions, or overtime pay. QuickBooks allows you to set up different earning types and assign the appropriate accounts to accurately track and report on employee compensation.
Next, specify the employee’s withholding allowances for income tax purposes. This information ensures that the correct amount of income tax is withheld from the employee’s paycheck. QuickBooks also provides options to set up employee deductions for items like health insurance, retirement contributions, or other voluntary benefits.
As part of the payroll setup process, you will need to select a payroll schedule that determines the frequency of payroll runs and the deadlines for submitting payroll information. This ensures that your employees are paid accurately and on time.
QuickBooks offers built-in features for calculating payroll taxes and generating payroll reports. You can set up payroll tax items to accurately track and account for federal, state, and local payroll taxes. These tax items can be customized to align with the tax regulations and requirements specific to your business location.
Along with setting up employees and payroll, QuickBooks provides features for managing employee time tracking, benefits administration, and generating payroll reports. These features help streamline your payroll processes and ensure accurate record-keeping.
It’s essential to stay up to date with payroll regulations and tax laws to ensure compliance. QuickBooks offers payroll tax updates to keep your system aligned with the latest regulations, reducing the chances of errors and compliance issues.
By effectively setting up employees and payroll in QuickBooks, you can automate payroll calculations, generate employee paychecks, and maintain accurate records. In the next chapter, we will explore how to connect bank accounts and credit cards to QuickBooks for seamless financial transactions.
Chapter 8: Connecting Bank Accounts and Credit Cards
Connecting your bank accounts and credit cards to QuickBooks is a crucial step in effectively managing your business finances. In this chapter, we will guide you through the process of connecting your bank accounts and credit cards to QuickBooks, enabling you to streamline financial transactions and effortlessly track your income and expenses.
Connecting your bank accounts and credit cards to QuickBooks allows you to automatically import and categorize your transactions, eliminating the need for manual data entry and reducing the risk of errors. This integration saves you time and ensures that your financial records are accurate and up to date.
To connect your bank accounts, navigate to the “Banking” or “Transactions” tab in QuickBooks, and select the option to connect an account. QuickBooks supports connections with many major banks and financial institutions, making it easy to link your accounts.
Follow the prompts to provide your bank’s login credentials, and QuickBooks will establish a secure connection to retrieve your transaction data. Depending on your bank, this process may involve multi-factor authentication to ensure the security of your financial information.
Once connected, QuickBooks will automatically import your banking transactions into the software. You can review and categorize these transactions, ensuring that they are accurately recorded in the appropriate accounts. This helps you keep track of your income and expenses in real-time and simplifies the reconciliation process.
Connecting your credit cards to QuickBooks follows a similar process. Navigate to the “Banking” or “Transactions” tab, select the option to add a credit card account, and follow the prompts to enter the necessary information. QuickBooks will establish a secure connection and import your credit card transactions for easy categorization and tracking.
By connecting your bank accounts and credit cards to QuickBooks, you gain a comprehensive view of your financial transactions. This visibility allows you to monitor your cash flow, identify potential discrepancies, and make informed financial decisions based on up-to-date information.
It’s important to regularly reconcile your bank and credit card accounts in QuickBooks to ensure that your records match the actual transactions and balances. Reconciliation helps identify any errors or discrepancies that need to be resolved, ensuring the accuracy of your financial reports.
By effectively connecting your bank accounts and credit cards to QuickBooks, you streamline your financial transactions, enhance accuracy, and gain valuable insights into your business’s financial health. In the next chapter, we will explore how to set up sales tax in QuickBooks to ensure compliance with tax regulations.
Chapter 9: Setting Up Sales Tax
Setting up sales tax in QuickBooks is essential for accurately tracking and reporting the taxes you collect on taxable sales. In this chapter, we will guide you through the process of setting up sales tax in QuickBooks, ensuring compliance with tax regulations and simplifying the management of your taxes.
Before setting up sales tax, it’s important to understand the specific tax rules and rates that apply to your business. Familiarize yourself with the sales tax requirements in your jurisdiction, including any exemptions, thresholds, or special considerations.
To begin setting up sales tax in QuickBooks, navigate to the “Taxes” or “Sales Tax” tab and select the option to set up sales tax. QuickBooks provides a step-by-step process to guide you through the necessary configurations.
First, you will need to select the appropriate tax agency or agencies that you are responsible for remitting sales tax to. This ensures that the tax collected from your sales is properly allocated to the relevant tax authorities.
Next, specify the tax rates for each jurisdiction in which you collect sales tax. You can create different tax items for different locations or tax categories. QuickBooks allows you to set up both single-rate and combined tax rates, accommodating various tax structures.
In addition to tax rates, you can also set up tax groups in QuickBooks. Tax groups are useful when you need to apply multiple tax rates to a single transaction, such as when different tax rates apply to specific products or services.
QuickBooks also provides options for managing tax exemptions and resale certificates. You can enter customer exemptions or attach electronic certificates to ensure that the appropriate sales tax is not applied to exempt transactions. This feature streamlines the handling of exempt sales and helps maintain compliance with tax regulations.
After setting up your sales tax configurations, it’s important to properly apply sales tax to your transactions. QuickBooks will automatically calculate and track the sales tax owed based on the taxable items and rates specified. Regularly review and reconcile your sales tax reports to ensure accurate records.
By effectively setting up sales tax in QuickBooks, you streamline the management of your taxable sales, ensure compliance with tax regulations, and facilitate accurate reporting. In the next chapter, we will explore how to run reports and analyze your data in QuickBooks to gain valuable insights into your business’s financial performance.
Chapter 10: Running Reports and Analyzing Data
In QuickBooks, running reports and analyzing data is vital for gaining valuable insights into your business’s financial performance and making informed decisions. In this chapter, we will explore how to run reports and use data analysis tools in QuickBooks to gain a deeper understanding of your financial information.
QuickBooks offers a wide range of pre-built reports that cover various aspects of your business, such as profit and loss, balance sheet, cash flow, and sales reports. To run a report, navigate to the “Reports” tab and select the report you want to generate.
Once you select a report, you can customize it by adjusting the date range, filters, and layout to focus on specific time periods or aspects of your business. You can also save customized reports for future use, enabling you to access them easily and generate updated reports with just a few clicks.
QuickBooks also offers data analysis tools, such as graphs and charts, to visually represent your financial data. These visualizations provide a clear snapshot of your business’s performance and trends, making it easier to identify areas of strength and areas that require attention.
When analyzing your data, pay attention to key performance indicators (KPIs) that align with your business objectives. Some common KPIs include revenue growth, gross profit margin, accounts receivable turnover, and inventory turnover. By monitoring these metrics, you can assess your business’s financial health and make informed decisions accordingly.
In addition to pre-built reports and data analysis tools, QuickBooks allows you to create custom reports tailored to your unique business needs. You can select the desired data fields, apply filters and sorting options, and organize the report layout according to your preferences. Custom reports help you drill down into specific areas of your business to extract the insights you need.
It’s important to regularly review and analyze your financial reports to track your business’s progress and identify areas for improvement. Consider scheduling regular report reviews to keep a close eye on your financial performance and compare it to your business goals.
By leveraging QuickBooks’ reporting and data analysis capabilities, you can gain a deeper understanding of your business’s financials, identify trends and patterns, and make data-driven decisions to drive growth and profitability.
With this concludes our guide to setting up and using QuickBooks. We hope that this comprehensive guide has equipped you with the knowledge and confidence to effectively manage your business finances using this powerful software.
Conclusion
Congratulations on completing our comprehensive guide to setting up and using QuickBooks! We have covered a wide range of topics, from getting started with QuickBooks to setting up company files, connecting bank accounts and credit cards, and running reports to analyze your financial data.
By following the steps outlined in this guide, you have gained the knowledge and skills necessary to efficiently manage your business’s finances with QuickBooks. From setting up customers and vendors to configuring payroll and tracking sales tax, you now have a solid foundation in using QuickBooks effectively.
Remember to regularly update and review your information in QuickBooks to stay on top of your financial records. This will ensure the accuracy and integrity of your financial data, enabling you to make informed decisions that drive the growth and success of your business.
While this guide has provided a comprehensive overview, it’s important to continually educate yourself on the latest features and updates in QuickBooks. Intuit, the company behind QuickBooks, regularly releases new versions and enhancements to improve user experience and provide even more robust functionality.
QuickBooks is a powerful tool that can help you streamline your financial management and gain valuable insights into your business’s performance. Take advantage of its features and customization options to tailor the software to your specific business needs.
Thank you for embarking on this learning journey with us. We hope that this guide has been valuable in equipping you with the knowledge and skills to effectively use QuickBooks for your business. Embrace the power of QuickBooks and enjoy the benefits of streamlined financial management for years to come!