Introduction
Welcome to the world of QuickBooks, where managing your business finances becomes not only quick but also efficient. In the vast realm of QuickBooks, one crucial component that plays a significant role in streamlining your financial processes is the vendor feature.
As a business owner, you often rely on external suppliers and service providers to keep your operations running smoothly. QuickBooks simplifies this process by allowing you to effortlessly manage and track your vendors’ information in one centralized location.
In this article, we will explore the role of vendors in QuickBooks and how they can benefit your business. We will delve into setting up and managing vendors, understanding different vendor types, and generating insightful vendor reports. So, let’s dive right in!
Using the vendor feature in QuickBooks not only saves you time and effort but also helps you maintain accurate financial records. With comprehensive vendor management, you can easily pay bills, track expenses, and streamline your procurement processes.
Whether you are sourcing products from suppliers, outsourcing services, or hiring independent contractors, QuickBooks allows you to organize and stay on top of your vendor relationships. By leveraging the power of QuickBooks’ vendor management capabilities, you can increase efficiency, reduce errors, and make well-informed financial decisions for your business.
In the following sections, we will explore how to set up and manage vendors in QuickBooks, understand the different vendor types, and generate insightful reports to gauge vendor performance. We will also provide you with some valuable tips to effectively manage your vendors using QuickBooks. So, let’s get started!
Definition of a Vendor in QuickBooks
In QuickBooks, a vendor refers to an individual or a company from whom you purchase goods or services for your business. Vendors can range from suppliers who provide raw materials or finished products to contractors who offer specialized services. By categorizing these external entities as vendors, QuickBooks allows you to efficiently manage your accounts payable and track your expenses.
When you set up vendors in QuickBooks, you provide essential information such as their name, contact details, payment terms, and tax identification number. This information helps you accurately record financial transactions, such as bills and payments, associated with each vendor in your books.
One of the critical functionalities of vendors in QuickBooks is the ability to track outstanding bills. Each time you receive an invoice from a vendor, you can record it in QuickBooks as a bill, specifying due dates and payment terms. This feature not only allows you to manage your cash flow effectively but also helps in staying organized and timely with your payments.
Furthermore, vendors in QuickBooks also play a pivotal role in expense tracking. By categorizing expenses under the appropriate vendor name, you can generate detailed reports that offer insights into your spending patterns. This information is crucial when analyzing your business’s financial health, identifying cost-saving measures, and even negotiating better pricing with your vendors.
It’s important to note that QuickBooks allows you to create and manage multiple vendors simultaneously. Whether you work with a handful of suppliers or have an extensive network of service providers, QuickBooks provides the flexibility to organize and track all your vendor information in one place.
By maintaining accurate and up-to-date vendor records in QuickBooks, you can ensure that your business financials are in order. QuickBooks simplifies vendor management, allowing you to streamline your accounts payable process, have better control over your expenses, and make informed decisions about your business’s financial well-being.
Benefits of Using Vendors in QuickBooks
The vendor feature in QuickBooks offers several benefits that can have a significant impact on the efficiency and effectiveness of your business operations. Let’s explore some of these benefits:
- Streamline Accounts Payable: By setting up vendors in QuickBooks, you can easily manage and track your outstanding bills. QuickBooks provides a centralized platform where you can store vendor invoices, record bill payments, and monitor payment due dates. This streamlined accounts payable process ensures that you stay organized and on top of your financial obligations.
- Efficient Expense Tracking: Categorizing expenses under the appropriate vendor name allows you to generate detailed expense reports. This enables you to gain insights into your spending patterns, identify areas of excessive expenditure, and make informed decisions to optimize costs. With QuickBooks, you can easily track and manage your business expenses, helping you maintain control over your financial health.
- Enhanced Vendor Management: QuickBooks provides a comprehensive vendor management system where you can store and organize critical vendor information. This includes contact details, payment terms, tax identification numbers, and more. Having all this information readily available in one place allows for efficient communication and better relationship management with your vendors.
- Better Cash Flow Management: With QuickBooks’ vendor functionality, you can effectively manage your cash flow by tracking and scheduling bill payments. By knowing exactly when your bills are due, you can plan and allocate funds accordingly. This helps to avoid late payment fees, maintain good relationships with vendors, and ensure a healthy cash flow for your business.
- Accurate Financial Reporting: By diligently recording vendor transactions in QuickBooks, you can generate accurate financial reports. These reports provide a clear overview of your business’s expenses, vendor balances, and outstanding bills. Detailed financial reporting allows you to make well-informed decisions, set realistic budget goals, and present reliable financial information to stakeholders.
The benefits of using vendors in QuickBooks go beyond mere organization and streamline processes. It empowers you to efficiently manage your accounts payable, gain insights into your expenses, establish strong vendor relationships, optimize cash flow, and make informed financial decisions.
Now that we have explored the benefits of using vendors in QuickBooks, let’s continue to the next section and learn how to set up and manage vendors effectively.
How to Set Up and Manage Vendors in QuickBooks
Setting up and managing vendors in QuickBooks is a straightforward process that allows you to maintain accurate vendor records and streamline your financial operations. Here are the steps to get started:
- Create Vendor Profiles: To set up a vendor in QuickBooks, navigate to the “Vendors” menu and select “Vendor Center”. Click on “New Vendor” and enter the necessary information, such as vendor name, address, contact details, and payment terms.
- Add Account Details: Specify the account name and account number that you will use to track transactions with the vendor. QuickBooks allows you to link your vendor profiles to specific general ledger accounts to ensure accurate financial reporting.
- Manage Payment Terms: Customizing payment terms for each vendor is essential to ensure timely and accurate bill payments. In the vendor profile, set up the preferred payment method, net terms, and due dates to help you stay on top of your financial obligations.
- Associate Transactions: When you receive a bill from a vendor, record the details in QuickBooks by selecting “Enter Bills” under the Vendors menu. Link the bill to the appropriate vendor profile and categorize it with the correct expense or asset account.
- Schedule Payments: To manage your cash flow effectively, schedule payments for your bills. QuickBooks provides a payment scheduling feature that allows you to set due dates and ensure timely payments. Remember to review and verify payment details before finalizing the payment.
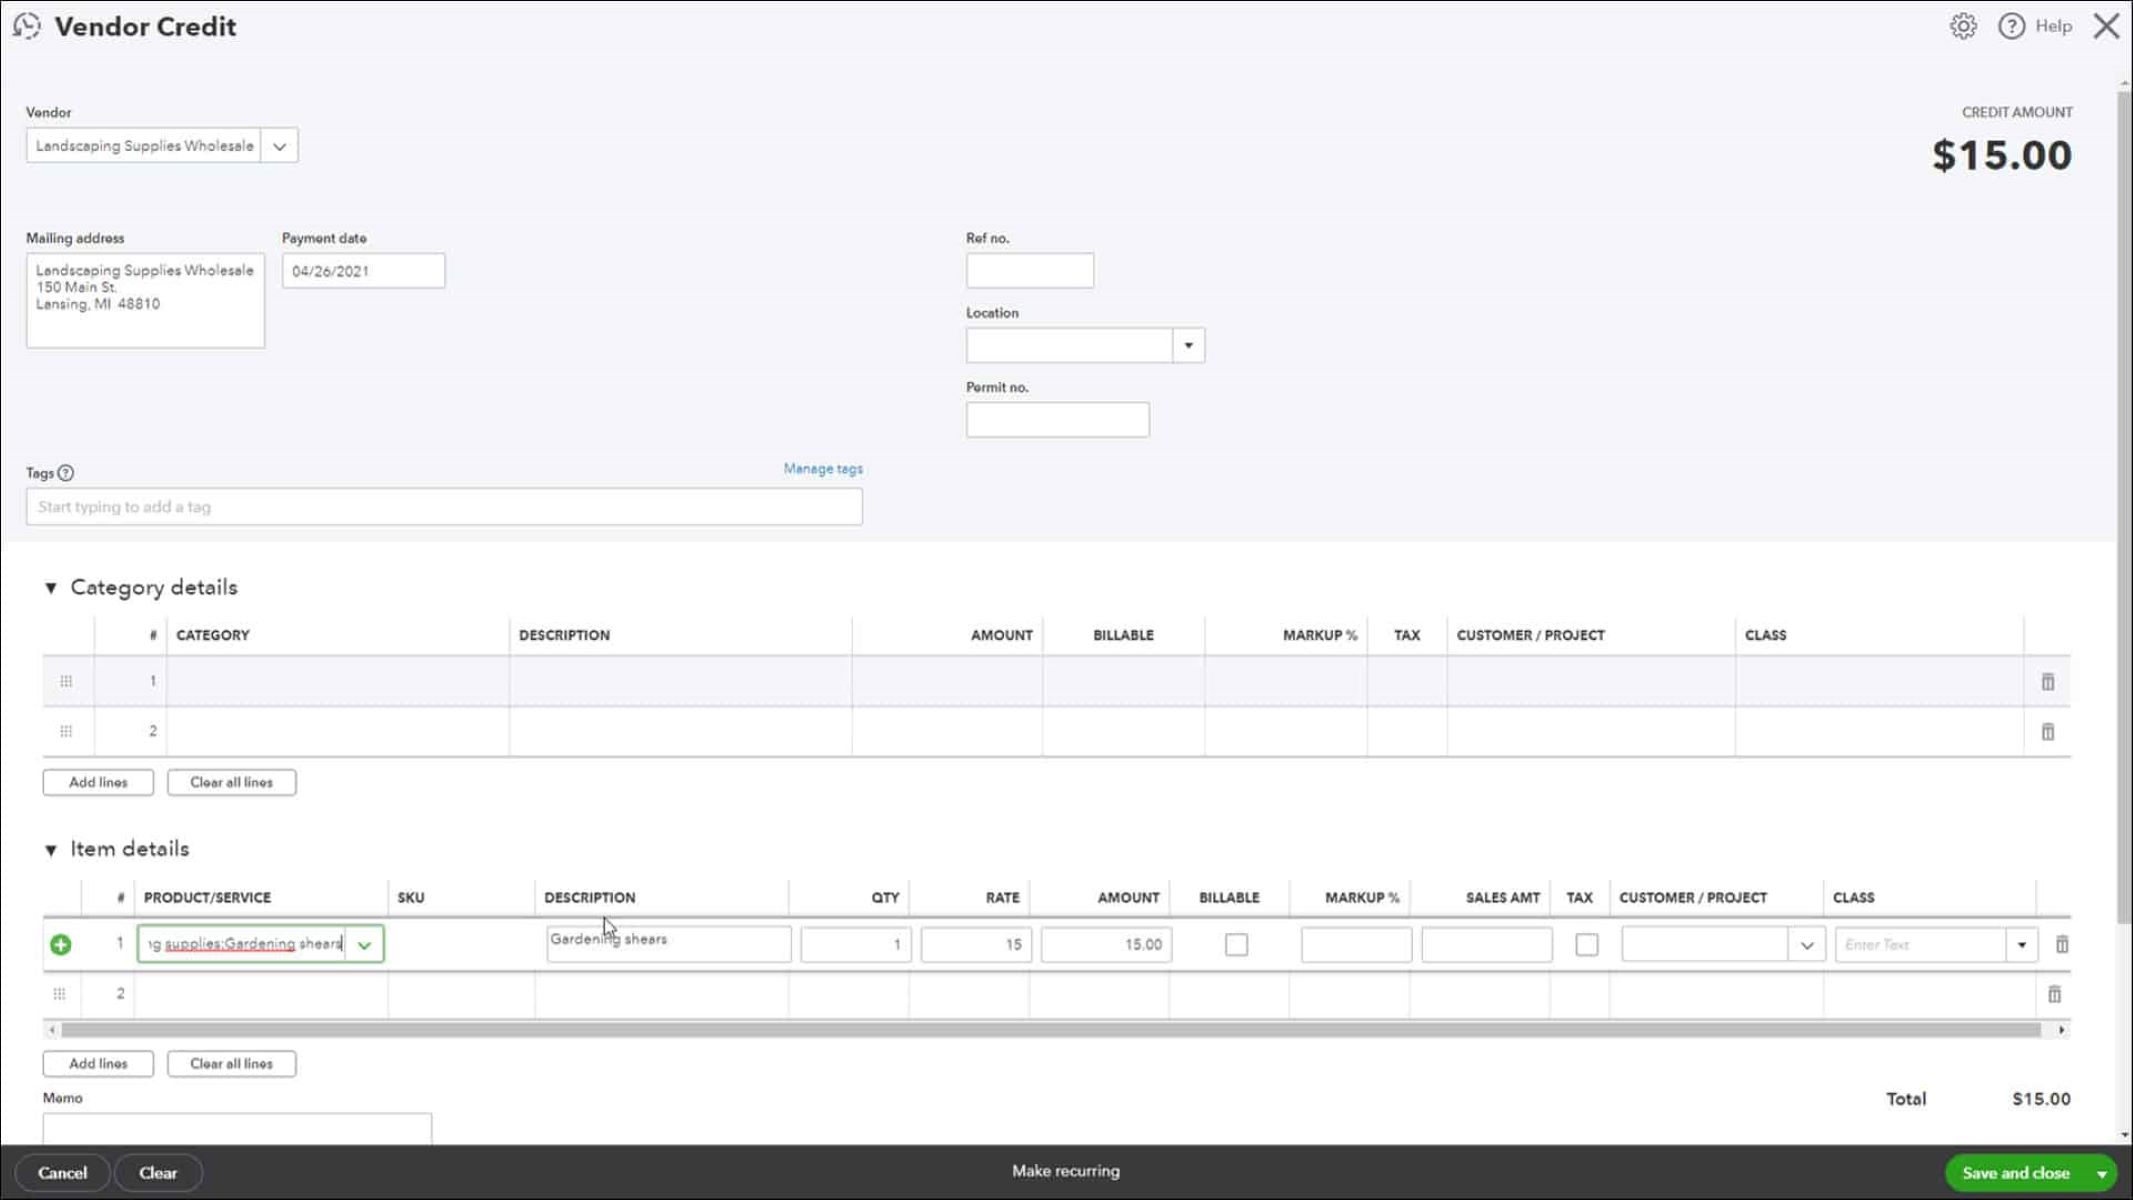
- Track Vendor Credits: If a vendor provides you with a credit or refund, record it in QuickBooks by selecting the “Vendor Credit” option. Ensure that you link the credit to the correct vendor profile to accurately track outstanding balances.
- Regularly Review Vendor Reports: QuickBooks provides various vendor reports that offer insights into your vendor relationships, outstanding balances, and payment history. Regularly review these reports to monitor your financial obligations and make informed decisions.
Managing vendors in QuickBooks not only requires setting up profiles and recording transactions but also regular maintenance. Update vendor information as needed, reconcile vendor statements with your records, and communicate any changes to your vendors promptly.
By following these steps and effectively managing your vendor profiles in QuickBooks, you can streamline your financial operations, maintain accurate records, and build stronger relationships with your vendors.
Now that you know how to set up and manage vendors in QuickBooks, let’s move on to understanding the different types of vendors you can work with in QuickBooks.
Understanding Vendor Types in QuickBooks
In QuickBooks, vendor types are used to categorize and classify vendors based on the nature of their services or products. Understanding the different vendor types can help you organize your vendor database more effectively and streamline your financial processes. Below are some common vendor types in QuickBooks:
- Supplier: Suppliers are vendors from whom you purchase raw materials, inventory, or finished goods for your business. By categorizing them as suppliers, you can easily track your purchases and costs associated with inventory management.
- Contractor: Contractors are vendors who provide specialized services to your business. They could be independent contractors or external service providers. Categorizing them separately helps in distinguishing their transactions from other types of vendors.
- Professional Services: Professional service vendors include professionals such as lawyers, accountants, consultants, or marketing agencies who provide specialized services to your business. Classifying them separately enables accurate tracking and reporting of expenses related to professional services.
- Utilities: Utility vendors provide essential services such as electricity, water, internet, or telephone. Categorizing them as utilities helps in keeping track of recurring expenses and monitoring costs associated with these services.
- Rentals and Leases: If you rent or lease equipment, vehicles, or premises for your business, categorizing these vendors separately allows for better expense tracking and reporting.
- Subcontractors: Subcontractors are vendors whom you hire for specific projects or tasks. Categorizing them separately helps in managing expenses and accurately reporting subcontracting costs.
- Others: Besides the common vendor types mentioned above, you can also create custom vendor types in QuickBooks based on your specific business needs. This flexibility allows you to organize and classify vendors as per your unique requirements.
When setting up vendors in QuickBooks, assign the appropriate vendor type to each vendor profile. This allows for easy filtering and reporting based on the vendor type, enabling you to analyze expenses, track payments, and monitor performance for each vendor category.
Properly classifying vendors based on their type not only helps in organizing your financial records but also provides insights into your business’s spending patterns. It allows you to identify areas where cost-saving measures can be implemented, negotiate better terms with certain vendor types, and make informed decisions about resource allocation.
Now that you understand the different vendor types in QuickBooks, let’s explore how you can create and view vendor reports to gain valuable insights into your vendor relationships and financial performance.
How to Create and View Vendor Reports in QuickBooks
Vendor reports in QuickBooks provide valuable insights into your vendor relationships, outstanding balances, and financial performance. Creating and viewing these reports is a straightforward process that allows you to make informed decisions and effectively manage your vendors. Here’s how you can create and view vendor reports in QuickBooks:
- Access the Reports Center: To create vendor reports, navigate to the “Reports” menu in QuickBooks and select “Reports Center”. Here, you will find a wide range of report categories.
- Select Vendor Reports: In the Reports Center, click on the “Vendor & Payables” category to access a variety of vendor-related reports. These reports include Vendor Balance Summary, Vendor Balance Detail, Vendor Contact List, Vendor Expense Summary, and more.
- Customize the Report: Once you select a vendor report, you can customize it to suit your specific needs. QuickBooks allows you to modify report settings such as date range, columns, filters, and sorting options. Customization ensures that the report delivers the precise information you require.
- Filter by Vendor Type: If you want to view reports specific to a particular vendor type, utilize the vendor type filters available in QuickBooks. This allows you to focus on analyzing the performance and expenses associated with a specific category of vendors.
- Export and Share Reports: QuickBooks enables you to export vendor reports in various formats such as PDF or Excel. This feature enables you to share reports with stakeholders, such as your accountant or business partners, or archive them for future reference.
- Schedule Automatic Reporting: To save time and stay on top of your vendor performance, you can schedule automatic report generation in QuickBooks. This feature allows you to receive vendor reports regularly via email, ensuring that you always have the most up-to-date information at your fingertips.
By creating and viewing vendor reports in QuickBooks, you gain insights into your vendor relationships, outstanding balances, and spending patterns. These reports help you identify trends, evaluate vendor performance, monitor expenses, and make informed decisions to optimize your vendor management strategies.
Regularly reviewing vendor reports in QuickBooks ensures that you have a clear understanding of your financial obligations, can negotiate better terms with vendors, and identify areas for cost-saving measures. It also helps in fostering stronger vendor relationships and ensuring efficient cash flow management.
Now that you know how to create and view vendor reports in QuickBooks, let’s move on to some tips for effectively managing vendors in the platform.
Tips for Effectively Managing Vendors in QuickBooks
Managing vendors in QuickBooks requires attention to detail and efficient processes to ensure smooth operations and accurate financial records. Here are some tips to help you effectively manage vendors in QuickBooks:
- Maintain Accurate Vendor Records: Ensure that you enter complete and up-to-date information for each vendor in QuickBooks. This includes their name, contact details, payment terms, and tax identification number. Regularly review and update vendor profiles as needed to ensure accuracy.
- Set Up Preferred Payment Methods: Customize payment methods for each vendor to streamline bill payments. By specifying your preferred payment method in the vendor profile, QuickBooks will automatically populate it when you record bills, saving you time and reducing errors.
- Implement a Consistent Naming Convention: Use a standardized naming convention for your vendors to ensure consistency and ease of search. This will help you quickly locate specific vendors in the vendor list and maintain organization in your records.
- Regularly Review and Verify Vendor Statements: Compare vendor statements with your records in QuickBooks to identify any discrepancies. This will help you catch errors or missing transactions and address them promptly, ensuring accurate financial reporting.
- Monitor Vendor Performance: Regularly review vendor reports in QuickBooks to evaluate vendor performance. Analyze factors such as delivery times, quality of products or services, and adherence to agreed-upon terms. This assessment will help you make informed decisions about continuing or renegotiating partnerships with vendors.
- Utilize Vendor Categories: Take advantage of the vendor types in QuickBooks to categorize vendors based on their nature or industry. This allows for easy filtering, reporting, and analysis, helping you understand spending patterns and make strategic decisions based on different vendor categories.
- Schedule Regular Vendor Reviews: Set aside time to conduct periodic vendor reviews. Evaluate vendor relationships, assess their contribution to your business, and identify opportunities for improvement or cost-saving measures. Regular reviews help in maintaining strong vendor relationships and optimizing vendor management strategies.
- Automate Vendor Reminders: QuickBooks allows you to set reminders for important vendor-related tasks, such as outstanding bills or contract renewals. Utilize the reminder feature to ensure timely payments, contract renewals, or follow-ups with vendors, reducing the risk of missed deadlines or late fees.
- Regularly Back up Your QuickBooks Data: Protect your vendor records and financial data by regularly backing up your QuickBooks data. This ensures that your valuable information is secure and can be easily restored in case of any technical issues or data loss.
By implementing these tips, you can effectively manage vendors in QuickBooks, maintain accurate records, and strengthen your vendor relationships. With streamlined vendor management processes, you can optimize cash flow, improve financial reporting, and make informed decisions to drive the success of your business.
Now that you are equipped with these tips, you can confidently manage vendors in QuickBooks and maximize the benefits of this powerful financial management tool.
Conclusion
Managing vendors is a critical aspect of running a successful business, and QuickBooks provides the necessary tools and features to simplify and streamline this process. By utilizing the vendor functionality in QuickBooks, you can efficiently track and manage your vendors, maintain accurate financial records, and make informed decisions for your business.
In this article, we explored the definition of a vendor in QuickBooks and the benefits of using vendors in the platform. We also discussed how to set up and manage vendors effectively, understanding different vendor types, creating and viewing vendor reports, and shared tips for effective vendor management in QuickBooks.
Using vendors in QuickBooks helps you streamline your accounts payable, track expenses, enhance vendor management, improve cash flow management, and generate accurate financial reports. It empowers you to make well-informed decisions, negotiate better terms with suppliers, and optimize your financial operations.
Remember to maintain accurate vendor records, customize payment terms, regularly review and verify vendor statements, monitor vendor performance, and use vendor categories to efficiently manage your vendors in QuickBooks. Additionally, take advantage of the reporting features to gain valuable insights into your vendor relationships and financial performance.
By following the tips provided and leveraging the power of QuickBooks’ vendor management capabilities, you can create strong vendor partnerships, streamline your financial processes, and ultimately drive the success of your business.
So, embrace the power of QuickBooks’ vendor feature and start effectively managing your vendors today!