Introduction
Welcome to our QuickBooks tutorial on how to record a refund in QuickBooks. As a business owner or bookkeeper, it’s essential to accurately track your financial transactions, including refunds. QuickBooks, a widely used accounting software, provides a seamless process for recording refunds, ensuring your financial records are up to date and accurate.
Whether you need to issue a refund to a customer, record a vendor refund, or refund a payroll liability, QuickBooks offers an intuitive interface that simplifies the refunding process. By following the steps outlined in this tutorial, you’ll be able to record refunds efficiently and keep your books in order.
Accurate tracking of refunds is crucial for several reasons. It allows you to maintain transparency with your customers and vendors, ensuring that any overpayments or returns are properly documented. Additionally, refunds can impact your financial statements, affecting your revenue, expenses, and cash flow. By accurately recording refunds in QuickBooks, you can generate accurate reports and make informed business decisions.
In the following sections, we will walk you through the step-by-step process of recording a refund in QuickBooks. Whether you’re a beginner or an experienced QuickBooks user, this tutorial will provide you with the necessary guidance to streamline your refunding process.
Now, let’s get started with Step 1: Navigating to the Sales Receipts or Refunds window in QuickBooks.
Step 1: Navigate to the Sales Receipts or Refunds Window
The first step in recording a refund in QuickBooks is to navigate to the Sales Receipts or Refunds window. This is where you can initiate the process of recording a refund for a customer, vendor, or payroll liability. Follow the steps below to access the appropriate window:
- Open QuickBooks and log in to your company file.
- From the main menu, click on “Customers” or “Vendors,” depending on the type of refund you need to record.
- In the drop-down menu, select “Create Sales Receipt” or “Enter Bills,” respectively.
- If you’re recording a customer refund, you’ll be redirected to the Sales Receipts window. If you’re recording a vendor refund, you’ll be redirected to the Enter Bills window.
Once you have accessed the appropriate window, you’re ready to proceed to the next step. The Sales Receipts or Enter Bills window provides you with the necessary fields to enter the details of the refund, including the customer/vendor information, refund amount, and payment method.
Navigating to the Sales Receipts or Refunds window is crucial for ensuring that you’re in the right place to record the refund accurately. Now that you know how to access the appropriate window, let’s move on to Step 2: Choosing the Customer and Date of the Refund.
Step 2: Choose the Customer and Date of the Refund
Once you have accessed the Sales Receipts or Refunds window in QuickBooks, the next step is to choose the customer or vendor for whom you are recording the refund and specify the date of the refund. Follow the steps below to complete this step:
- In the Sales Receipts or Enter Bills window, locate the field labeled “Customer” or “Vendor” and click on the drop-down arrow.
- Select the appropriate customer or vendor from the list. If the customer or vendor is not listed, you can click on the “Add New” option to create a new customer or vendor profile.
- Once you have chosen the customer or vendor, proceed to the field labeled “Date” or “Bill Date.”
- Click on the field and select the date on which the refund occurred. If the refund is being recorded at a later date, you can choose the current date or the date of the refund, depending on your preference.
Choosing the correct customer or vendor and specifying the accurate date of the refund is essential for maintaining accurate financial records. This information ensures that the refund is associated with the appropriate customer or vendor and reflects the correct timing of the transaction.
Now that you have selected the customer or vendor and specified the refund date, let’s move on to the next step: selecting the payment method for the refund.
Step 3: Select the Payment Method
After choosing the customer or vendor and specifying the date of the refund in QuickBooks, the next step is to select the payment method used for the refund. This step is crucial for accurately recording the refund transaction. Follow the steps below to complete this step:
- In the Sales Receipts or Enter Bills window, locate the field labeled “Payment Method” or “Payment Terms” and click on the drop-down arrow.
- Select the appropriate payment method from the list. QuickBooks provides options such as cash, check, credit card, electronic transfer, and more. If the desired payment method is not available in the list, you can click on “Add New” to create a new payment method in QuickBooks.
Selecting the correct payment method ensures that your financial records accurately reflect how the refund was processed. It allows for clear tracking of the funds and ensures consistency across your financial statements.
Once you have selected the payment method, you can proceed to the next step: entering the amount of the refund. This step is essential for recording the financial aspect of the refund transaction. Continue to Step 4 to learn more.
Step 4: Enter the Amount of the Refund
Now that you’ve selected the payment method for the refund in QuickBooks, the next step is to enter the amount of the refund. This step is crucial for accurately recording the financial aspect of the refund transaction. Follow the steps below to complete this step:
- In the Sales Receipts or Enter Bills window, locate the field labeled “Amount” or “Refund Amount.”
- Click on the field and enter the exact amount of the refund. Make sure to enter the amount in the appropriate currency if your business deals with multiple currencies.
Entering the correct amount ensures that your financial records reflect the exact value of the refund. It allows for accurate reporting of revenue, expenses, and cash flow, providing you with a clear picture of your business’s financial standing.
In addition, if there are any partial refunds, make sure to enter the correct amount for each partial refund transaction. QuickBooks allows you to enter multiple refund transactions for the same customer or vendor.
Once you have entered the refund amount, you can proceed to the next step: allocating the refund to the correct account. Allocating the refund properly ensures that your financial statements are accurate and reflect the appropriate accounts affected by the refund. Continue to Step 5 to learn more.
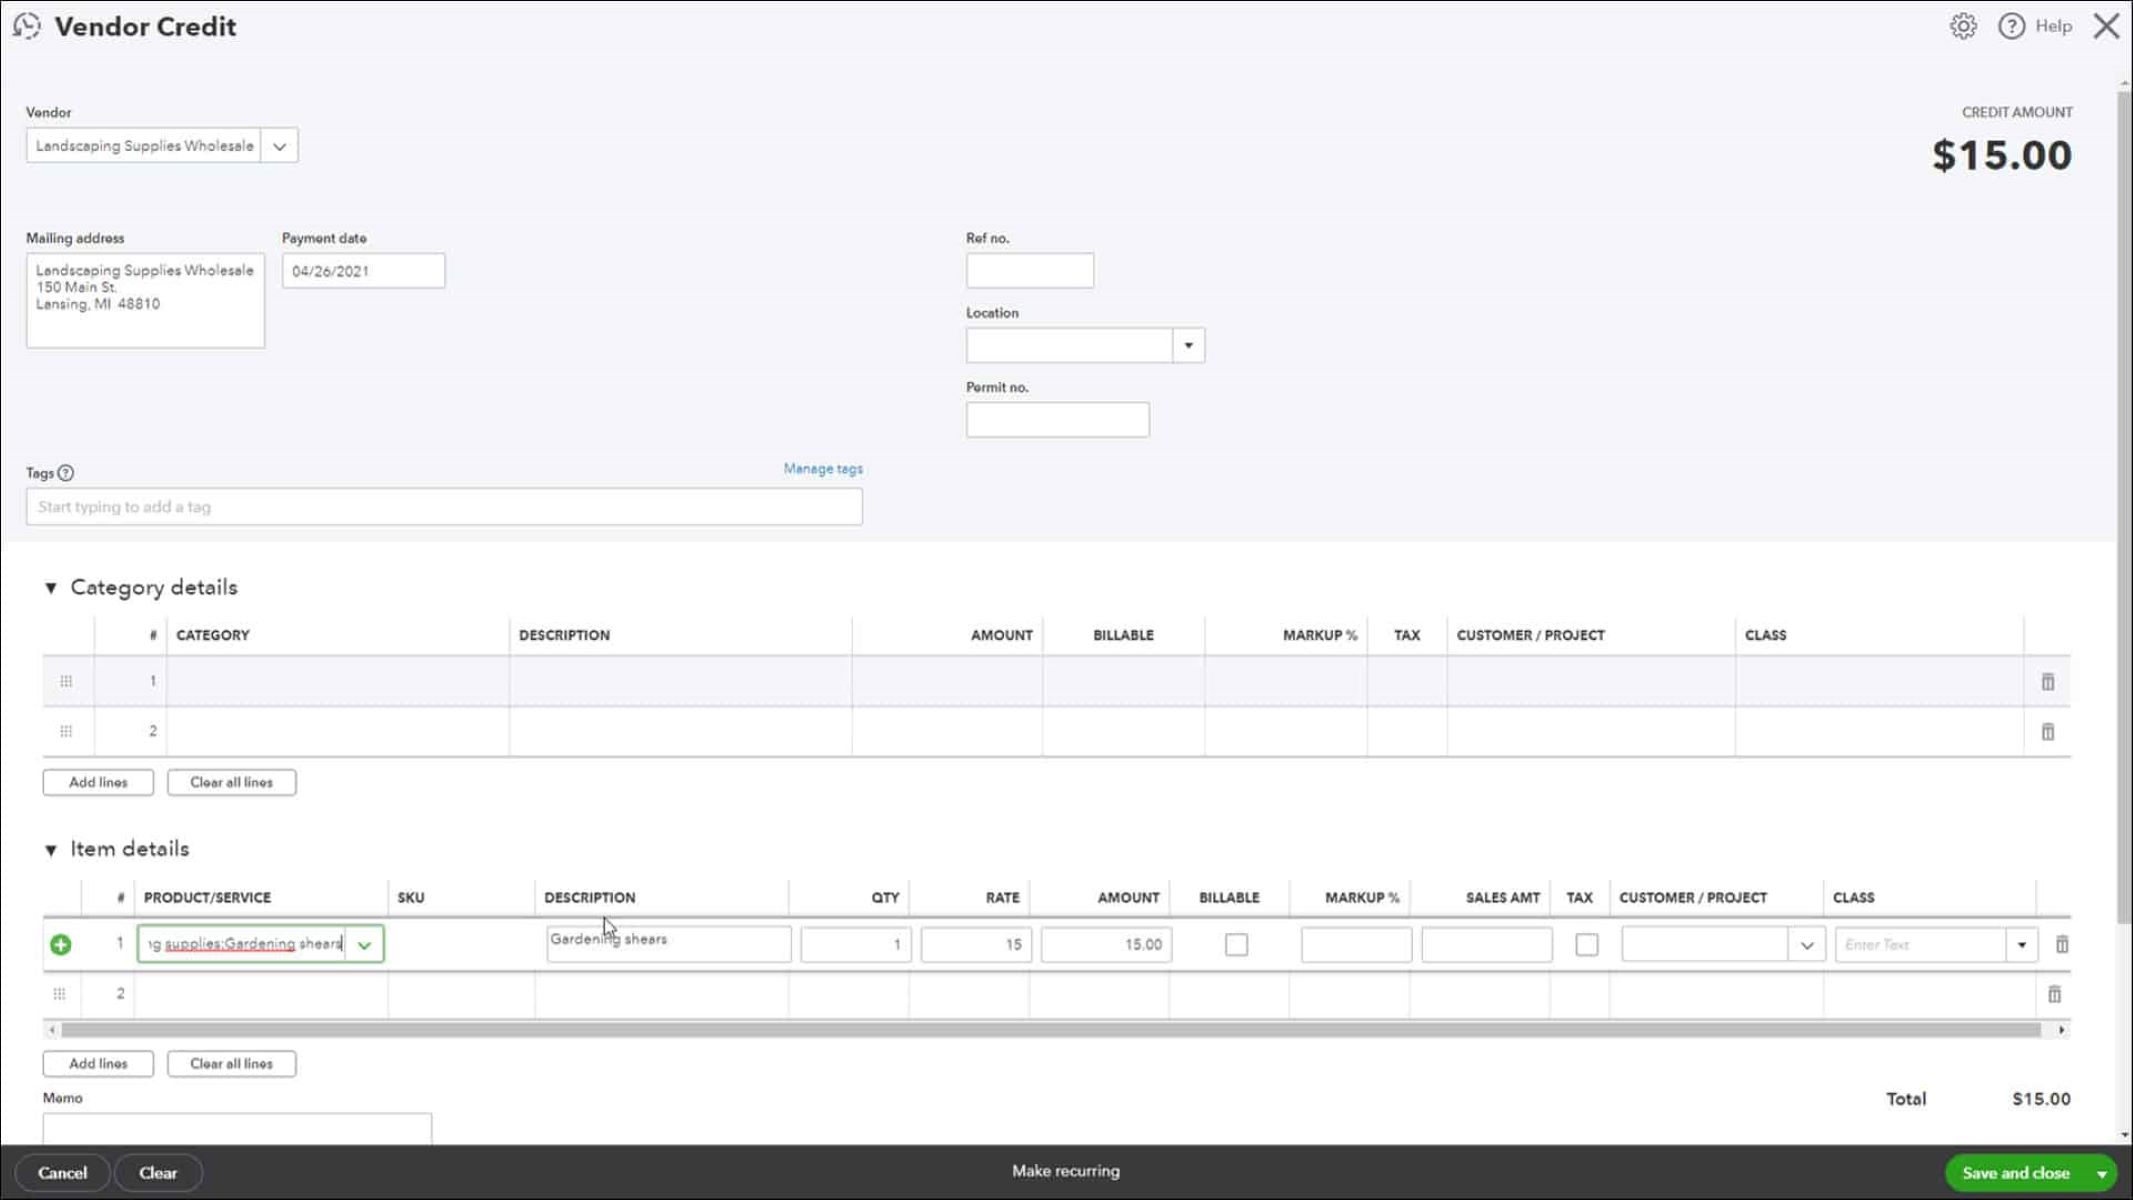
Step 5: Allocate the Refund to the Correct Account
After entering the amount of the refund in QuickBooks, the next step is to allocate the refund to the correct account. This step is vital for accurate financial reporting and ensures that the refund transaction is properly categorized. Follow the steps below to allocate the refund:
- In the Sales Receipts or Enter Bills window, locate the field or section labeled “Account” or “Expense Account.”
- Click on the field or section and select the appropriate account to which the refund should be allocated. The account will typically depend on the nature of the refund. For example, if it is a customer refund, you might allocate it to an income account. If it is a vendor refund, you might allocate it to an expense account.
Accurately allocating the refund to the appropriate account ensures that your financial statements accurately reflect the impact of the refund on your business’s revenue, expenses, or other relevant accounts. It also helps you track and analyze your financial transactions more effectively.
QuickBooks allows you to allocate the refund to multiple accounts if necessary. Simply repeat the above steps for each account you want to allocate the refund to.
Once you have allocated the refund to the correct account(s), you can proceed to the final step: saving the refund and recording the transaction. This step finalizes the refund process and ensures that the transaction is accurately recorded in your QuickBooks file. Continue to Step 6 to learn more.
Step 6: Save the Refund and Record the Transaction
After allocating the refund to the correct account(s) in QuickBooks, the final step is to save the refund and record the transaction. This step ensures that the refund is officially recorded in your financial records, making it easier to track and reconcile your transactions. Follow the steps below to save the refund and record the transaction:
- Review the refund details in the Sales Receipts or Enter Bills window to ensure accuracy. Double-check the customer/vendor, date, payment method, refund amount, and allocated accounts.
- Click on the “Save” or “Record” button located at the top or bottom of the window. QuickBooks will save the refund and record it as a transaction in your company file.
By saving the refund and recording the transaction, you create an official record of the refund in QuickBooks. This record can be easily accessed and referenced in the future for financial reporting, reconciliation, and auditing purposes.
It is important to note that the exact steps and terminology may vary slightly depending on the version of QuickBooks you are using. However, the general concept of saving the refund and recording the transaction remains the same across versions.
Congratulations! You have successfully recorded a refund in QuickBooks. Your financial records are now up to date and accurately reflect the refund transaction. It is important to regularly reconcile your bank accounts and review your financial reports to ensure that all transactions, including refunds, are correctly recorded.
We hope this tutorial has been helpful in guiding you through the process of recording a refund in QuickBooks. If you have any further questions or need more assistance, don’t hesitate to consult the QuickBooks Help Center or reach out to a qualified accounting professional.
Thank you for choosing QuickBooks as your accounting software. Happy refunding!