Introduction
Welcome to our comprehensive guide on understanding the meaning of “revert” in QuickBooks. QuickBooks is a popular accounting software that helps businesses manage their financial transactions and keep their books in order. Reverting transactions is a powerful tool within QuickBooks that allows users to undo or reverse a previously recorded transaction. This can be incredibly useful in correcting errors, reconciling accounts, or making necessary adjustments to the financial records.
Reverting a transaction essentially means rolling back the changes made by that particular transaction, returning the accounts and balances to their previous state. It is important to note that reverting a transaction should be done with caution as it can have significant implications on your financial records. Therefore, it is crucial to have a thorough understanding of how to properly revert transactions in QuickBooks to ensure accuracy and maintain the integrity of your financial data.
In this guide, we will walk you through the process of reverting various types of transactions in QuickBooks. Whether you need to revert invoices, payments, sales receipts, journal entries, bill payments, or paychecks, we have you covered. So, let’s dive in and explore the world of reverting transactions in QuickBooks, empowering you with the knowledge and confidence to effectively manage your financial records.
Understanding Revert in QuickBooks
In QuickBooks, the term “revert” refers to the action of undoing or reversing a transaction that has already been recorded. When you revert a transaction, you essentially roll back the changes made by that specific transaction, restoring the affected accounts and balances to their original state.
Reverting a transaction can be necessary for various reasons. It allows you to correct errors, reconcile accounts, or make adjustments to your financial data. It provides a level of flexibility and control in managing your books, ensuring the accuracy and integrity of your financial records.
It’s important to note that reverting a transaction in QuickBooks does not erase or delete it completely. Instead, it reverses the impact of the transaction by creating a new transaction that counteracts the original one. This preserves a complete audit trail of your financial activity, providing transparency and accountability.
When you revert a transaction in QuickBooks, it’s essential to consider its impact on related transactions. Reverting a transaction may also revert related transactions that were dependent on it. For example, if you revert a payment, the associated invoice or bill may also be reverted.
Reverting transactions in QuickBooks can save valuable time and effort that would otherwise be spent manually correcting errors or making adjustments. It provides a streamlined and efficient way to maintain accurate financial records, helping you make informed business decisions based on reliable data.
In the following sections, we will explore the process of reverting different types of transactions in QuickBooks. By understanding how to properly revert invoices, payments, sales receipts, journal entries, bill payments, and paychecks, you will have the necessary knowledge and skills to effectively manage your financial records in QuickBooks.
How to Revert Transactions in QuickBooks
Reverting transactions in QuickBooks is a straightforward process that allows you to undo or reverse a recorded transaction. Depending on the type of transaction you need to revert, the steps may slightly vary. Here, we will provide a general overview of how to revert transactions in QuickBooks:
- Open QuickBooks and navigate to the transaction you want to revert. This can be an invoice, payment, sales receipt, journal entry, bill payment, or paycheck.
- Locate and select the transaction you wish to revert.
- Once the transaction is open, look for the option to “Reverse” or “Revert” the transaction. This option is typically found under the “More” or “Edit” dropdown menu.
- Click on the “Reverse” or “Revert” option, and QuickBooks will automatically create a new transaction that counteracts the original one. This new transaction will have a negative amount to reverse the impact of the original transaction.
- Review the details of the new transaction and make any necessary adjustments before saving it.
- Save the reversed transaction, and QuickBooks will update the affected accounts and balances accordingly, restoring them to their previous state.
It’s important to note that when you revert a transaction, QuickBooks will create a new transaction with the same reference number but with a different date. This helps maintain a clear audit trail and prevents any potential conflicts with duplicate reference numbers.
Remember to review and reconcile any related transactions that may have been affected by reverting the original transaction. For example, if you revert a payment, make sure to review the associated invoice or bill to ensure accuracy and consistency in your financial records.
By following these steps, you can easily revert transactions in QuickBooks, correcting errors or making necessary adjustments to your financial data without impacting the integrity of your books.
Reverting Invoice in QuickBooks
In QuickBooks, reverting an invoice allows you to undo or reverse a previously recorded invoice. This can be useful if you need to correct any errors, adjust the invoice amount, or cancel the invoice altogether. Here’s how you can revert an invoice in QuickBooks:
- Open QuickBooks and navigate to the “Invoices” section.
- Locate the invoice you want to revert and select it.
- Once the invoice is open, click on the “More” or “Edit” dropdown menu.
- Choose the “Reverse” or “Revert” option, and QuickBooks will generate a new transaction to reverse the impact of the original invoice.
- Review the details of the new transaction and make any necessary adjustments.
- Save the reversed transaction, and QuickBooks will update the accounts and balances accordingly, reverting the invoice and its impact on your financial records.
When you revert an invoice, QuickBooks creates a new transaction with a negative amount to offset the original invoice’s impact. It maintains the original invoice’s reference number but assigns a different date to differentiate it from the original transaction.
It’s important to note that reverting an invoice will only impact the accounts and balances associated with the invoice itself. Any related transactions, such as payments or balance adjustments, will need to be handled separately.
By reverting an invoice in QuickBooks, you can accurately correct any errors or make necessary adjustments to your financial records, ensuring the integrity and accuracy of your books.
Reverting Payments in QuickBooks
In QuickBooks, reverting a payment allows you to undo or reverse a recorded payment transaction. This can be helpful in situations where you need to correct errors, reconcile accounts, or cancel a payment. Here’s a step-by-step guide on how to revert payments in QuickBooks:
- Open QuickBooks and navigate to the “Payments” or “Receive Payments” section.
- Locate the payment transaction you want to revert and select it.
- Once the payment is open, click on the “More” or “Edit” dropdown menu.
- Choose the “Reverse” or “Revert” option, and QuickBooks will generate a new transaction to reverse the impact of the original payment.
- Review the details of the new transaction and make any necessary adjustments.
- Save the reversed transaction, and QuickBooks will update the accounts and balances accordingly, reverting the payment and its impact on your financial records.
When you revert a payment, QuickBooks creates a new transaction with a negative amount to offset the original payment’s impact. It maintains the original payment’s reference number but assigns a different date to distinguish it from the original transaction.
It’s important to note that when you revert a payment, any associated invoices or sales receipts will also be reverted. Make sure to review these related transactions and adjust them as needed to maintain accurate financial records.
By reverting payments in QuickBooks, you can easily correct errors, reconcile your accounts, or manage cancelled payments, ensuring the accuracy and integrity of your financial records.
Reverting Sales Receipts in QuickBooks
In QuickBooks, you have the option to revert sales receipts, allowing you to reverse a recorded sales transaction. This can be helpful if you need to correct errors, adjust sales amounts, or cancel a sales receipt. Here’s a step-by-step guide on how to revert sales receipts in QuickBooks:
- Open QuickBooks and navigate to the “Sales Receipts” section.
- Locate the sales receipt you want to revert and select it.
- Once the sales receipt is open, click on the “More” or “Edit” dropdown menu.
- Choose the “Reverse” or “Revert” option, and QuickBooks will generate a new transaction to reverse the impact of the original sales receipt.
- Review the details of the new transaction and make any necessary adjustments.
- Save the reversed transaction, and QuickBooks will update the accounts and balances accordingly, reverting the sales receipt and its impact on your financial records.
When you revert a sales receipt in QuickBooks, a new transaction is created with a negative amount to offset the original sales receipt’s impact. The reference number of the original sales receipt is maintained, but the new transaction is assigned a different date to differentiate it from the original transaction.
It’s important to note that reverting a sales receipt will only impact the accounts and balances associated with the sales receipt itself. Any related transactions, such as payments or inventory adjustments, will need to be handled separately.
By reverting sales receipts in QuickBooks, you can easily correct errors, adjust sales amounts, or manage cancelled sales, ensuring the accuracy and integrity of your financial records.
Reverting Journal Entries in QuickBooks
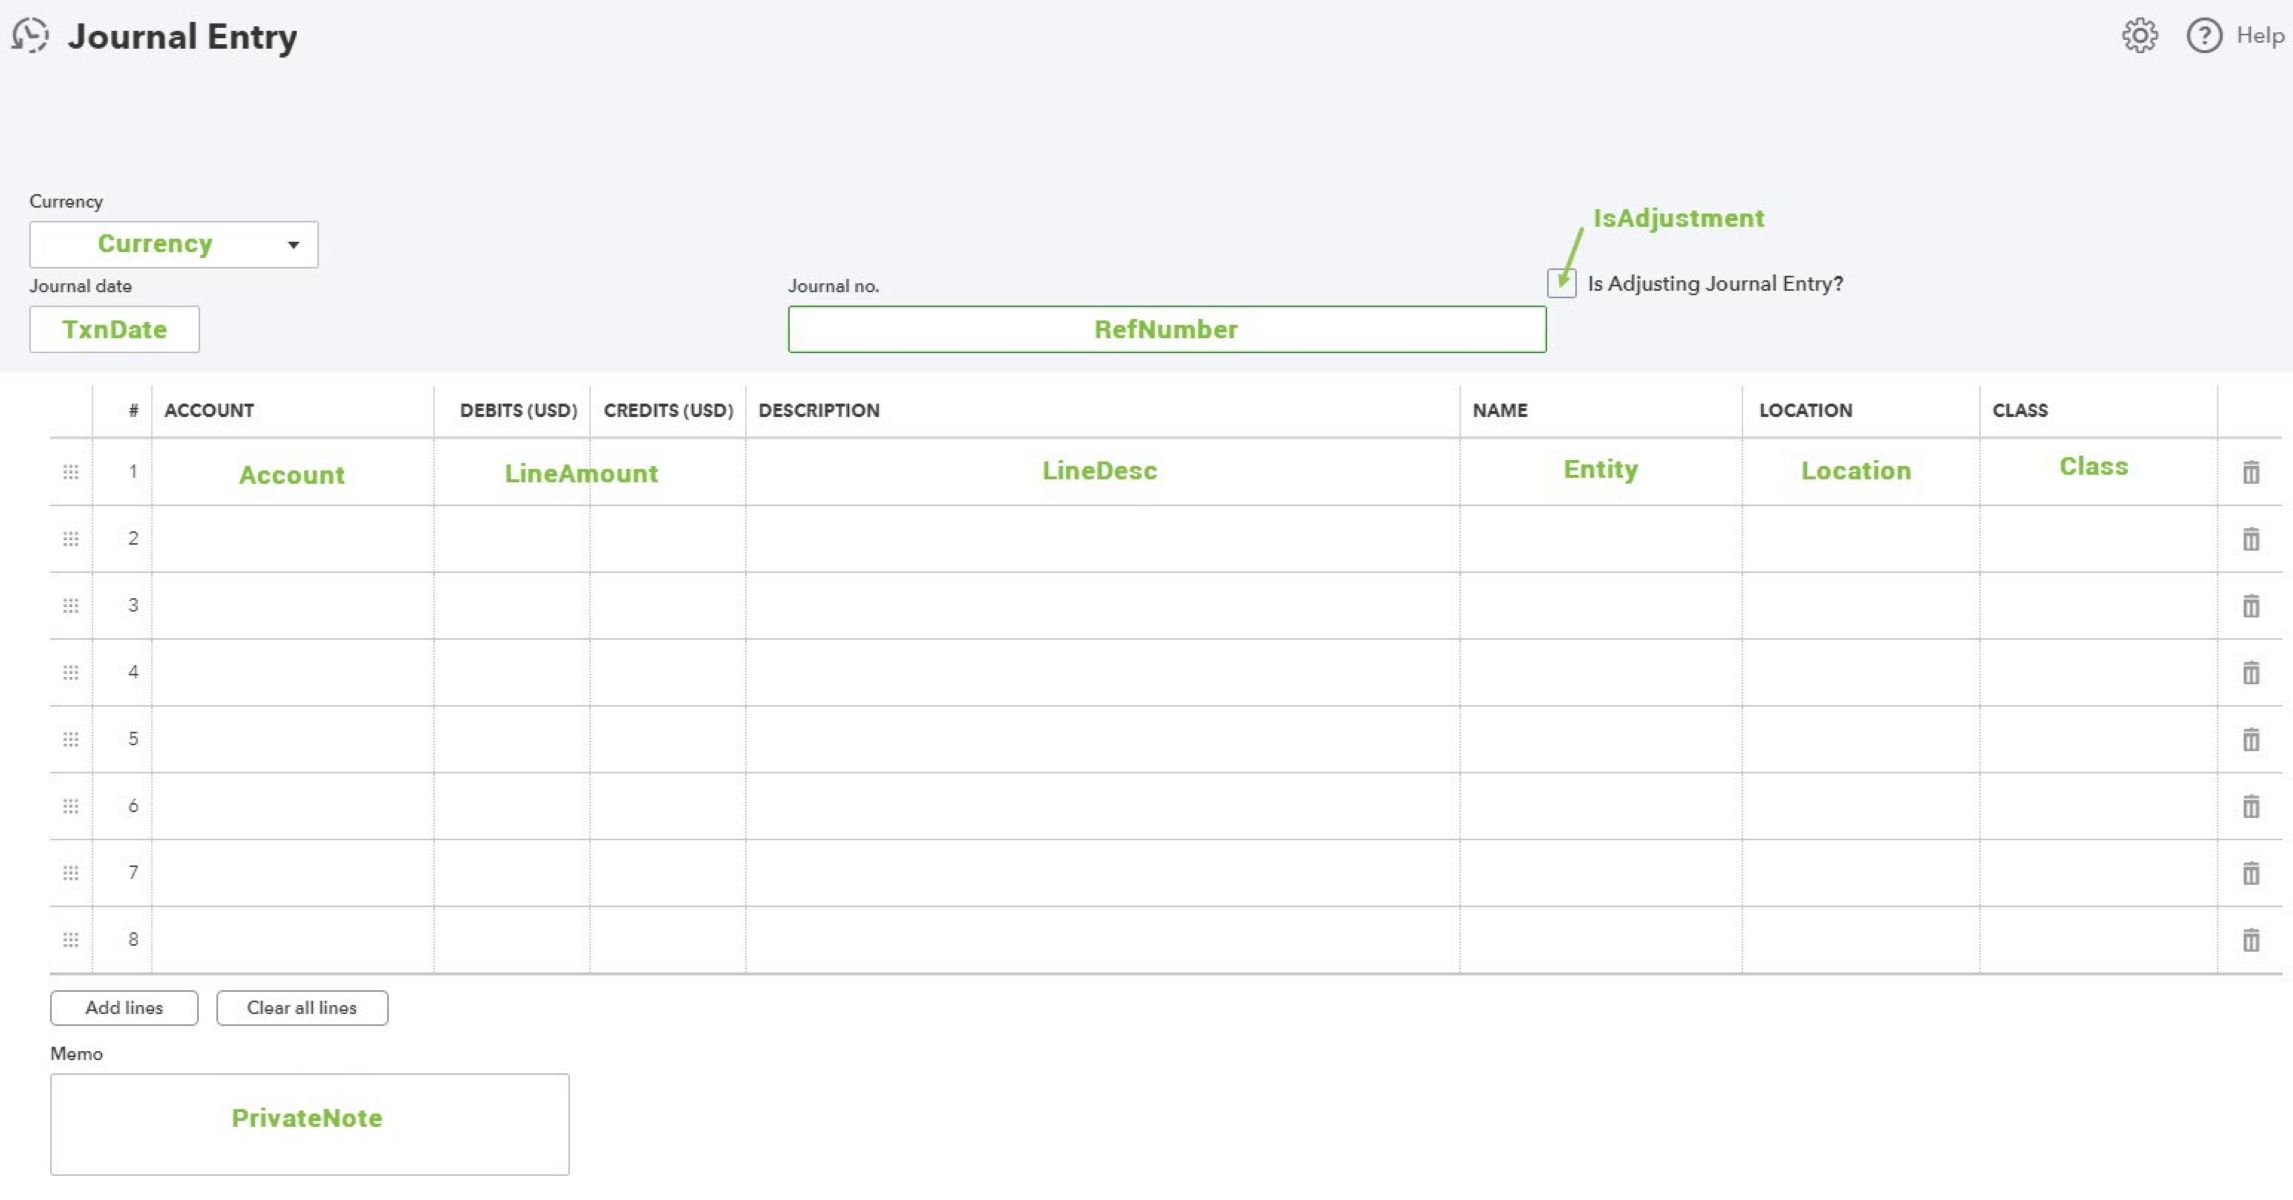
In QuickBooks, reverting journal entries allows you to undo or reverse a recorded journal entry. This can be crucial when you need to correct errors, adjust account balances, or cancel a journal entry. Here’s a step-by-step guide on how to revert journal entries in QuickBooks:
- Open QuickBooks and navigate to the “Journal Entry” section.
- Locate the journal entry you want to revert and select it.
- Once the journal entry is open, click on the “More” or “Edit” dropdown menu.
- Choose the “Reverse” or “Revert” option, and QuickBooks will generate a new journal entry to reverse the impact of the original entry.
- Review the details of the new entry and make any necessary adjustments.
- Save the reversed entry, and QuickBooks will update the accounts and balances accordingly, reverting the journal entry and its impact on your financial records.
When you revert a journal entry in QuickBooks, a new entry is created with the original entry’s amounts but with opposite debits and credits. This effectively cancels out the impact of the original entry and restores the accounts’ balances to their prior state.
It’s important to note that reverting a journal entry only impacts the accounts and balances associated with the specific entry. Any linked transactions or subsequent journal entries will need to be reviewed and adjusted accordingly.
By reverting journal entries in QuickBooks, you can easily correct errors, adjust balances, and manage any unwanted entries, ensuring the accuracy and integrity of your financial records.
Reverting Bill Payments in QuickBooks
In QuickBooks, reverting bill payments allows you to reverse a recorded payment made towards a bill. This feature is handy when you need to correct errors, reconcile accounts, or cancel a bill payment. Here’s a step-by-step guide on how to revert bill payments in QuickBooks:
- Open QuickBooks and navigate to the “Pay Bills” or “Bills” section.
- Locate the bill payment you want to revert and select it.
- Once the bill payment is open, click on the “More” or “Edit” dropdown menu.
- Choose the “Reverse” or “Revert” option, and QuickBooks will generate a new transaction to reverse the impact of the original bill payment.
- Review the details of the new transaction and make any necessary adjustments.
- Save the reversed transaction, and QuickBooks will update the accounts and balances accordingly, reverting the bill payment and its impact on your financial records.
When you revert a bill payment in QuickBooks, a new transaction is created with a negative amount to offset the original bill payment’s impact. The original bill payment’s reference number is maintained, but the new transaction is assigned a different date to differentiate it from the original transaction.
It’s important to note that reverting a bill payment will only impact the accounts and balances associated with the bill payment itself. Any related transactions, such as bills or expense accounts, will need to be handled separately.
By utilizing the revert bill payment feature in QuickBooks, you can easily correct errors, reconcile your accounts, or manage cancelled bill payments, ensuring the accuracy and integrity of your financial records.
Reverting Paychecks in QuickBooks
In QuickBooks, reverting paychecks allows you to undo or reverse a recorded paycheck transaction. This can be useful if you need to correct errors, adjust employee wages, or cancel a paycheck. Here’s a step-by-step guide on how to revert paychecks in QuickBooks:
- Open QuickBooks and navigate to the “Employees” or “Payroll” section.
- Locate the paycheck you want to revert and select it.
- Once the paycheck is open, click on the “More” or “Edit” dropdown menu.
- Choose the “Reverse” or “Revert” option, and QuickBooks will generate a new transaction to reverse the impact of the original paycheck.
- Review the details of the new transaction and make any necessary adjustments.
- Save the reversed transaction, and QuickBooks will update the accounts, employee records, and balances accordingly, reverting the paycheck and its impact on your financial records.
When you revert a paycheck in QuickBooks, a new transaction is created with negative amounts to offset the original paycheck’s impact. The original paycheck’s reference number is maintained, but the new transaction is assigned a different date to differentiate it from the original transaction.
It’s important to note that reverting a paycheck will impact the payroll expenses and liability accounts associated with the original paycheck. Any related transactions, such as tax payments or employee deductions, will need to be reviewed and adjusted separately.
By utilizing the revert paycheck feature in QuickBooks, you can easily correct errors, adjust employee wages, and manage cancelled paychecks, ensuring the accuracy and integrity of your financial records and payroll data.
Conclusion
In conclusion, understanding how to revert transactions in QuickBooks is essential for maintaining accurate and reliable financial records. QuickBooks provides a straightforward process for reverting various types of transactions such as invoices, payments, sales receipts, journal entries, bill payments, and paychecks.
By properly reverting transactions in QuickBooks, you can correct errors, reconcile accounts, make necessary adjustments, and manage cancelled transactions effectively. Reverting transactions not only ensures the accuracy and integrity of your financial records but also maintains a clear audit trail, allowing you to track and review changes made to your books.
Remember, when reverting transactions, it’s important to review any related transactions that may have been impacted. Adjustments may need to be made to maintain consistency throughout your financial records.
Whether you need to reverse an incorrect invoice, cancel a payment, adjust a sales receipt, undo a journal entry, or revert a paycheck, following the step-by-step guides provided in this guide will empower you to confidently manage your financial records in QuickBooks.
By utilizing the revert feature in QuickBooks, you can maintain accurate records, streamline your bookkeeping processes, and make informed business decisions based on reliable financial data.
Now that you have a solid understanding of how to revert transactions in QuickBooks, you can utilize this powerful tool to ensure the accuracy and integrity of your financial records, making your bookkeeping tasks more efficient and effective.