Overview of Recording Sale of Asset in QuickBooks
Recording the sale of an asset accurately in QuickBooks is crucial for maintaining accurate financial records. Whether you are selling equipment, vehicles, or any other fixed asset, following the proper steps ensures that your books reflect the transaction correctly.
When recording the sale of an asset in QuickBooks, it’s crucial to gather all the necessary information relating to the sale. This includes details such as the date of the sale, the buyer’s information, the selling price, and any associated fees or expenses related to the sale. Having this information ready will streamline the process and enable you to record the sale accurately.
To begin, you’ll need to create a new account to track the sale of assets. This account should be set up as an income account specifically designed for recording asset sales. By creating a dedicated account, you can keep the transaction separate from any other income or expenses in your books, providing a clear statement of the asset’s sale.
Once the account is created, you can proceed to record the sale in QuickBooks. This involves creating a sales receipt or invoice, depending on the nature of the sale. Ensure that you accurately input the date, buyer’s information, selling price, and any applicable taxes or fees.
After recording the sale, it is important to determine whether there is a gain or loss on the transaction. This is calculated by comparing the selling price of the asset to its book value. If the selling price is higher, you have a gain; if it is lower, you have a loss. Take note of this amount, as it will need to be recorded separately in QuickBooks.
Next, record the gain or loss on the sale. You can do this by creating a journal entry and debiting/crediting the appropriate accounts to reflect the gain or loss amount. Be sure to review the accounts affected by the journal entry to ensure accuracy.
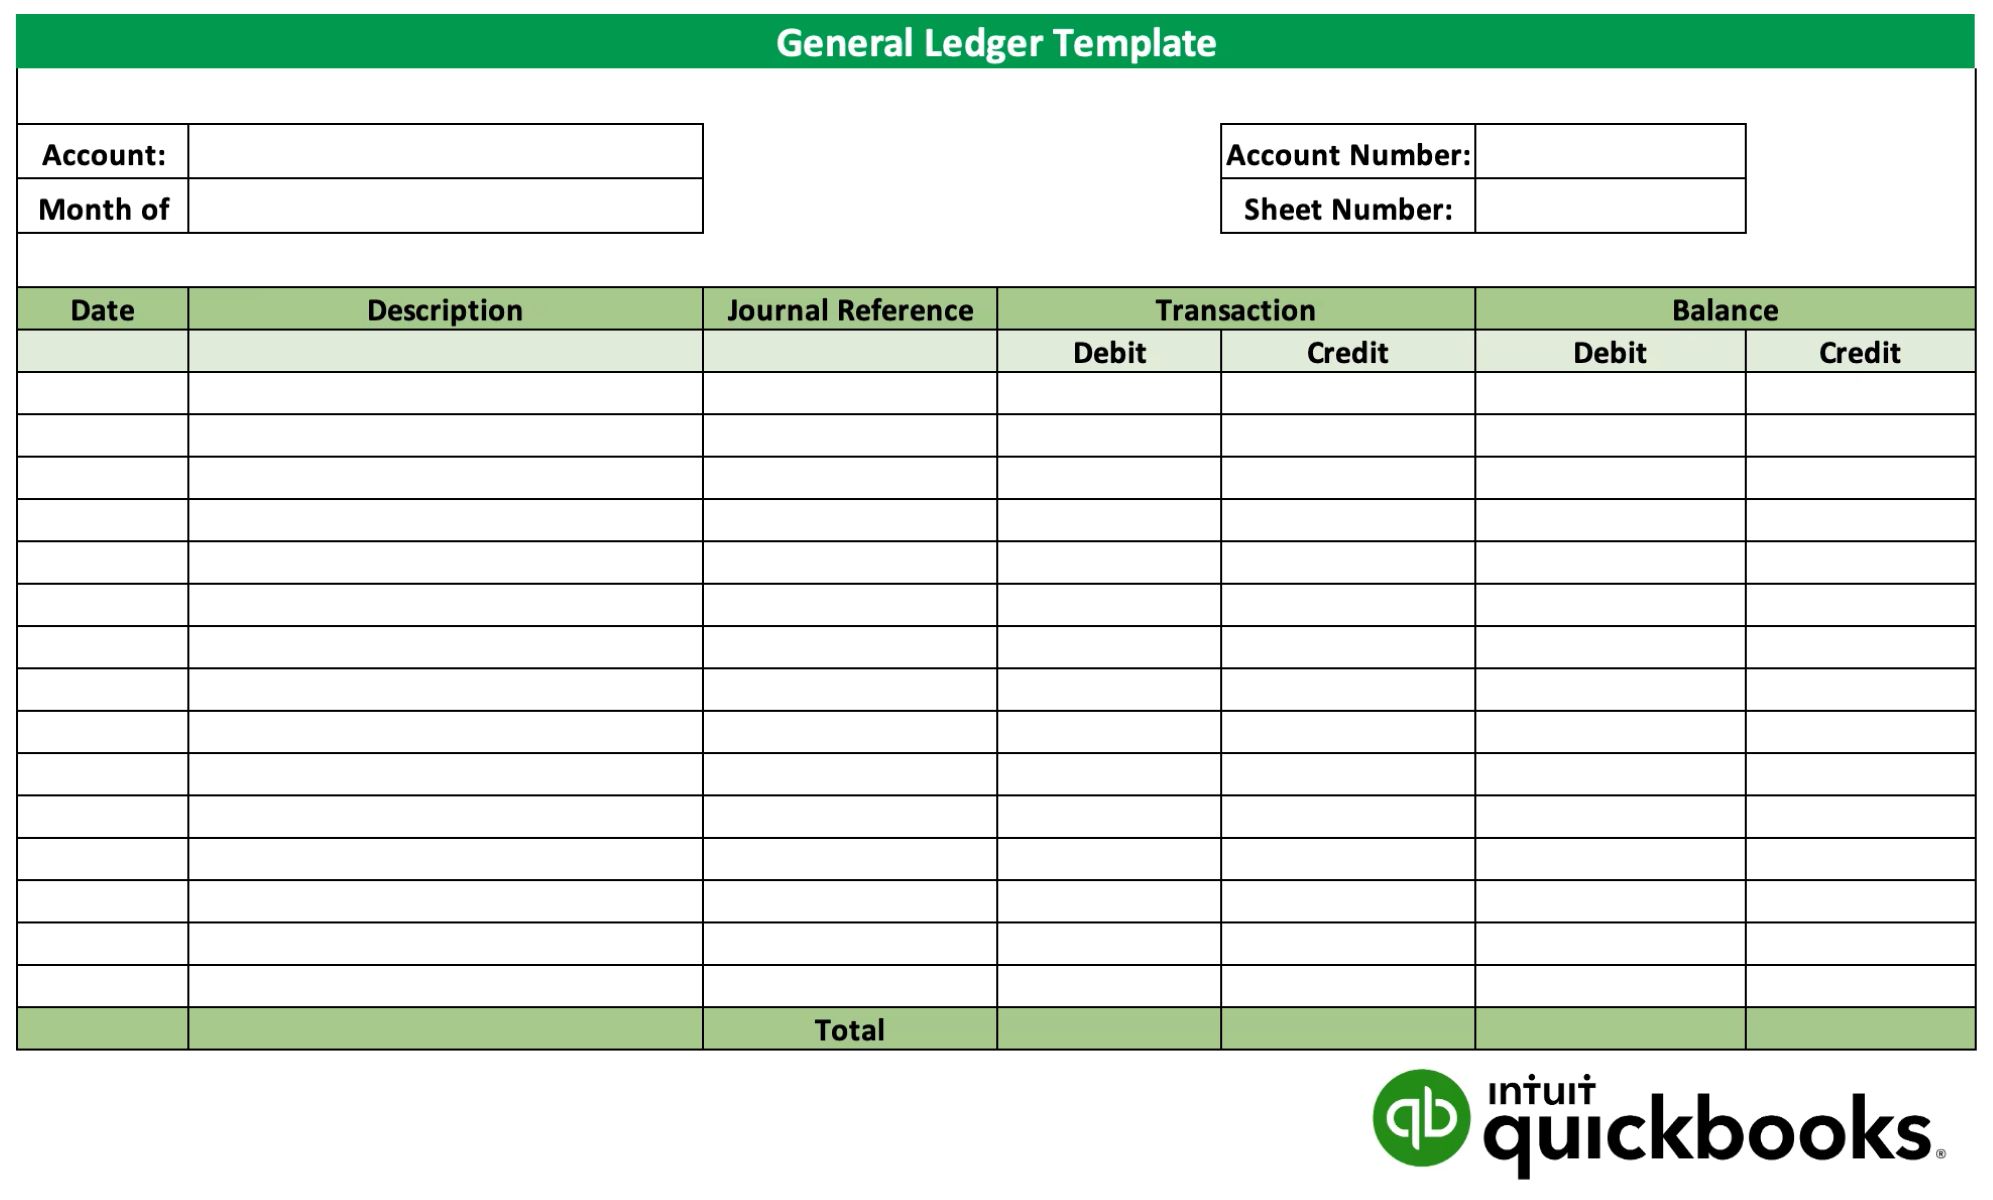
Finally, update the asset records in QuickBooks. This involves adjusting the asset’s value to reflect the sale and removing it from your list of active assets. You can do this by using the “Asset Register” feature in QuickBooks to make the necessary adjustments.
Recording the sale of an asset in QuickBooks accurately is essential for maintaining clean and organized financial records. By following the step-by-step process outlined above, you can ensure that your books accurately reflect the transaction, providing you with the necessary information for financial reporting and analysis.
Step 1: Gathering Necessary Information
Before proceeding with recording the sale of an asset in QuickBooks, it is essential to gather all the necessary information related to the transaction. This information will enable you to accurately reflect the sale in your financial records and ensure compliance with tax regulations. Here are the key details you need:
Date of the Sale: Record the date when the sale of the asset took place. This will enable you to track the timing of the transaction and ensure accurate financial reporting.
Buyer’s Information: Collect detailed information about the buyer, including their name, contact information, and any relevant identifiers such as their company name or tax identification number. This information will help you identify the buyer in your records and provide necessary documentation for tax purposes.
Selling Price: Determine the selling price of the asset. This refers to the amount at which the asset is sold to the buyer. It is essential to accurately record this figure to reflect the financial impact of the sale on your books.
Fees or Expenses: Take into account any fees or expenses associated with the sale of the asset. This could include commissions paid to a broker or agent, transportation costs, legal fees, or any other expenses directly attributable to the sale. Recording these expenses will help provide a comprehensive view of the total costs and impact on your financial statements.
Gathering these details beforehand ensures a smooth recording process in QuickBooks. It allows you to easily input the required information into the software, minimizing the chances of errors and discrepancies. Additionally, having this information readily available will streamline any potential audits or financial reporting requirements.
Accurate record-keeping is a fundamental aspect of running a successful business, and properly recording the sale of an asset is no exception. By gathering the necessary information upfront, you can ensure that your financial records are complete, organized, and compliant with regulations. Take the time to gather all the required details to set yourself up for success when recording the sale of an asset in QuickBooks.
Step 2: Create a New Account for the Sale
When recording the sale of an asset in QuickBooks, it is important to create a new account specifically designated for tracking asset sales. This dedicated account helps you record and monitor the income generated from the sale and keeps it separated from other revenue sources. Here’s how you can create a new account for the sale:
1. Access the Chart of Accounts: In QuickBooks, go to the Chart of Accounts, which is where all your accounts are listed. You can typically find this under the “Lists” or “Accounting” menu.
2. Create a New Account: Once in the Chart of Accounts, look for the option to create a new account. This is typically represented by a button or an icon with a plus sign (+). Click on it to start creating a new account.
3. Select the Account Type: Choose the appropriate account type for tracking asset sales. In this case, you would select an income account type since the sale of an asset generates income. Selecting the correct account type ensures accurate categorization of the transaction.
4. Name the Account: Provide a clear and descriptive name for the account. You can choose a name that reflects the nature of the asset being sold or simply name it “Asset Sales” or “Sales of Fixed Assets,” for example. This will help you easily identify and differentiate the account.
5. Save the Account: Once you have entered all the necessary information, save the new account. QuickBooks will assign a unique account number to the new account, which you can also make note of for future reference.
Creating a new account for the sale of assets allows you to track income specifically generated from asset sales. By isolating this income, you can monitor and analyze it separately from other sources of revenue. It provides a clear and accurate picture of the financial impact of asset sales on your business.
It is important to note that the creation of a new account is a one-time setup process. Once created, you can reuse this account for recording future asset sales.
By dedicating a separate account for asset sales in QuickBooks, you can easily track and analyze the financial performance of these transactions. It enhances the accuracy and organization of your financial records, making it easier to generate reports, reconcile accounts, and analyze your business’s financial health.
Step 3: Record the Sale of the Asset
Recording the sale of an asset accurately in QuickBooks is essential for maintaining precise financial records. To do so, you need to create a sales receipt or invoice to reflect the transaction. Follow these steps to record the sale of the asset in QuickBooks:
1. Open QuickBooks: Launch QuickBooks and access the dashboard or home screen to begin recording the sale of the asset.
2. Create a Sales Receipt or Invoice: Depending on your specific circumstances, choose to create either a sales receipt or an invoice. If the buyer made an immediate payment, use a sales receipt. If the buyer will be billed for the sale, use an invoice. Select the appropriate option from the menu or toolbar.
3. Enter the Customer’s Information: Fill in the buyer’s details, including their name, address, contact information, and any other required fields. If the customer is already in your QuickBooks customer list, select their name from the dropdown menu to auto-fill the information.
4. Add the Sold Asset: In the sales receipt or invoice, add a line item for the asset sold. Provide a clear description of the asset, the quantity (use “1” for a single asset), and the selling price. If applicable, include any taxes, fees, or discounts associated with the sale.
5. Review and Save: Double-check all the information entered in the sales receipt or invoice for accuracy. Ensure that the selling price and any additional charges are correct. Once you are satisfied, save the transaction.
6. Allocate Payment: If the buyer made an immediate payment, allocate it to the appropriate account. You can assign it to the asset sale account you created earlier or any other appropriate income account. If the buyer will be billed later, skip this step for now.
By following these steps, you can accurately record the sale of the asset in QuickBooks. This ensures that the transaction is captured in your financial records, benefiting your financial reporting and analysis.
Recording the sale of the asset in QuickBooks provides a clear record of the transaction and its impact on your business’s financial position. It allows you to generate reports, track revenue, and analyze the performance of your asset sales over time. By effectively utilizing QuickBooks, you can maintain accurate and organized financial records for the sale of assets.
Step 4: Determine the Gain or Loss on the Sale
When recording the sale of an asset in QuickBooks, it is important to determine whether there is a gain or loss on the transaction. This step helps provide a clear understanding of the financial impact of the sale. To determine the gain or loss, follow these steps:
1. Calculate the Book Value: Start by determining the book value of the asset. The book value is the original cost of the asset minus any accumulated depreciation. This will give you the value of the asset as it appears on your balance sheet before the sale.
2. Compare with the Selling Price: Compare the book value of the asset with the selling price. If the selling price is higher than the book value, you have a gain on the sale. If the selling price is lower than the book value, you have a loss.
3. Calculate the Gain or Loss Amount: Calculate the gain or loss amount by subtracting the book value from the selling price. If there is a gain, the result will be a positive number. If there is a loss, the result will be a negative number.
4. Take Note of the Gain or Loss: Make a note of the gain or loss amount as it will need to be recorded separately in QuickBooks. This information is crucial for accurate financial reporting and analysis.
Determining the gain or loss on the sale of an asset helps provide insights into the profitability of the transaction. It helps you understand whether the asset was sold at a higher or lower value than its book value, highlighting the financial impact on your business.
By calculating the gain or loss, you can analyze the performance of your asset sales and make informed decisions in the future. It also ensures that your financial records reflect the true financial impact of the sale.
Accurately determining the gain or loss on the sale of an asset in QuickBooks allows you to track the profitability of your assets and make strategic decisions based on the information. This step is crucial for generating accurate financial reports and analyzing the financial health of your business.
Step 5: Record the Gain or Loss on the Sale
After determining the gain or loss from the sale of an asset in QuickBooks, it is essential to record this amount separately in your financial records. By doing so, you can accurately reflect the financial impact of the sale on your business. Follow these steps to record the gain or loss on the sale:
1. Create a Journal Entry: Access the Journal Entry feature in QuickBooks. This feature allows you to manually adjust accounts to reflect specific transactions.
2. Debit or Credit the Appropriate Accounts: Depending on whether you have a gain or loss, you will either debit or credit specific accounts. If there is a gain on the sale, debit the gain account and credit the asset account from which the asset was sold. If there is a loss, debit the asset account and credit the loss account.
3. Include the Gain or Loss Amount: Enter the precise gain or loss amount determined in the previous step. Ensure accuracy when entering these numbers to maintain the integrity of your financial records.
4. Review and Save the Journal Entry: Double-check all the account entries and verify that the numbers are correct. Once you are confident that the entries accurately reflect the gain or loss on the sale, save the journal entry.
Recording the gain or loss on the sale of an asset separately in QuickBooks ensures that the impact of the transaction is correctly reflected in your financial records. It allows you to track the specific gain or loss associated with the sale, providing valuable insights into your business’s financial performance.
Accurate recording of the gain or loss is crucial for generating accurate financial reports and measuring the profitability of your asset sales. It helps you analyze the success of your sales efforts and make informed decisions regarding future asset purchases or sales.
By recording the gain or loss on the sale of an asset in QuickBooks, you can maintain precise financial records that provide a comprehensive view of your business’s financial health. Take the time to accurately record the gain or loss associated with each asset sale, as it will contribute to the overall accuracy and integrity of your financial statements.
Step 6: Update the Asset Records
After recording the sale of an asset and capturing the gain or loss in QuickBooks, it is essential to update the asset records to reflect the transaction accurately. By doing so, you can ensure that your asset records remain up to date and aligned with your financial statements. Follow these steps to update the asset records:
1. Locate the Asset in QuickBooks: Access your list of assets in QuickBooks and locate the specific asset that was sold.
2. Adjust the Asset’s Value: Modify the asset’s value to reflect the selling price of the asset. Replace the original cost of the asset with the selling price, as this accurately represents the asset’s value after the sale.
3. Remove the Asset from Active Assets: If the asset is no longer in your possession or part of your business, move it from the list of active assets to a separate category or mark it as sold. This step ensures that the asset is no longer included in calculations or reports related to active assets.
4. Update Depreciation: If the asset was being depreciated, adjust the depreciation calculation to reflect the period up until the sale date. This adjustment ensures that the depreciation expense is accurately recorded and reflects the portion of the asset’s useful life that was utilized before the sale.
5. Save and Verify the Changes: Once you have made the necessary updates to the asset records, save the changes and review them to ensure accuracy. Double-check that the asset’s value, status, and depreciation calculations are updated correctly.
Updating asset records after the sale is a crucial step for maintaining accurate financial records in QuickBooks. By reflecting the changes in the asset’s value, status, and depreciation calculations, you ensure that your financial statements present a true and up-to-date picture of your assets’ value and status.
Accurate asset records are essential for various financial purposes, such as financial reporting, tax calculations, and evaluating the overall financial health of your business. By regularly updating asset records in QuickBooks, you can effectively track the changes in your assets and make informed decisions regarding future asset purchases or sales.
Take the time to update the asset records promptly after recording the sale in QuickBooks. This attention to detail and accuracy will contribute to the overall integrity and reliability of your financial records.
Conclusion
Recording the sale of an asset in QuickBooks is a crucial task for maintaining accurate financial records and monitoring the financial performance of your business. By following the steps outlined in this guide, you can effectively record the sale, determine the gain or loss, and update the asset records to reflect the transaction.
Gathering the necessary information before recording the sale ensures a smooth and error-free process. Creating a new account specifically for asset sales allows for accurate tracking of income generated from these transactions. Recording the sale itself through a sales receipt or invoice captures the key details and provides a clear record of the transaction.
Determining the gain or loss on the sale allows for a comprehensive understanding of the financial impact of the transaction. By recording the gain or loss separately, you can accurately reflect these amounts in your financial statements and analyze the profitability of your asset sales.
Lastly, updating the asset records ensures that your financial data remains accurate and up to date. Adjusting the asset’s value and marking it as sold or moving it to a separate category keeps your records aligned with the actual status of your assets.
Accurate recording of asset sales in QuickBooks provides invaluable insights into your business’s financial health. It allows for effective financial reporting, analysis, and decision-making. By following these steps and maintaining precise financial records, you can ensure the integrity of your financial statements and have a clear view of your business’s performance.
So, make it a priority to record the sale of assets accurately in QuickBooks, and regularly update your asset records to maintain accurate and organized financial data. This attention to detail and accuracy will support your business’s financial management and contribute to its overall success.