Introduction
Welcome to the world of Zoom – the popular video conferencing platform that has become indispensable in today’s remote work and online communication era. Whether you’re a business professional looking to host virtual meetings or a teacher endeavoring to conduct online classes, Zoom provides a seamless and user-friendly platform to connect with colleagues, friends, and students from anywhere in the world.
In this comprehensive guide, we will walk you through the process of hosting a Zoom meeting, from setting up your account to managing participants and troubleshooting common issues. By the end of this article, you’ll have a solid understanding of how to utilize Zoom to its fullest potential and ensure productive and engaging virtual meetings.
Zoom offers a range of features that make it an ideal choice for hosting meetings, webinars, and virtual events. From screen sharing and video conferencing to recording meetings and collaborating with participants through chat, Zoom provides the necessary tools to facilitate effective communication and collaboration.
Whether you’re a beginner just starting with Zoom or have some experience but want to improve your hosting skills, this guide will provide you with step-by-step instructions and tips to make your Zoom meetings a success.
So, let’s dive in and learn how to host a Zoom meeting like a pro!
Setting Up a Zoom Account
Before you can start hosting Zoom meetings, you’ll need to set up a Zoom account. Here’s a step-by-step guide to get you started:
- Visit the Zoom website at zoom.us.
- Click on the “Sign Up, It’s Free” button at the top right corner of the page.
- Enter your email address in the required field and click “Sign Up”.
- Go to your email inbox and look for an email from Zoom.
- Open the email and click on the confirmation link provided to activate your Zoom account.
- After verifying your email address, you’ll be redirected to the Zoom website. Fill in your first name, last name, and desired password.
- Click on “Continue” to proceed.
- You’ll then be prompted to invite others to Zoom. You can skip this step by clicking on “Skip this step” at the bottom of the page.
- Next, Zoom will provide you with a personal meeting ID. You can use this ID to start instant meetings anytime. You can also opt for generating random meeting IDs for increased security.
- Click on “Continue” to finish setting up your account.
Once you’ve completed these steps, you’ll have successfully set up your Zoom account. You can now access your account and start hosting meetings.
It’s worth noting that Zoom offers different plans, including a free basic plan that allows you to host meetings of up to 100 participants, along with a 40-minute time limit for group meetings. If you require more features or longer meeting durations, you can explore their paid plans for additional options.
Now that you have your Zoom account set up, let’s move on to the next step – scheduling a meeting.
Scheduling a Meeting
Scheduling a meeting in Zoom allows you to plan ahead and send invitations to participants, ensuring that everyone is aware of the meeting details and can join at the specified time. Here’s how you can schedule a meeting in Zoom:
- Log in to your Zoom account.
- Click on the “Schedule a Meeting” button on the main dashboard.
- Provide a relevant title for your meeting in the “Topic” field.
- Select the date and time for the meeting.
- Specify the duration of the meeting.
- Choose whether you want to enable video for the host and participants. You can also decide whether to allow participants to join before the host.
- If desired, you can set a meeting password to add an extra layer of security.
- Turn on the “Enable join from web browser” option if you want participants to be able to join the meeting without downloading the Zoom app.
- Scroll down to invite participants. You can enter their email addresses manually or import them from your contacts or a CSV file. You can also generate an invitation link that can be shared via email, chat, or other communication channels.
- Once you’ve filled in the necessary details and invited participants, click on the “Schedule” button to create the meeting.
After scheduling the meeting, you’ll have the option to add the meeting to your calendar or send out email invitations directly from Zoom. This makes it convenient to keep track of your meetings and ensure that participants have all the necessary information at their fingertips.
Additionally, Zoom provides integration with popular calendar applications like Google Calendar, Microsoft Outlook, and iCal, making it easy to sync your Zoom meetings with your existing schedule.
Now that you have successfully scheduled your meeting, it’s time to invite participants and prepare any materials you may need for the meeting.
Inviting Participants
Once you have scheduled your Zoom meeting, it’s crucial to invite participants to ensure their attendance. Here are the steps to invite participants to your Zoom meeting:
- After scheduling the meeting, you will be provided with various options to invite participants. You can choose to send invitations via email, copy the meeting invitation details, or even use third-party calendar applications.
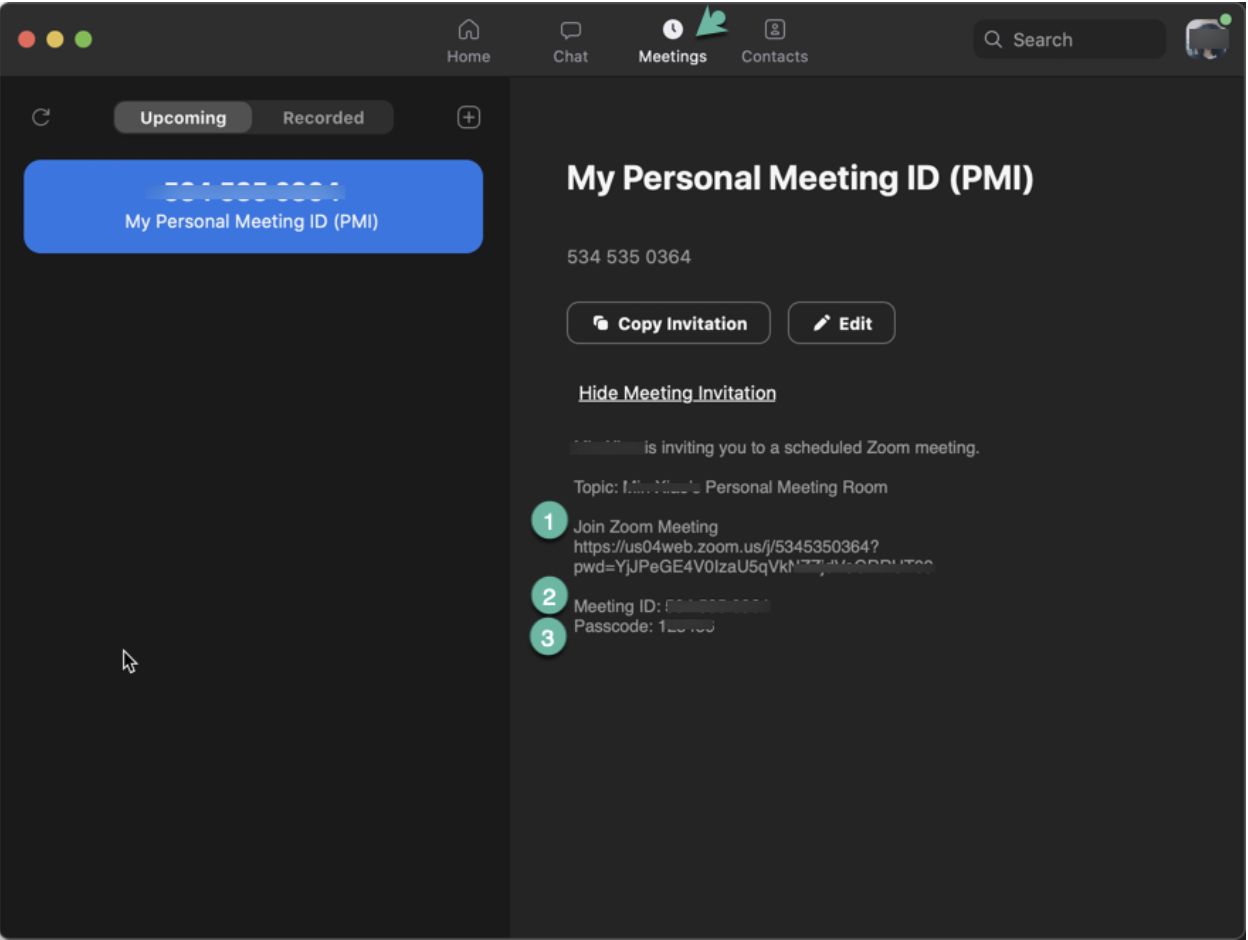
- If you choose to send an email invitation, click on the “Copy Invitation” button and paste the information into an email or your preferred communication platform.
- The meeting invitation includes details such as the date, time, and duration of the meeting, as well as the Join URL and Meeting ID and password (if applicable).
- You can customize the invitation by adding a personal message or specific instructions for participants.
- If you prefer to invite participants manually, you can copy and share the Join URL or Meeting ID through your chosen communication channels like chat platforms, messaging apps, or social media.
- For added convenience, Zoom also allows you to import and invite participants from your contacts or a CSV file. This can save time, especially when hosting meetings with multiple participants.
When inviting participants, it’s essential to provide clear instructions and ensure that they have all the necessary information to join the meeting successfully. This includes the meeting date and time, the Join URL or Meeting ID, any required password, and any specific conference details or instructions that participants need to be aware of.
Remember to send out the invitations well in advance so that participants have ample time to prepare and adjust their schedules accordingly. Providing a reminder closer to the meeting date is also helpful to ensure that participants don’t miss the meeting.
Now that you have invited participants to your meeting, it’s time to prepare any materials or documents you may need and familiarize yourself with the Zoom meeting interface.
Preparing Meeting Materials
Before hosting a Zoom meeting, it’s important to prepare any materials or documents that you may need to share or reference during the meeting. Here are some steps to help you prepare meeting materials:
- Outline the agenda: Determine the key points and topics you want to cover during the meeting. This will help you stay organized and ensure that you cover all necessary points.
- Create presentation slides: If you plan to share slides or visual aids during the meeting, create them in advance using presentation software like PowerPoint or Google Slides. Make sure the slides are concise, easy to read, and visually appealing.
- Gather relevant documents: If there are any documents, reports, or other materials that you need to discuss or reference, gather them beforehand and have them accessible on your computer.
- Test screen sharing: If you plan to share your screen during the meeting, ensure that the files and documents you want to share are accessible and that your screen sharing is working correctly. Familiarize yourself with the screen sharing options in Zoom to ensure a seamless experience.
- Consider additional tools: Depending on the nature of your meeting, you may need additional tools or software. For example, if you plan to conduct a brainstorming session, consider using a virtual whiteboard tool or collaboration software to facilitate the process.
- Check audio and video settings: Before the meeting, test your audio and video settings to make sure you can be heard and seen clearly. Adjust your microphone volume, test your speakers or headphones, and ensure that your camera is functioning properly.
By preparing your meeting materials in advance, you’ll be able to deliver a smooth and professional presentation. Having everything ready will also save you time and minimize interruptions during the meeting.
Now that you have prepared your meeting materials, it’s time to learn how to join a Zoom meeting and navigate the Zoom meeting interface.
Joining a Zoom Meeting
Joining a Zoom meeting allows you to actively participate and collaborate with other participants. Whether you’ve been invited to a meeting or have the meeting ID, joining is a straightforward process. Here’s how you can join a Zoom meeting:
- Open the Zoom application on your computer or mobile device.
- Click on the “Join” button.
- Enter the Meeting ID provided by the host. Alternatively, you can click on the invitation link sent to you or join from a list of upcoming meetings if applicable.
- Choose whether to join with video or audio only, depending on your preference.
- If prompted, enter the meeting password provided by the host.
- Click on the “Join” button to join the meeting.
- Once you’re in the meeting, make sure to check your audio and video settings. Test your microphone and speakers to ensure others can hear you and adjust your video settings, if needed.
- Wait for the host to start the meeting or follow any instructions provided.
- When joining a meeting, it’s important to be mindful of your surroundings. Find a quiet and well-lit environment, minimize distractions, and position yourself properly in front of the camera.
If you encounter any issues while joining a meeting, ensure that you have a stable internet connection and that you have downloaded and installed the latest version of Zoom on your device. Restarting your device or trying to join the meeting from a different device may also help troubleshoot any connection problems.
Whether you’re joining a meeting as a participant or hosting your own, being punctual and following meeting etiquette will ensure smooth interactions and productive discussions.
Now that you know how to join a Zoom meeting, let’s explore the various features and tools available in the Zoom meeting interface.
The Zoom Meeting Interface
The Zoom meeting interface is designed to be user-friendly and intuitive, providing you with a range of tools and features to enhance your meeting experience. Here’s an overview of the key elements you will find in the Zoom meeting interface:
1. Video and Audio Controls: At the bottom of the screen, you’ll find buttons to toggle your video and audio on or off. You can also access settings to change your camera and microphone preferences.
2. Participant Panel: The Participant panel displays a list of meeting attendees. Participants can raise their hands, chat, and manage their audio and video settings from this panel.
3. Chat Feature: The Chat feature allows participants to send text messages to the entire group or privately to specific individuals. This can be useful for asking questions, sharing links, or providing feedback during the meeting.
4. Screen Sharing: You can share your screen with the meeting participants, allowing everyone to see the content on your desktop, presentation slides, or specific application windows. The screen sharing options can be accessed from the meeting toolbar.
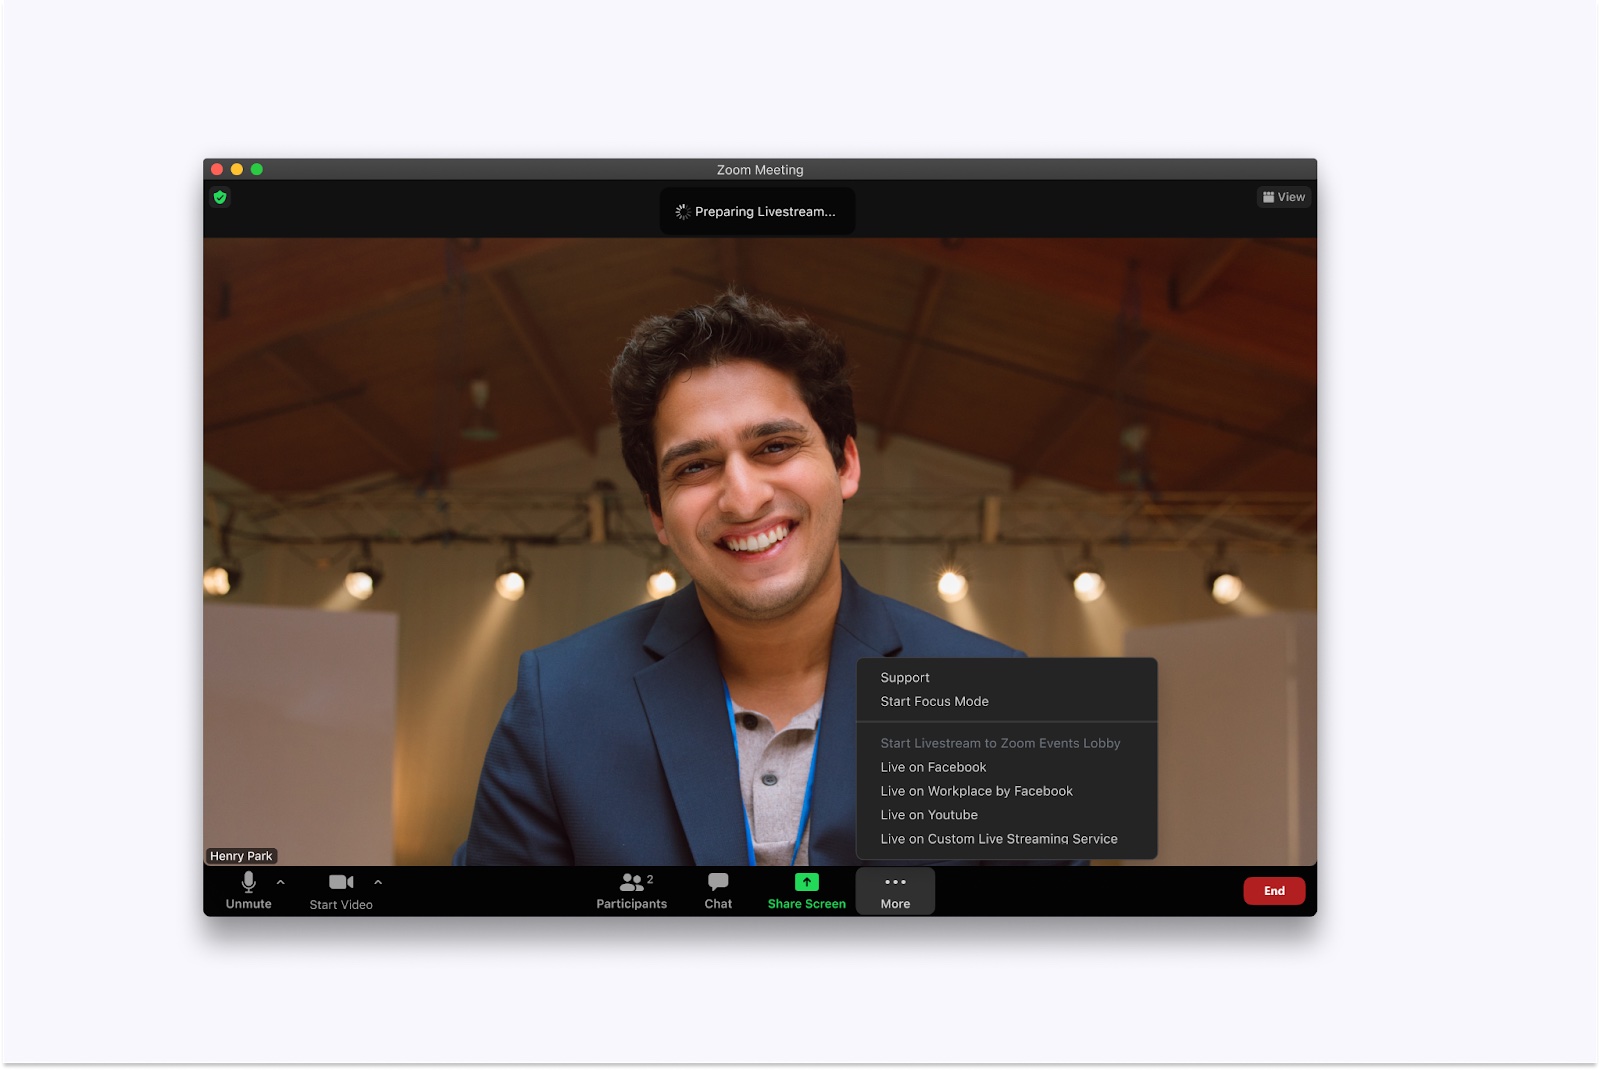
5. Meeting Controls: The meeting controls consist of various icons at the bottom of the screen. These icons allow you to manage your audio and video settings, start and stop recording, manage participants, and access additional features like reactions and polling.
6. Reactions and Polling: Zoom offers the option for participants to react to meeting content through emojis or participate in polls, which can be initiated by the host. These interactive features help engage participants and gauge their feedback.
7. Breakout Rooms: Breakout Rooms allow the host to create smaller groups within the main meeting. This feature can be useful for discussions, group activities, or team collaboration during the meeting.
8. Recording: Zoom provides the ability to record meetings, including audio, video, and screen sharing. The recorded meeting can be saved locally on your device or to the Zoom cloud, depending on your account settings.
These are just some of the key elements you’ll encounter in the Zoom meeting interface. Familiarizing yourself with these features will enable you to make the most of your Zoom meetings and facilitate efficient communication and collaboration.
Now that you have a good grasp of the Zoom meeting interface, let’s explore how to share your screen during a meeting.
Sharing Your Screen
Sharing your screen in a Zoom meeting allows you to present slides, demonstrate software applications, or show any other content on your computer’s display. Here’s how you can share your screen during a Zoom meeting:
- While in a meeting, locate the meeting toolbar at the bottom of the screen.
- Click on the “Share Screen” button. It is represented by an icon that looks like a computer monitor.
- A popup window will appear, displaying options for screen sharing.
- Choose whether you want to share your entire desktop, a specific application window, or a whiteboard.
- If you select the “Desktop” option, you can switch between different screens if you have multiple monitors connected.
- Once you’ve selected the desired screen or application, click on the “Share” button.
- The screen or application you selected will now be visible to all meeting participants.
While sharing your screen, you can still navigate and interact with the content on your computer privately. Meeting participants will only see the content you are sharing, and your video feed will appear in a small window at the corner of their screens.
The meeting toolbar will display options to pause or stop screen sharing, annotate the shared content using various tools, and switch between screens or applications if needed. When you’re finished sharing your screen, simply click on the “Stop Share” button in the meeting toolbar to return to the regular meeting view.
Remember to ensure that the content you share is relevant to the meeting agenda and prepared in advance. Check that the shared content is visible, legible, and properly displayed on the screens of meeting participants.
Now that you know how to share your screen during a Zoom meeting, let’s explore another useful feature – the chat feature.
Using the Chat Feature
The chat feature in Zoom enables participants to communicate with each other through text messages during a meeting. Whether you want to ask a question, provide feedback, or share relevant information, the chat feature offers a convenient way to engage in real-time conversations. Here’s how you can use the chat feature in Zoom:
- During a meeting, locate the chat icon on the meeting toolbar. It resembles a speech bubble.
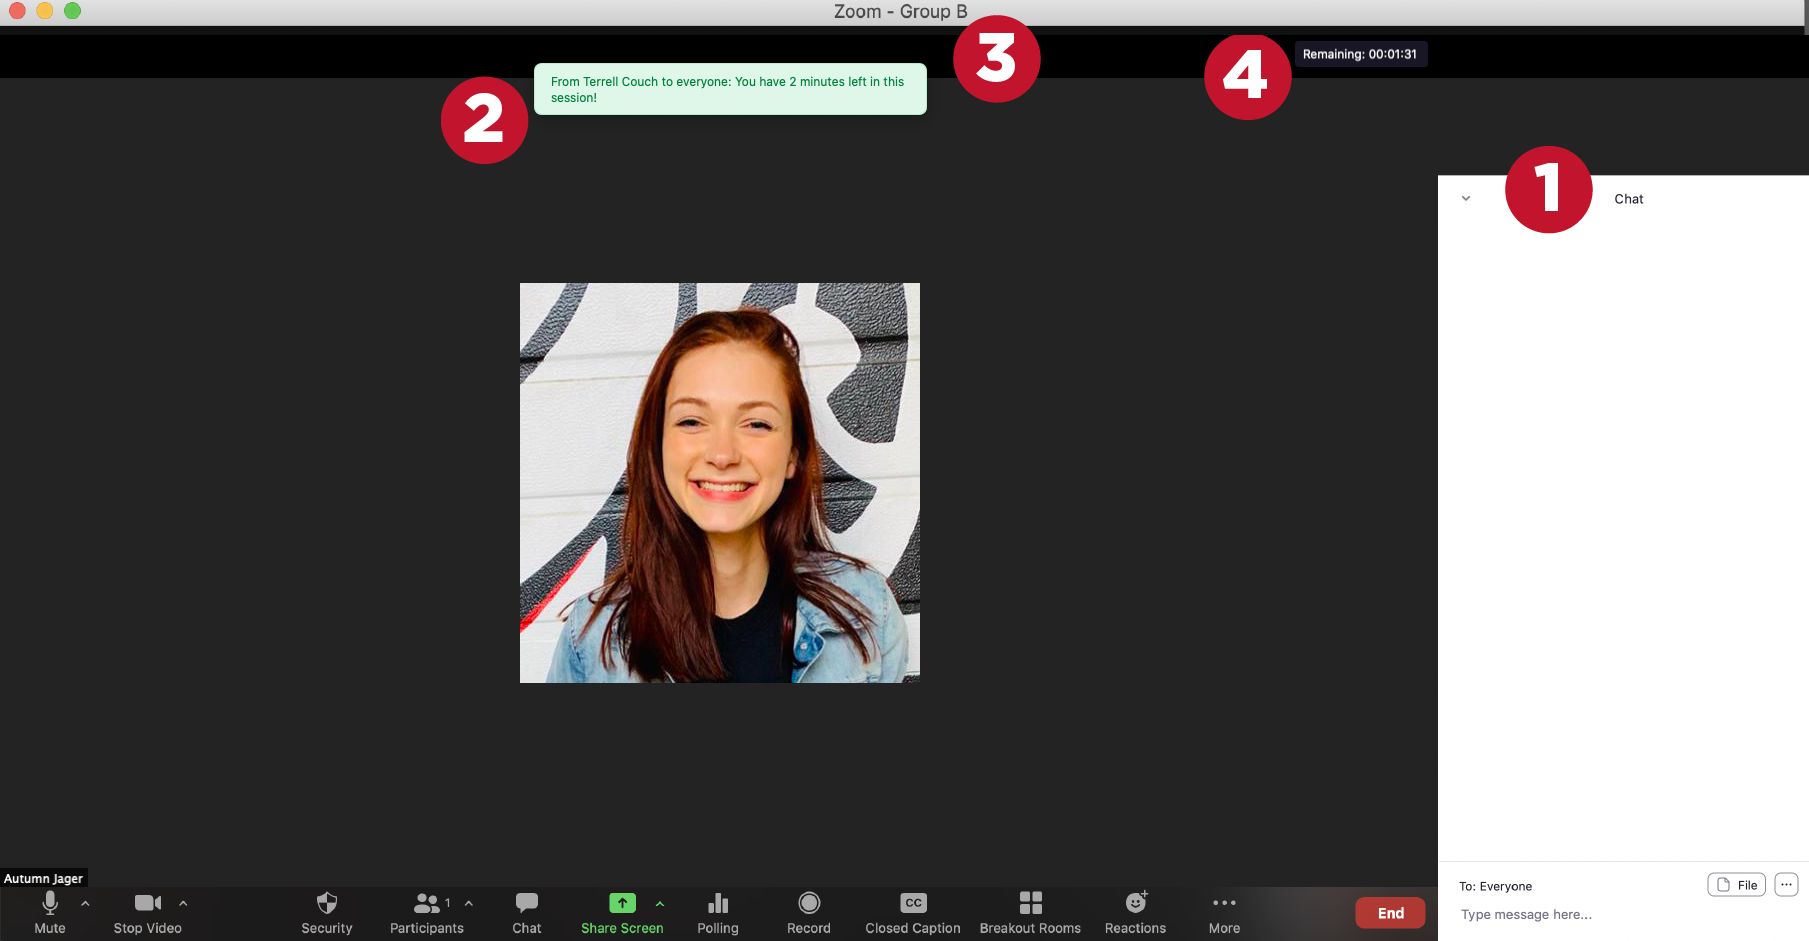
- Click on the chat icon to open the chat panel on the right side of the screen.
- In the chat panel, you can choose to send a message to everyone in the meeting or privately to a specific participant.
- Type your message in the text box at the bottom of the chat panel.
- Press Enter or click the send button to send your message.
- All participants in the meeting will be able to see the message in the chat panel, and they can respond accordingly.
- You can also use emojis by clicking on the smiley face icon next to the text box. This adds a fun element to your messages and helps express emotions.
- Additionally, you can save the chat history after the meeting. To do this, click on the gear icon in the chat panel and select the “Save Chat” option.
The chat feature is not only useful for text-based communication but also allows participants to share links, files, or other important resources. You can simply copy and paste the link or attachment into the chat, making it easily accessible to all participants.
It’s important to note that hosts can control the chat feature during a meeting. They can choose to disable chat for all participants or restrict it to specific individuals. This helps maintain a focused and productive meeting environment.
By utilizing the chat feature in Zoom, you can effectively communicate and collaborate with meeting participants, ensuring that important information and discussions are shared smoothly in real-time.
Now that you have learned about the chat feature, let’s move on to exploring how to record a meeting in Zoom.
Recording a Meeting
The recording feature in Zoom allows you to capture audio, video, and screen sharing during a meeting. Recording your meetings can be beneficial for participants who couldn’t attend the live session or for future reference. Here’s how you can record a meeting in Zoom:
- While in a meeting, locate the meeting toolbar at the bottom of the screen.
- Click on the “Record” button. It is represented by an icon that looks like a red dot.
- A menu will appear with recording options.
- Choose whether you want to record the meeting to the cloud or your local device. Note that cloud recording may require a paid Zoom subscription.
- If you select cloud recording, Zoom will automatically save the recording to your account’s cloud storage when the meeting ends.
- If you choose to record locally, a recording will be saved to the designated location on your device.
- During the meeting, the meeting toolbar will display a red dot indicating that the meeting is being recorded.
- Once the meeting is over, click on the “Stop Recording” button in the meeting toolbar to end the recording.
- If you are recording to the cloud, the recording will be processed and made available in your Zoom account after a short period of time.
- If you are recording locally, you can access the recording file from the designated location on your device.
When recording a meeting, it’s essential to inform participants that the session is being recorded. This can be done at the beginning of the meeting or through a notification in the chat. Respecting participants’ privacy and consent is important to maintain trust and compliance.
It’s worth noting that Zoom provides various recording settings and options that allow you to customize your recording experience. You can choose to record audio only, record active speaker or gallery view, and even enable automatic transcription for cloud recordings (if available in your Zoom plan).
By utilizing the recording feature in Zoom, you can ensure that important discussions, presentations, and collaborations are preserved for future review. This is particularly useful for training sessions, educational webinars, or any meeting where reference material may be required.
Now that you know how to record a meeting in Zoom, let’s move on to managing participants during a meeting.
Managing Participants
As a meeting host in Zoom, you have the ability to manage participants, ensuring smooth interactions and maintaining a productive meeting environment. Here’s how you can effectively manage participants during a Zoom meeting:
- During a meeting, locate the meeting toolbar at the bottom of the screen.
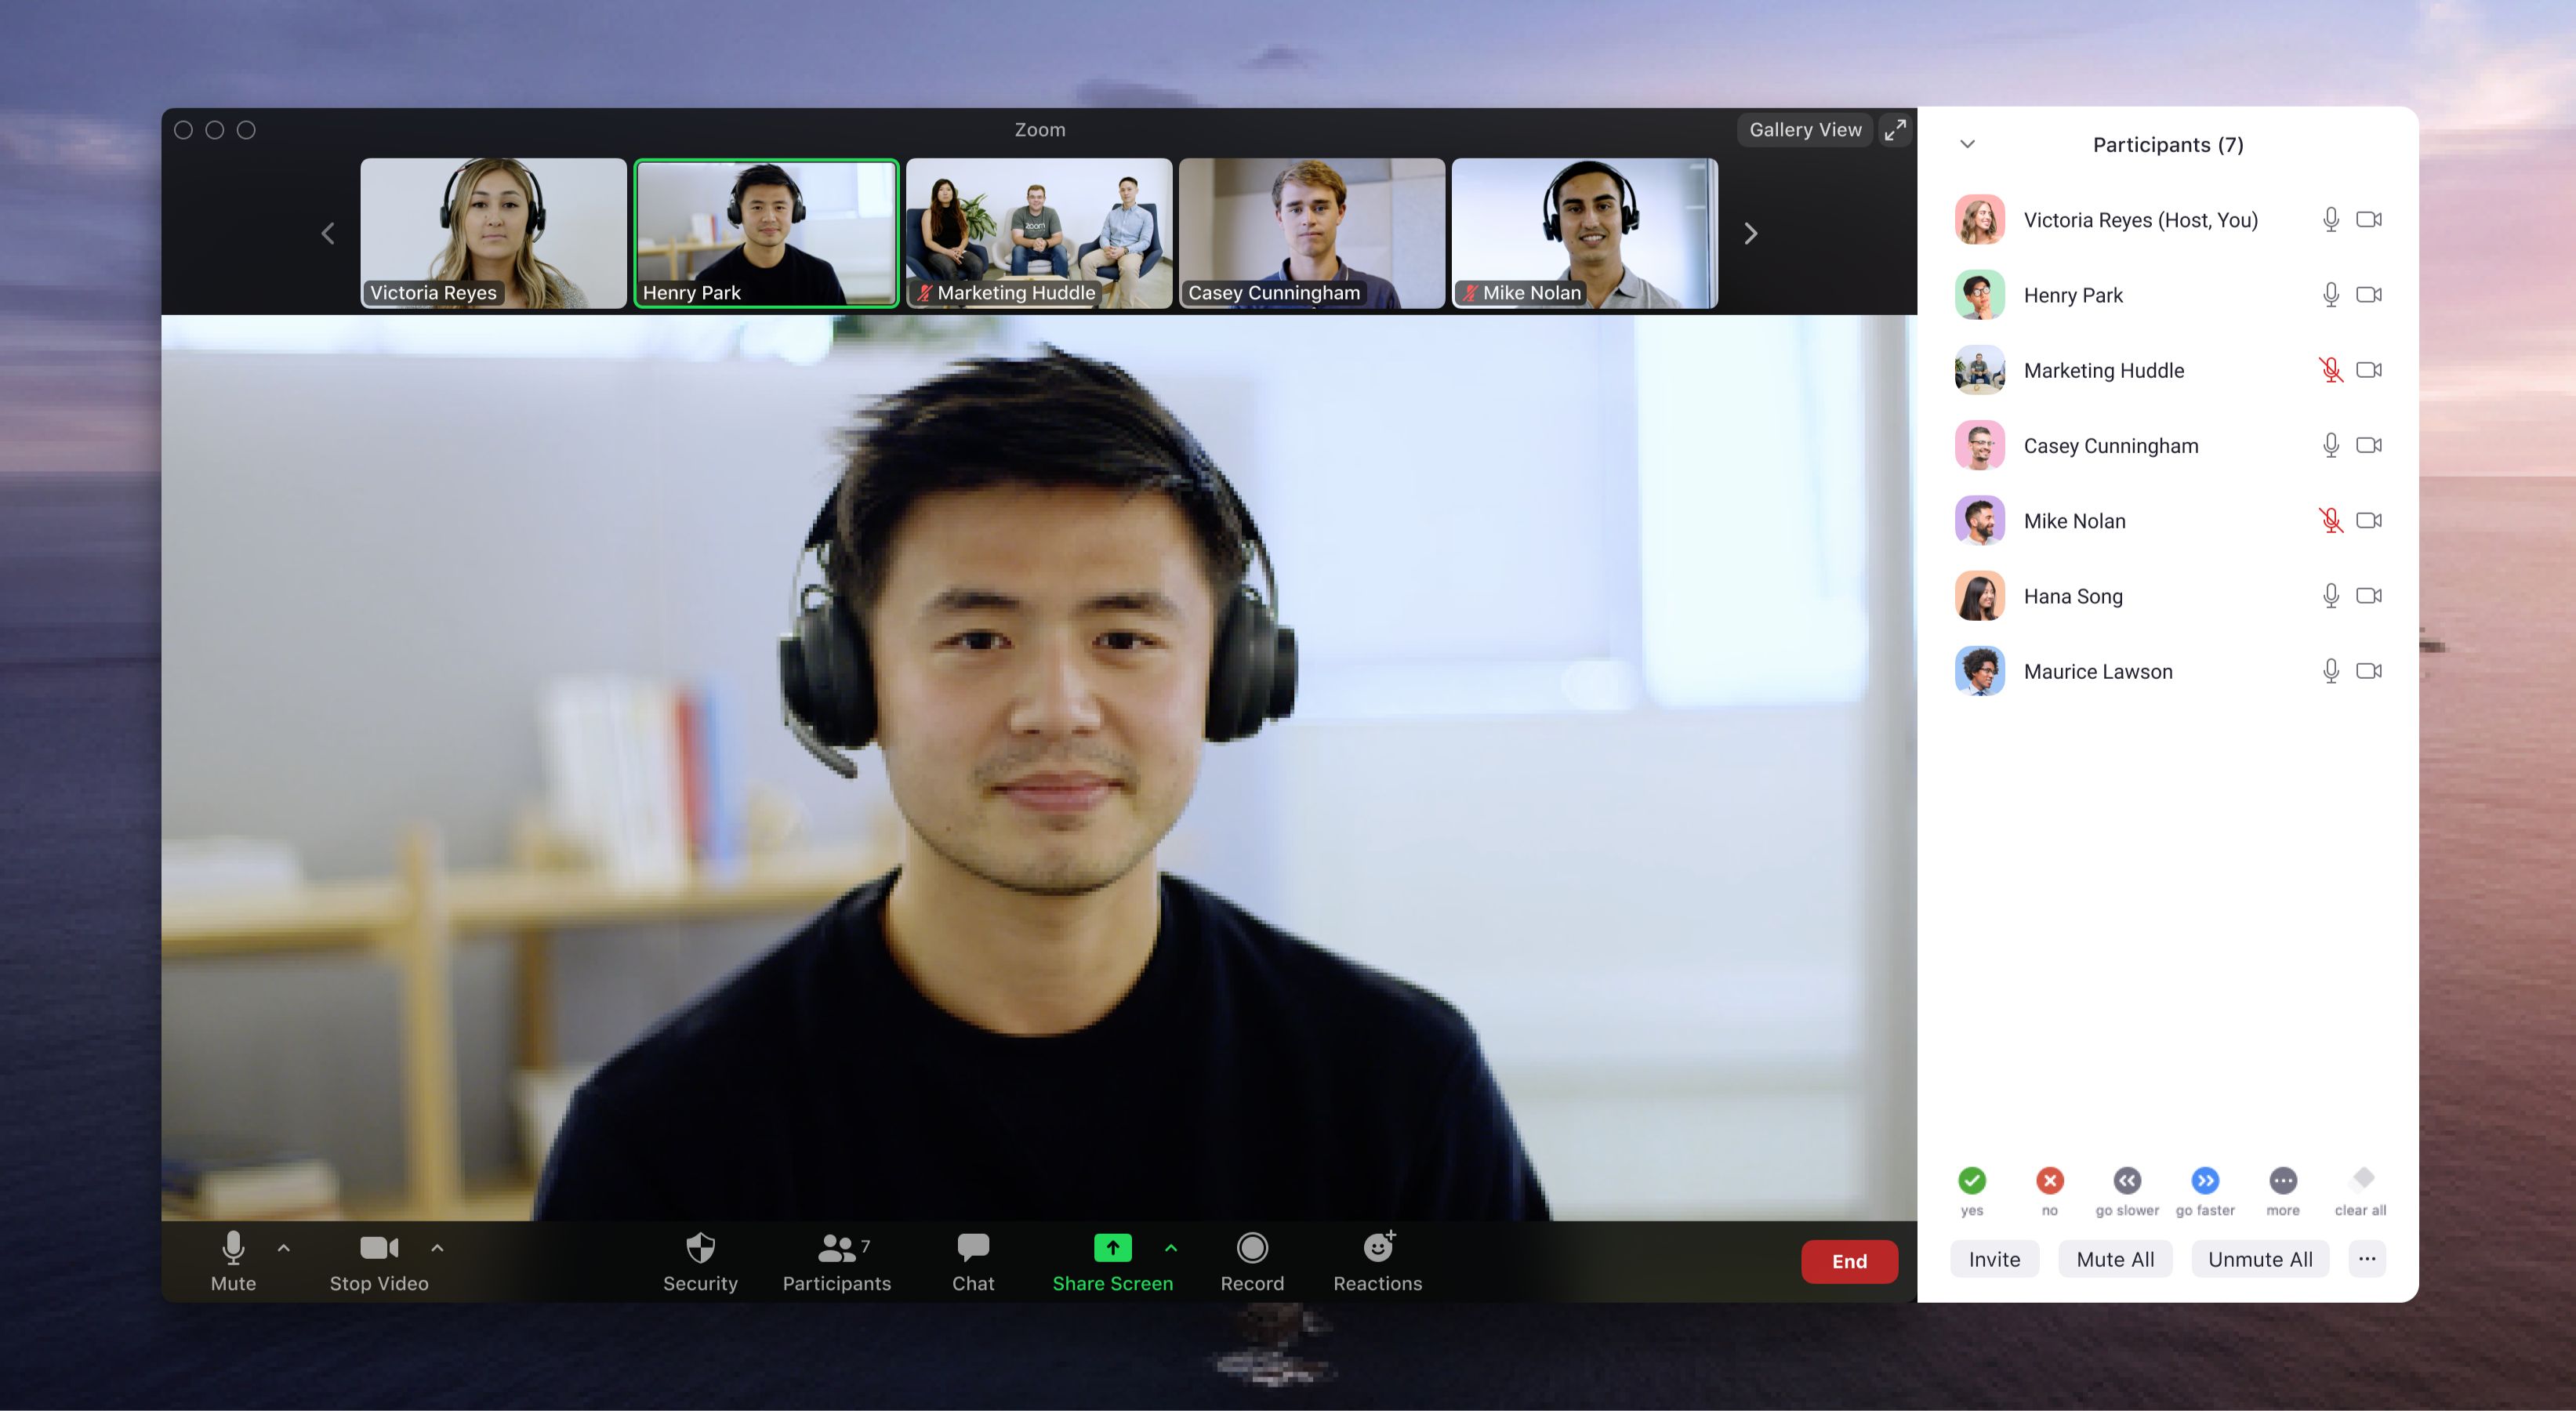
- Click on the “Participants” button to open the Participants panel.
- The Participants panel will display a list of participants currently in the meeting.
- From the Participants panel, you can perform various actions, including muting or unmuting participants, stopping video, and renaming participants.
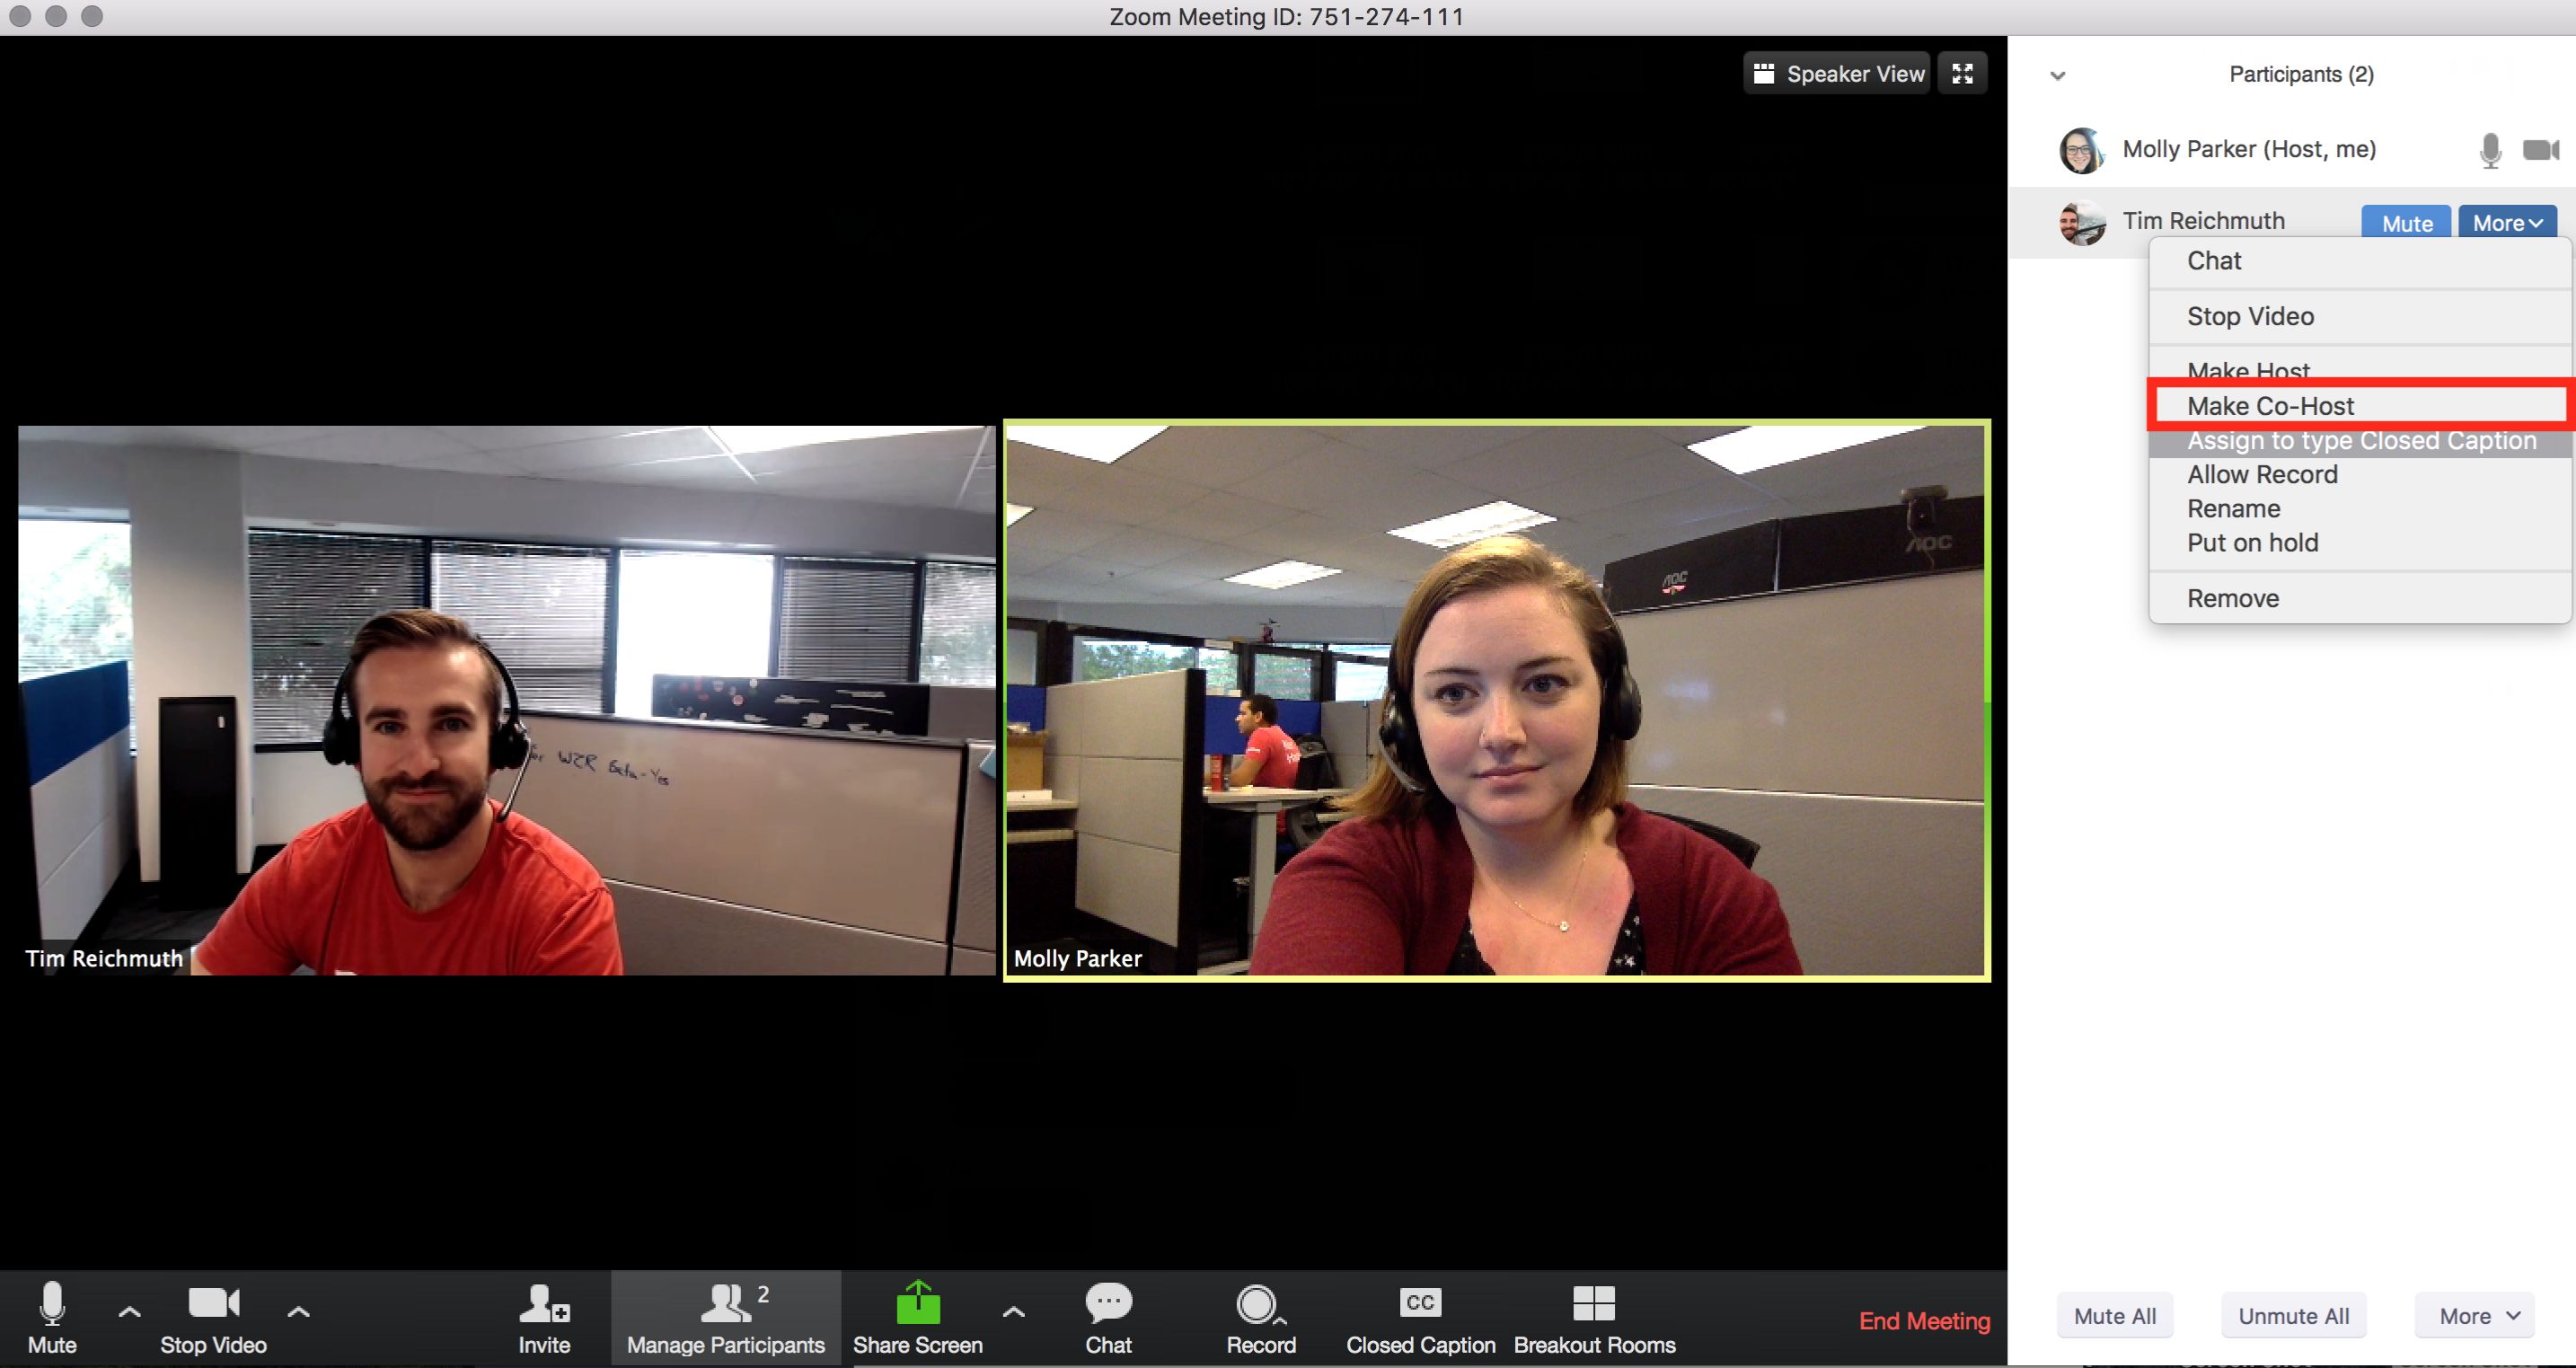
- To manage an individual participant, hover over their name and click on the “More” button that appears. From here, you can choose to mute, stop video, or remove the participant from the meeting.
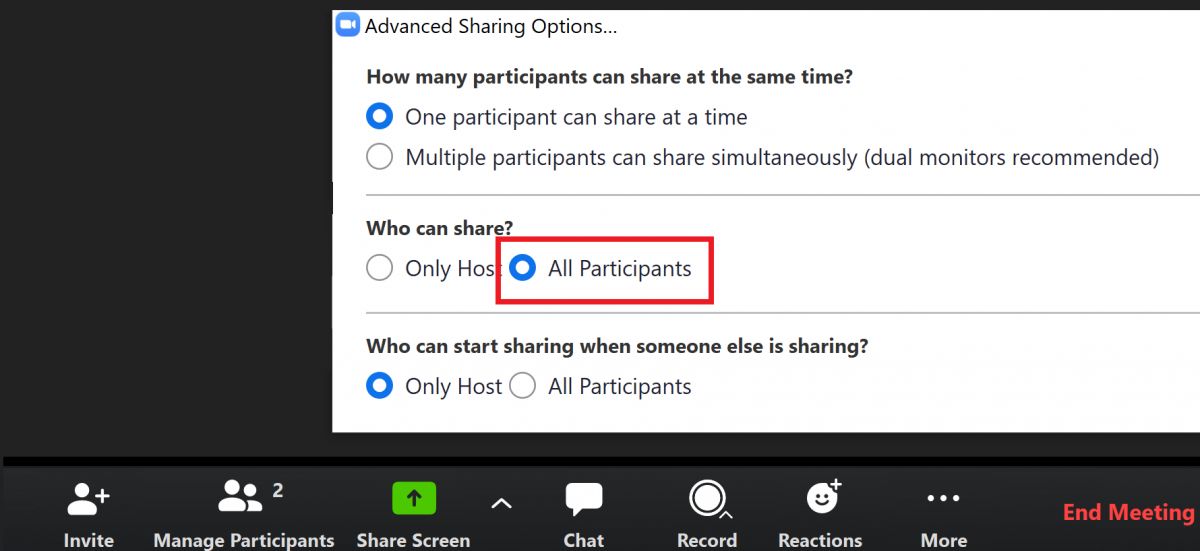
- For larger meetings or webinars, you can assign co-hosts to help manage participants. Co-hosts have similar controls and can assist in managing the meeting, allowing you to focus on the discussion or presentation.
- In addition to managing participant controls, you can also enable certain features like allowing participants to annotate during screen sharing or allowing participants to raise their hand to indicate they have a question or comment.
- If needed, you can also lock the meeting to prevent additional participants from joining.
The ability to manage participants effectively is particularly valuable in scenarios where controlling audio and video quality, managing interruptions, or maintaining a structured discussion format is crucial. By using these management options, you can ensure that your Zoom meetings run smoothly and remain focused.
Remember to be respectful and considerate when managing participants. Encourage active participation, listen to questions and feedback, and address any concerns or issues that may arise during the meeting.
Now that you know how to effectively manage participants, let’s explore some common issues that may occur during a Zoom meeting and how to troubleshoot them.
Troubleshooting Common Issues
While Zoom is generally a reliable and user-friendly platform, you may encounter some common issues during your meetings. Understanding how to troubleshoot these issues can help ensure a seamless meeting experience. Here are some common issues and their possible solutions:
1. Audio or Video Connectivity Issues: If you’re experiencing audio or video problems, ensure that your microphone and camera are properly connected and selected as the default devices in your Zoom settings. Also, check your internet connection and consider switching between Wi-Fi and a wired connection for a more stable connection.
2. Poor Audio or Video Quality: To improve audio or video quality, try closing any background applications that might be using up system resources. Additionally, ensure that your microphone and speakers are not blocked or obstructed, and that there are no external factors causing interference with the audio or video signal.
3. Echoes or Feedback: Echoes or feedback can occur when using audio during a meeting. To resolve this issue, make sure all participants use headphones or earphones, and mute participants when they are not speaking. Adjusting the microphone and speaker settings in your Zoom preferences may also help reduce echo and feedback.
4. Unable to Share Screen: If you’re unable to share your screen, check that you have the necessary permissions enabled as a host or co-host. You may also need to close other applications or windows that are blocking screen sharing. Restarting the Zoom application or your device can sometimes resolve this issue as well.
5. Unable to Join or Start a Meeting: If you’re encountering difficulties joining or starting a meeting, double-check that you have the correct meeting ID and password, if required. Ensure that you have a stable internet connection and that your Zoom application is up to date. Restarting your device or reinstalling the Zoom application may also help resolve this issue.
6. Participants Unable to Connect: If participants are having trouble connecting to the meeting, verify that they have the correct meeting details, including the meeting ID and password. Encourage them to check their internet connection and update their Zoom application if necessary. Consider providing alternative methods of joining the meeting, such as through a web browser or via phone call.
If none of these troubleshooting steps solve the issue, you can consult Zoom’s comprehensive support documentation or reach out to their customer support for further assistance. Remember to plan ahead and allow for extra time before the meeting to address any technical difficulties that may arise.
With the ability to troubleshoot common issues, you can ensure a smooth and uninterrupted Zoom meeting experience.
Now that we have covered troubleshooting common issues, let’s proceed to the next section on ending and saving a meeting.
Ending and Saving a Meeting
When the time comes to wrap up your Zoom meeting, it’s important to properly end the session and save any necessary information or recordings. Here’s how you can end and save a meeting in Zoom:
- In the meeting toolbar, locate the “End Meeting” button. It is represented by an icon that looks like a red phone handset.
- Click on the “End Meeting” button to initiate the meeting ending process.
- A confirmation dialog will appear, asking if you are sure you want to end the meeting.
- If you’re the host, you’ll have the option to choose whether to leave the meeting, which allows the meeting to continue without you, or end the meeting for all participants.
- Select the appropriate option and confirm your choice.
- Once the meeting ends, a window will appear showing you the summary of the meeting, including the duration and size of any cloud recordings (if applicable).
- If you have recorded the meeting to the cloud, allow some time for Zoom to process and save the recording. You can access the recording from your Zoom account’s recording section.
- If you have recorded the meeting locally, the recording file will be saved to the designated location on your device. You can access it immediately after the meeting ends.
It’s a good practice to review any cloud recordings to ensure that everything is captured correctly before sharing or archiving them. If you have recorded sensitive or confidential information, be cautious when sharing the recording and make sure to follow appropriate privacy and data protection guidelines.
Lastly, when ending a meeting, take a moment to thank the participants for their time and contributions. A brief closing remark or summary of the key discussion points can help provide a sense of closure and reinforce the main takeaways from the meeting.
By properly ending and saving your Zoom meetings, you ensure that important information and recordings are preserved, and you maintain professionalism and organization throughout the process.
Now that you know how to end and save a meeting, let’s conclude this guide on how to host a Zoom meeting like a pro.
Conclusion
Hosting a successful Zoom meeting doesn’t have to be complicated. By following the steps outlined in this guide, you can confidently navigate the process of setting up a Zoom account, scheduling meetings, inviting participants, and managing various aspects of the meeting.
Remember to prepare meeting materials, share your screen effectively, utilize the chat feature, and record meetings when necessary. Troubleshooting common issues and properly ending and saving the meeting ensures a smooth and productive experience for all participants.
As you become more familiar with Zoom’s features and functionalities, you’ll find yourself hosting engaging, interactive, and efficient virtual meetings. Whether you’re collaborating with colleagues, conducting online classes, or connecting with friends and family, Zoom offers a versatile platform that creates a virtual space for meaningful connections.
Keep in mind that effective communication, planning, and time management are key to hosting a successful Zoom meeting. By employing these strategies and adapting to the needs of your participants, you can create a positive and engaging online meeting environment.
So, go ahead and schedule your next Zoom meeting with confidence. Embrace the power of technology to connect, collaborate, and communicate effectively, no matter the distance.