Introduction
Zoom is a popular video conferencing platform that allows people to connect and collaborate online. Whether you’re hosting a business meeting, a virtual classroom session, or a social gathering, Zoom offers a range of features to facilitate effective communication. One such feature is the ability to add a co-host to your Zoom meeting.
Adding a co-host can be beneficial in a variety of situations. It allows you to share the responsibilities of running the meeting, ensuring a smooth and organized experience for all participants. With a co-host, you can divide tasks such as managing participants, muting/unmuting attendees, and monitoring the chat. This can be especially useful when hosting large meetings or events.
In this article, we will guide you through the process of adding a co-host on Zoom. Whether you’re new to Zoom or have been using it for a while, our step-by-step instructions will help you leverage this feature to enhance your virtual meetings. So, let’s get started and learn how to add a co-host on Zoom!
Step 1: Log in to your Zoom account
Before you can add a co-host to your Zoom meeting, you need to log in to your Zoom account. If you don’t have an account yet, you can sign up for free on the Zoom website.
To log in to your Zoom account, follow these simple steps:
- Open your preferred web browser and go to the Zoom website.
- Click on the “Sign In” button located at the top right corner of the page.
- Enter your email address and password associated with your Zoom account.
- Click on the “Sign In” button to access your Zoom account.
Once you are logged in, you will have access to all the features and settings of your Zoom account, including the ability to add a co-host to your meetings.
It is important to note that if you are using the Zoom desktop or mobile application, you can also log in directly from the app by entering your Zoom account credentials.
Now that you are logged in to your Zoom account, you are ready to proceed to the next step of adding a co-host to your Zoom meeting. In the following steps, we will guide you through the process of scheduling a meeting and accessing the meeting settings.
Step 2: Schedule a meeting
Once you are logged in to your Zoom account, the next step is to schedule a meeting. Scheduling a meeting allows you to set a specific date and time for your virtual gathering, ensuring that both you and your co-host are aware of the event in advance.
Follow these steps to schedule a meeting:
- From the Zoom dashboard, locate and click on the “Schedule a Meeting” option. This will open a new meeting scheduling window.
- In the scheduling window, fill in the details of your meeting. This includes the topic of the meeting, the date and time, the duration, and any other relevant information you may want to include.
- You can also set advanced options such as requiring a passcode for participants to join, enabling join before host, and selecting the desired video and audio settings. Take your time to configure these options according to your preferences.
- Once you have filled in all the necessary details, click on the “Save” or “Schedule” button at the bottom of the scheduling window.
After scheduling the meeting, Zoom will generate a unique meeting ID and join URL that you can share with your co-host and other participants. Make sure to copy and save this information for future reference.
Now that you have successfully scheduled a meeting, you are ready to move on to the next step, which involves accessing the meeting settings to add a co-host.
Step 3: Access meeting settings
After scheduling your Zoom meeting, it’s time to access the meeting settings where you can add a co-host. The meeting settings allow you to configure various options and permissions for your meeting, including the ability to assign co-host privileges.
To access the meeting settings, follow these steps:
- From the Zoom dashboard, click on the “Meetings” tab located on the left-hand side of the screen. This will display a list of all your scheduled meetings.
- Locate the meeting for which you want to add a co-host and click on the “Edit” button next to it. This will open the meeting settings page.
- On the meeting settings page, you will find a range of options and settings that you can customize. Scroll down until you reach the “Co-host” option.
- To enable co-hosting for this meeting, toggle the switch next to the “Co-host” option. This will allow you to assign co-host privileges to one or more participants.
By accessing the meeting settings and enabling co-hosting, you have laid the foundation for adding a co-host to your Zoom meeting. In the next step, we will explore how to actually add a co-host and assign them the necessary privileges.
Step 4: Add a co-host
Now that you have accessed the meeting settings and enabled co-hosting, it’s time to add a co-host to your Zoom meeting. Adding a co-host allows you to delegate certain meeting management tasks and share the responsibilities of running the meeting.
To add a co-host, follow these steps:
- While on the meeting settings page, scroll down to the “Co-host” section.
- Click on the “Add” button next to the “Co-host” section. This will open a dialog box where you can search for and select the co-host you want to add.
- Start typing the name or email address of the person you want to add as a co-host. Zoom will populate the search results based on your input.
- Select the desired co-host from the search results by clicking on their name or email address. The selected co-host will be added to the co-host list.
You can repeat the process to add multiple co-hosts if needed. Once added, the co-hosts will have access to certain meeting controls and can help you in managing the meeting effectively.
It’s important to note that the co-host must have a Zoom account and join the meeting with their Zoom account credentials to activate their co-host privileges.
With the co-hosts added to your meeting, you are now ready to move on to the next step, which involves assigning the co-host privileges.
Step 5: Assign co-host privileges
After adding a co-host to your Zoom meeting, the next step is to assign them the necessary privileges. Assigning co-host privileges allows the co-host to actively assist in managing the meeting and perform specific tasks to ensure a smooth and successful session.
To assign co-host privileges, follow these steps:
- Once you have added the co-host(s), go to the meeting settings page for the specific meeting.
- Scroll down to the “Co-host” section and locate the list of added co-hosts.
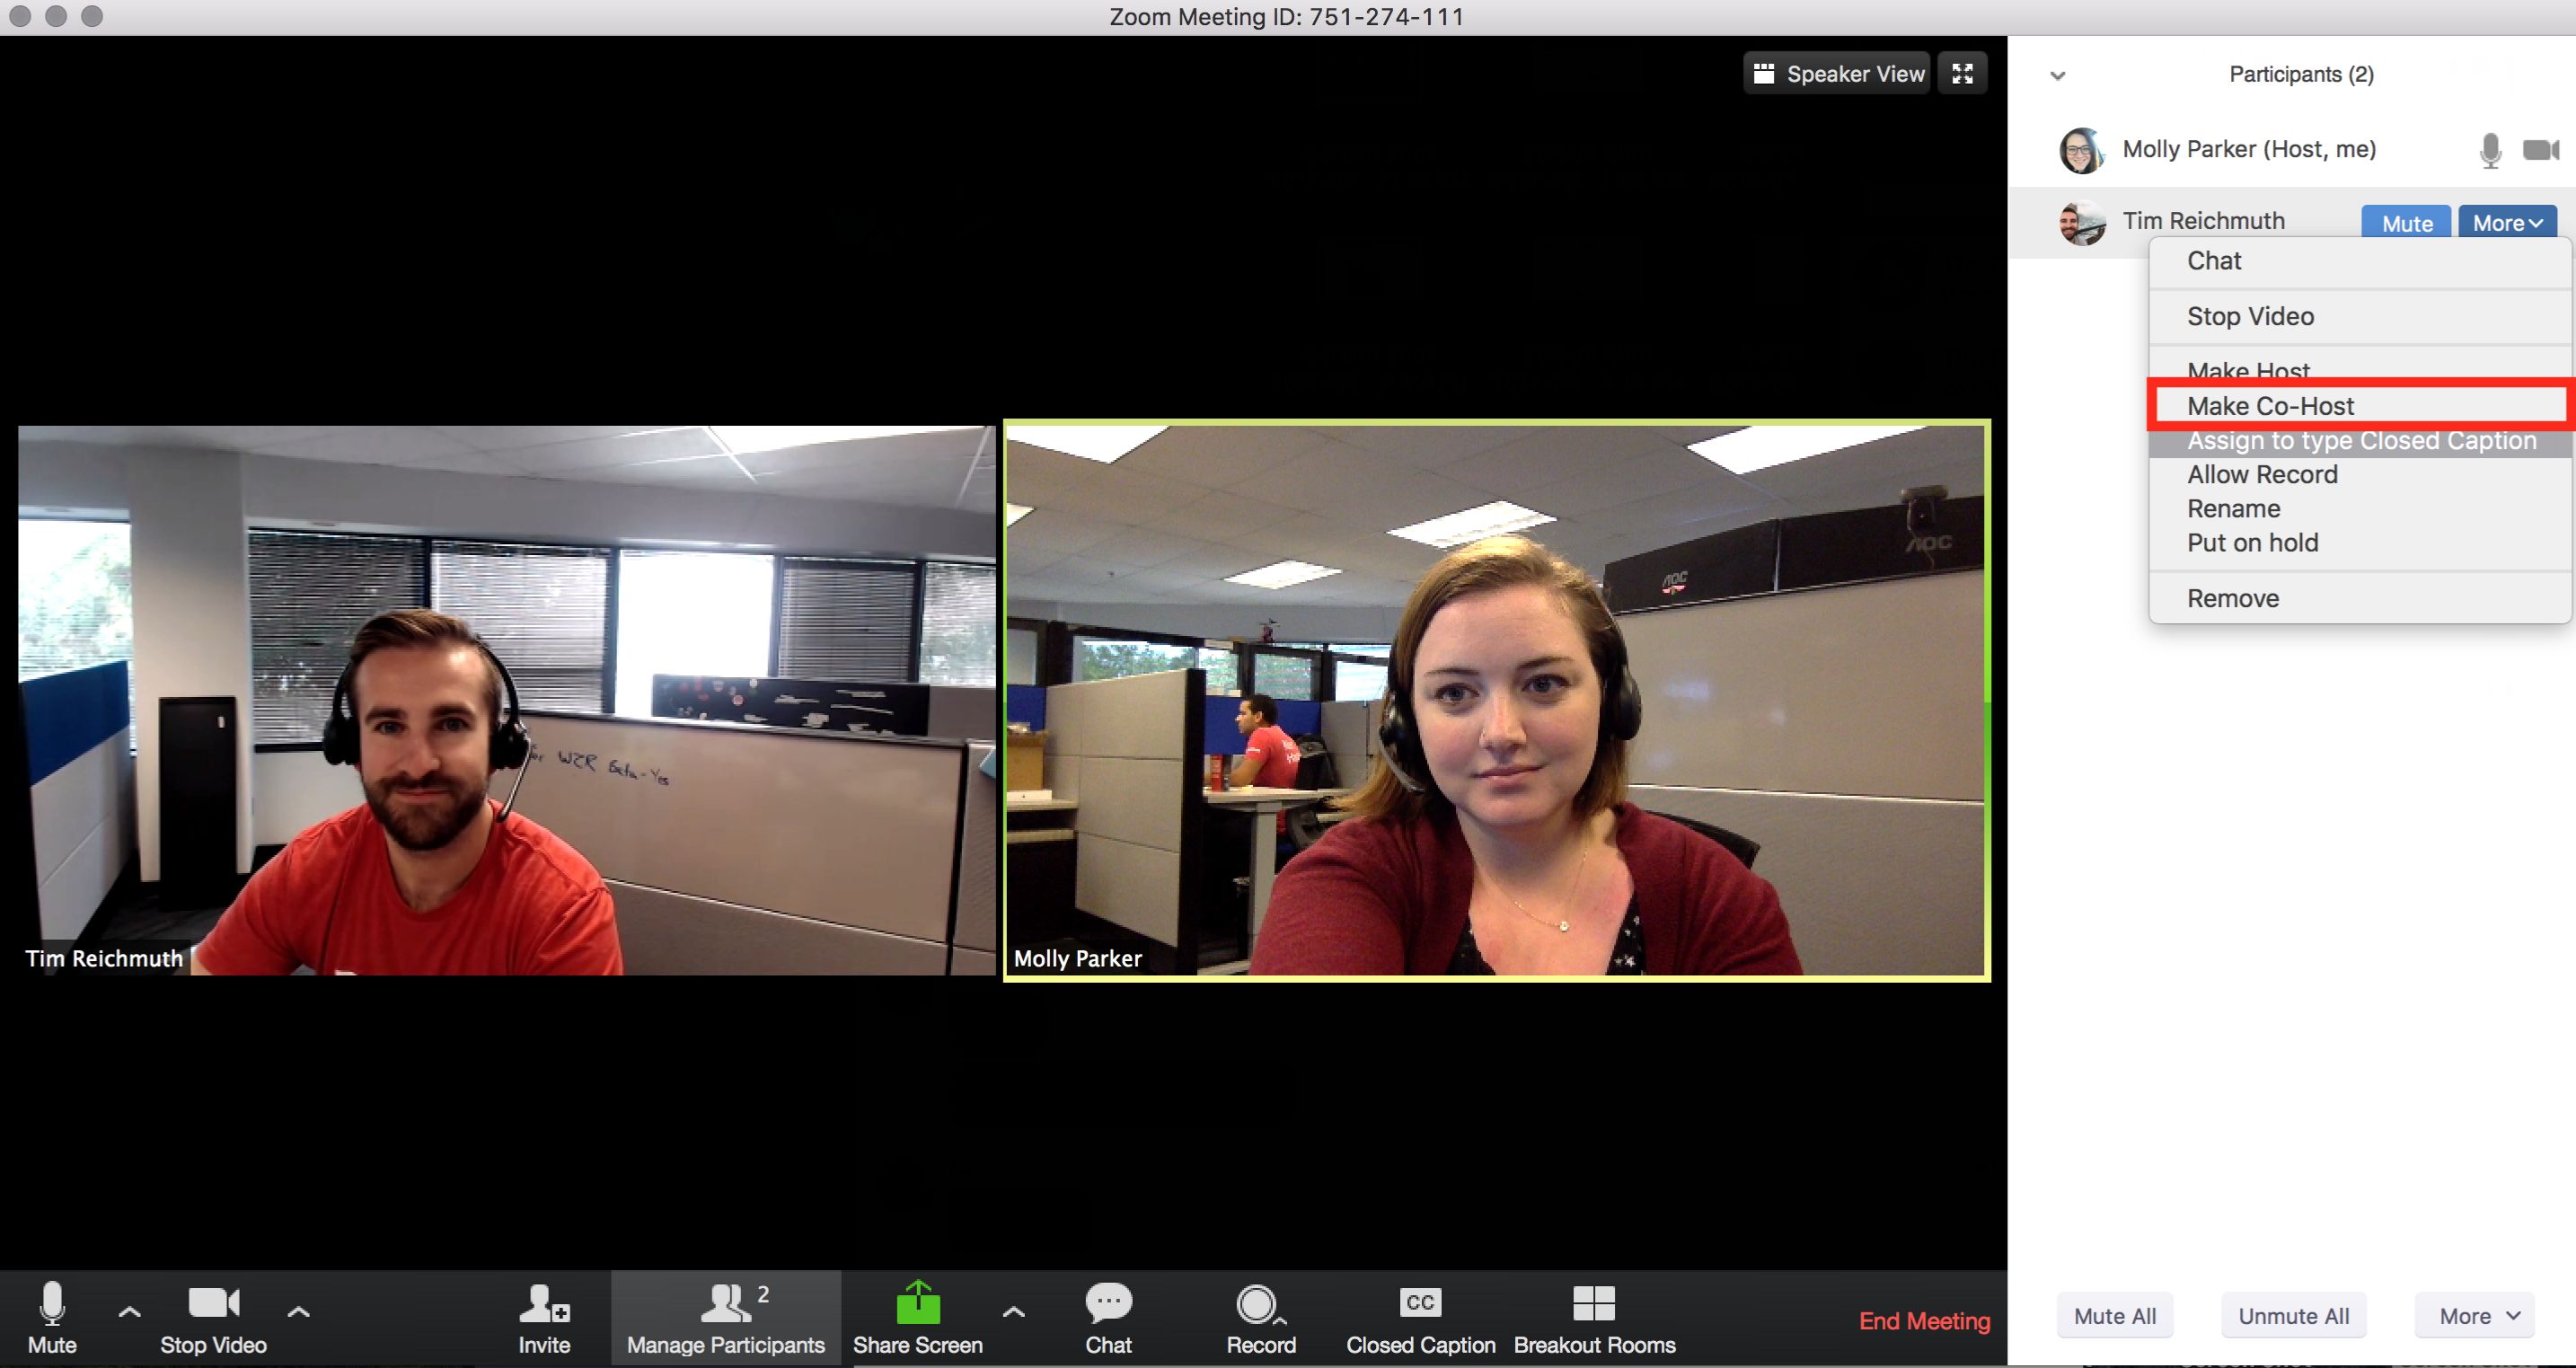
- Next to each co-host’s name, you will see a checkbox labeled “Make Co-host.” Check this box to assign the co-host privileges to that individual.
- You can assign co-host privileges to one or multiple co-hosts based on your requirements.
Assigning co-host privileges grants the selected individuals the ability to perform certain tasks such as managing participants, muting/unmuting attendees, controlling screen sharing, and more. This allows for a collaborative and efficient meeting experience.
It’s worth mentioning that the host (the individual who scheduled the meeting) retains overall control and authority in the meeting, even when co-hosts are assigned. Co-hosts serve as facilitators and provide support to the host.
With the co-host privileges assigned, you are now ready to proceed to the next step, which involves saving your changes to ensure the settings are applied to your Zoom meeting.
Step 6: Save your changes
Once you have added a co-host and assigned them the necessary privileges, it is important to save your changes to ensure that the updated settings are applied to your Zoom meeting. Saving your changes will activate the co-host functionality and allow the assigned co-hosts to actively participate in managing the meeting.
To save your changes, follow these simple steps:
- While on the meeting settings page, review all the settings you have configured, including the added co-hosts and their assigned privileges.
- Scroll to the bottom of the meeting settings page until you find the “Save” or “Save Changes” button.
- Click on the “Save” or “Save Changes” button to save your updated meeting settings.
By saving your changes, the co-hosts you’ve added and their assigned privileges will be in effect when the meeting starts. This ensures that the co-hosts have the necessary access and control to assist in managing the meeting as designated.
Remember that any further modifications to the meeting settings, such as adding or removing co-hosts or adjusting privileges, will require you to save the changes again to ensure they are implemented.
Now that your changes have been saved, you are all set to start your Zoom meeting with the co-hosts by your side. In the next step, we will explore how to initiate the meeting and collaborate effectively with your co-hosts.
Step 7: Start your meeting with a co-host
After successfully adding a co-host, assigning their privileges, and saving your changes, it’s time to start your Zoom meeting with your co-host by your side. Initiating the meeting allows you and your co-host to collaborate, manage participants, and ensure a productive session.
Follow these steps to start your Zoom meeting with a co-host:
- From your Zoom dashboard, locate and click on the “Meetings” tab.
- Find the scheduled meeting for which you have assigned a co-host and click on the “Start” button next to it.
- The Zoom application will launch, and a new window will appear displaying your meeting controls.
- Ensure that your co-host is also logged in to their Zoom account and has joined the meeting using their Zoom credentials.
- Once all participants, including the co-host, have joined the meeting, you can begin by clicking on the “Start Meeting” button.
As the host, you will have overall control of the meeting, while your co-host can assist you in managing various aspects. They can help with muting/unmuting participants, managing the chat, sharing their screens, and other tasks you have delegated to them.
During the meeting, make sure to communicate and collaborate with your co-host effectively. You can assign specific responsibilities, coordinate actions, and work together to create a smooth and engaging experience for all participants.
Remember that you and your co-hosts can communicate privately through the Zoom application’s chat or use audio and video features to streamline communication during the meeting.
By starting your Zoom meeting with a co-host, you can ensure that the workload is shared, and all participants receive the necessary attention. A collaborative approach utilizing co-hosts can greatly enhance the overall success of the meeting.
Now that you have started your meeting with a co-host, you are ready to facilitate a seamless and productive session. With effective communication and coordination, you can lead a successful Zoom meeting with your co-host by your side.
Conclusion
Adding a co-host to your Zoom meeting can greatly enhance the overall experience and efficiency of your virtual gatherings. With a co-host by your side, you can divide the responsibilities of managing the meeting, ensuring a smoother and more organized event for all participants.
In this article, we have guided you through the step-by-step process of adding a co-host on Zoom:
- Logging in to your Zoom account
- Scheduling a meeting
- Accessing meeting settings
- Adding a co-host
- Assigning co-host privileges
- Saving your changes
- Starting your meeting with a co-host
By following these steps, you can effectively leverage the co-host feature and collaborate with others to create engaging and successful Zoom meetings.
Remember, as the host, you have full control over the meeting, and co-hosts serve as valuable allies in managing various aspects of the session. Communication and coordination with your co-hosts are key to ensure that tasks are delegated and responsibilities are shared effectively.
Whether you are hosting a business meeting, an educational session, or a social gathering, the ability to add a co-host on Zoom can make a significant difference in the overall productivity and engagement of your participants.
So, next time you schedule a Zoom meeting, consider adding a co-host to share the load and create an even more impactful virtual experience.
Now that you have the knowledge and tools, go ahead and start adding co-hosts to your Zoom meetings, and elevate your online collaboration to new heights!