Introduction
Welcome to this guide on how to send a Zoom invite! Zoom has become an essential tool for virtual meetings, webinars, and online events. Whether you’re hosting a team meeting, a virtual family gathering, or a webinar for your business, sending a Zoom invite is a crucial step to ensure that participants can join your event easily.
In this article, we’ll walk you through a step-by-step process on how to send a Zoom invite. We’ll cover everything from signing in to Zoom and scheduling a meeting to generating an invite link and customizing the invite message. By following these simple steps, you’ll be able to effortlessly invite your participants to your Zoom meeting or event.
Zoom offers a user-friendly interface and a range of features to make online collaboration and communication smooth and efficient. With its robust capabilities, including video and audio conferencing, screen sharing, and chat functionality, Zoom has become the go-to platform for connecting with colleagues, friends, and family in the virtual world.
Whether you’re a beginner or have some experience using Zoom, this guide will provide you with the necessary instructions and tips to send a Zoom invite like a pro. So, let’s dive in and discover how to send a Zoom invite step by step!
Step 1: Sign in to Zoom
Before you can start sending a Zoom invite, you need to sign in to your Zoom account. If you don’t have an account yet, you can easily create one by going to the Zoom website and clicking on the “Sign Up, It’s Free” button. Follow the on-screen instructions to set up your account.
If you already have a Zoom account, here are the steps to sign in:
- Go to the Zoom website (www.zoom.us) in your preferred web browser.
- Click on the “Sign In” button located at the top right corner of the homepage.
- Enter your registered email address and password in the respective fields.
- Click on the “Sign In” button to log in to your Zoom account.
Once you’re signed in, you’ll have access to all the features and settings in your Zoom account, including the ability to schedule and send Zoom invites.
It’s important to note that if you’re using Zoom for the first time, you may need to download and install the Zoom desktop client or mobile app. The Zoom client provides a more robust and integrated experience compared to using Zoom in a web browser.
After signing in to Zoom, you’re ready to move on to the next step in sending a Zoom invite: scheduling a meeting.
Step 2: Schedule a Meeting
Once you’re signed in to your Zoom account, the next step is to schedule a meeting. Scheduling a meeting allows you to set a date, time, and duration for your event. This ensures that you have a dedicated space where participants can join at the designated time.
Here’s how you can schedule a meeting in Zoom:
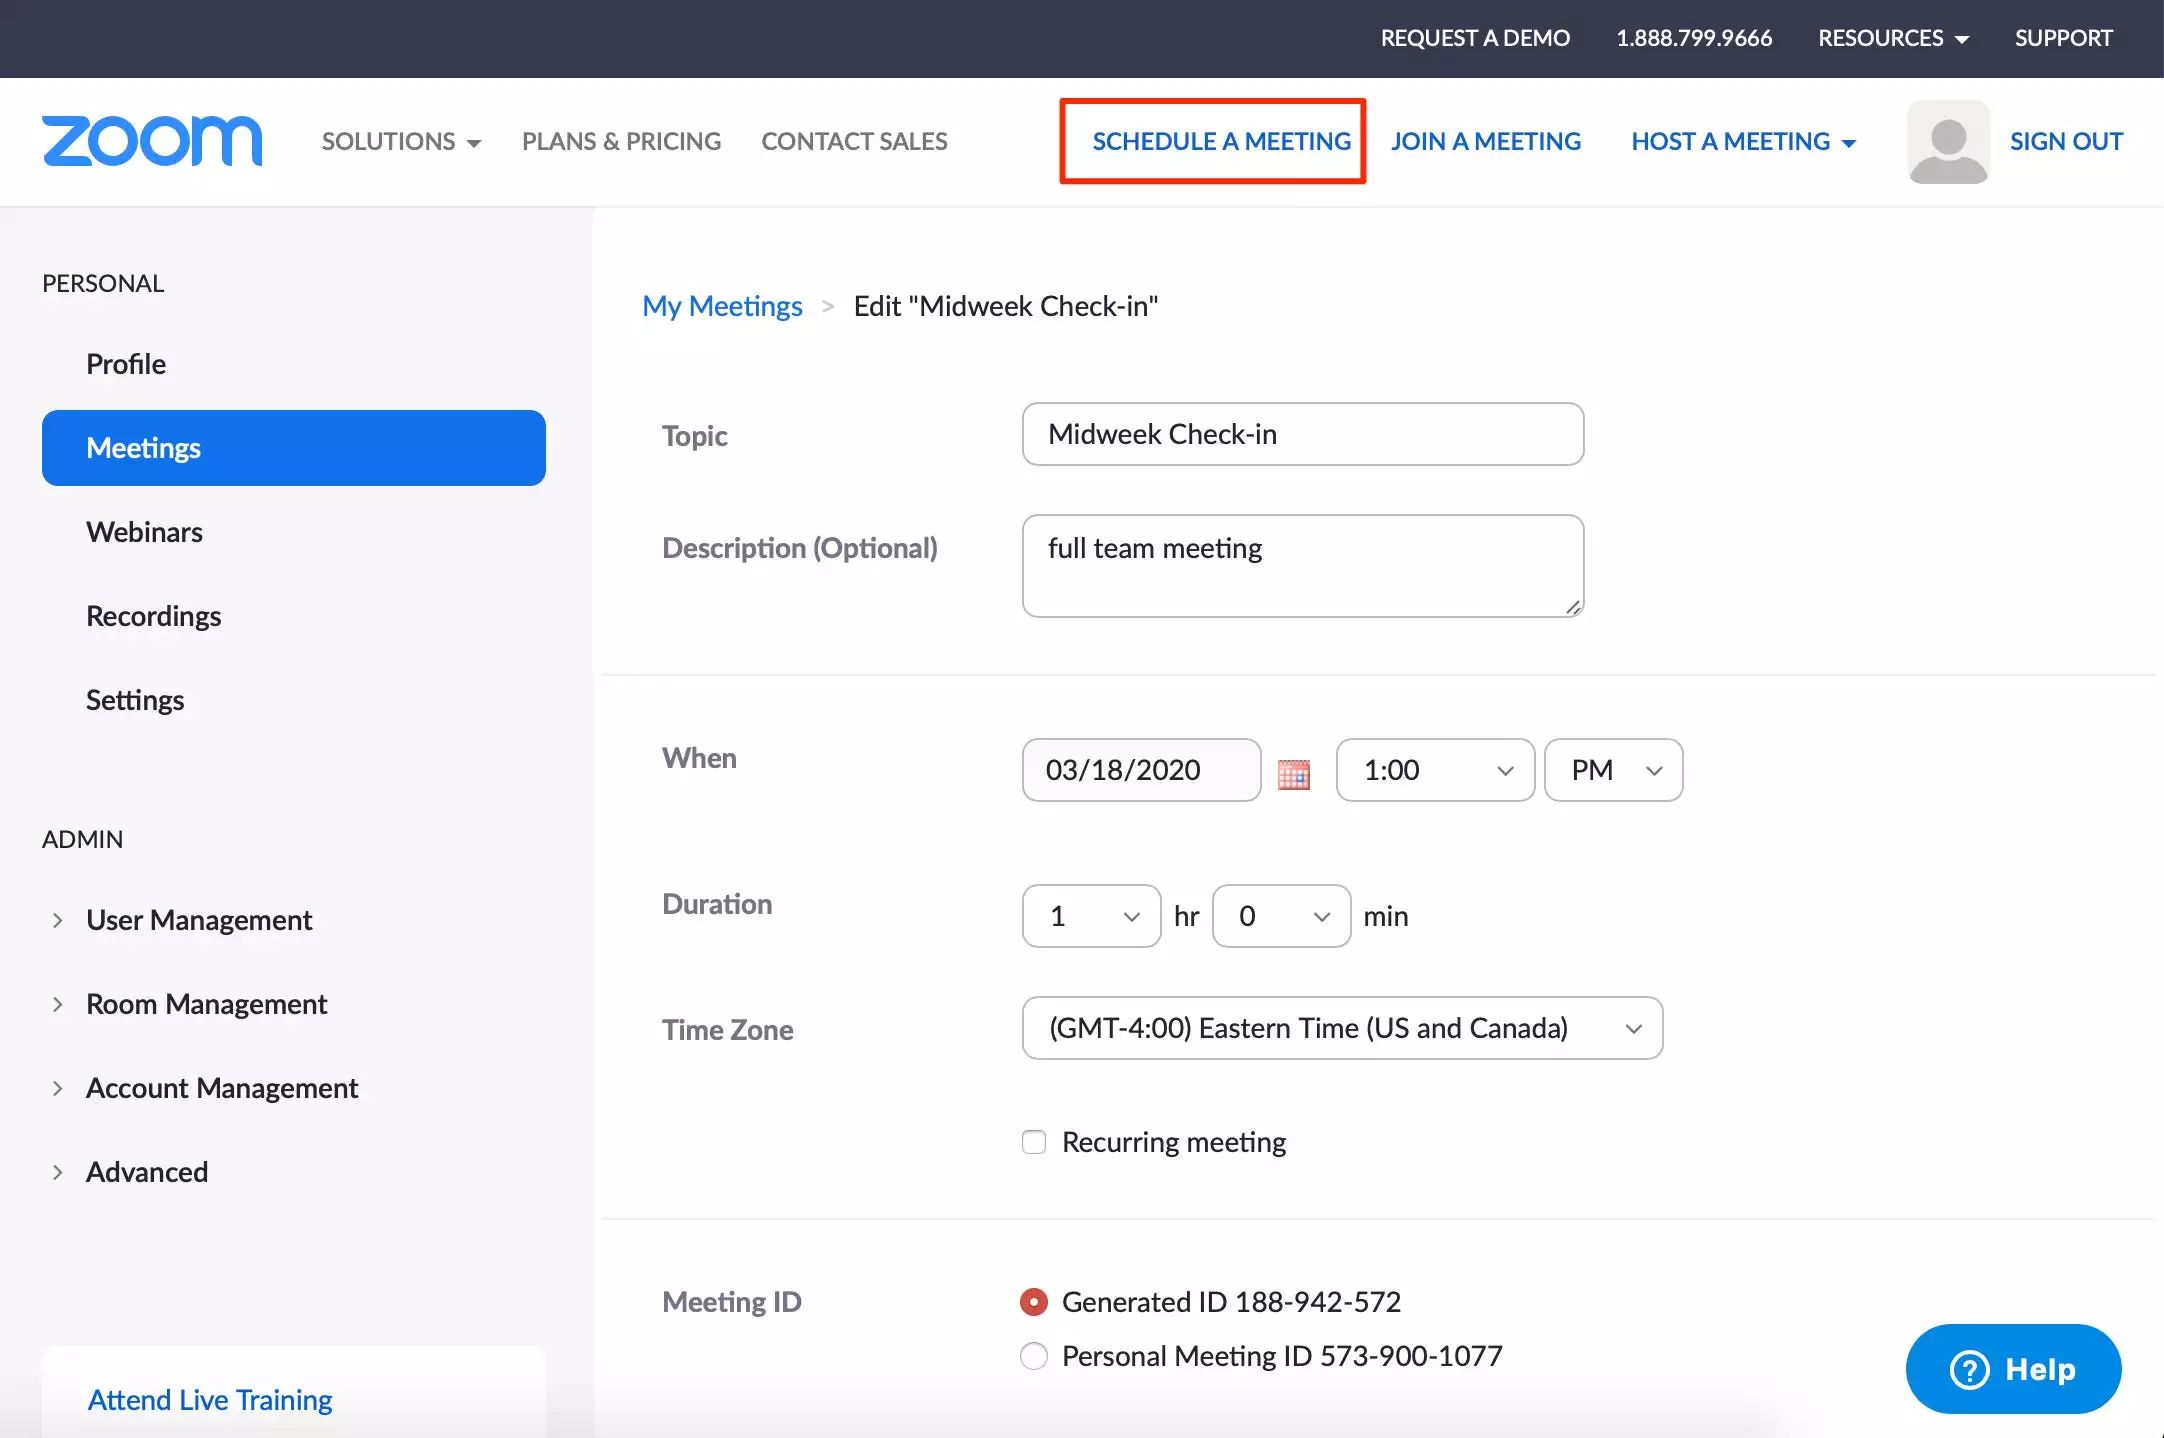
- On the Zoom homepage, click on the “Schedule a Meeting” button. This will take you to the meeting scheduling page.
- In the “Topic” field, enter a descriptive title for your meeting. This helps participants understand the purpose of the meeting at a glance.
- Set the date and time for your meeting in the “Date” and “Time” fields. Zoom provides options for both one-time meetings and recurring meetings.
- Specify the duration of your meeting using the “Duration” field. This ensures that the meeting doesn’t exceed the allotted time.
- Optionally, you can enable the “Recurring meeting” setting if you want the meeting to occur regularly, such as daily, weekly, or monthly. This is useful for recurring team meetings or classes.
- Configure the meeting settings according to your preferences. Here, you can choose to enable video, audio, screen sharing, and other features for participants.
- Click on the “Save” button to schedule the meeting. You will be redirected to the meeting details page.
Once you’ve scheduled the meeting, you can proceed to the next step of setting up meeting details.
By scheduling a meeting in advance, you allow participants to plan their time accordingly and join the meeting without any confusion. It also gives you the opportunity to prepare for the meeting and share the Zoom invite with participants well in advance.
Now that you’ve successfully scheduled a meeting, let’s move on to the next step and set up the meeting details.
Step 3: Set up Meeting Details
Once you have scheduled a meeting in Zoom, the next step is to set up the meeting details. This includes configuring the meeting options, such as enabling video and audio settings, adding a password for extra security, and more. Setting up the meeting details ensures that you have complete control over the meeting environment and can customize it according to your specific requirements.
Here’s how you can set up meeting details:
- After scheduling a meeting, you will be redirected to the meeting details page. This page provides you with various options to customize your meeting.
- First, review the basic meeting information displayed on the page, such as the meeting topic, date, time, and duration. Make sure all the details are correct.
- Next, you can choose whether to enable video for participants. By default, video is enabled for all participants, but you have the option to disable it if necessary. You can also choose to enable or disable participants’ ability to start video upon joining the meeting.
- Similarly, you can configure the audio settings for the meeting. By default, both computer audio and phone audio options are available for participants. You can choose to enable or disable either or both options.
- For added security, you can set up a password for the meeting. Enabling a password ensures that only authorized participants can join the meeting.
- If needed, you can enable the “Join before host” option. This allows participants to join the meeting before the host arrives.
- Zoom also provides advanced options like enabling waiting rooms, allowing participants to record the meeting, and more. Explore these options and customize them as per your requirements.
- Once you have configured all the meeting details, click on the “Save” button to apply the changes.
Setting up the meeting details gives you control over the meeting environment and ensures a seamless experience for both you and the participants. By customizing the settings according to your needs, you can create a professional and secure meeting space.
Now that you have set up the meeting details, let’s move on to generating an invite link in the next step.
Step 4: Generate an Invite Link
After scheduling a meeting and setting up the necessary details in Zoom, the next step is to generate an invite link. An invite link provides a convenient way for participants to join your meeting with just a click. Once you generate the invite link, you can easily share it with your intended participants through various communication channels.
Here’s how you can generate an invite link in Zoom:
- On the meeting details page, scroll down to the “Invite attendees” section.
- Click on the “Copy the invitation” button. This will copy the meeting details, including the invite link, to your clipboard.
- You can now paste the invite link into the communication channel of your choice, such as email, messaging apps, or project management tools.
- Alternatively, you can click on the “Copy invitation” dropdown menu to copy the invite link in various formats, such as email, calendar invites, or a plain text format. Choose the format that suits your needs.
- If you prefer, you can also click on the “Email” button to send the invite link directly via email using your default email client.
By generating an invite link, you provide a direct and hassle-free way for participants to join your Zoom meeting. They simply need to click on the link to access the meeting without any additional steps.
Remember to include any additional meeting information or instructions when sharing the invite link. This ensures that participants are well-informed and have all the necessary details to join your meeting.
Now that you have successfully generated the invite link, let’s move on to the next step and learn how to share the invite link with participants.
Step 5: Share the Invite Link
Once you have generated the invite link for your Zoom meeting, it’s time to share it with your intended participants. Sharing the invite link ensures that everyone you want to join your meeting has easy access to it. There are several effective ways to share the invite link, depending on your preferred communication channels and the participants you are inviting.
Here are some methods to share the invite link with your participants:
- Email: One of the most common ways to share the invite link is through email. You can simply compose an email, paste the invite link, and add any additional meeting information or instructions. Make sure to provide a clear subject line and let participants know the date, time, and duration of the meeting.
- Messaging Apps: If you’re working with a team or a group of individuals who frequently use messaging apps like Slack, Microsoft Teams, or WhatsApp, you can share the invite link through these platforms. Create a group chat or direct message and paste the invite link along with any necessary details.
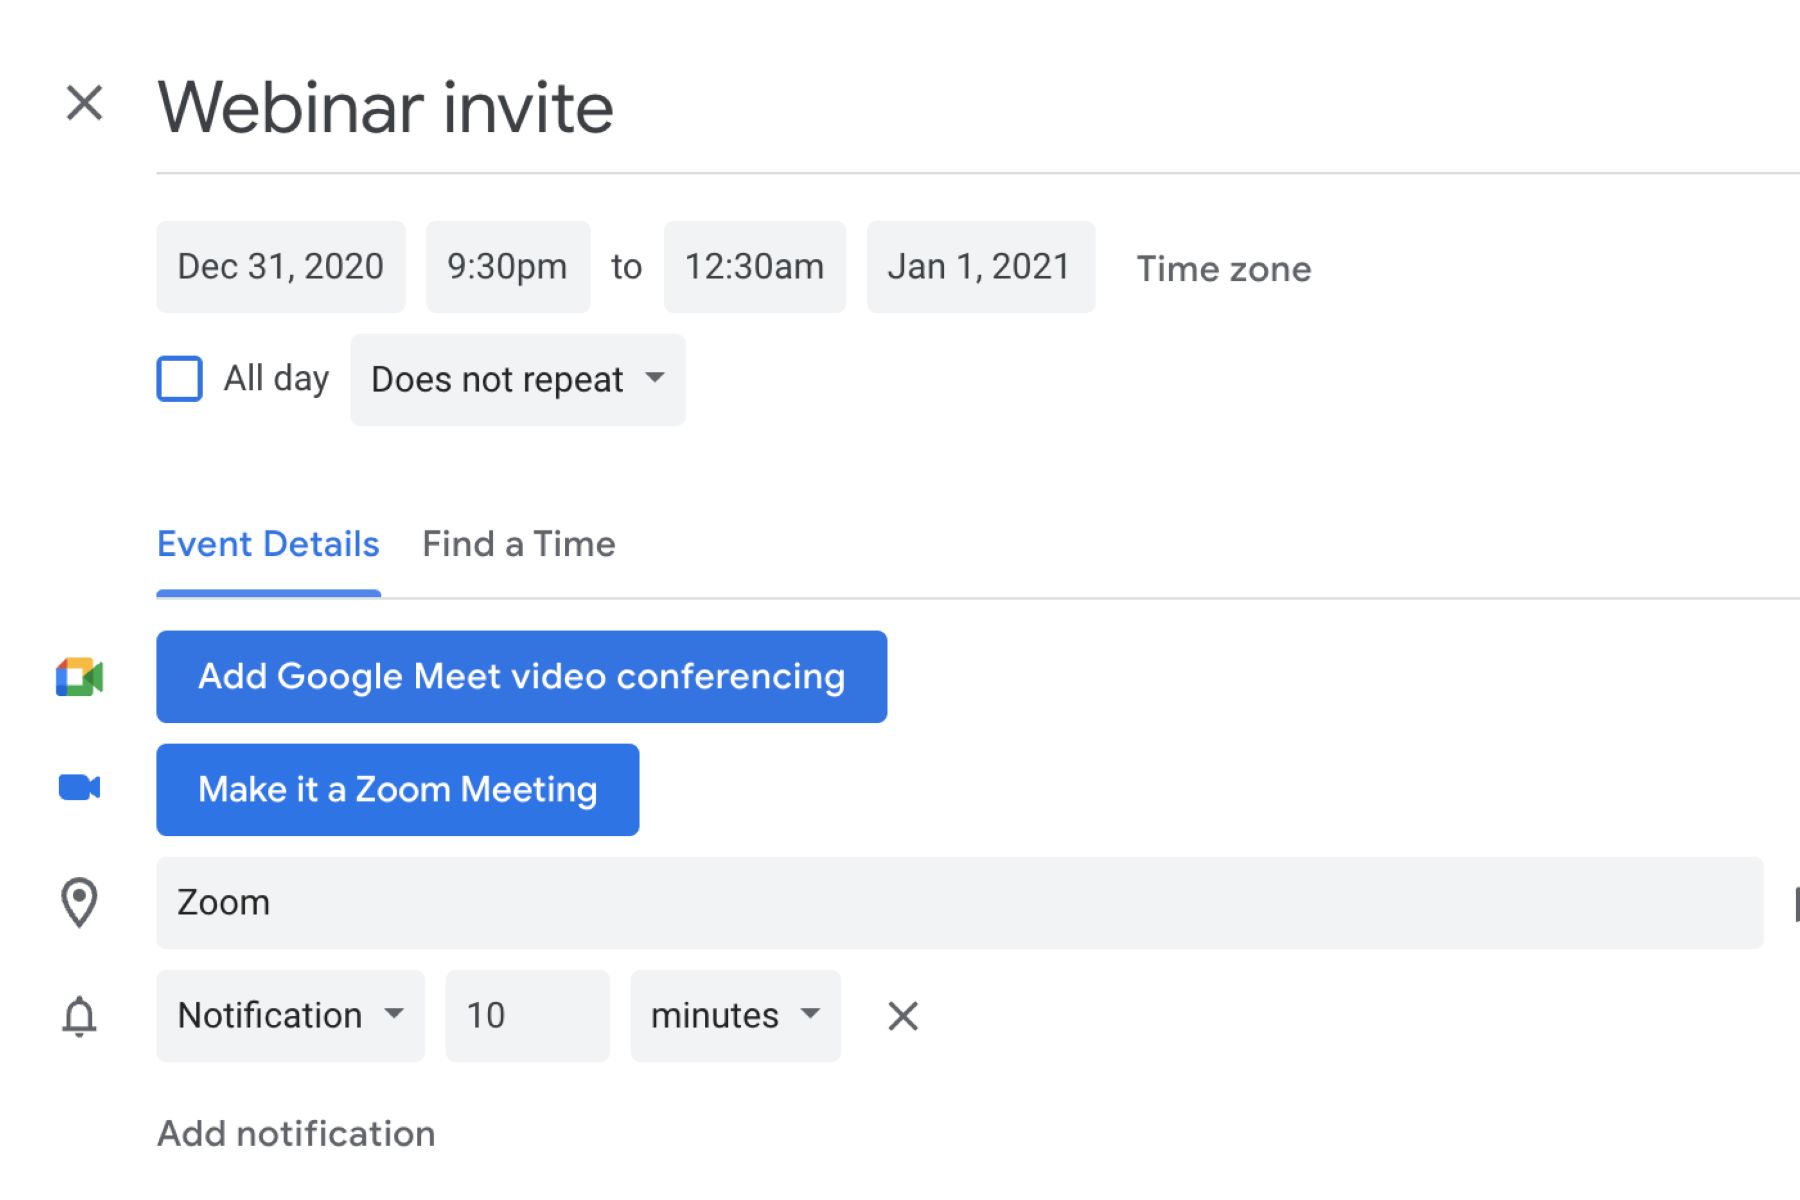
- Calendar Invites: If you use a calendar application like Google Calendar, you can create a new event and include the invite link in the event description. Once you invite participants to the event, they will receive a calendar invite with the meeting details and the invite link.
- Project Management Tools: If you collaborate with a team through project management tools like Trello, Asana, or Basecamp, you can share the invite link in the relevant project or task. This ensures that everyone involved in the project has easy access to the meeting details.
- Social Media: If you’re inviting a larger audience or hosting a public webinar, you can share the invite link on your social media platforms. Post the invite link along with a brief description of the meeting and encourage your followers to join.
Remember to provide clear instructions and any necessary meeting details alongside the invite link. This ensures that participants can join the meeting without any confusion or issues.
Now that you know how to share the invite link, let’s move on to the next step and learn how to customize the invite message for a personal touch.
Step 6: Customize the Invite Message
Customizing the invite message is a great way to add a personal touch and provide additional information to your participants. By crafting a well-written and informative invite message, you can set the tone for the meeting, highlight important details, and engage your attendees. Customization allows you to tailor the message according to the specific needs and expectations of your audience.
Here are some tips for customizing the invite message:
- Greet the participants: Start the invite message with a warm greeting to make participants feel welcome and valued.
- Provide a brief overview: Give a brief overview of the meeting’s purpose, agenda, and any key topics that will be covered.
- Highlight important details: Clearly state the date, time, and duration of the meeting to ensure participants are aware of the specific time commitment.
- Include the invite link: Be sure to include the invite link you generated earlier so participants can easily join the meeting.
- Add any necessary instructions: Depending on the nature of the meeting, you may need to provide specific instructions or requirements, such as preparation materials, software downloads, or recommended equipment.
- Encourage participants to ask questions: Let participants know that you welcome questions or concerns they may have. Provide contact information or a designated channel where they can reach out for any queries.
- Show appreciation: Express your gratitude for their time and participation, acknowledging the value they bring to the meeting.
- Keep it concise: While it’s good to provide necessary details, make sure your message is concise and easy to read. Avoid overwhelming participants with excessive information.
Remember to maintain a professional tone in your invite message while also injecting a sense of enthusiasm and excitement for the upcoming meeting. Customizing your invite message adds a personal touch that can make participants feel more connected and engaged.
Once you have crafted the perfect invite message, it’s time to move on to the final step: sending the invite!
Step 7: Send the Invite
After you have customized the invite message and finalized all the details, it’s time to send the invite to your participants. Ensuring that the invite reaches your intended audience in a timely manner is crucial for the success of your Zoom meeting. Fortunately, Zoom provides various options to send the invite conveniently.
Here’s how you can send the invite:
- If you composed an email with the invite link and customized message, simply click the “Send” button to send the email to your participants. Make sure to double-check the recipient list and verify that all the necessary information is included in the email.
- If you haven’t composed an email, but copied the invite link, you can paste it into your preferred communication channel, such as a messaging app, project management tool, or social media platform. Ensure that all relevant participants have access to the invite link and any additional details you provided.
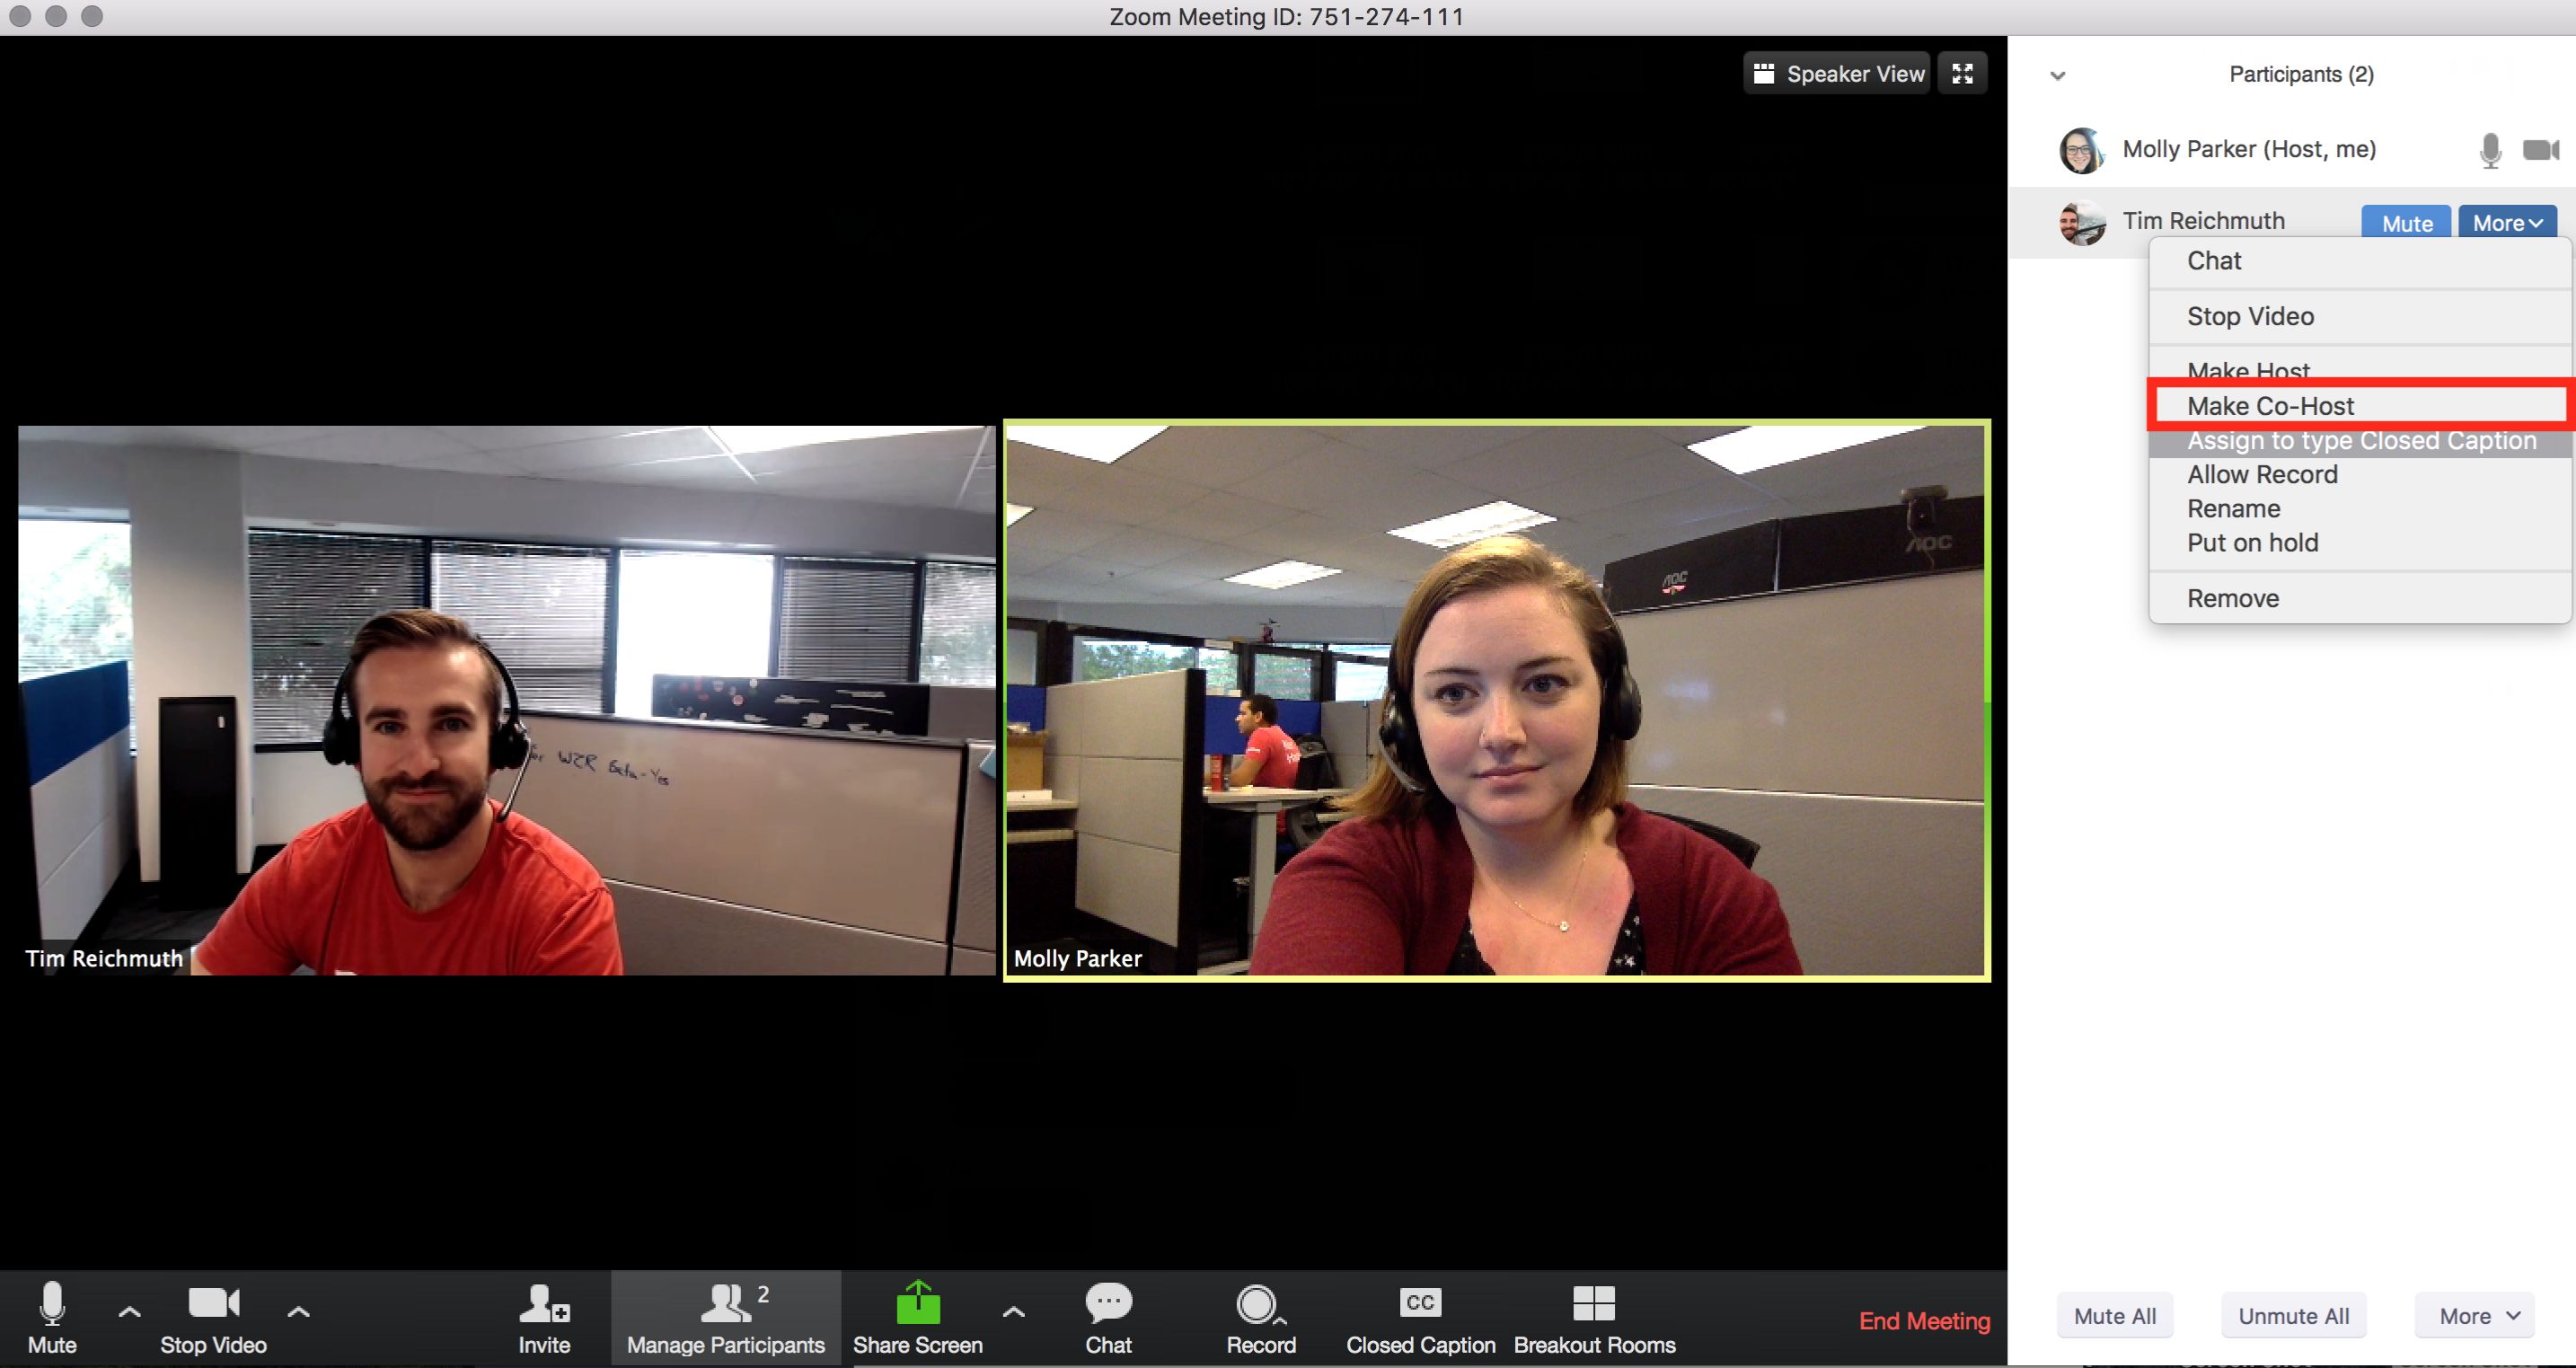
- If you prefer to send the invite directly within Zoom, you can go to the meeting details page and click on the “Invite” button. Zoom will provide options to invite participants via email or by generating a meeting ID that participants can use to join the meeting directly within the Zoom app or website.
- For larger meetings or webinars, you can use Zoom’s built-in registration feature to gather participants’ information and automatically send them the invite. This ensures a streamlined process and allows you to track the attendees more effectively.
Remember to double-check all the details and verify that the invite is being sent to the correct recipients. It’s also a good idea to inform participants that the invite has been sent and provide them with any necessary follow-up instructions or reminders.
By sending the invite promptly, you ensure that participants have ample time to prepare and mark their calendars. It’s essential to communicate effectively and provide all the necessary information to ensure a smooth and successful meeting.
Congratulations! You have successfully completed all the steps to send a Zoom invite. Now you can sit back, relax, and look forward to a productive and engaging meeting with your participants.
Conclusion
Following the steps outlined in this guide, you now have the knowledge and tools to send a Zoom invite with ease. Whether you’re hosting a team meeting, conducting a virtual workshop, or connecting with friends and family for a virtual gathering, sending a Zoom invite ensures that participants can join your event seamlessly.
From signing in to your Zoom account, scheduling a meeting, and setting up meeting details, to generating an invite link, customizing the invite message, and sending the invite, each step plays a crucial role in creating a smooth and professional experience for both you and your participants.
Remember to be mindful of the details you include in the invite, such as the meeting agenda, date, time, and any necessary instructions or requirements. Customizing your invite message adds a personal touch that helps engage participants and set the tone for the meeting.
Additionally, be sure to choose the most appropriate method for sharing the invite link, whether it’s through email, messaging apps, calendar invites, or social media. Consider the preferences of your participants and use the communication channels that are most convenient for them.
By following these steps and utilizing the features and functionality of Zoom, you can create a seamless and convenient experience for participants and effectively connect in the virtual world.
So, what are you waiting for? Start sending those Zoom invites and enjoy productive and engaging meetings with your participants!