Introduction
Zoom has become an essential tool for conducting virtual meetings, webinars, and online events. As the host, you have the power to control the meeting, manage participants, and ensure that everything runs smoothly. However, there may be times when you need someone else to take over the hosting duties. Whether you need to step away temporarily or hand over the reins to another participant, Zoom provides an easy way to make this transition.
In this article, we will guide you through the steps of making someone else the host on Zoom. We will explain how you can assign the host role to another participant before a meeting starts or during an ongoing session. We will also cover how to remotely control another participant’s Zoom session, ensuring a seamless transition and effective hosting experience.
By having the ability to transfer the host role, you can delegate responsibilities, share the workload, and facilitate collaboration among participants. This feature is especially useful for team meetings, training sessions, and webinars where multiple hosts may be required.
We understand that navigating the host transfer process can be daunting, especially if you are new to Zoom. But don’t worry – we have got you covered. Follow the steps outlined in this article, and you will be well-equipped to make someone else the host on Zoom effortlessly.
So, let’s dive in and learn how to empower others to take the lead in your Zoom meetings!
Step 1: Understanding the Role of the Host in Zoom Meetings
Before we delve into the process of making someone else the host on Zoom, it’s essential to have a clear understanding of the role and responsibilities of the host.
The host is the person who initiates and manages the Zoom meeting. They have the highest level of control over the meeting settings and participants. Some of the key responsibilities of the host include:
- Scheduling and Inviting: The host is responsible for scheduling the meeting, setting the time, date, and duration, and sending out invitations to participants.
- Starting and Ending the Meeting: The host has the authority to start the meeting and end it when the discussion is complete.
- Managing Participants: As the host, you can control the participants’ audio and video settings, mute or unmute them, and manage their permissions within the meeting.
- Sharing Content: The host can share their screen, present slides, documents, or videos, and collaborate with participants by allowing them to share their screens as well.
- Enforcing Meeting Security: Hosts have the ability to manage security measures for the meeting, such as enabling waiting rooms, requiring passwords, and controlling access to the meeting.
- Managing Breakout Rooms: In larger meetings, hosts can create breakout rooms for participants to have small group discussions and later bring them back to the main session.
- Recording the Meeting: The host can record the meeting for future reference or to share it with participants who were unable to attend.
Understanding these responsibilities will help you appreciate the significance of the host role and the reasons why you may need to transfer the hosting duties to someone else. Now that we have a clear picture of what being the host entails, let’s move on to the next step: assigning someone else as the host on Zoom.
Step 2: Assigning Someone Else as the Host
There are two scenarios in which you may need to assign someone else as the host on Zoom: before the meeting starts or during an ongoing session. Let’s explore both scenarios and the respective steps to follow:
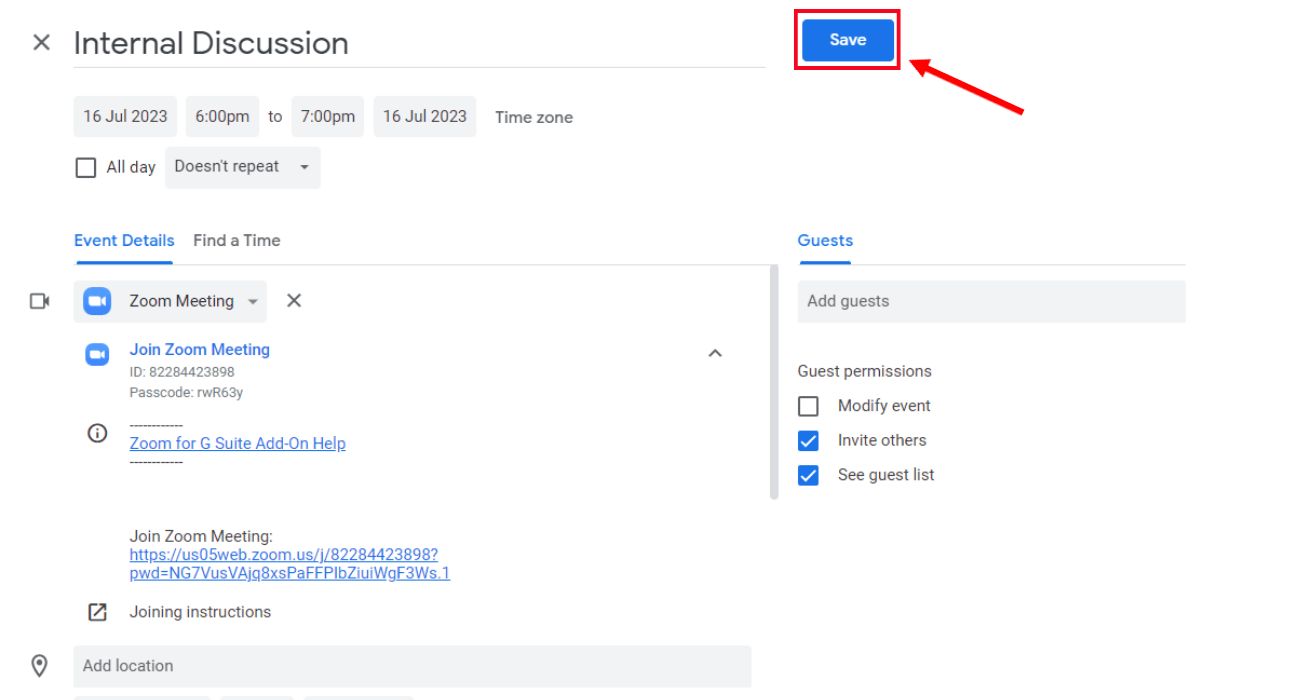
Before the Meeting Starts
- Open the Zoom desktop or mobile application and sign in to your Zoom account.
- Click on the “Meetings” tab at the bottom or side navigation bar, depending on your device.
- Select the meeting you want to edit and click on the “Edit” option. Alternatively, you can schedule a new meeting by clicking on the “Schedule a Meeting” button.
- In the meeting details window, navigate to the “Host” section.
- Click on the drop-down menu next to “Host” and select the participant whom you want to assign as the new host.
- Scroll down and click on the “Save” or “Save Changes” button to apply the modifications.
By following these steps, you have successfully assigned someone else as the host for the upcoming Zoom meeting. When the scheduled time arrives, the chosen participant will have host privileges and be in control of the meeting.
During an Ongoing Session
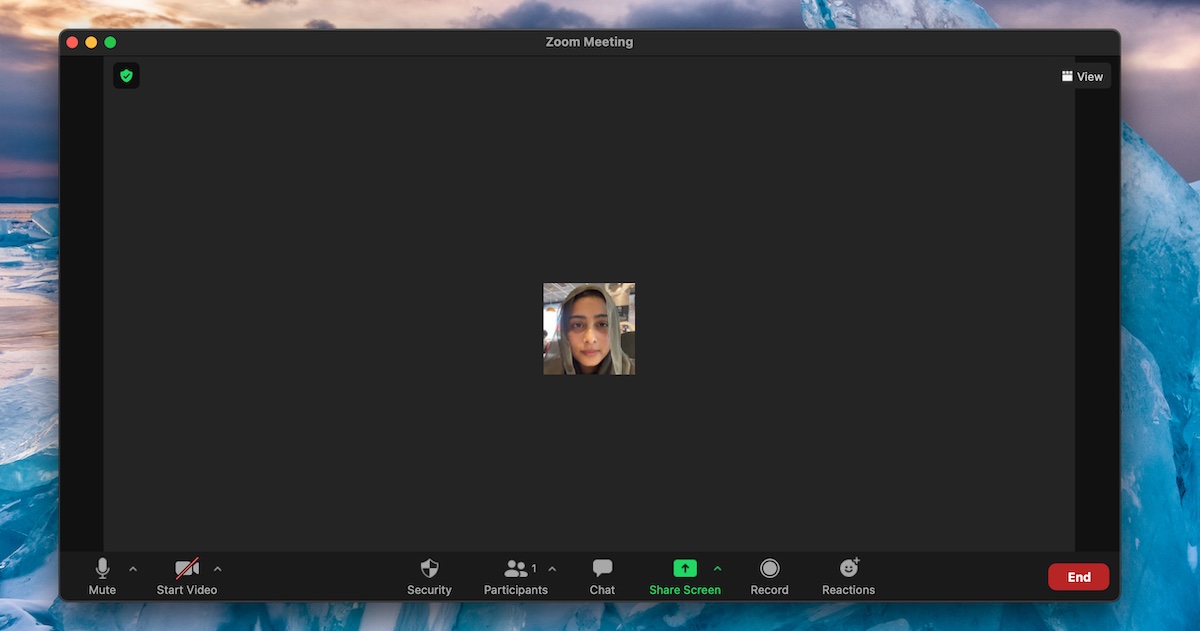
- As the current host, click on the “Participants” button at the bottom of the Zoom meeting window.
- A participants panel will appear on the right-hand side of the screen. Locate the participant whom you want to assign as the new host.
- Hover over the participant’s name and click on the “More” button (represented by three dots).
- In the drop-down menu, select the option “Make Host.”
That’s it! The selected participant will now become the new host of the meeting, with full control over the meeting settings and participants’ management.
Transferring the host role before or during a meeting can be incredibly useful when you need to delegate responsibilities or allow another participant to take the lead. Now that you know how to assign someone else as the host, let’s explore the next step: granting host privileges to another participant during a meeting.
Step 3: Granting Host Privileges to Another Participant During a Meeting
Sometimes, you may need to grant host privileges to another participant while a Zoom meeting is already in progress. This can be done through the “Manage Participants” feature. Here’s how to do it:
- In the Zoom meeting window, click on the “Participants” button at the bottom of the screen.
- The participants panel will appear on the right-hand side.
- Locate the participant to whom you want to grant host privileges.
- Hover over their name and click on the “More” button (represented by three dots).
- Select the option “Make Host” from the drop-down menu.
Once you have completed these steps, the participant will gain host control and have the ability to manage the meeting just like you.
It’s important to note that when you grant host privileges to another participant, you relinquish your own control over the meeting. The newly appointed host will have the ability to manage participants, share content, and perform other host functions. However, you will still remain in the meeting as a participant and can continue to actively participate without host privileges.
This feature is particularly useful when you need to hand over the hosting responsibilities to someone else temporarily or when a co-host needs to take charge in your absence. Granting host privileges enables a seamless transition and ensures that the meeting can continue without interruption.
Now that you know how to grant host privileges to another participant during a meeting, let’s move on to the next step: remotely controlling another participant’s Zoom session.
Step 4: Remotely Controlling Another Participant’s Zoom Session
In certain situations, you may need to remotely control and assist another participant during a Zoom meeting. Zoom provides a feature called “Remote Control” that allows you to gain control over another participant’s screen. Follow these steps to remotely control another participant’s Zoom session:
- Ensure that the participant whose screen you want to control has enabled screen sharing.
- In the Zoom meeting window, click on the “Participants” button at the bottom of the screen.
- The participants panel will appear on the right-hand side.
- Locate the name of the participant whose screen you want to control.
- Hover over their name and click on the “More” button (represented by three dots).
- Select the option “Remote Control” from the drop-down menu.
- A pop-up window will appear, asking for confirmation to start remote control. Click “Yes” to proceed.
- You will now have control over the participant’s screen. You can move their mouse, click on items, and navigate through their screen as needed.
- To release control, click on the “Stop Share” button at the top of the participant’s screen or inform the participant to click on the “Stop Share” button themselves.
By following these steps, you can easily remote control another participant’s Zoom session when necessary. This feature can be especially useful for providing technical support, guiding participants through a presentation, or troubleshooting issues collectively.
Remember to always respect the participant’s privacy and seek their permission before remotely controlling their screen. Open communication and mutual consent are crucial in maintaining a collaborative and respectful meeting environment.
Now that you know how to remotely control another participant’s Zoom session, let’s move on to the final step: tips for smooth handover and successful hosting by someone else.
Step 5: Tips for Smooth Handover and Successful Hosting by Someone Else
When transferring the host role to someone else in a Zoom meeting, it’s important to ensure a smooth handover process for a successful hosting experience. Here are some valuable tips to keep in mind:
1. Clear Communication:
Communicate with the participant who will be taking over as the host. Clearly explain their new responsibilities, any special instructions, and provide them with any necessary meeting details in advance.
2. Test in Advance:
If possible, conduct a test run or rehearsal with the new host. This will allow them to familiarize themselves with the controls, practice screen sharing, and ensure they are comfortable with their new role.
3. Briefing Session:
Prior to the handover, hold a brief meeting or virtual chat with all participants to introduce the new host and explain the reasoning behind the transition. This will help set expectations and provide a smooth transition for everyone involved.
4. Transition Announcement:
Announce the transition of host role to all participants in the meeting, including the name of the new host. Ensure that everyone is aware of the change and knows whom to contact for any queries or assistance.
5. Supportive Documentation:
Prepare and share any necessary documentation or guidelines with the new host. This may include important meeting links, agenda, presentation slides, or any other relevant information that will assist them in smoothly taking over the hosting duties.
6. Availability:
Be available during the meeting as a participant to support the new host if they have any questions or need assistance. This demonstrates your commitment to the success of the meeting and creates a safety net for the new host.
7. Follow-up Discussion:
After the meeting, have a debriefing session with the new host to discuss their experience and address any concerns or suggestions they may have. This feedback will provide valuable insights for future host transitions.
By following these tips, you can ensure a seamless handover and empower another participant to successfully handle the hosting responsibilities in your Zoom meetings. Collaboration and effective communication are key to a successful hosting experience.
Now that you have all the tools and knowledge to make someone else the host on Zoom, go ahead and delegate those responsibilities with confidence!
Conclusion
Being able to assign someone else as the host on Zoom is a valuable feature that allows for seamless collaboration and sharing of responsibilities. In this article, we walked through the steps to make someone else the host before a meeting, during a meeting, and how to grant host privileges to another participant. We also explored how to remotely control another participant’s Zoom session for effective collaboration.
By understanding the role of the host in Zoom meetings, you can appreciate the significance of transferring hosting duties and empower others to take the lead. Clear communication, testing, and supportive documentation are essential elements for a smooth handover process.
Remember to follow our tips to ensure a successful hosting experience by someone else. Clear communication, briefing sessions, and availability for support will contribute to a seamless transition and ensure that the meeting runs smoothly in the hands of the new host.
Now that you have all the necessary knowledge and steps at your disposal, you can confidently assign someone else as the host on Zoom. Whether it’s for team meetings, webinars, or any other virtual gatherings, sharing the hosting responsibilities will promote collaboration and empower participants to contribute effectively.
So go ahead and explore the host transfer feature on Zoom. Delegate those hosting duties, foster teamwork, and make the most out of your virtual meetings!