Introduction
Welcome to the wonderful world of Zoom! Whether you’re a seasoned pro or a newbie to online meetings, knowing how to mute yourself or others is a crucial skill to have. In this article, we will guide you through the steps on how to effectively mute a Zoom meeting.
In today’s virtual landscape, Zoom has become the go-to platform for remote work, online classes, and connecting with friends and family. However, it’s common to encounter situations where you need to mute your audio to limit background noise or maintain privacy during a meeting. Additionally, as a meeting host, you may need to mute participants to manage the flow and ensure a productive discussion.
During a Zoom meeting, there are various ways to mute your audio, including using the Zoom toolbar or keyboard shortcuts. As a host, you have the ability to mute and unmute others, allowing you to maintain control over the meeting’s dynamics. By mastering these techniques, you can prevent distractions, promote a smooth meeting experience, and communicate effectively with others.
In the following steps, we will walk you through the process of muting yourself and others in a Zoom meeting. Whether you’re using the Zoom desktop app or the web interface, these methods apply to both Windows and Mac users. So let’s dive in and learn how to navigate the mute feature in Zoom!
Step 1: Join the Zoom Meeting
The first step in muting yourself or others during a Zoom meeting is to join the meeting itself. After receiving the meeting link or invitation, simply click on it to join the meeting. You may be prompted to download the Zoom app if you haven’t already installed it on your device. Follow the on-screen instructions to complete the installation process.
Once you’ve successfully joined the meeting, you will enter the virtual meeting room. Here, you will find different options and controls to interact with other participants and manage your audio settings.
Before proceeding with muting, make sure your audio devices, such as microphone and speakers or headphones, are properly connected and functioning. You can check your audio settings by clicking on the audio icon located at the bottom left corner of the Zoom meeting window. This will open the audio options menu, where you can select the appropriate audio input and output devices. It’s crucial to ensure that the correct devices are selected to avoid any audio issues during the meeting.
In addition, it’s a good practice to test your audio settings before entering the meeting. Zoom provides a built-in test feature that allows you to check the microphone and speaker volume in a virtual audio test meeting. To access this feature, click on the arrow next to the microphone icon in the audio options menu and select “Audio Settings.” Then, click on the “Test Mic” button to start the audio test. Follow the on-screen instructions to adjust the volume and verify that your audio is working correctly.
Once you’ve joined the meeting and ensured that your audio settings are in order, you’re ready to proceed to the next step – understanding the Zoom audio options.
Step 2: Understand Zoom Audio Options
Before you can effectively mute yourself or others in a Zoom meeting, it’s important to have a clear understanding of the Zoom audio options available to you. These options will allow you to customize your audio settings and make the necessary adjustments during the meeting.
The first audio option to be familiar with is the microphone mute button. This button, represented by a microphone icon, enables you to mute or unmute your own microphone. When your microphone is muted, other meeting participants will not be able to hear any audio from you. You can find the microphone mute button in the Zoom toolbar at the bottom of the meeting window. Simply click on the microphone icon to toggle between mute and unmute.
Next, we have the speaker volume controls. These controls allow you to adjust the volume of the sound coming from the meeting, whether it’s the audio from other participants, screen sharing, or videos. To access the speaker volume controls, click on the arrow next to the speaker icon in the Zoom toolbar. This will open a slider that you can move left or right to increase or decrease the volume.
Another important audio option is the audio settings menu. Located next to the microphone and speaker icons in the Zoom toolbar, clicking on this menu will open a list of audio settings and preferences. Here, you can select the preferred audio device, adjust the volume levels, and access advanced audio options such as echo cancellation and noise suppression. Take some time to explore these settings and make any necessary adjustments based on your personal preferences and the requirements of the meeting.
Lastly, Zoom also provides the option to test your speaker and microphone. This is particularly helpful if you’re experiencing any audio issues or want to ensure that your audio devices are functioning correctly. To access the test settings, click on the upward arrow next to the microphone and speaker icons in the Zoom toolbar. From the dropdown menu, select “Test Speaker & Microphone” to initiate the test. Follow the instructions provided to verify that your audio is working as intended.
By familiarizing yourself with these Zoom audio options, you’ll have the necessary tools to effectively manage your audio during a meeting. Next, we’ll move on to the practical steps of muting yourself using the Zoom toolbar.
Step 3: Mute Yourself Using the Zoom Toolbar
When participating in a Zoom meeting, there may be times when you need to mute yourself to avoid background noise or distractions. Thankfully, Zoom provides a user-friendly toolbar that allows you to easily mute and unmute yourself during the meeting. Here’s how you can do it:
1. Locate the Zoom toolbar at the bottom of the meeting window. You’ll find various icons and options here to manage your audio and video settings.
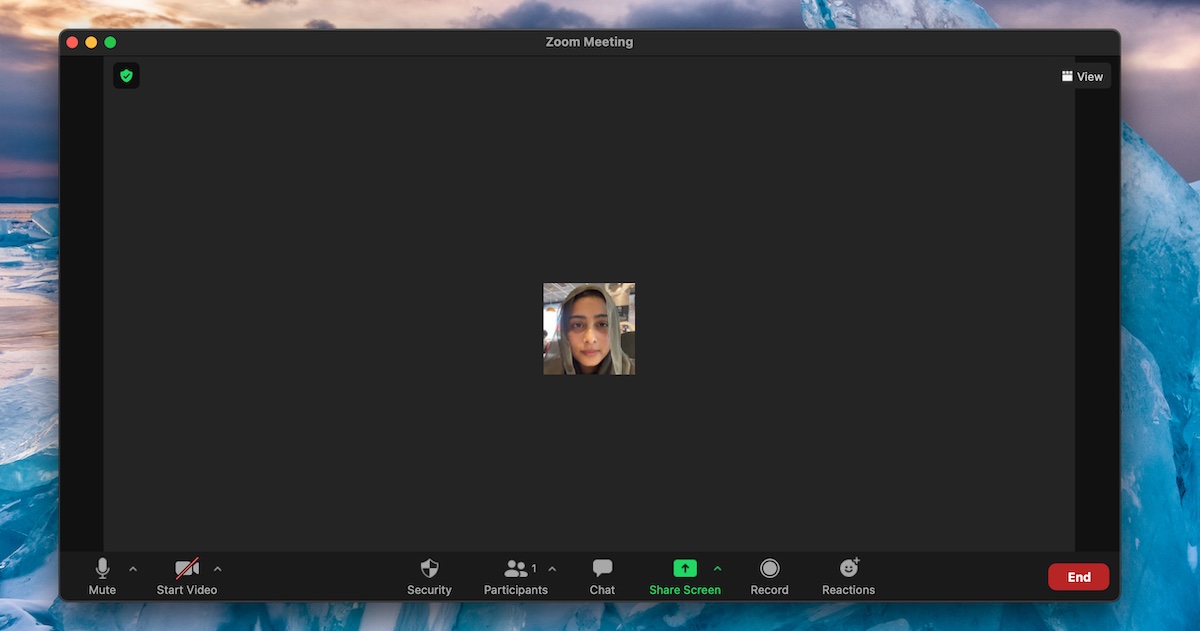
2. Look for the microphone icon, which represents the mute/unmute function. Click on it to toggle your microphone’s status between mute and unmute. When your microphone is muted, the icon will have a red diagonal line. Conversely, when it’s unmuted, the icon will be blue.
3. By muting yourself, you ensure that others in the meeting won’t be able to hear any sounds coming from your microphone. This is particularly useful if you’re in a noisy environment or if you need to cough or sneeze without interrupting the conversation.
4. If you want to speak during the meeting, simply click on the microphone icon again to unmute yourself. The icon will change to blue, indicating that your microphone is now active and others can hear you.
5. Remember to monitor your audio status throughout the meeting and adjust it as necessary. Keeping yourself muted when you’re not speaking helps maintain a clear and focused conversation for all participants.
Using the Zoom toolbar to mute yourself is a convenient and efficient way to control your audio during a meeting. As we move on to the next step, we’ll explore how to mute and unmute yourself using keyboard shortcuts, which can be even faster and more convenient.
Step 4: Mute and Unmute Yourself Using Keyboard Shortcuts
Did you know that Zoom offers keyboard shortcuts to help you quickly mute and unmute yourself during a meeting? Using keyboard shortcuts can be a time-saving and convenient method, especially if you prefer to keep your hands on the keyboard while participating in a Zoom call. Here’s how you can utilize keyboard shortcuts to mute and unmute yourself:
1. To mute yourself, simply press the “Alt” (Windows) or “Command” (Mac) key along with the “A” key. This shortcut will instantly mute your microphone, indicated by a red diagonal line over the microphone icon.
2. If you wish to unmute yourself, press the same keyboard shortcut combination again: “Alt” (Windows) or “Command” (Mac) + “A”. Your microphone will be unmuted, and you can speak freely in the meeting.
3. It’s important to note that keyboard shortcuts work regardless of whether you have the Zoom meeting window in focus or not. This means you can toggle your mute status even when another application or browser window is active.
4. Using the keyboard shortcuts for muting and unmuting is especially useful during presentations, where quick and seamless control over your audio is crucial. Instead of searching for the mute button in the toolbar, you can simply press the keyboard shortcut to instantly mute or unmute your microphone.
5. Additionally, mastering these keyboard shortcuts can also come in handy if you’re participating in a larger meeting and want to avoid accidentally unmuting yourself while someone else is speaking. With a simple key press, you can ensure that your microphone remains muted until you actively choose to unmute it.
By utilizing keyboard shortcuts, you can efficiently manage your microphone status without taking your focus away from the meeting or interrupting your workflow. As we move forward, we’ll explore the steps to mute and unmute others as the meeting host.
Step 5: Mute and Unmute Others as the Host
As the host of a Zoom meeting, you have the authority to manage the participants and maintain order in the discussion. One of the crucial responsibilities you may have is to mute and unmute others when necessary. This allows you to control the audio flow and prevent any disruptions. Here’s how you can mute and unmute others as the host:
1. To mute a participant, locate their video thumbnail in the Zoom meeting window. Hover your mouse over their video thumbnail, and you will see a set of options appear.
2. In the options that appear, click on the “Mute” button. This will mute the selected participant, disabling their microphone. The mute icon will be displayed on their video thumbnail to indicate their muted status.
3. If you want to unmute a participant, follow the same process. Hover over their video thumbnail and click on the “Unmute” button. This will enable their microphone, allowing them to speak in the meeting again.
4. Additionally, as the host, you have the capability to mute or unmute all participants at once if needed. To mute all participants, navigate to the Zoom toolbar at the bottom of the meeting window. Click on the “Manage Participants” button, which will open a participants list on the right side of the window.
5. Within the participants list, locate the “Mute All” button at the bottom. Click on this button to mute all participants simultaneously, ensuring a quiet environment for important announcements or presentations.
6. To unmute all participants, click on the “Unmute All” button located in the same section. This will allow everyone to have their microphones active again.
Remember that muting or unmuting others is an important responsibility as the host, and it should be done with consideration and communication. While it can be beneficial to mute participants to minimize background noise or prevent interruptions, it’s essential to encourage open dialogue and provide participants with opportunities to speak when appropriate.
By effectively managing the muting and unmuting of participants, you can foster a productive and engaging Zoom meeting environment.
Conclusion
Mastering the art of muting in Zoom meetings is essential for a seamless and focused virtual communication experience. Whether you need to mute yourself to avoid background noise or manage the audio of other participants as the host, understanding the various methods and options available can greatly enhance your meeting dynamics.
In this article, we’ve covered the steps to join a Zoom meeting and familiarize yourself with the audio options. We’ve also explored how to mute yourself using the Zoom toolbar and keyboard shortcuts, providing you with quick and convenient ways to control your audio. Additionally, as a host, you have the power to mute and unmute other participants, maintaining order and facilitating effective communication.
By utilizing these techniques, you can create a harmonious and distraction-free meeting environment. Muting yourself when appropriate helps to prevent background noise and maintain clarity in the conversation, while muting others as the host allows you to guide the discussion and avoid disruptions.
Remember to always be mindful of the meeting context and dynamics. Encourage open dialogue and provide opportunities for participants to speak, ensuring a balanced and inclusive conversation for all. Communication is key in virtual meetings, and knowing how to effectively use the mute feature is just one part of facilitating a successful and engaging discussion.
Now, armed with these insights and practical methods, you’re ready to confidently navigate the world of Zoom meetings and effectively manage your audio. So go ahead, join that meeting, and embrace the power of muting!