Introduction
Understanding the RAM (Random Access Memory) details of your Windows 10 computer is essential for troubleshooting issues, optimizing performance, and ensuring compatibility with software and hardware requirements. RAM plays a crucial role in the overall functioning of your computer, as it determines how efficiently your system can handle and process data.
In this article, we will explore the different methods to obtain RAM details in Windows 10. Whether you are a tech-savvy user or a beginner, these methods will help you quickly access the necessary information about your system’s memory.
By having a clear understanding of your system’s RAM specifications, you can make informed decisions when upgrading or adding additional memory modules. This knowledge also allows you to identify potential bottlenecks or issues that may arise due to insufficient memory capacity.
We will cover various ways to retrieve RAM details, such as using the Task Manager, System Information, Command Prompt, and PowerShell. Each method provides a different level of accessibility and information, giving you flexibility in choosing the one that best suits your needs and technical expertise.
Having a basic understanding of these methods will not only help you obtain RAM details in Windows 10 but also empower you to troubleshoot and diagnose potential memory-related problems. With this knowledge, you can take appropriate measures to optimize your system’s performance and ensure compatibility with resource-intensive applications.
Without further ado, let’s dive into the different methods you can use to retrieve RAM details in Windows 10.
Method 1: Using Task Manager
The Task Manager is a built-in utility in Windows 10 that provides real-time information about the performance of your computer, including details about your system’s RAM. Here’s how you can retrieve RAM details using Task Manager:
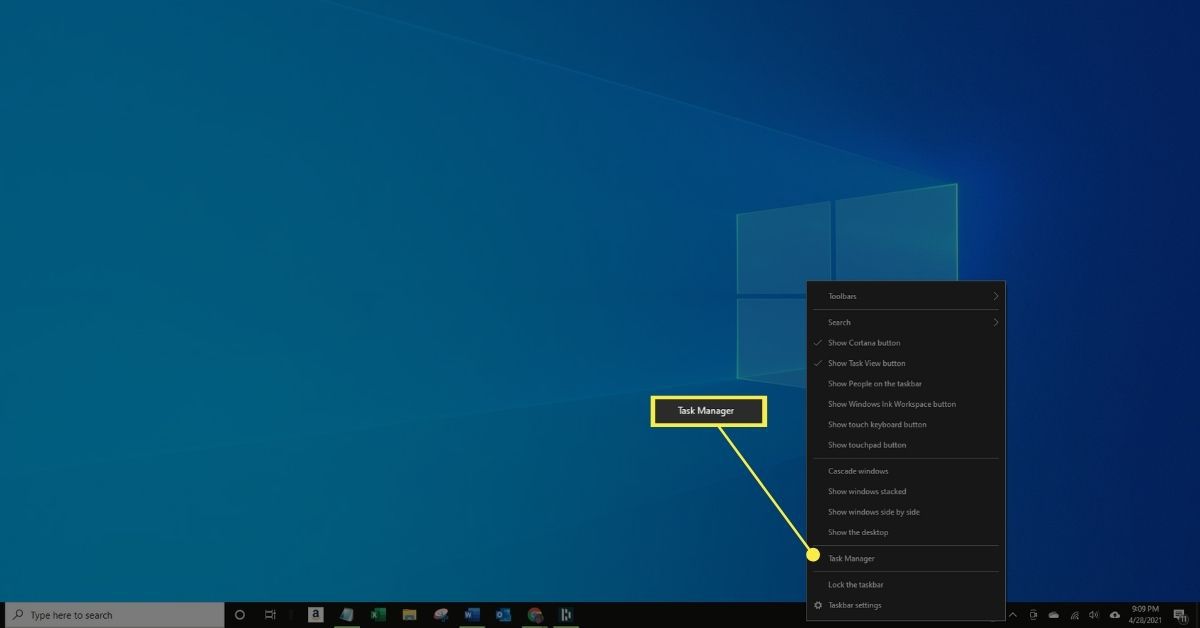
- Right-click on the taskbar and select “Task Manager” from the context menu. Alternatively, you can use the keyboard shortcut Ctrl + Shift + Esc to open Task Manager directly.
- Once Task Manager opens, click on the “Performance” tab.
- In the left-hand sidebar, click on “Memory” to view detailed information about your system’s RAM.
- Under the “Memory” section, you will find information such as “Total,” which indicates the total physical memory installed, “In Use,” which shows the amount of memory currently in use, and “Available,” which displays the amount of memory that is available for use.
- You can also view memory usage in graphical format by looking at the line graph displayed under the “Memory” section. This graph provides a visual representation of how your system’s memory is being utilized.
- If you wish to view more specific details about the processes consuming memory, click on the “Open Resource Monitor” link at the bottom of the Task Manager window. This will open the Resource Monitor utility, where you can explore memory usage in greater depth.
Using Task Manager is a quick and straightforward way to access basic information about your system’s RAM. It allows you to monitor memory usage in real-time and identify any anomalies or excessive memory consumption by specific processes. This information can be valuable for troubleshooting performance issues or managing memory-intensive tasks.
Now that you know how to retrieve RAM details using Task Manager, let’s explore another method to access even more comprehensive information about your computer’s memory.
Method 2: Using System Information
Another method to retrieve RAM details in Windows 10 is by using the System Information utility. System Information provides a comprehensive overview of your computer’s hardware and software configuration, including detailed information about your system’s RAM. Here’s how you can access this information:
- Press the Windows key + R on your keyboard to open the Run dialog box.
- Type “msinfo32” in the Run dialog box and hit Enter. This will open the System Information utility.
- In the System Information window, scroll down to find the “System Summary” section.
- Look for the “Installed Physical Memory (RAM)” field. This field will display the total amount of RAM installed on your system in bytes.
- Beneath the “Installed Physical Memory (RAM)” field, you will find additional information such as the memory slots used and available, as well as the maximum supported memory capacity of your system.
- For more detailed information about each memory module installed, click on the “+” icon next to “Components” in the left-hand sidebar of the System Information window. Then, click on “Memory” to expand the details.
- Under the “Memory” section, you will find detailed information about each RAM module, including the manufacturer, part number, speed, and capacity.
Using the System Information utility allows you to access more in-depth information about your system’s RAM. It provides specific details about each RAM module installed, allowing you to determine compatibility for future upgrades or replacements.
Now that you know how to retrieve detailed RAM information using the System Information utility, let’s explore another method—using the Command Prompt—to access RAM details in Windows 10.
Method 3: Using Command Prompt
Using the Command Prompt is another effective method to retrieve RAM details in Windows 10. The Command Prompt provides a command-line interface where you can execute various commands to access system information. Here’s how you can obtain RAM details using the Command Prompt:
- Open the Command Prompt by pressing the Windows key + R on your keyboard to open the Run dialog box. Type “cmd” in the Run dialog box and hit Enter.
- In the Command Prompt window, type the following command:
- Press Enter to execute the command.
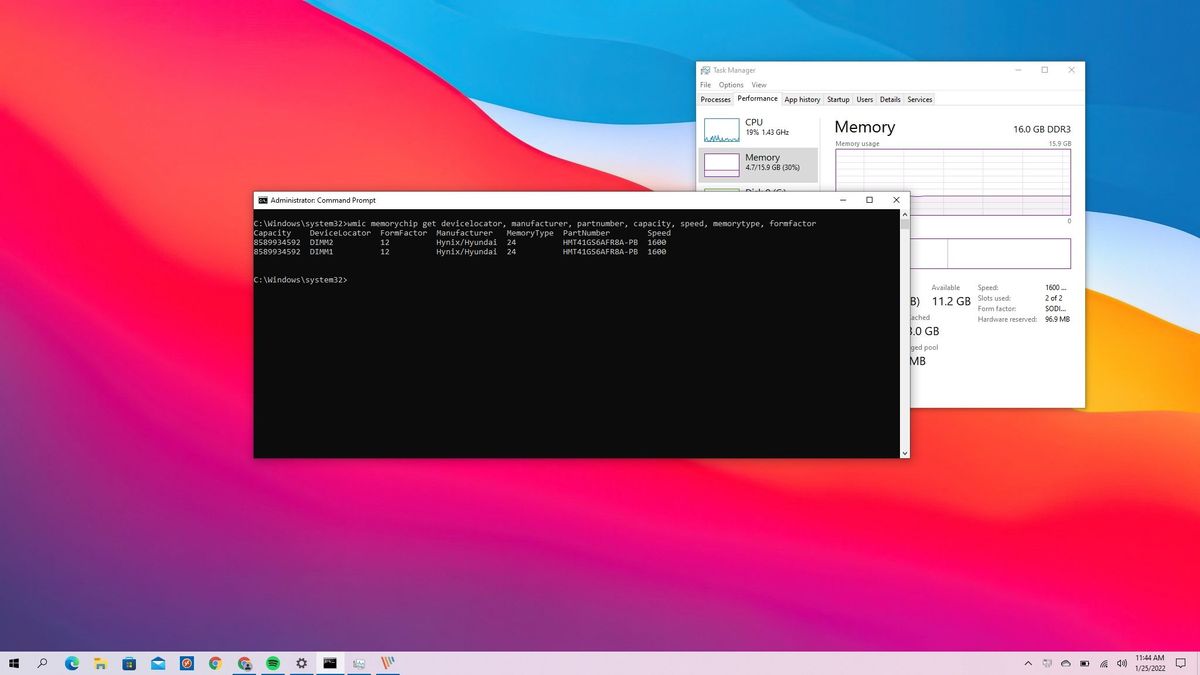
- The Command Prompt will display detailed information about each RAM module installed on your system. The information includes the manufacturer, part number, capacity, and speed of each memory module.
wmic memorychip get Manufacturer, PartNumber, Capacity, Speed
Using the Command Prompt gives you quick access to specific RAM details. You can use this information to verify the compatibility of your RAM modules, ensure they are functioning correctly, or plan for future upgrades.
Now that you know how to retrieve RAM details using the Command Prompt, let’s move on to the next method—using PowerShell—to access even more advanced information about your computer’s memory.
Method 4: Using PowerShell
PowerShell is a powerful command-line shell and scripting language that allows users to automate tasks and access system information. Using PowerShell, you can retrieve detailed RAM information in Windows 10. Here’s how:
- Open PowerShell by pressing the Windows key + X on your keyboard and selecting “Windows PowerShell” from the menu.
- In the PowerShell window, type the following command:
- Press Enter to execute the command.
- The PowerShell window will display a table with detailed information about each RAM module installed in your system. This includes the bank label, manufacturer, part number, capacity, and speed of each memory module.
Get-CimInstance -ClassName "Win32_PhysicalMemory" | Select-Object BankLabel, Manufacturer, PartNumber, Capacity, Speed
Using PowerShell gives you even more advanced access to RAM information. It allows you to retrieve specific details that can be helpful for troubleshooting, system configuration, or compatibility checks.
With these four methods—Task Manager, System Information, Command Prompt, and PowerShell—you now have multiple options to retrieve RAM details in Windows 10. Depending on your technical expertise and the level of detail you require, you can choose the method that best suits your needs.
Understanding your system’s RAM details is crucial for optimizing performance, managing memory-intensive tasks, and making informed decisions about memory upgrades or replacements. By utilizing these methods, you can gather the necessary information to ensure your computer’s memory is functioning optimally.
Now that you are familiar with these methods, you can confidently retrieve RAM details and enhance your Windows 10 experience.
Conclusion
Knowing how to retrieve RAM details in Windows 10 is essential for troubleshooting, optimizing performance, and making informed decisions about memory upgrades. In this article, we explored four different methods to obtain RAM information: using Task Manager, System Information, Command Prompt, and PowerShell.
Task Manager offers a quick and basic overview of memory usage, allowing you to monitor real-time data and identify memory-intensive processes.
System Information provides comprehensive details about installed RAM modules, including capacity, speed, and compatibility information, helping you plan for future upgrades or replacements.
Command Prompt allows you to execute commands to retrieve specific RAM details, making it useful for quick checks or troubleshooting purposes.
PowerShell offers advanced access to RAM information, enabling you to retrieve in-depth details and automate tasks related to memory management.
By utilizing these methods, you can gather the necessary information about your system’s RAM, ensuring smooth functionality, optimal performance, and compatibility with resource-intensive applications.
Understanding your computer’s RAM details empowers you to address memory-related issues, optimize performance, and make informed decisions when it comes to upgrading or replacing memory modules. This knowledge plays a crucial role in maximizing the capabilities of your Windows 10 computer.
Now that you are familiar with these methods, you can confidently retrieve RAM details whenever necessary, enabling you to effectively manage your system’s memory resources.
So go ahead and explore these methods to retrieve RAM details in Windows 10, and make the most out of your computer’s memory for an optimized computing experience.