Introduction
Welcome to our guide on how to check the RAM in Windows 10. RAM, or Random Access Memory, is a crucial component of your computer’s hardware. It stores temporary data and allows your computer to access and execute tasks quickly. Checking your RAM is essential for troubleshooting any performance issues and determining if your system meets the requirements for certain applications or games.
In this article, we will explore different methods to check your RAM on Windows 10. We will cover the utilization of Task Manager, System Information, Command Prompt, and PowerShell. Each method offers its own advantages and provides different levels of detail about your computer’s RAM.
Whether you want to ensure your current RAM is functioning correctly, need to find out how much RAM is installed on your system, or want to see how much memory is being used during specific tasks, this guide has you covered.
Before we dive into the different methods, it’s important to note that checking your RAM does not require any advanced technical knowledge. You can easily follow along regardless of your computer expertise. All the methods mentioned here are built-in features of Windows 10, so you won’t need to install any additional software or tools.
Without further ado, let’s jump right in and explore the various ways to check your RAM on Windows 10.
Checking RAM with Task Manager
Task Manager is a powerful built-in utility in Windows 10 that allows you to monitor and manage running processes, performance, and, of course, check your system’s RAM usage. Here’s how you can use Task Manager to check your RAM:
- Open Task Manager by right-clicking on the taskbar and selecting “Task Manager” from the menu, or by pressing the Ctrl, Shift, and Esc keys simultaneously.
- Once Task Manager is open, click on the “Performance” tab at the top.
- In the left-hand sidebar, select “Memory”. Here, you will find detailed information about your current RAM usage, including the amount of total physical memory, available memory, and how much memory is being used by different processes and applications.
- You can also find a visual representation of your RAM usage in the form of a graph. The green portion represents the used memory, while the blue portion represents the available memory.
- If you want to dig deeper into the memory usage of individual processes, click on the “Open Resource Monitor” link at the bottom of the Task Manager window. The Resource Monitor provides more in-depth information about your memory usage, including the processes consuming the most memory.
Task Manager is a straightforward and convenient way to get a quick overview of your RAM usage. It allows you to monitor your system’s performance in real-time and identify any applications or processes that may be causing excessive memory usage.
It’s worth noting that Task Manager can also be used to end unresponsive processes, launch new applications, and manage startup programs. So, it’s a handy tool to have in your arsenal for troubleshooting and optimizing your computer’s performance.
Checking RAM with System Information
Another method to check your RAM in Windows 10 is by using the System Information tool. System Information provides a comprehensive overview of your computer’s hardware and software configurations, including your RAM details. Here’s how you can use System Information to check your RAM:
- Open the Start menu and type “System Information” in the search bar. Click on the “System Information” app from the search results to open it.
- Once the System Information window appears, navigate to the “System Summary” section in the left-hand panel.
- In the right-hand pane, scroll down until you find the “Installed Physical Memory (RAM)” field. The value displayed next to it represents the total amount of RAM installed on your computer.
- Along with the total installed RAM, you can also view other details such as the RAM speed, manufacturer, and more.
System Information offers a straightforward and detailed overview of your computer’s hardware, making it an excellent choice for checking your RAM specifications. It’s particularly useful if you’re looking to upgrade your RAM and want to ensure compatibility with your existing hardware.
Remember that System Information not only provides information about your RAM but also other crucial details about your system, such as the processor, operating system, disk drives, and more. It’s a valuable tool for getting a holistic view of your computer’s specifications.
Using the System Information tool is a reliable and straightforward way to check your RAM information without the need for any additional software or technical expertise.
Checking RAM with Command Prompt
If you prefer using the command line, you can check your RAM in Windows 10 using the Command Prompt. The Command Prompt provides a quick and efficient way to access system information, including your RAM specifications. Here’s how you can use the Command Prompt to check your RAM:
-
- Open the Start menu and type “Command Prompt” in the search bar. Right-click on the “Command Prompt” app from the search results and select “Run as administrator” to open it with administrative privileges.
- In the Command Prompt window, type the following command and press Enter:
wmic memorychip get capacity
-
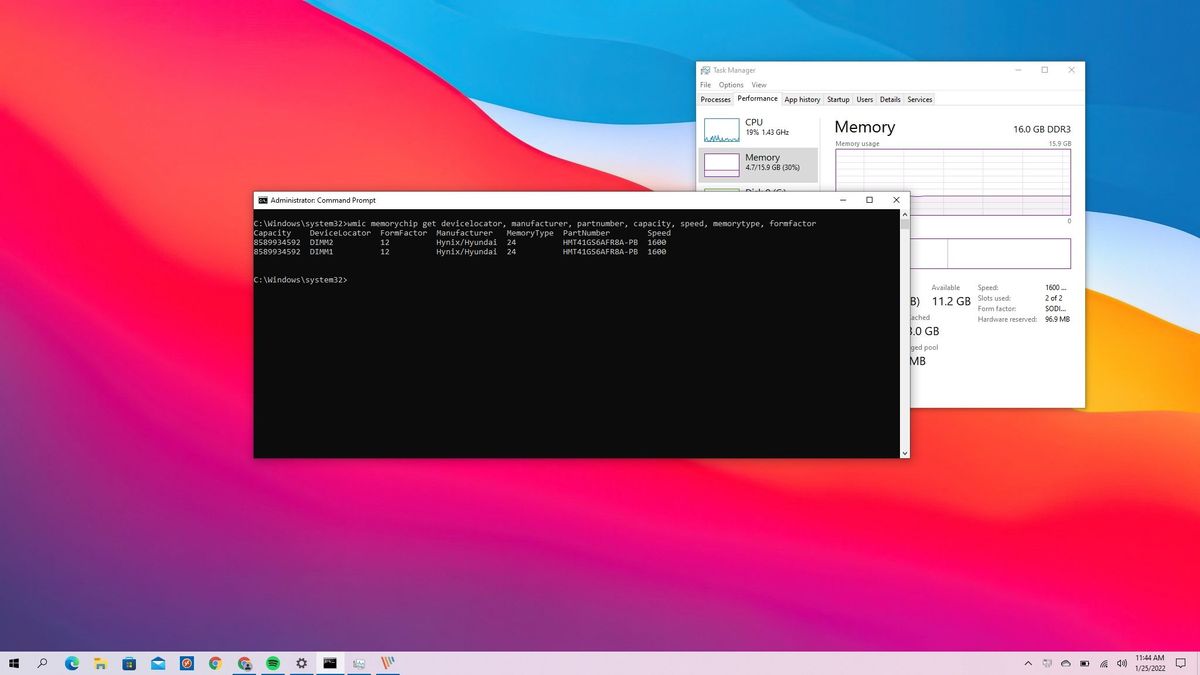
- The Command Prompt will display the capacity of each RAM module installed on your computer, expressed in bytes. You can convert the value to a more readable format by dividing it by 1,073,741,824 for gigabytes (GB).
- Additionally, you can use the following command to get more detailed information about your RAM:
wmic memorychip get Manufacturer, PartNumber, Speed, Capacity
- This command will provide information such as the RAM manufacturer, part number, speed, and capacity for each installed module.
The Command Prompt method is especially useful if you prefer using the command line interface or if you need to retrieve RAM information in a script or automate the process. It provides a concise and direct way to access the necessary details without any graphical interfaces.
Keep in mind that the Command Prompt offers various other commands and utilities that can help you gather system information and perform advanced troubleshooting tasks. Exploring the Command Prompt can unlock a whole new level of control and customization for your Windows 10 system.
Checking RAM with PowerShell
If you’re familiar with PowerShell, you can leverage its capabilities to check your RAM in Windows 10. PowerShell is a powerful scripting and automation platform that provides a more advanced and flexible approach to system management. Here’s how you can use PowerShell to check your RAM:
-
- Open the Start menu, type “PowerShell” in the search bar, and click on the “Windows PowerShell” app from the results. Make sure to select the one that says “Windows PowerShell” and not “Windows PowerShell (ISE)”.
- Once PowerShell is open, type the following command and press Enter:
Get-CimInstance -ClassName Win32_PhysicalMemory | Select-Object -Property Manufacturer, PartNumber, Speed, Capacity
-
- This PowerShell command retrieves detailed information about your physical memory, including the manufacturer, part number, speed, and capacity of each RAM module installed on your computer.
- You can also use the following command to get a summary of the total installed RAM:
(Get-WmiObject -Class Win32_ComputerSystem).TotalPhysicalMemory
- The output will show the total amount of RAM installed on your system, expressed in bytes. You can divide the value by 1,073,741,824 to convert it to gigabytes (GB).
Powershell provides a powerful and flexible way to retrieve detailed information about your RAM and other system components. It allows for more advanced scripting and automation capabilities, making it an excellent choice for system administrators and power users.
By using PowerShell, you can not only check your RAM but also perform various system management tasks, automate processes, and gather extensive system information. It’s a versatile tool that provides a deeper level of control and customization for your Windows 10 environment.
Conclusion
Checking your RAM on Windows 10 is a crucial step in troubleshooting performance issues and ensuring your system meets the requirements for specific software applications or games. In this guide, we explored various methods to check your RAM using built-in Windows 10 tools.
We started with the Task Manager, which provides a quick overview of your RAM usage and allows you to monitor running processes. Then, we moved on to the System Information tool, which offers a comprehensive view of your computer’s hardware specifications, including RAM details.
For those who prefer the command line interface, we discussed how to use the Command Prompt to retrieve RAM information using simple commands. And finally, we explored the capabilities of PowerShell, a more advanced scripting and automation platform that provides detailed and customizable RAM information.
Whether you choose to use Task Manager, System Information, Command Prompt, or PowerShell, each method offers its own advantages in terms of simplicity, level of detail, and flexibility. Select the method that suits your preferences and technical expertise.
Remember, checking your RAM is not just limited to troubleshooting; it also helps you make informed decisions about upgrading your system’s memory and optimizing overall performance.
By following the steps outlined in this guide, you can easily check your RAM on Windows 10 and gain valuable insights into your computer’s memory capabilities. Utilize the method that best suits your needs and continue to enjoy a smooth and efficient computing experience.