Introduction
Welcome to our guide on how to fix the screen of your Chromebook. Chromebooks are popular lightweight laptops that run on Chrome OS, a user-friendly operating system developed by Google. However, like any electronic device, Chromebook screens can sometimes encounter issues and require troubleshooting.
Whether you’re dealing with a blank screen, flickering display, or unresponsive touchpad, there are several troubleshooting steps you can take to resolve the problem. In this guide, we will walk you through common solutions to help you get your Chromebook screen back to normal.
Before we dive into the troubleshooting tips, it’s important to note that some screen issues may require professional assistance or contacting support. If you are not comfortable performing the troubleshooting steps or believe the problem may be due to physical damage, it’s always best to seek help from a professional technician or reach out to the manufacturer’s support team.
Now let’s get started with some basic troubleshooting tips to fix your Chromebook screen.
Troubleshooting Tips
When dealing with a Chromebook screen issue, it’s helpful to follow a systematic approach to narrow down the root cause. Here are some troubleshooting tips to get you started:
- Check for Physical Damage: Sometimes, screen issues can be a result of physical damage. Inspect your Chromebook screen for cracks, scratches, or any other visible signs of damage. If you notice any, it may require professional repair.
- Adjust the Screen Brightness: The screen may appear dark or dim due to incorrect brightness settings. To adjust the brightness, locate the brightness keys on your keyboard (usually represented with a sun icon) and press the respective function key to increase or decrease the brightness.
- Restart Your Chromebook: A simple restart can often resolve software-related issues. Press the power button and select the “Restart” option to reboot your Chromebook. This can help clear any temporary glitches or conflicts that may affect the screen.
- Update Chrome OS: Outdated software can sometimes cause screen problems. Ensure that your Chromebook is running the latest version of Chrome OS. To check for updates, click on the clock in the bottom-right corner, select the Settings icon, click on “About Chrome OS,” and then select “Check for Updates.”
- Reset Chromebook Display Settings: Incorrect display settings can result in screen abnormalities. To reset the display settings, press the “Power” button and the “Refresh” key simultaneously for a few seconds. Release the buttons, and your Chromebook will restart with default display settings.
- Check Display Cable Connections: Loose or faulty display cable connections can cause screen issues. Power off your Chromebook, then carefully disconnect and reconnect the display cable. Ensure it is properly seated and secured.
- Perform a Powerwash: A powerwash erases all data from your Chromebook and restores it to its factory settings. This step should only be taken as a last resort after backing up your important files. To perform a powerwash, go to Settings, choose “Advanced,” then click on “Powerwash” and follow the prompts.
- Contact Support or Seek Professional Help: If the above troubleshooting steps do not resolve the screen issue, it may be time to seek professional help. Contact the manufacturer’s support team or consult a certified technician for further assistance.
By following these troubleshooting tips, you can often resolve common Chromebook screen issues on your own. Remember to stay patient and cautious throughout the process, and always seek professional assistance if you are unsure or uncomfortable performing any steps.
Checking for Physical Damage
When encountering a screen problem with your Chromebook, it is essential to start by checking for any physical damage. Physical damage to the screen, such as cracks or scratches, can result in various display issues. Here’s how to examine your Chromebook for signs of physical damage:
First, visually inspect the screen for any noticeable cracks, scratches, or other damages. Use a soft cloth to wipe away any smudges or fingerprints that may obstruct your view. If you notice any damage, it is likely the cause of your screen issues and will require professional repair or replacement.
Additionally, examine the surrounding bezel and frame of your Chromebook. Look for any signs of impact or bending that may have occurred, as this can also affect the screen’s performance.
If you cannot find any visible damage, gently press on the screen to see if there are any abnormal spots or areas of discoloration. Be careful not to apply too much pressure to avoid further damage.
It is worth noting that physical damage may not always be obvious. Sometimes, the internal components or connections may be affected, leading to screen issues without any external signs. If you suspect internal damage, it is best to seek professional assistance rather than attempting to fix it yourself.
Remember, DIY repairs can worsen the situation if you are uncertain or inexperienced. It is always safer and more effective to rely on the expertise of professionals when dealing with physical damage to your Chromebook screen.
If you determine that physical damage is the cause of the screen issues, contact the manufacturer or authorized repair center to discuss your options. They will guide you on the next steps to get your Chromebook screen repaired or replaced.
Adjusting the Screen Brightness
One common issue that Chromebook users encounter is a dark or dim screen. This can make it difficult to see the content clearly. Thankfully, adjusting the screen brightness is a straightforward troubleshooting step that can often resolve this problem. Here’s how you can adjust the screen brightness on your Chromebook:
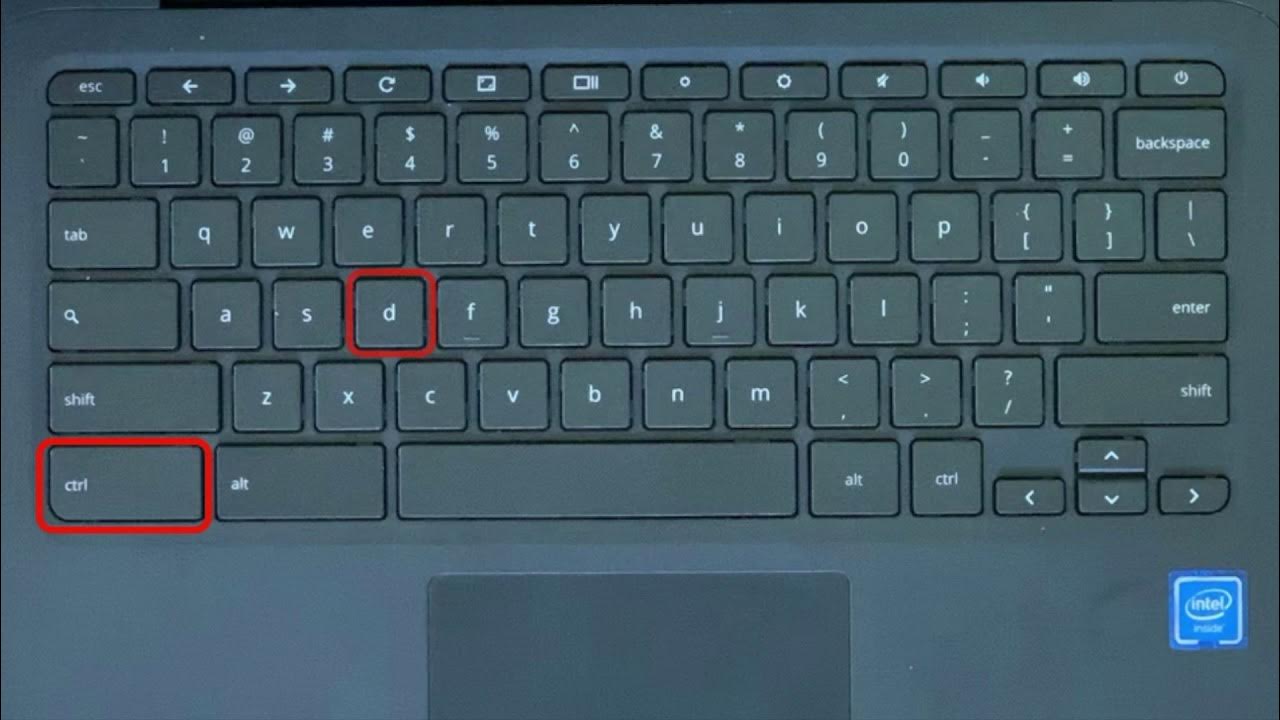
Look for the brightness keys on your Chromebook’s keyboard. These keys are usually represented with a sun icon and are located on the top row of the keyboard.
Press the brightness key together with the corresponding function key to increase or decrease the screen brightness. On most Chromebooks, you will need to press the “Alt” or “Function” key simultaneously with the brightness key.
As you adjust the brightness, pay attention to the screen and observe any changes. Increase the brightness if the screen appears too dark, or decrease it if the screen is too bright.
Take note that the location of the brightness keys may vary slightly depending on the model of your Chromebook. If you can’t find the specific keys, refer to your Chromebook’s user manual or the manufacturer’s support website for detailed instructions.
In some cases, a malfunctioning brightness key may prevent you from adjusting the screen brightness. If this happens, you can manually adjust the brightness through the Chrome OS settings:
- Click on the clock in the bottom-right corner of the screen to open the Quick Settings menu.
- Select the gear icon to access the Settings menu.
- In the Settings menu, click on “Display” in the left-hand sidebar.
- Locate the “Brightness level” slider and adjust it to your desired brightness level.
After adjusting the brightness, observe the screen to see if the issue is resolved. If the screen remains dark or dim, proceed to the next troubleshooting step.
Remember, a dim screen could also be caused by other factors such as a low battery or a power-saving mode enabled on your Chromebook. Make sure your Chromebook is properly charged and check the power settings to ensure they are not affecting the screen brightness.
By adjusting the screen brightness either through the keyboard keys or the Chrome OS settings, you can often alleviate dark or dim screen issues on your Chromebook.
Restarting the Chromebook
Restarting your Chromebook is a simple but effective troubleshooting step that can resolve various software-related issues, including screen problems. When you encounter a screen issue such as a frozen display or unresponsive touchpad, it is often caused by temporary glitches or conflicts that can be cleared by performing a restart. Here’s how to restart your Chromebook:
- Locate the power button on your Chromebook. It is usually located on the side or the top row of the keyboard.
- Press and hold the power button until a menu appears on the screen.
- Select “Restart” from the menu options using the arrow keys on the keyboard.
- Press the Enter key to initiate the restart process.
Alternatively, you can perform a restart by clicking on the clock in the bottom-right corner of the screen to access the Quick Settings menu. Next, click on the power icon and select “Restart” from the options provided.
After initiating the restart, your Chromebook will shut down and then automatically reboot. This process may take a few moments, so be patient and allow it to complete.
Once your Chromebook has restarted, check to see if the screen issue has been resolved. In many cases, a simple restart can clear any temporary software glitches or conflicts that may have caused the screen problem.
If the screen issue persists after the restart, proceed to the next troubleshooting step. It is worth noting that a restart may not fix hardware or more persistent software issues, and further troubleshooting may be required.
Restarting your Chromebook periodically is also a good preventive measure to keep the system running smoothly and avoid potential software-related problems. It helps refresh the system and clear any temporary files or processes that could impact performance.
By restarting your Chromebook, you can often address screen issues caused by temporary software glitches, providing a fresh start for your device.
Updating Chrome OS
Updating Chrome OS is an important step in troubleshooting screen issues on your Chromebook. Outdated software can sometimes cause compatibility issues and lead to various display problems. By ensuring that your Chromebook is running the latest version of Chrome OS, you can often resolve these issues. Here’s how to update Chrome OS:
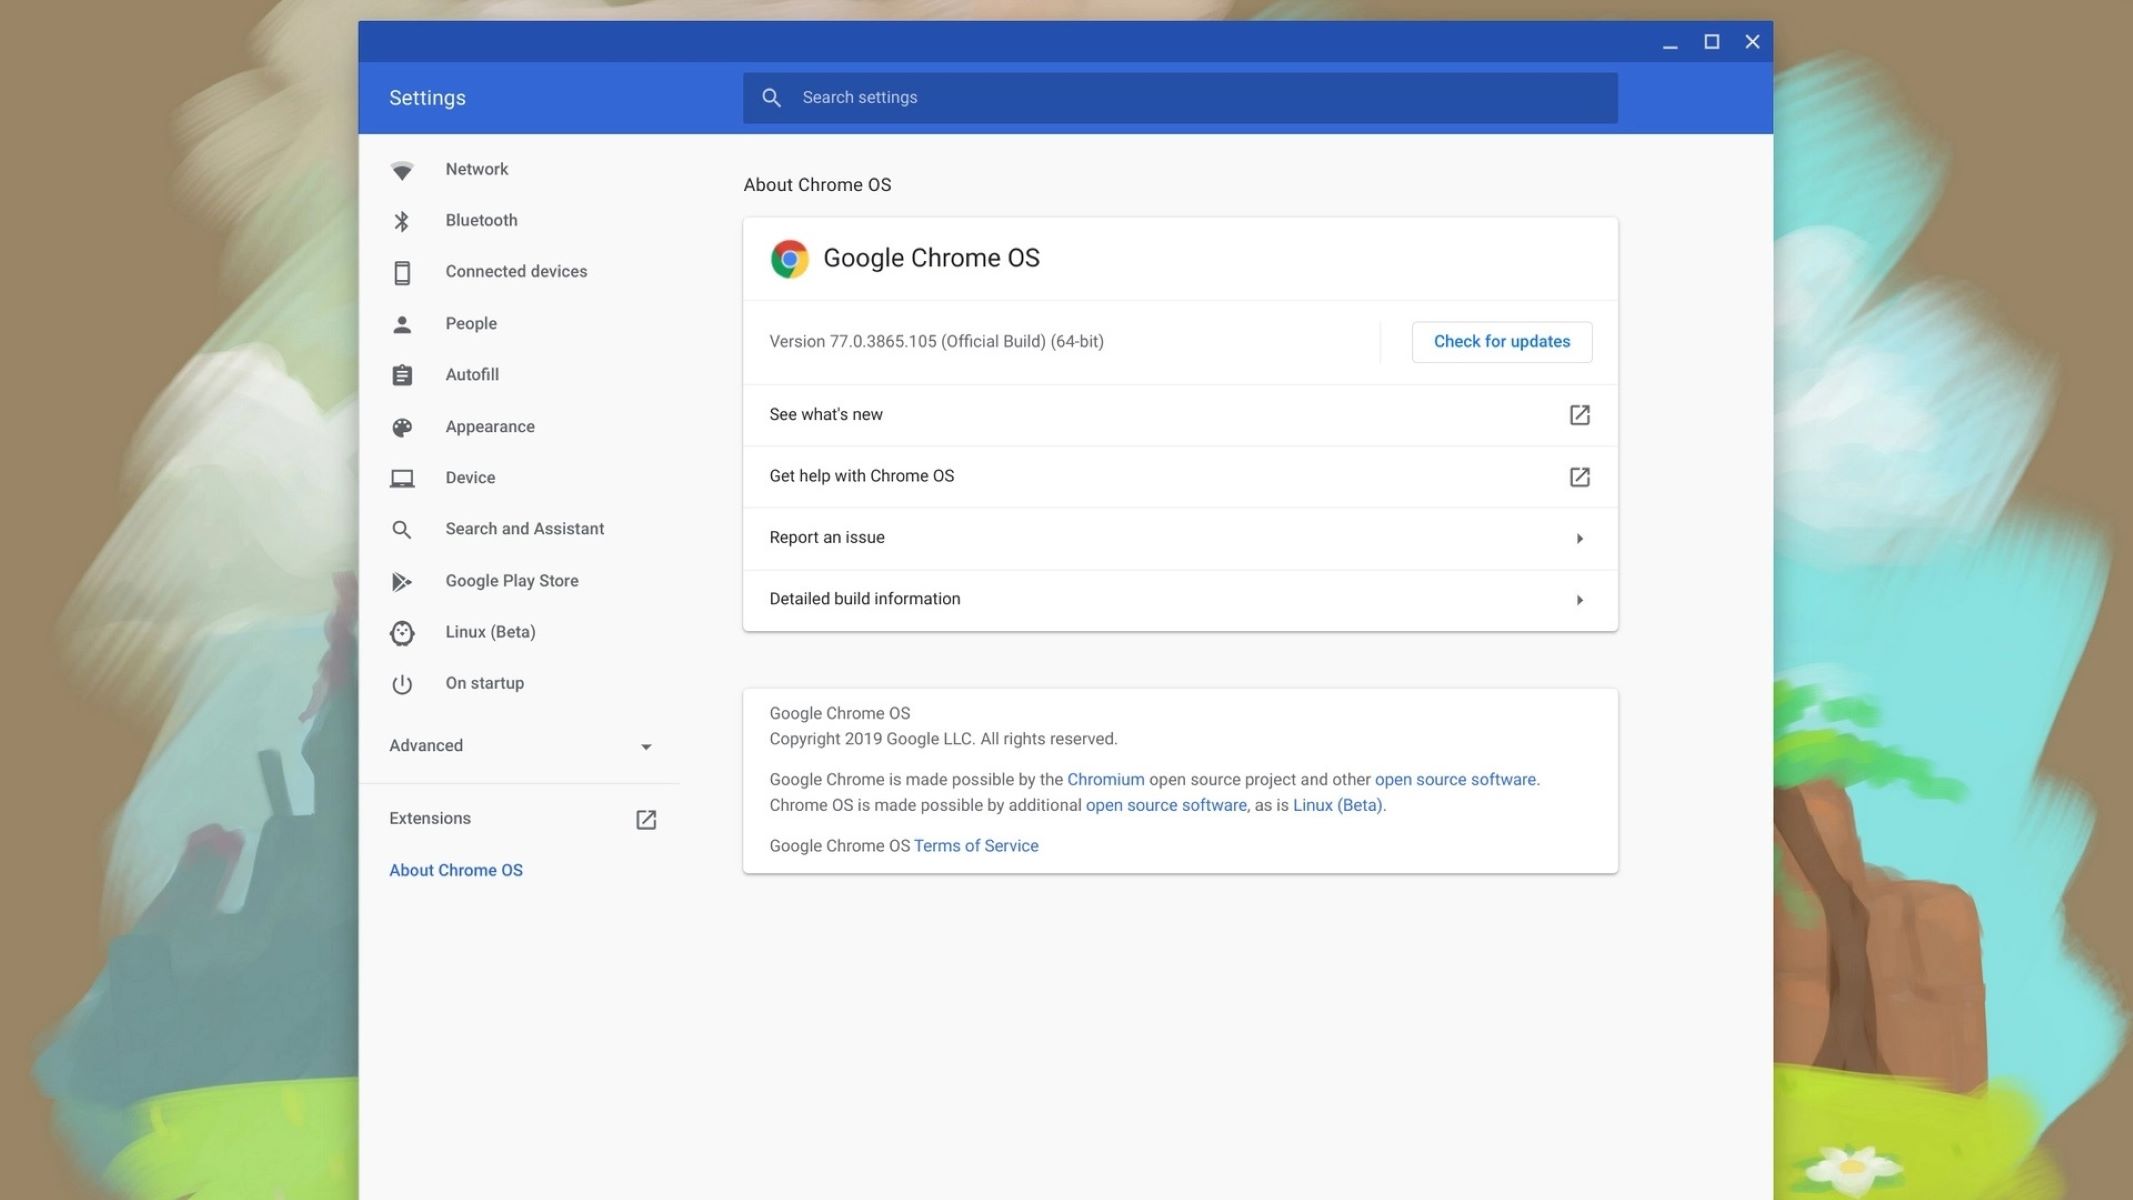
- Click on the clock in the bottom-right corner of your Chromebook’s screen. This will open the Quick Settings menu.
- Select the gear icon to access the Settings menu.
- In the Settings menu, scroll down and click on “About Chrome OS” on the left-hand sidebar.
- On the “About Chrome OS” page, click on the “Check for Updates” button.
- Your Chromebook will start checking for available updates. If any updates are found, they will be downloaded and installed automatically.
- Once the update process is complete, you will be prompted to restart your Chromebook to apply the updates. Click on the “Restart to update” button.
During the update process, it is essential to keep your Chromebook connected to a stable internet connection to ensure a smooth download and installation.
After your Chromebook restarts, the updated version of Chrome OS will be applied. Check to see if the screen issue is resolved. In many cases, updating Chrome OS can fix compatibility problems and improve system stability, which can ultimately resolve screen-related issues.
If there are no available updates or if the screen issue persists after updating Chrome OS, proceed to the next troubleshooting step.
Regularly checking for and installing Chrome OS updates is vital for optimal performance and security. Google releases updates frequently, which include bug fixes, improvements, and new features. Keeping your Chromebook up to date ensures that you have the latest software enhancements and bug fixes, potentially resolving screen issues and other problems you may encounter.
Remember to periodically check for updates to keep your Chromebook running smoothly and to address any potential software-related screen issues.
Resetting Chromebook Display Settings
If you’re experiencing persistent screen issues on your Chromebook, resetting the display settings to their default values can often be a helpful troubleshooting step. Incorrect display settings can lead to abnormal screen behavior or distorted visuals. Here’s how to reset the display settings on your Chromebook:
- Press and hold the “Power” button on your Chromebook until it turns off completely.
- Next, locate the “Refresh” key on your Chromebook’s keyboard. On most models, it is labeled with a circular arrow icon.
- While holding down the “Refresh” key, press and release the “Power” button to turn on your Chromebook.
- Continue holding down the “Refresh” key until you see a screen with a message saying, “Chrome OS is missing or damaged.”
- Release the “Refresh” key and wait for your Chromebook to go through the recovery process. This may take a few minutes.
During the recovery process, the display settings on your Chromebook will be reset to their default values. This includes settings like screen resolution, color calibration, and orientation.
Note that resetting the display settings will not erase any of your files or personal data. It only restores the display settings to their default state.
After the recovery process is complete, your Chromebook will restart. Once it has restarted, check to see if the screen issue is resolved. If the problem persists, proceed to the next troubleshooting step.
Resetting the display settings can be an effective way to eliminate any incorrect configurations that may be causing screen issues on your Chromebook. It provides a fresh start for the display settings and can help restore normal functionality.
Keep in mind that if the screen issues persist after resetting the display settings, there may be other underlying causes, such as hardware problems or software conflicts. In such cases, it is recommended to contact support or seek professional assistance for further troubleshooting.
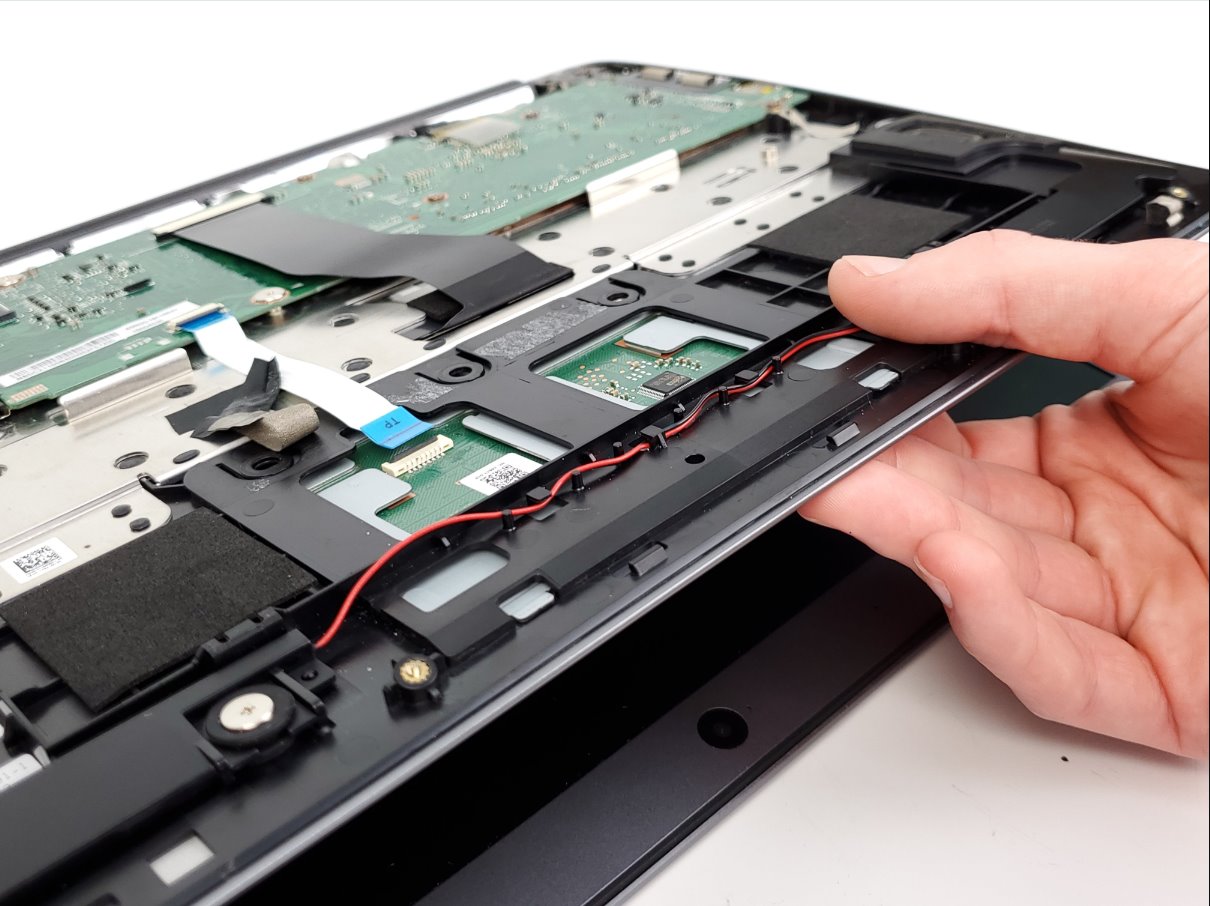
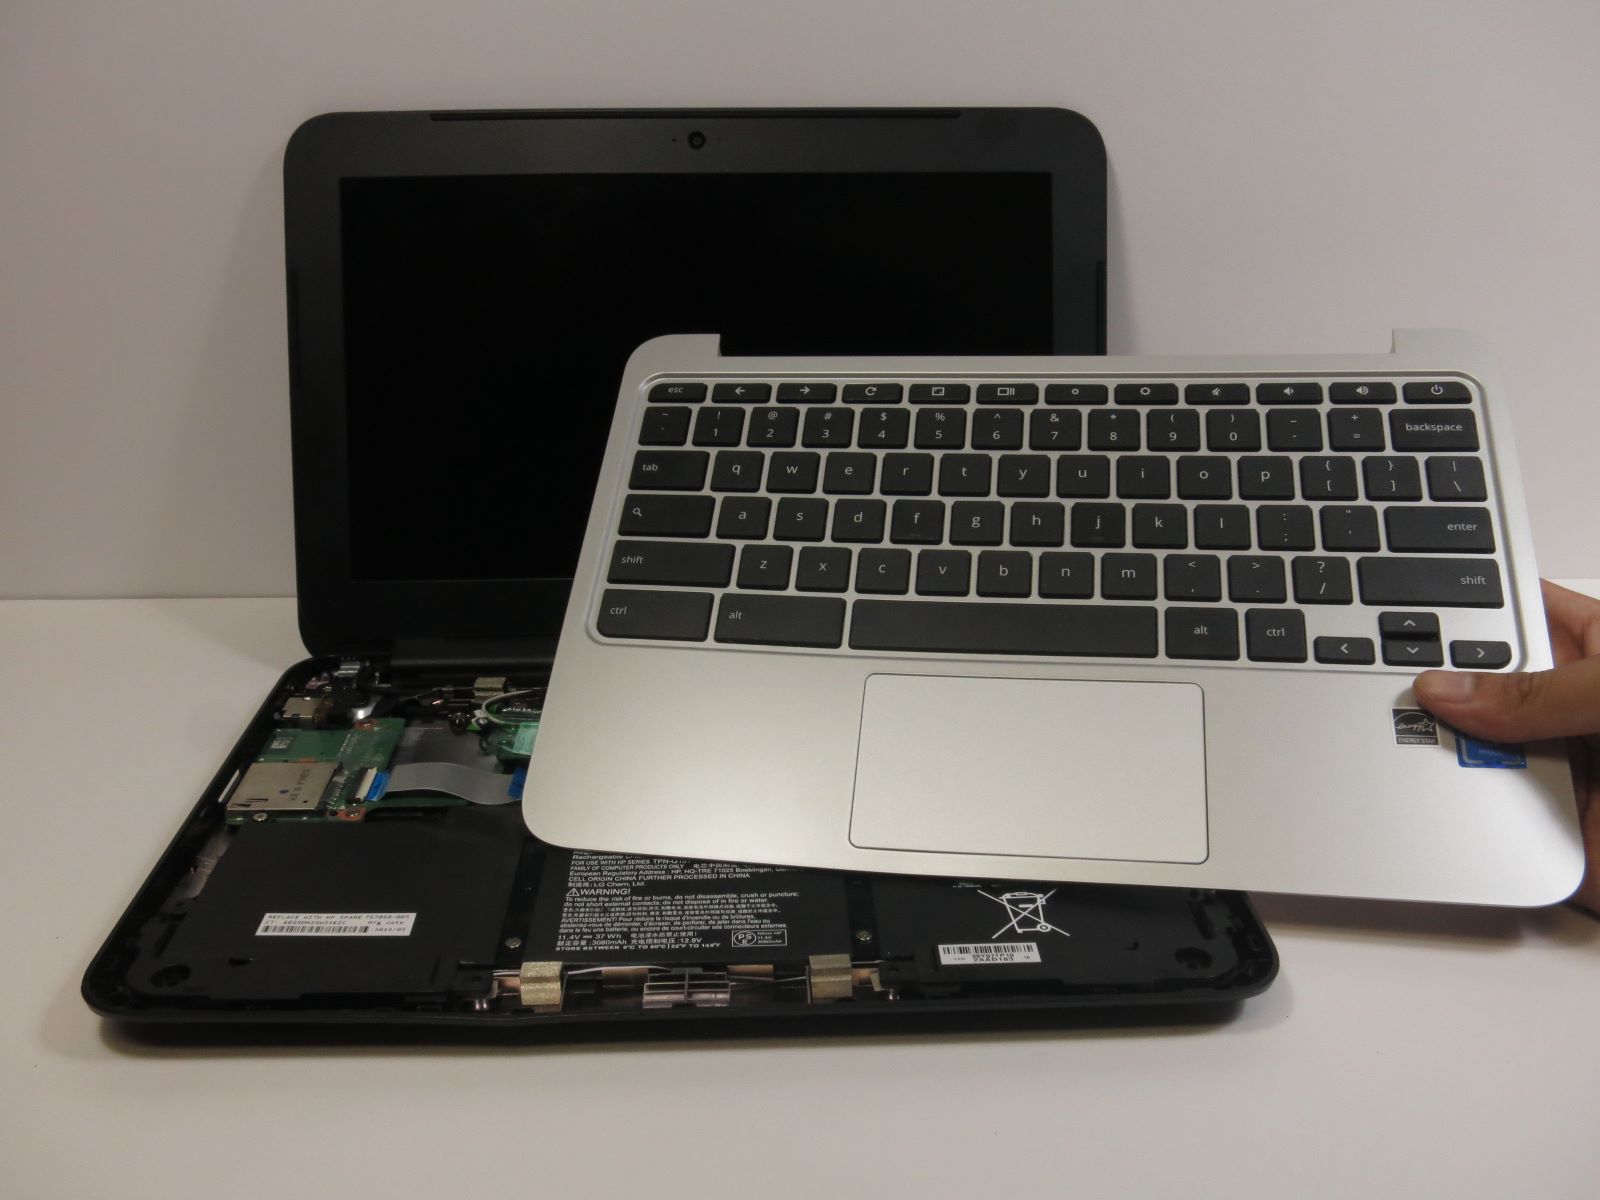
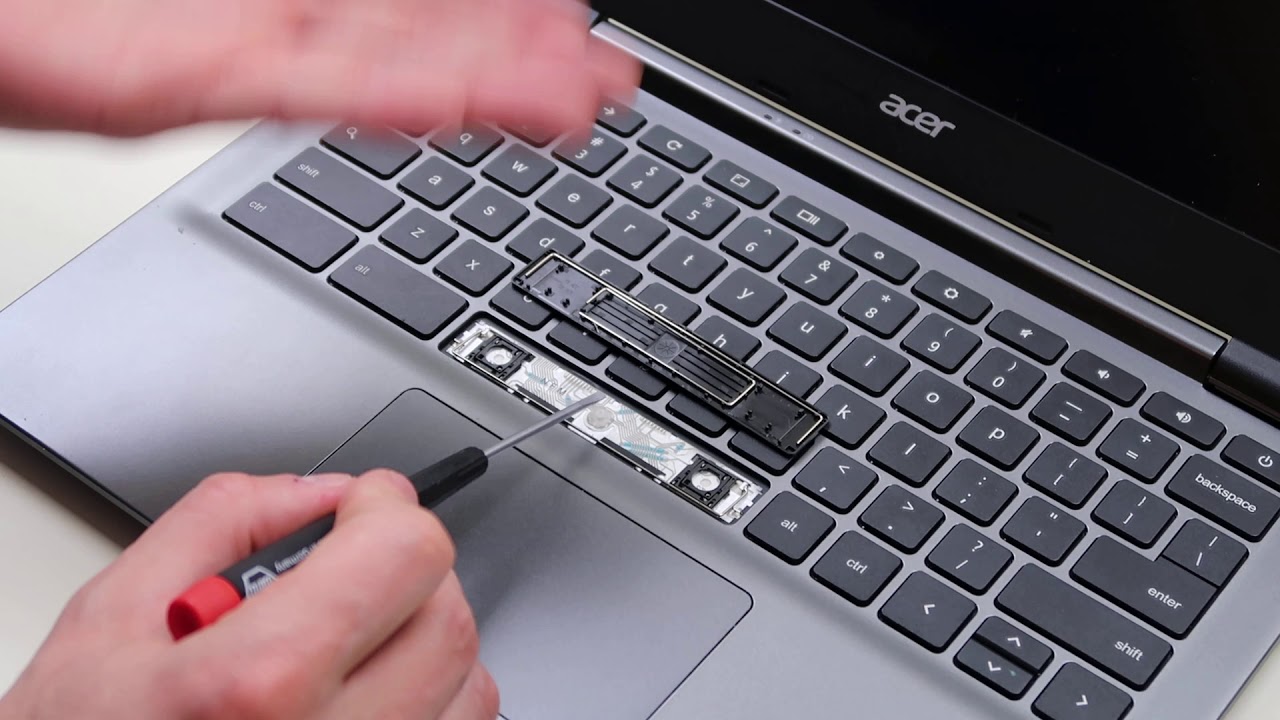
Checking the Display Cable Connections
Loose or faulty display cable connections can contribute to screen issues on your Chromebook. These connections can become loose over time, resulting in a distorted or non-functional display. Checking and ensuring the proper connection of the display cables can help resolve such problems. Here’s how to check the display cable connections on your Chromebook:
- Power off your Chromebook completely.
- Close the lid and flip your Chromebook over to expose the bottom.
- Using a screwdriver or a similar tool, carefully remove the screws securing the bottom panel of your Chromebook.
- Gently lift off the bottom panel, being mindful of any attached cables or fragile components.
- Locate the display cable connections near the screen and motherboard. They may be covered by protective tape or a metal shielding.
- Inspect the connections to ensure they are secure and free from any visible damage, such as bent pins or loose connectors.
- If a connection seems loose, carefully disconnect it and reseat it firmly to ensure a proper connection.
- Once you’ve checked all the display cable connections, reattach the bottom panel of your Chromebook by aligning it properly and tightening the screws.
- Turn on your Chromebook and check if the screen issues have been resolved.
It’s important to exercise caution when working with the internal components of your Chromebook. Make sure to follow any specific instructions provided by the manufacturer to avoid damaging the device.
If you’re unsure about handling the internal components or if the screen issue persists even after checking the display cable connections, it is advisable to seek professional help or contact the manufacturer’s support team for further assistance. They will guide you on the appropriate steps to resolve the issue without causing any further damage.
Checking the display cable connections is a proactive troubleshooting step that can address screen issues caused by loose or faulty connections. Keeping these connections secure ensures a reliable and properly functioning display on your Chromebook.
Performing a Powerwash
If you’ve exhausted other troubleshooting methods and are still experiencing persistent screen issues on your Chromebook, performing a powerwash can help resolve software-related problems. A powerwash essentially restores your Chromebook to its factory settings, erasing all data and settings. Here’s how to perform a powerwash:
- Click on the clock in the bottom-right corner of your Chromebook’s screen to open the Quick Settings menu.
- Select the gear icon to access the Settings menu.
- In the Settings menu, scroll down and click on “Advanced” to expand the options.
- Scroll further and click on “Powerwash.”
- A pop-up window will appear, explaining what a powerwash does. Read the information carefully.
- If you’re ready to proceed, click on the “Restart” button.
- Your Chromebook will restart and go through the powerwash process. This may take some time, so be patient and wait for it to complete.
- Follow the on-screen instructions to set up your Chromebook with your Google account and other preferences.
It’s important to note that performing a powerwash will remove all files and data from your Chromebook, including downloads, bookmarks, and settings. Therefore, it’s crucial to back up any important files or data before proceeding.
After the powerwash process is complete, your Chromebook will be restored to its factory settings, effectively eliminating any software-related issues that may have been causing the screen problems.
However, if the screen issues persist even after the powerwash, it could indicate potential hardware problems or deeper software conflicts. In such cases, it is recommended to contact support or seek professional assistance for further diagnosis and resolution.
Performing a powerwash is a drastic step, so it should be considered as a last resort after trying other troubleshooting methods. It provides a fresh start for your Chromebook’s software and can often resolve persistent screen issues by eliminating any underlying software conflicts.
Contacting Support or Seeking Professional Help
If you’ve followed all the previous troubleshooting steps and are still unable to resolve the screen issues on your Chromebook, it may be time to consider contacting support or seeking professional assistance. Expert help can provide you with the guidance and expertise needed to identify and resolve the underlying problem. Here are a few options to consider:
1. Manufacturer Support: Go to the manufacturer’s website and look for a support section or contact page. From there, you can find resources such as knowledge bases, forums, or live chat support. Explain the issue you’re experiencing with your Chromebook’s screen and follow their instructions for further troubleshooting or warranty claims.
2. Chromebook Community Forums: Online forums dedicated to Chromebook users can be a valuable resource. Engage with fellow Chromebook owners who may have encountered similar screen issues and seek their advice or recommendations for resolving the problem.
3. Local Technicians: If you prefer hands-on assistance, consider reaching out to local technicians or computer repair shops experienced in handling Chromebook repairs. They can assess the hardware components and perform diagnostics to identify the root cause of the screen issues.
4. Authorized Service Centers: Check if there are authorized service centers near your location that specialize in Chromebook repairs. Authorized technicians have direct access to manufacturer support and genuine replacement parts, ensuring a reliable and efficient repair process.
Remember to provide detailed information about the screen problems you’re encountering, including any troubleshooting steps you’ve already attempted. This will help the support staff or technicians better understand your situation and provide appropriate guidance.
It’s essential to communicate your concerns and ask questions to ensure a successful resolution. Be prepared to provide relevant information such as your Chromebook’s model number, warranty status, and any error messages or unusual behaviors encountered.
While seeking professional help may involve additional costs, it can save you time, effort, and potentially prevent further damage to your Chromebook. Professional assistance ensures that the screen issues are properly diagnosed and addressed by experienced technicians.
By reaching out to support or seeking professional help, you can take advantage of the expertise and resources available to resolve the screen issues on your Chromebook effectively.
Conclusion
Dealing with screen issues on your Chromebook can be frustrating, but with the troubleshooting tips we’ve discussed, you can resolve many common problems. By following these steps, you can often identify and address the root cause of the screen issue, restoring your Chromebook to its normal functionality.
Remember, the first step is to check for physical damage on the screen or any loose connections. Adjusting the screen brightness and restarting your Chromebook are simple yet effective troubleshooting measures. Updating Chrome OS and resetting the display settings can further help resolve software-related issues. If all else fails, contacting support or seeking professional help can provide you with the necessary expertise to troubleshoot and fix the problem.
It’s important to approach the troubleshooting process patiently and diligently, as it may take a few attempts to find the solution. Not all screen problems can be resolved through DIY methods, and there may be instances where professional assistance is required.
Ultimately, by familiarizing yourself with these troubleshooting techniques and understanding the capabilities of your Chromebook, you can overcome screen issues and ensure a smooth and enjoyable user experience.
Don’t let screen issues hold you back from fully utilizing your Chromebook. Follow the steps outlined in this guide, and if needed, don’t hesitate to seek help from the manufacturer’s support or professional technicians. With the right approach and determination, you can get your Chromebook screen back to its optimal condition.